How to Configure DRS in VMware vSphere: A Step-by-Step Guide
One of the key advantages with the VMware cluster configuration is efficient resource management. The vSphere cluster technology that makes this possible is VMware DRS or distributed resource scheduler.
In this post, we are going to explore how DRS works and how to configure a DRS cluster with an explanation of the main settings.

What Is VMware DRS?
VMware DRS is a clustering feature for optimal resource usage and load balancing on ESXi hosts within a cluster. The feature is designed to manage a cluster’s available resources efficiently to ensure that each VM has enough computing resources for the optimal performance of applications.
If an ESXi host is overloaded and VMs are overloaded, VM performance degrades. With DRS configured, particular VMs are moved to ESXi hosts with free resources. VMware vMotion provides VM live migration for running VMs.
What DRS does
- DRS can proactively manage resources in the cluster so that the load between hosts is shared more evenly.
- DRS rules can make sure that certain VMs or groups of VMs are always on different hosts or the same hosts.
- Starting from vSphere 6.5, DRS can take network bandwidth into consideration when scheduling resources to prevent oversubscription.
How DRS works
When a host is added to a DRS cluster, the host’s resources become part of the cluster’s resources and are managed accordingly. This allows for the use of cluster-level resource pools and resource allocation policies.
Resource pools allow you to allocate resources according to your needs, policies, or VM requirements. This can give some VMs access to more hardware resources and others to fewer resources.
There is a wide range of VMware DRS settings in vSphere Client for managing the resources of vSphere clusters, and these settings are covered in our configuration guide below.
VMware DRS Configuration Step by Step
You can perform DRS configuration in VMware vCenter by using vSphere Client after creating a vSphere cluster. There are many VMware DRS settings that provide flexible configuration in your VMware DRS cluster. Let’s first cover the DRS requirements and then go over the steps for how to configure DRS in VMware vSphere.
DRS requirements
DRS requirements are identical to the general vSphere cluster requirements and include the following:
- Shared storage. This is storage that is accessible by all cluster nodes and is used to store VM files.
- Processor compatibility. Since DRS utilizes vMotion, the vMotion process transfers the running CPU state between the various ESXi hosts, requiring that destination hosts have at least the equivalent CPU instruction capability.
- Hosts in the cluster must be part of a vMotion network.
How to enable DRS on the cluster
Follow these steps to enable DRS in VMware vSphere Client:
- Using a web browser, log in to VMware vSphere Client.
- Navigate to your cluster in the Navigation pane by using the Hosts and Clusters view (the left icon).
- Right-click the cluster name, and in the menu that opens, click Settings.
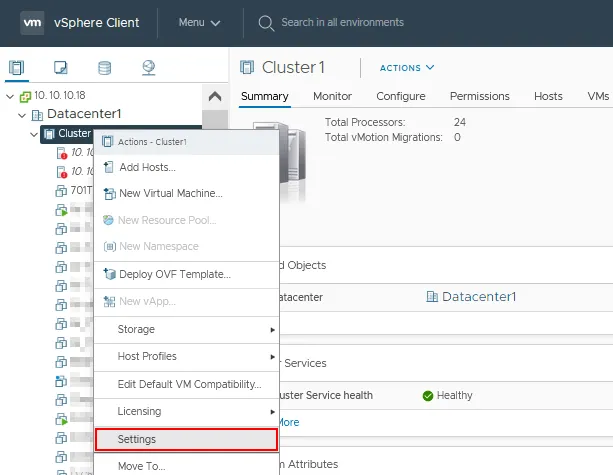
- Now you are in the Configure tab. In the vSphere vCenter 7 user interface, the HA and DRS settings are configured using the Configure tab of the cluster. DRS is turned off by default. Select vSphere DRS in the Services section of the middle pane and click EDIT.

- We see a simple switcher where DRS can be enabled. Switch on the vSphere DRS toggle to enable or disable vSphere DRS (see the screenshot below).
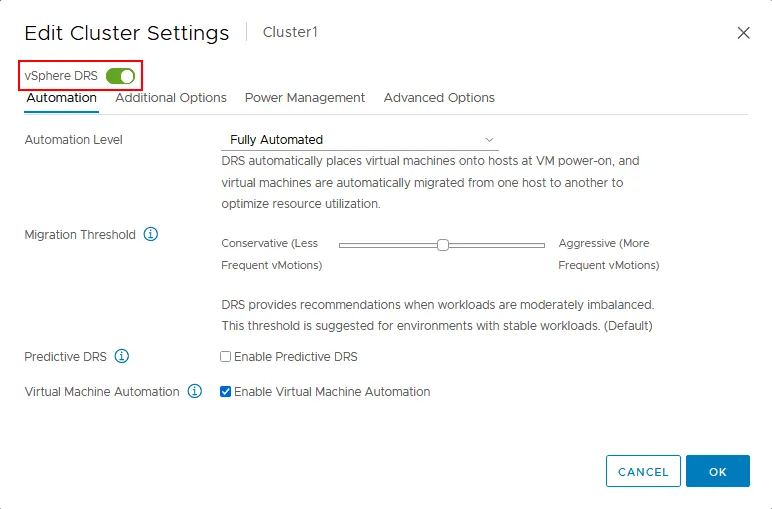
There are four tabs with VMware DRS settings:
- Automation
- Additional Options
- Power Management
- Advanced Options
Let’s look at them in detail.
VMware DRS configuration
If we drill down into the DRS settings, we can customize the behavior of DRS within our VMware cluster. VMware vSphere DRS settings are flexible and allow you to configure DRS as you need.
Automation
The Automation tab contains DRS automation settings (see the screenshot above). The automation level can be selected to decide how much control DRS has over migrating resources.
Automation level. VMware DRS settings allow you to set the level of automation of your DRS cluster. You have three options:
- Fully automated. VMware vSphere fully automates VM placement and migration within a cluster. If a DRS detects that the cluster is imbalanced and that the situation can be improved, VM migration is started automatically. Initial VM placement and VM migration recommendations are applied automatically.
- Partially automated. Initial VM placement recommendations are applied automatically. When DRS generates VM migration recommendations for load balancing, you have to apply them manually.
- Manual. In this mode, DRS generates recommendations for initial VM placement and for VM migrations. You have to apply them manually when you agree with these recommendations.
Migration Threshold. Use this parameter to set the agression level for DRS behavior when there are conditions for VM migration and to define how the cluster tolerates the imbalance.
There are 5 slider positions to configure the migration threshold – from most conservative to most aggressive (left to right slider positions):
- With the most conservative value, the DRS tolerates the imbalance and initiates VM migrations to meet the affinity rules when enabling the maintenance mode for an ESXi host.
- The DRS provides recommendations if a vSphere cluster has imbalanced workloads or resources are not enough to satisfy VM demands.
- The middle position of the slider is the default value for DRS. It allows you to have a balance between a high number of VM migrations and resource distribution in the cluster. This value is the optimal threshold value for VMware DRS configuration in most cases (see the screenshot above).
- The DRS provides recommendations when workloads in the cluster are fairly imbalanced. You can use this DRS threshold position for clusters with workload bursts.
- The most aggressive mode initiates VM migration even if minimal load balancing benefits and performance boost can be achieved. The most aggressive mode causes frequent VM migrations in the DRS cluster. A DRS doesn’t tolerate even the smallest imbalance in this mode.
Predictive DRS. This feature is used only with vRealize Operations Manager. A combination of Distributed Resource Scheduler and vRealize Operations Manager (with the Dynamic Thresholds feature) allows you to predict cluster resource demand in the future and migrate VMs before the cluster becomes imbalanced. Predictive DRS initiates VM migration before having resource contention.
For example, there are spikes in the consumption of CPU and memory resources for a particular VM every work day from 9 AM to 10 AM and from 6 PM to 7 PM. Knowing this information after collecting resource consumption data during VM monitoring, vSphere can predict when these spikes will occur the next time with a high probability. VMware monitoring can significantly help you use your infrastructure rationally.
Virtual Machine Automation. You can configure custom DRS automation settings for individual VMs and override global cluster automation settings. A VM can have automation settings that are different from the DRS cluster automation settings. Select the checkbox to enable this option.
To configure more VM override options, go to the Configure tab for a cluster and in the Configuration section of the middle pane, hit VM Overrides (Cluster > Manage > Settings > VM Overrides).
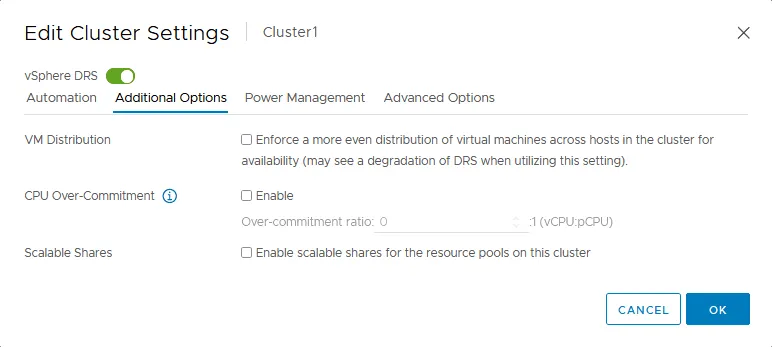
Additional options
Additional options for DRS settings allow you to configure VM distribution, CPU over-commitment, and scalable shares. There are useful VMware DRS settings in this tab.
VM Distribution. When enabling this option, VMs are distributed across ESXi hosts in the cluster. The even distribution can improve availability and sometimes reduce the number of VM migrations. You can use DRS VM Distribution together with Migration Threshold if you are not sure which Migration Threshold value to choose when you need a lower number of VM migrations.
CPU Over-Commitment. This feature lets you set the number of virtual processors or processor cores that you can provision based on the existing number of physical processor cores. An ESXi server has physical processors with the corresponding number of cores.
One virtual processor or processor core of a VM consumes one physical processor core of a physical server. In this case, the ratio is 1:1, and the CPU performance of VMs is optimal. Hyper-threading is not considered.
However, sometimes you provision more CPU cores for virtual processors than the number of physical processor cores on the ESXi server. In this case, the performance of virtual machines that are sensitive to CPU resources can degrade. For example, if an ESXi server has 48 processor cores (48 pCPU), and you create 48 VMs each with 2 single-core virtual processors (96 vCPU), you get CPU over-commitment with a 2:1 ratio.
The CPU Over-Commitment setting allows you to set the maximum over-commitment ratio to tolerate for VMs on the ESXi host. If the over-commitment ratio exceeds the set value, VM migration is initiated to other ESXi hosts by DRS. Also, when setting CPU Over-Commitment in VMware DRS configuration, you ensure that VM migrations to other hosts do not affect CPU performance.
You can follow these recommendations to configure CPU Over-Commitment in your DRS cluster depending on workloads (vCPU:pCPU ratio):
- Mission-critical applications 1:1
- Business-critical applications 3:1
- Supporting applications 5:1
- Virtual desktops 10:1
As you can see, a tier 1 cluster should use the lowest ratio and a tier 4 one the highest ratio.
You can edit CPU Over-Commitment settings in advanced options:
- MaxVcpusPerClusterPct – controls the vCPU:pCPU ratio at the cluster level. The total number of all VM vCPUs in the cluster is divided by the sum of pCPUs on all ESXi hosts.
- MaxVCPUsPerCore – controls the vCPU:pCPU ratio on each ESXi host individually. This value cannot be exceeded on any ESXi host within a cluster.
Scalable Shares. This feature improves sharing of computing resources when using multiple resource pools of different priorities. When enabling Scalable Shares, you can ensure that CPU resources (CPU shares) are provisioned for high-priority VMs first and only then provisioned for lower-priority VMs. Scalable shares solve the old issue of when VMs of low and high priorities get the same amount of CPU resources because their entitlement to get resources is identical.
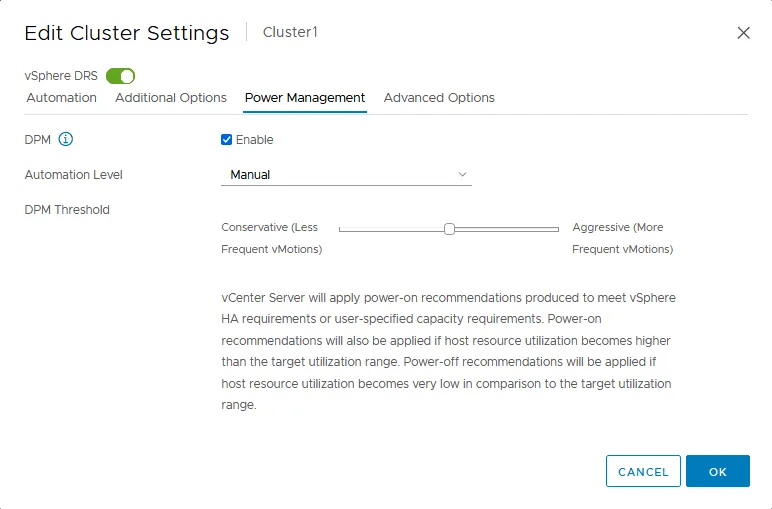
Power management
Power management options in VMware DRS settings are used to configure Distributed Power Management (see the screenshot below). Distributed Power Management (DPM) is a feature that initiates VM migration from a slightly loaded ESXi host to other hosts within the cluster to free up the unloaded ESXi host and then shut down this host. The idea is to power off the ESXi hosts when there is enough capacity on other hosts within the cluster to save power.
Note: Shutting down an ESXi host means putting the ESXi host in standby mode. Then the host can be started with the Wake On LAN feature.
DPM is disabled by default in VMware DRS configuration, and this is the recommended value for optimal VM performance. Select the Enable checkbox if you need to use the DPM and save power. You need to enable Wake On LAN in the BIOS of ESXi hosts that are members of the cluster. Network adapters must support Wake On LAN.
Automation level is the parameter of VMware DRS settings that defines the automation level of DRS. There are three values for this setting:
- Off – the feature is disabled.
- Manual – DPM makes VM migration recommendations and ESXi power-off recommendations, but you should apply them manually. These recommendations don’t run automatically.
- Automatic – DPM generates recommendations to migrate VMs and shut down ESXi hosts. All these recommendations are applied automatically.
DPM Threshold is a parameter that defines the priority for ESXi shutdown recommendations.
The conservative value (the left position) is used for less frequent VM migrations with vMotion. DPM initiates VM migrations and server shutdown if there are priority 1 recommendations.
The aggressive value is used to power off ESXi hosts if resource consumption on the hosts is lower than the target. This causes more frequent VM migration with vMotion. DPM initiates VM migration and server shutdown even for priority 5 recommendations.
There are 5 values for the DPM threshold. You can set intermediate values between the conservative and aggressive ones. The median value (3) is set by default.
Note that DPM threshold and DRS threshold are different and independent parameters for VMware DRS configuration.
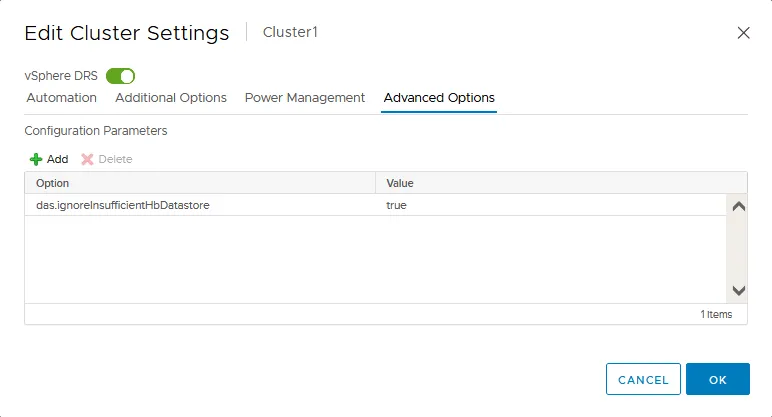
Advanced options
Advanced options is the tab that allows you to fine-tune the DRS cluster with advanced configuration of vSphere DRS settings. Enter a VMware DRS configuration parameter and supported value manually in the line.
Example 1:
You can set a period of demand history to evaluate. The collected information is used to evaluate power-off cost and benefits to make recommendations for DPM. To do this, add the parameter and a value:
HostsMinUptimeSecs 0-max
The supported range for this parameter is 0-max.
Example 2:
To set the maximum vCPU:pCPU ratio on the cluster level, enter the following parameter and value:
MaxVcpusPerClusterPct 100
Where 100 is 100% and means a 1:1 ratio, 300% is 3:1, 500% is 5:1, etc.
Any value between 0 and 99 sets the under-committment, where less than 1 vCPU can be used per 1 pCPU.
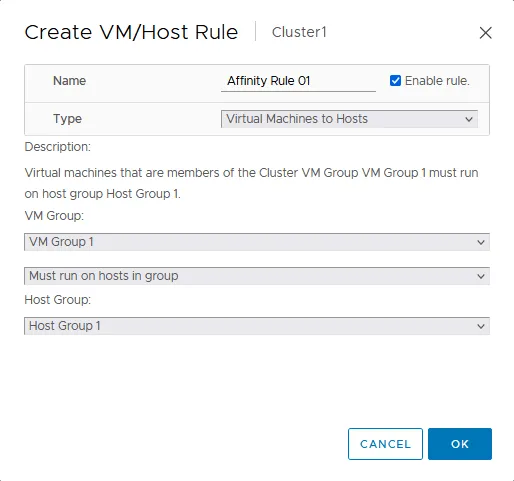
Affinity rules
Affinity rules define which VMs must be located (or not located) on the same ESXi host or run together (or separately) on any ESXi host. Affinity rules are also called VM/Host rules. Let’s take a look at how to configure affinity rules in VMware DRS settings of vSphere Client.
- Select a cluster in the Navigation pane of VMware vSphere Client.
- Select the Configure tab and select VM/Host rules in the Configuration section of the middle pane.
- Click + Add to add a new affinity rule.
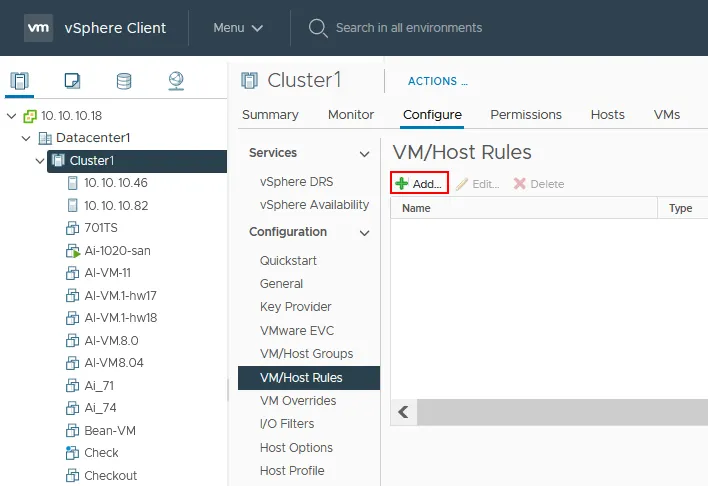
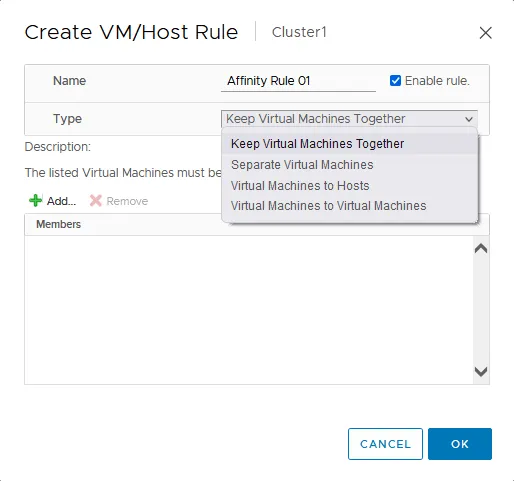
- The Create VM/Host Rule window opens.
- Enter a rule name, for example, Affinity Rule 01.
- Select the rule type in the drop-down list. There are four affinity rule types:
- Keep Virtual Machines Together
- Separate Virtual Machines
- Virtual Machines to Hosts
- Virtual Machines to Virtual Machines
We select the first option (Keep Virtual Machines Together) in this example.
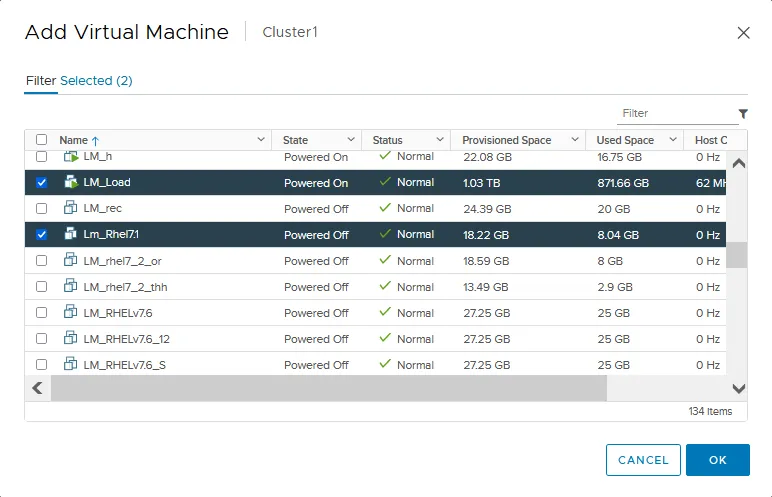
- Click + Add to select the virtual machines that must run together on any ESXi host of the cluster.
- Select the needed VMs in the Add Virtual Machine window.
- Click OK when done.
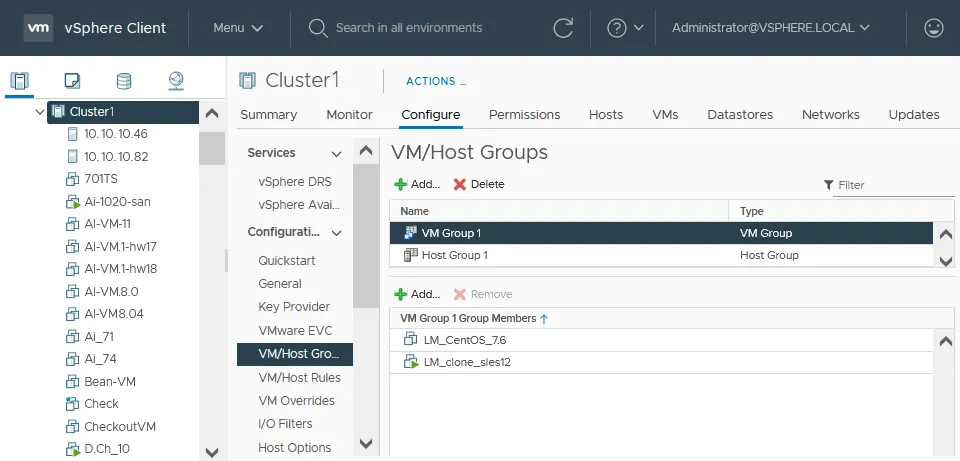
To configure other affinity rule types in VMware DRS settings, you must create VM groups or host groups first. Let’s find out how to create VM/Host groups in VMware vSphere Client.
- Select your cluster in the Navigation pane.
- Select the Configure tab and select the VM/Host Groups in the Configuration section of the middle pane.
- Click + Add in the VM/Host Groups section to create a new VM group or host group.
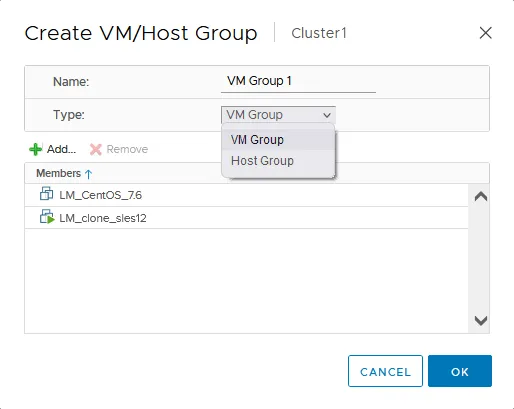
- The Create VM/Host Group window opens.
- Enter a group name.
- Select a type (VM group or host group) in the drop-down list.
- Click + Add to add the objects (VMs or ESXi hosts) to the group.
- Click OK to save settings and close the window.
Once you have created VM groups and host groups, you can create the corresponding VM/Host rules with rule types that require using groups.
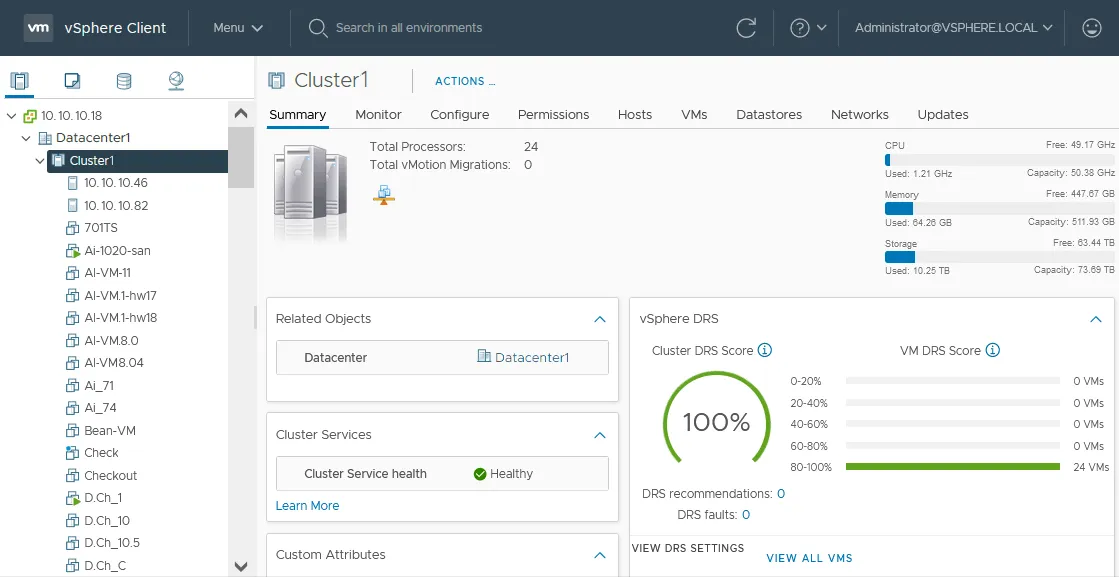
vSphere DRS score
After you enable DRS on the cluster and configure DRS settings, you can check the cluster DRS score:
- Select your cluster.
- Select the Summary tab.
VMware vSphere DRS measures the happiness for each VM and displays the DRS score for a cluster. This score is updated every minute. If resources are not sufficient for VMs, the score is less than 100%, and DRS generates migration recommendations to migrate VMs (manually or automatically, depending on VMware DRS configuration). The DRS score range of 80-100% is optimal for a cluster.
The DRS logic and principle of calculating the DRS score were significantly improved in VMware vSphere 7. In addition to VM happiness and ESXi host loads, DRS estimates VM migration costs. DRS estimates multiple characteristics before making a recommendation for VM migration. The DRS estimates the workload types, including CPU, memory, and network load.
For example, if there are many memory pages that are continuously updated (dirty memory pages), then VM migration costs are high because live vMotion takes a long time in this case. The intelligent DRS algorithms calculate that the potential benefits of such a VM migration are not significant and this affects the provision of VM migration recommendations.
You can use vSphere DRS and HA together in the same cluster to ensure load balancing and high availability for your VMs.
Conclusion
VMware DRS technology allows efficient and effective resource management of multiple hosts in the vSphere cluster. As shown, the feature is easily enabled and is very intuitive to configure. The new features of vSphere 7.0 also allow the technology to be predictive and proactive. VMware DRS settings provide an ability to use flexible settings for a cluster.
NAKIVO Backup & Replication is the universal data protection solution that supports VMware backup and allows you to automate the backup process even for VMs in the cluster and fault-tolerant VMs. Download Free Edition of the NAKIVO solution and back up VMs in your cluster.