What Is VMware vSwitch?
Virtual machines connect to a network much in the same way physical ones do. The difference is that the VMs use virtual network adapters and virtual switches to establish connections with physical networks. If you have used VMs running on VMware Workstation, you may be familiar with three default virtual networks. Each of them uses a different virtual switch:
- VMnet0 Bridged network – allows connection of a VM’s virtual network adapter to the same network as the physical host’s network adapter.
- VMnet1 Host Only network – allows connection to a host only, by using a different subnet.
- VMnet8 NAT network – uses a separate subnet behind the NAT, and allows connection of the VM’s virtual adapter through the NAT to the same network as the physical host’s adapter.
ESXi hosts also have virtual switches, but their settings are different. Today’s blog post explores the use of VMware virtual switches on VMware ESXi hosts for virtual machine network connections.

Definition of vSwitch
A virtual switch is a software program – a logical switching fabric that emulates a switch as a layer-2 network device. A virtual switch ensures the same functions as a regular switch, with the exception of some advanced functionalities. Namely, unlike physical switches, a virtual switch:
- Does not learn the MAC addresses of transit traffic from the external network.
- Does not participate in Spanning Tree protocols.
- Cannot create a network loop for redundant network connection.
VMware’s virtual switches are called vSwitches. vSwitches are used for ensuring connections between virtual machines as well as connecting virtual and physical networks. A vSwitch uses a physical network adapter (also called NIC – Network Interface Controller) of the ESXi host for connection to the physical network. You might want to create a separate network with a vSwitch and physical NIC for performance and/or security reasons in the following cases:
- Connecting storage, such as NAS or SAN, to ESXi hosts.
- vMotion network for live migration of virtual machines between ESXi hosts.
- Fault Tolerance logging network.
If a malefactor could access one of the virtual machines in one vSwitch’s network, he or she would be unable to access the shared storage connected to the separate network and vSwitch, even if they resided on the same ESXi host.
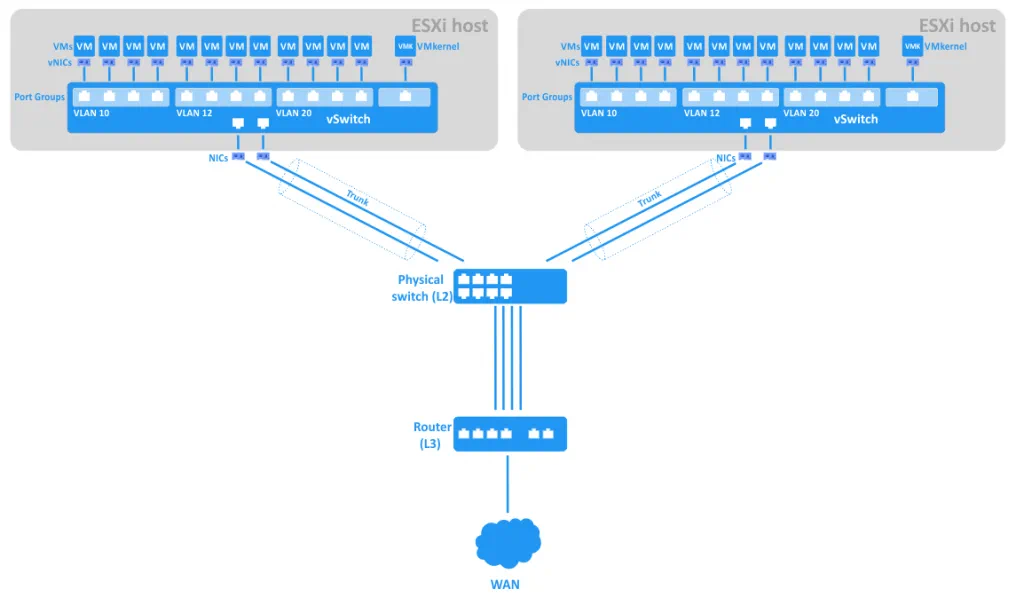
The schema below shows the network connections of VMs residing on an ESXi host, vSwitches, physical switches, and shared storage.
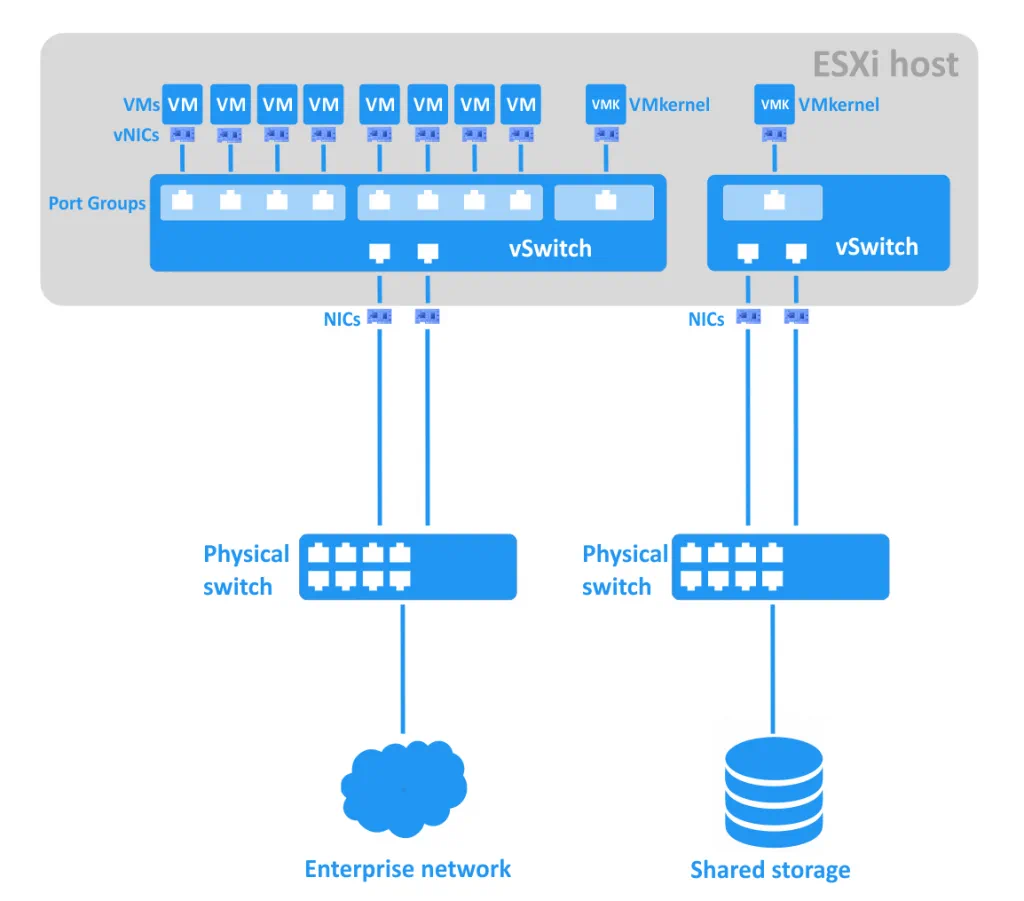
You can make a segmented network on an existing vSwitch by creating port groups for different VM groups. This approach can make it easier to manage large networks.
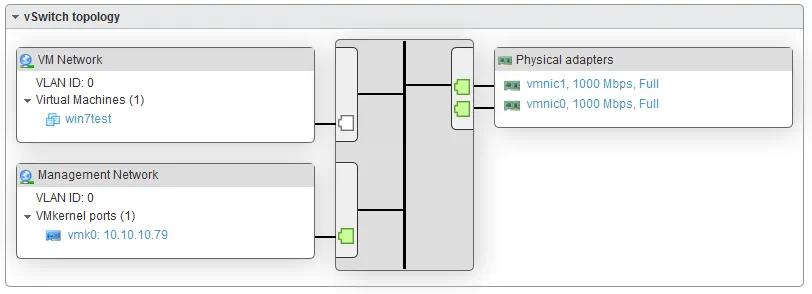
A Port Group is an aggregation of multiple ports for common configuration and VM connection. Each port group has unique network label. For example, in the sceenshot below, the “VM Network” created by default is a port group for guest virtual machines, while the “Management Network” is a port group for the EXSi host’s VMkernel network adapter, with which you can manage the ESXi. For storage and vMotion networks, you will need to connect a VMkernel adapter that can have a different IP address for each network. Each port group can have a VLAN ID.
The VLAN ID is the identifier of a VLAN (Virtual Local Area Network) that is used for VLAN tagging. VLAN IDs can be set from 1 to 4094 (the 0 and 4095 values are reserved). With VLAN, you can logically divide networks that exist in the same physical environment. VLAN is based on the IEEE 802.1q standard and operates on the second layer of the OSI model, the Protocol Data Unit (PDU) of which is frame. A special 4-byte tag is appended for Ethernet frames, enlarging them from 1518 bytes to 1522 bytes. The maximum Transmission Unit (MTU) is 1500 bytes; this represents the maximum size of encapsulated IP packets without fragmentation. Routing between IP networks is performed on the third layer of the OSI model. See the diagram below.
Each port in a vSwitch can have a Port VLAN Identifier (PVID). Ports that have PVIDs are called “tagged ports” or “trunked ports”. A trunk is a point-to-point connection between network devices that can transmit the data from multiple VLANs. Ports without PVIDs are called untagged ports – they can transmit the data of only one native VLAN. Untagged ports are typically used between switches and endpoint devices such as network adapters of user machines. The endpoint devices usually don’t know anything about VLAN tags, and they operate with normal untagged frames. (The exception is if the virtual machine has the “VMware Virtual Guest Tagging (VGT)” feature configured, in which case the tags are recognized).
Types of Virtual Switches
VMware vSwitches can be divided into two types: standard virtual switches and distributed virtual switches.
A vNetwork Standard Switch (vSwitch) is a virtual switch that can be configured on a single ESXi host. By default, this vSwitch has 120 ports. The maximum number of ports per ESXi host is 4096.
Standard vSwitch features:
Link discovery is a feature that uses Cisco Discovery Protocol (CDP) to gather and send information about connected switch ports that can be used for network troubleshooting.
Security settings allow you to set security policies:
- Turning the Promiscuous Mode option on lets the guest virtual adapter listen to all traffic, rather than just the traffic on the adapter’s own MAC address.
- With the MAC Address Changes option, you can allow or disallow changing the MAC address of a VM’s virtual network adapter.
- With the Forged Transmits option, you can permit or block the sending of output frames with different MAC addresses than the one set for the VM adapter.
NIC teaming. Two or more network adapters can be united in a team and uplinked to a virtual switch. This increases bandwidth (link aggregation) and provides a passive failover in case one of the teamed adapters goes down. The Load Balancing settings allow you to specify an algorithm for traffic distribution between NICs in the team. You can set a failover order by moving network adapters (which can be in “active” or “standby” mode) up and down in the list. A standby adapter becomes active in a case of active adapter failure.
Traffic shaping limits the bandwidth of outbound traffic for each virtual network adapter connected to the vSwitch. You can set limits for average bandwidth (Kb/s), peak bandwidth (Kb/s) and burst size (KB).
The port group policies such as security, NIC teaming and traffic shaping are inherited from the vSwitch policies by default. You can override these policies by configuring them manually for port groups.
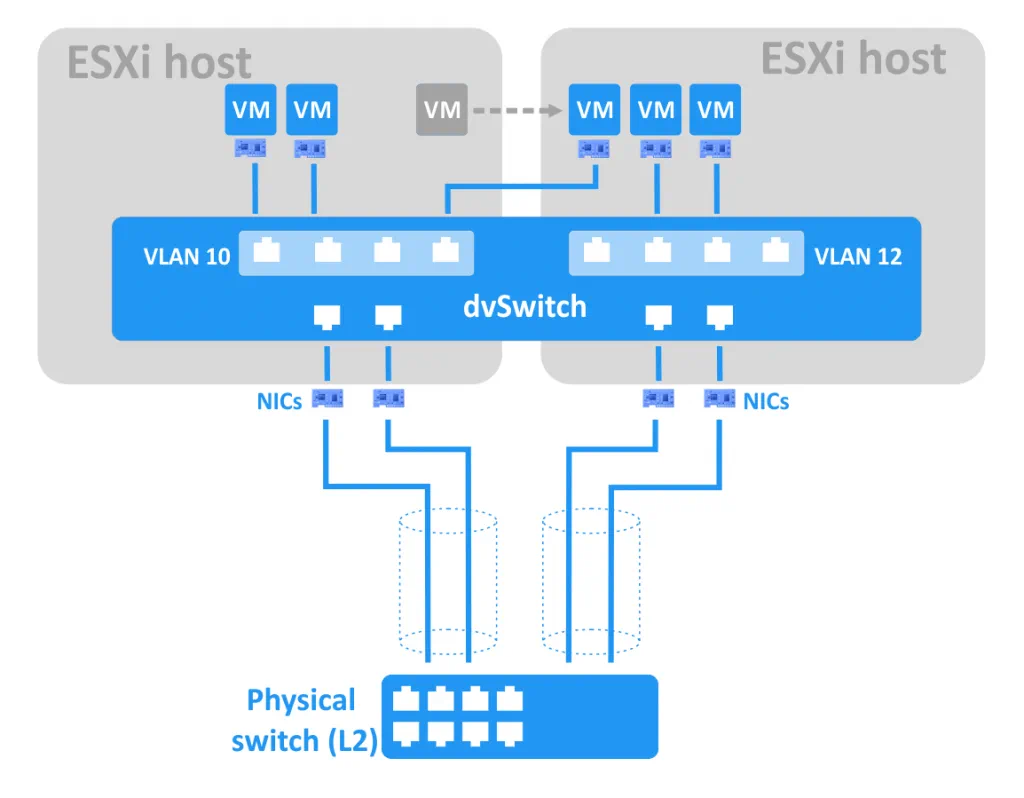
A vNetwork Distributed vSwitch (dvSwitch) is a virtual switch that includes standard vSwitch features while offering a centralized administration interface. dvSwitches can only be configured in vCenter Server. Once configured in vCenter, a dvSwitch has the same settings on all defined ESXi hosts within the datacenter, which facilitates management of large virtual infrastructures – you don’t need to set up standard vSwitches manually on each ESXi host. When using a dvSwitch, VMs keep their network states and virtual switch ports after migration between ESXi hosts. The maximum amount of ports per dvSwitch is 60,000. The dvSwitch uses the physical network adapters of the ESXi host on which the virtual machines are residing to link them with the external network. The VMware dvSwitch creates proxy switches on each ESXi host to represent the same settings. Note: an Enterprise Plus license is required to use the dvSwitch feature.
Compared to a vSwitch, the dvSwitch provides a wider set of features:
- Centralized network management. You can manage the dvSwitch for all defined ESXi hosts simultaneously with vCenter.
- Traffic shaping. Unlike the standard vSwitch, a dvSwitch supports both outbound and inbound traffic shaping.
- Port group blocking. You can disable sending and/or receiving data for port groups.
- Port mirroring. This feature duplicates each packet from a port to a special port with a SPAN (Switch Port Analyzer) system. This can allow you to monit traffic and perform network diagnostics.
- Per port policy. You can set specific policies for each port, not only for port groups.
- Link Layer Discovery Protocol (LLDP) support. LLDP is a second-layer non-proprietary protocol that is useful for monitoring of multi-vendor networks.
- Netflow support. This allows you to monitor IP traffic information on a distributed switch, which can be helpful for troubleshooting.
Now that we have explained the features of standard and distributed vSwitches, let’s discuss how to implement them.
How to Create and Configure VMware vSwitches
By default, there is one virtual switch on an ESXi host, with two port groups – VM Network and Management Network. Let’s create a new vSwitch.
Adding a Standard vSwitch
Connect to the ESXi host with vSphere Web Client and do the following:
- Go to Networking > Virtual switches.
- Click Add standard virtual switch.
- Set the vSwitch Name (“vSwitch2s”, in our case) and other options as needed. Then click the Add button.
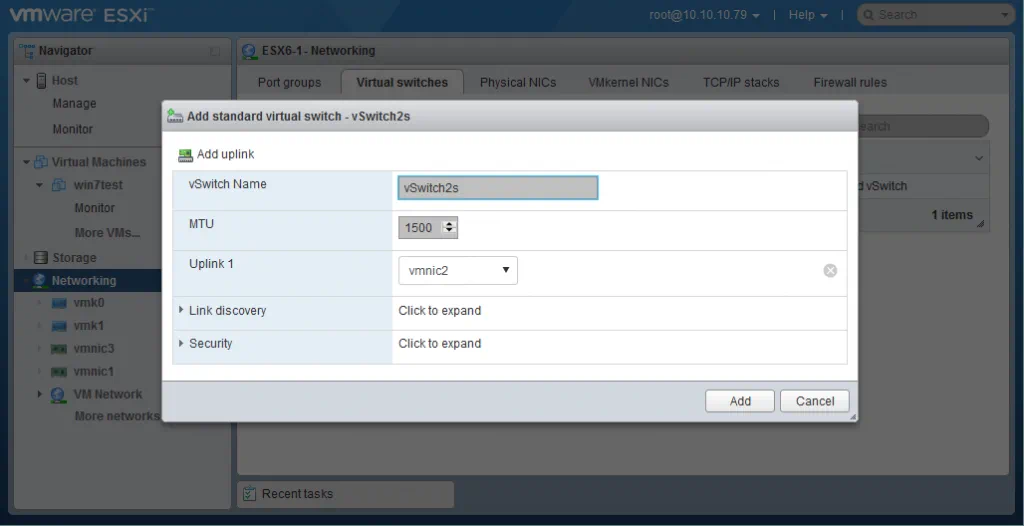
Note: If you want jumbo frames enabled to reduce packet fragmentation, you can set an MTU (Maximum Transmission Unit) value of 9,000 bytes.
Adding an Uplink
Add an uplink to ensure uplink redundancy by doing the following:
- Go to Networking > your vSwitch name > Actions > Add uplink.
- Select two NICs.
- You can also set other options here, such as link discovery, security, NIC teaming, and traffic shaping.
- Click the Save button to finish.
You can edit the vSwitch settings at any time by clicking Edit settings after selecting your vSwitch under Networking > Virtual switches.

Adding a Port Group
Now that you have created a vSwitch, you can create a port group. In order to do this, follow these steps:
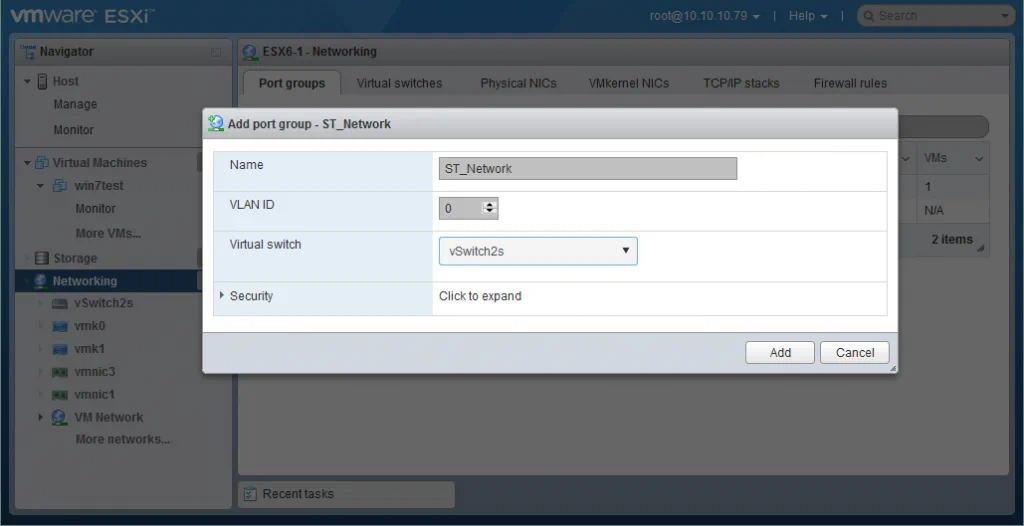
- Go to Networking > Port groups and click Add port group.
- Set the name of port group and the VLAN ID (if needed).
- Select the virtual switch on which this port group will be created.
- You can also configure security settings here if you wish.
- Click the Add button to finish.
Adding a VMkernel NIC
If you want to use a dedicated VM network, storage network, vMotion network, Fault Tolerance logging network, etc., you should create a VMkernel NIC for management of the relevant port group. The VMkernel networking layer handles system traffic, as well as connecting ESXi hosts with each other and with vCenter.
In order to create a VMkernel NIC, follow these steps:
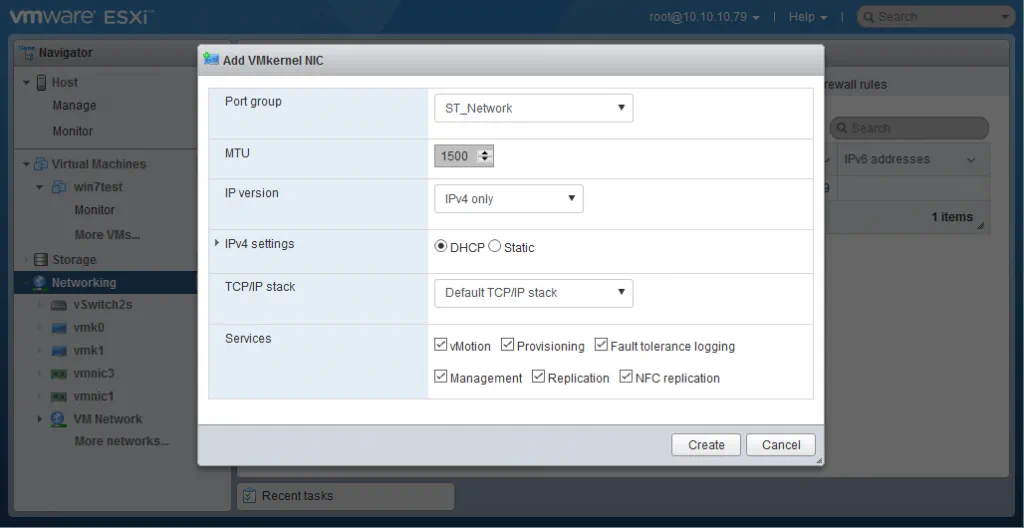
- Go to Networking > VMkernel NICs and click Add VMkernel NIC.
- Select the port group on which you want to create the VMkernel NIC.
- Configure the network settings and services for this VMkernel NIC as prompted.
- Click the Save button to finish.
Adding a Distributed vSwitch
To add a dvSwitch, log into vCenter with your vSphere web client and do the following:
- Go to vCenter > your Datacenter name.
- Right-click on your datacenter and select New Distributed Switch. A wizard window appears.
- Set the name and location for your dvSwitch. Click Next.
- Select the dvSwitch version that is compatible with the ESXi hosts within your datacenter. Click Next.
- Edit the settings. Specify the number of uplink ports, network input/output control, and the default port group. Click Next.
- In the Ready to complete section, click Finish.
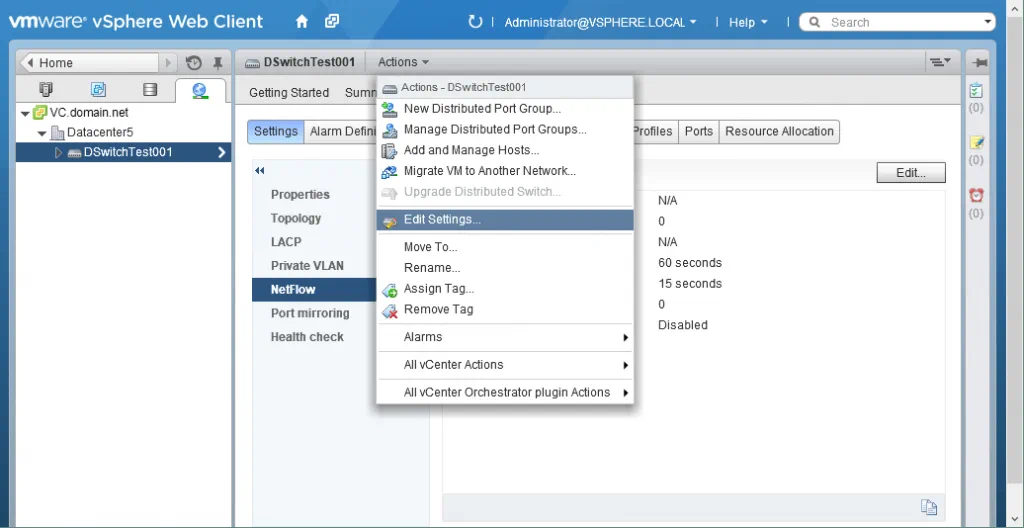
Now you can configure the dvSwitch you created. Go to Home > Networking > your Datacenter name > your dvSwitch name and select the Manage tab. The screenshot shows the features and options you can set by clicking on them.
First, the ESXi hosts must be added to your distributed virtual switch:
- Click Action > Add and Manage Hosts. A wizard window is launched.
- In the Select task section, select “Add hosts” and click Next.
- Click New host and select the ESXi host(s) you want to add. Click OK. Check the box in the bottom of the window if you want to enable template mode. Then click Next.
- If you have enabled template mode, select a template host. The template host’s network settings will be applied to the other hosts. Click Next.
- Select network adapter tasks by checking the appropriate boxes. You can add physical network adapters and/or VMkernel network adapters. Click Next when you are ready to proceed.
- Add physical network adapters to the dvSwitch and assign the uplinks. Click Apply to all and then Next.
- Manage VMkernel network adapters. In order to create a new VMkernel adapter, click New Adapter. You can then select a port group, IP address, and other settings. After completing this step, click Next.
- You are presented with an impact analysis. Check to make sure that all dependent network services work properly, and if you are satisfied, click Next.
- Under the Ready to complete section, review the settings you selected and click the Finish button if you are satisfied.
In order to add a new distributed port group, follow these steps:
- Click Actions > New Distributed Port Group.
- Set the name and location of the port group, then click Next.
- Configure the settings of the port group. In this step, you can configure port binding, port allocation, number of ports, network resource pool, and VLAN. Click Next when you’re ready.
- Under the Ready to complete section, review the settings you selected and click the Finish button if you are satisfied.
You now have your basic dvSwitch configuration ready. You can change the settings at any time for the purposes of conforming to changing demands.
The Advantages of Using vSwitches
Having considered how to set up VMware virtual switches, let’s summarize the advantages of using them:
- Separation of networks with VLANs and routers, allowing you to restrict access from one network to another.
- Improved security.
- Flexible network management.
- Fewer hardware network adapters needed for redundant network connection (compared to physical machines).
- Easier migration and deployment of VMs.
Conclusion
Virtual switches allow you to manage the network connections of VM groups, monitor them, improve security, and make administration easier for VMware vSphere virtual environments. The distributed virtual switch includes more features than the standard virtual switch and is preferable for a larger virtual infrastructure with a high number of ESXi hosts.
Regardless of the size of your virtual environment, you should use a data protection solution that integrates seamlessly with VMware to ensure maximal reliability. Here at NAKIVO, we know VMware inside and out. Our team of experts designed NAKIVO Backup & Replication specifically to work with vSphere and ESXi. This is why you can expect seamless, efficient, and reliable VMware backup with our solution.