How to Automate Windows Updates Using PowerShell: Short Overview
Patch management is a crucial aspect of IT infrastructure administration, just as Windows Workstation backup. With the right patch management solution, you can enhance your system by testing or installing the latest software updates and patches. Patches are regarded as temporary fixes for existing issues between full-scale software releases. If patch management is effectively performed, you can promptly address vulnerabilities of your system and mitigate any potential threats.
Windows offers its own patch management solution – Windows Update. However, many IT administrators still find the patch management process too complex and time-consuming. Moreover, system updates can affect your production workflow as they often start automatically during business hours. With PowerShell cmdlets, you can automate Windows updates, saving you effort and time.
This blog post describes how you can use PowerShell to install Windows updates and includes a list of useful PowerShell commands to automate the patch management process. Patching can reduce the risk of bugs or vulnerabilities affecting your system.
What Is PSWindowsUpdate?
To make the Windows patch management process smooth and easy, you can use the PSWindowsUpdate module developed by Michal Gajda. This module is publicly available and can be downloaded for free from the PowerShell Gallery. The main requirement is that a computer needs to run Windows OS versions starting from Vista or Windows Server 2008. Also, you need to have PowerShell 2.0 or later.
With PSWindowsUpdate, you can identify if any Windows updates are available for your computer. Moreover, this module allows you to centrally manage Windows updates across various Windows servers and workstations. This way, you can remotely control which updates are installed, removed, or hidden.
How to Automate Windows Updates with PowerShell
Below, we will outline the PSWindowsUpdate configuration process, including how to download and install the module, as well as how to check for the commands which can help you automate Windows updates.
How to install PSWindowsUpdate
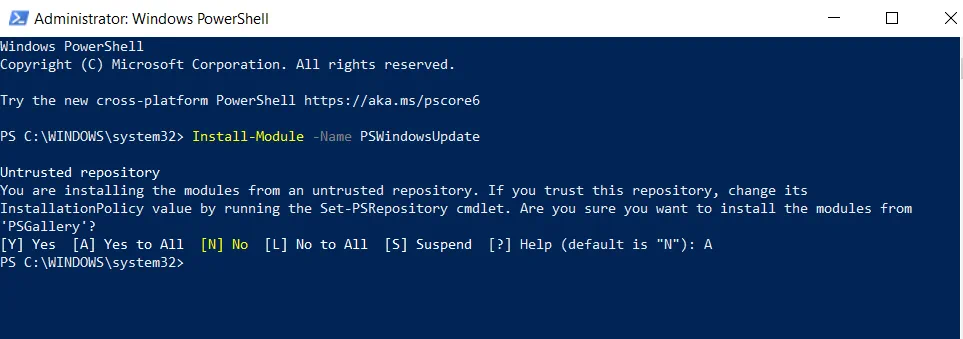
To effectively automate Windows patch management, you first need to install the PSWindowsUpdate module on your computer. For this purpose, open an elevated PowerShell prompt and enter the following command:
Install-Module -Name PSWindowsUpdate
After running this command, you will be asked whether you want to install the specified module from PSGallery. Select Yes if you wish to continue and accept all changes.
Once you have installed the module, you need to ensure that you can remotely access other computers. This way, you should be able to install Windows updates on remote computers, allowing you to spend minimal time and effort. For the PSWindowsUpdate module to work with remote machines, you need to save the module to your computer and share it over a network.
In case other servers are able to import and deploy this module, you can set up automated Windows patch management. To this end, you should run the following cmdlet:
Save-Module -Name PSWindowsUpdate -Path
Here, you need to define the –Path parameter by specifying where you want the PSWindowsUpdate module to be stored.
How to use PSWindowsUpdate
For the next step, you will learn how to use this module in order to automate Windows updates with PowerShell cmdlets. This is a great advantage for IT administrators who need to perform the patch management process on Server Core machines with no GUI. With the use of these cmdlets, you can minimize management complexity and make the process easier and less error-prone.
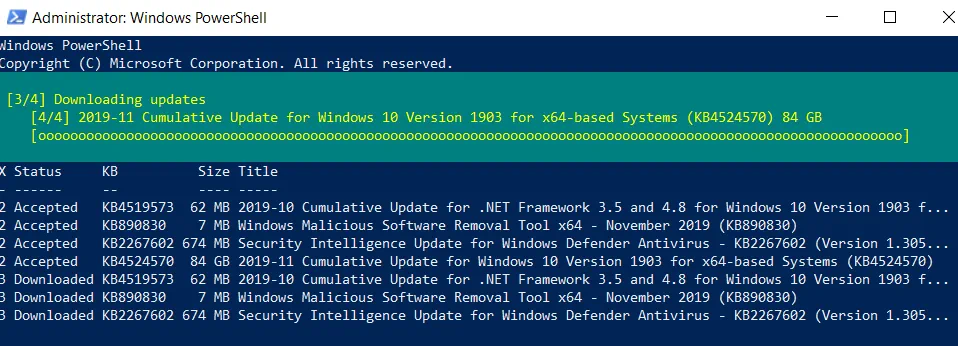
To get a full list of available Windows updates, run the following PowerShell command:
Get-WindowsUpdate
You should get the output seen below on your screen:

With this information, you will know for sure which software or application needs to be updated. After that, you can install all the updates by entering the command below. Moreover, by adding the –AutoReboot parameter, you can ensure that the system will automatically restart once the update is installed.
Get-WUInstall -AcceptAll –AutoReboot
If you would not like a reboot to start (so as not to interrupt the production workflow), you can run the following cmdlet:
Get-WUInstall -AcceptAll –IgnoreReboot
On the screen, you can see the progress of the patch management process, as well as the full list of updates and their current status.
After the installation process is complete, you will see the following message in the PowerShell console: ‘Reboot is required but do it manually’. Thus, you are still required to restart the system, but you can do it at the time which best suits your schedule.
Should you wish to download only a specific update, you can add the –KBArticleID parameter to the PowerShell cmdlet. Don’t forget to specify the number of KB Article in order to download the right patch. For example, I want to install Windows Malicious Software Removal Tool x64 and Security Intelligence Update for Windows Defender Antivirus. The appropriate PowerShell command should appear as follows:
Get-WUInstall -KBArticleID KB890830, KB2267602 –AcceptAll
After running this command, I will have only two of said updates installed on my computer.
Overview of PSWindowsUpdate commands
If you are wondering which PowerShell cmdlet can work with the PSWindowsUpdate module, you should type the following command and press Enter:
Get-Command –module PSWindowsUpdate
Here, you can see a full list of the module’s commands.

Let’s cover how some of these commands work.
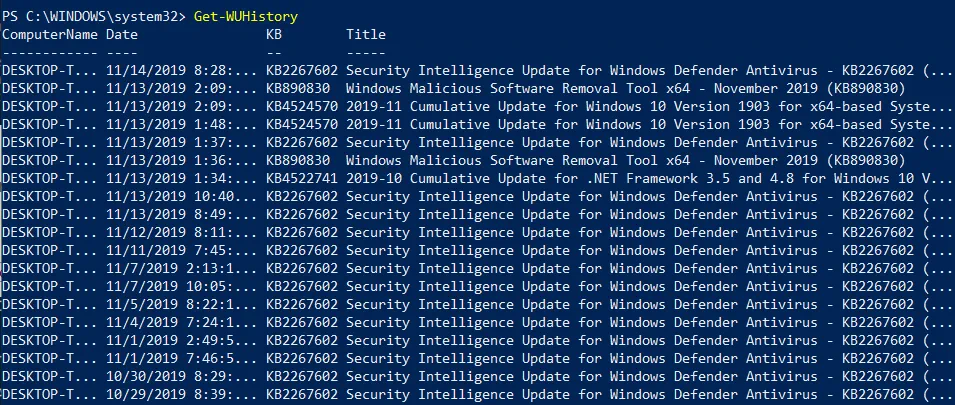
1. The Get-WUHistory cmdlet allows you to view the history of the latest updates. After running this command, you will receive a similar output on your screen.
2. The next cmdlet is Get-WUInstallerStatus, which can help you verify the status of the Windows Installer service. Here, you can check whether the installer is working properly or not. The output for this operation can look as follows:
![]()
3. By running the Get-WURebootStatus cmdlet, you can check whether you need to reboot the system so that a specific update is fully applied.
![]()
4. With the Get-WUServiceManager cmdlet, you can check the source of Windows updates.
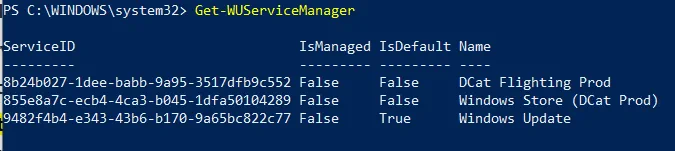
As you can see, the last column demonstrates the update source (e.g. Windows Update, DCat Flighting Prod, etc.).
5. You can hide certain updates from the list in order to avoid installing them on your computer. For this purpose, you should run the Hide-WindowsUpdate command where it is possible to specify the ID of KB articles you wish to hide. The following example demonstrates how you can hide the KB2267602 update from the list:
$HideList = "KB2267602"
Hide-WindowsUpdate -KBArticleID $HideList –Hide
Before any changes are made, you will be asked to confirm the selection. Type Y to hide the KB article.

However, if you wish to get the list of hidden updates, you can run the cmdlet below.
Get-WindowsUpdate –IsHidden

In the Status column, you can see the letter H denoting that the update has been successfully hidden. Thus, the next time you run the Get-WUInstall command, the selected update will be automatically excluded from the list of available updates.
Should you want to roll back the changes, you can use the following cmdlet in the PowerShell console:
Hide-WindowsUpdate -KBArticleID $HideList -Hide:$false
Once again, you will be asked to confirm the changes by typing Y.
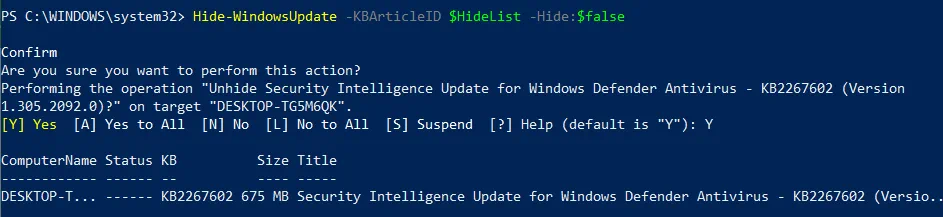
As you can see, the letter H is no longer included in the update status, meaning that this Windows update is not hidden anymore and can be downloaded on your computer.
6. Another configuration option available to you is to remove the updates you have installed on your machine. For this purpose, you can use the Remove-WindowsUpdate cmdlet and type the ID of the KB article you wish to uninstall from your computer. For example:
Remove-WindowsUpdate -KBArticleID KB4519573 –IgnoreReboot
By adding the –IgnoreReboot parameter, you ensure that the computer will not reboot automatically. Once the update is uninstalled, you can reboot the machine later.
7. Last but not least, you can scan for available Windows updates on a remote machine using the Get-WUList cmdlet.
Get-WUList –ComputerName Server5
For this cmdlet to work, you also need to install the PSWindowsUpdate module on a remote computer. This way, you can automate Windows updates for multiple machines from a single pane of glass. With PSWindowsUpdate, the patch management process is performed in a simple and efficient way.
Moreover, you can reduce the management overhead that IT administrators may experience during system patching.
Wrapping Up
The PSWindowsUpdate module was developed to make the patch management process simpler and more efficient. By automating the installation of updates, you can be sure that your system is updated on a regular basis, thus minimizing the risk of system failures and security breaches. Patches are mainly developed to resolve issues or vulnerabilities that are discovered within a program. However, regular patch management cannot ensure full-scale protection of the entire production environment.
To this end, you need to use a comprehensive data protection solution which offers backup and site recovery for physical, virtual, and cloud environments. With NAKIVO Backup & Replication, you can secure your most critical data and applications across multiple platforms, ensure recovery under any circumstances, and reduce data protection costs.