Data Protection Fundamentals: How to Backup an Amazon S3 Bucket
Amazon S3 is reliable cloud storage provided by Amazon Web Services (AWS). Files are stored as objects in Amazon S3 buckets. This storage is widely used to store data backups due to the high reliability of Amazon S3. Unlike Amazon Elastic Block Storage (EBS), where redundant data is stored in one availability zone, in Amazon S3, redundant data is distributed across multiple availability zones.
If a data center in one zone becomes unavailable, you can access data in another zone. In some cases, you may need to back up data stored in Amazon S3 buckets to avoid data loss caused by human error or software failure. Data can be deleted or corrupted if a user who has access to an S3 bucket deletes data or corrupts data by writing unwanted changes. Software failure can cause similar results.

Amazon S3 Versioning
Object versioning is an effective feature in Amazon S3 that protects your data in a bucket against corruption, writing unwanted changes, and deletion. When changes are made to a file (that is stored as an object in S3), then a new version of the object is created. Multiple versions of the same object are stored in a bucket. You can access and restore previous versions of the object. If the object is deleted, the “deletion marker” is applied to the object, but you can reverse this action and open a previous version of the object before deletion. Amazon S3 versioning can be used without additional S3 backup software.
You can use the lifecycle policy to define how long versions should be stored in an S3 bucket to have a form of Amazon S3 backup. Extra costs for storing additional versions should not be high if you configure the lifecycle policy properly, and new versions replace the oldest ones. The old versions can be deleted or moved to more cost-effective storage (for example, cold storage) to optimize costs.
How to enable AWS S3 versioning
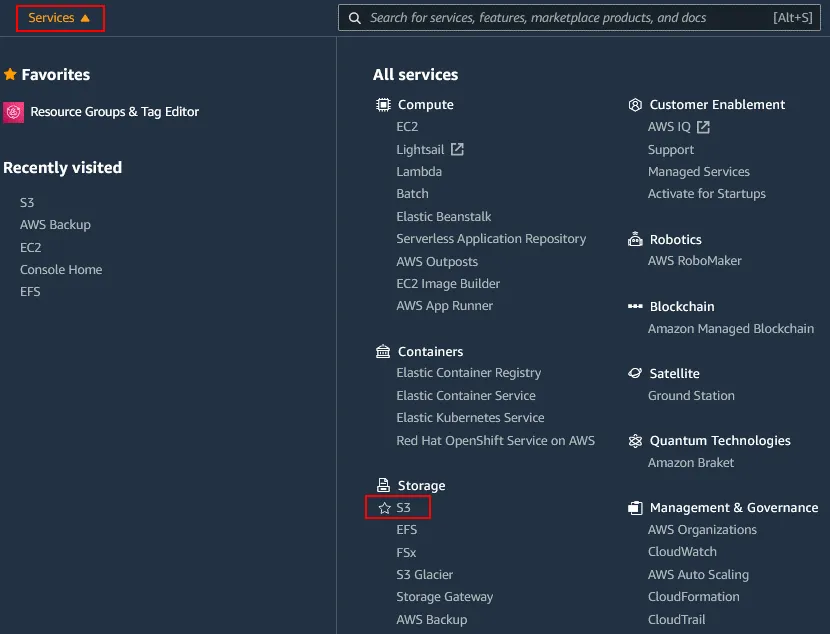
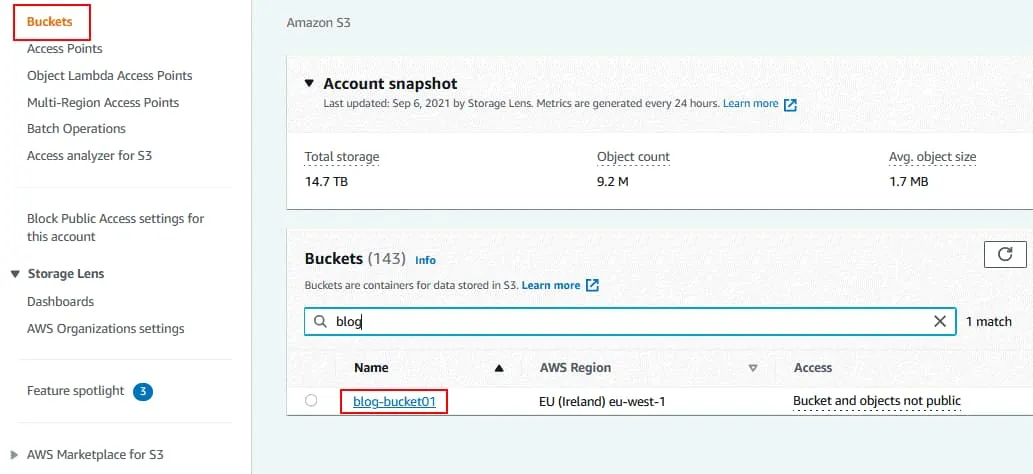
Sign in to AWS Management Console by using the account with enough permissions. Click Services and then select S3 in the Storage category.
In the navigation pane, click Buckets and select the needed S3 bucket you want to enable versioning for. In this example, I select the bucket with the name blog-bucket01. Click the bucket name to open bucket details.
Open the Properties tab for the selected bucket.
In the Bucket Versioning section, click Edit.
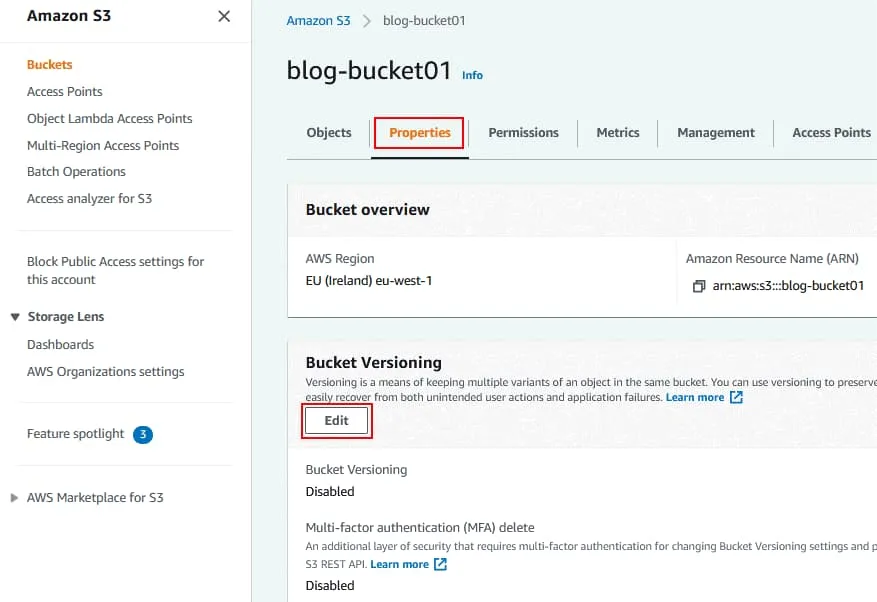
Bucket versioning is disabled by default.
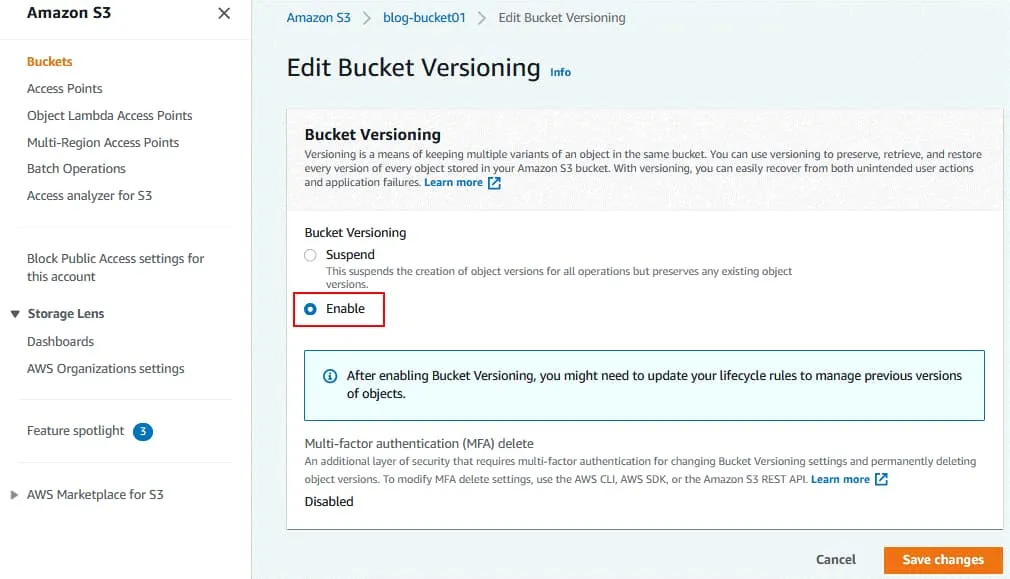
Click Enable to turn on bucket versioning.
Click Save Changes.
A tip is displayed that you might need to update your lifecycle rules. This is the next step.
The message is displayed at the top of the page if configuration changes have been applied: Successfully edited bucket versioning.
Lifecycle rules
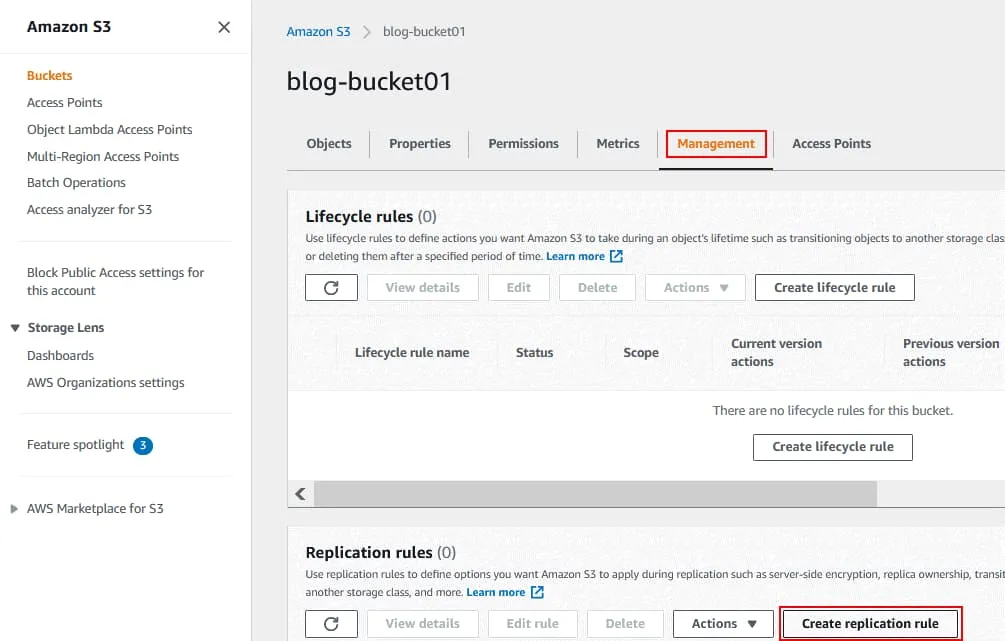
In order to configure lifecycle rules for Amazon S3 versioning, go to the Management tab on the page of the selected bucket. In the Lifecycle rules section, click Create lifecycle rule.
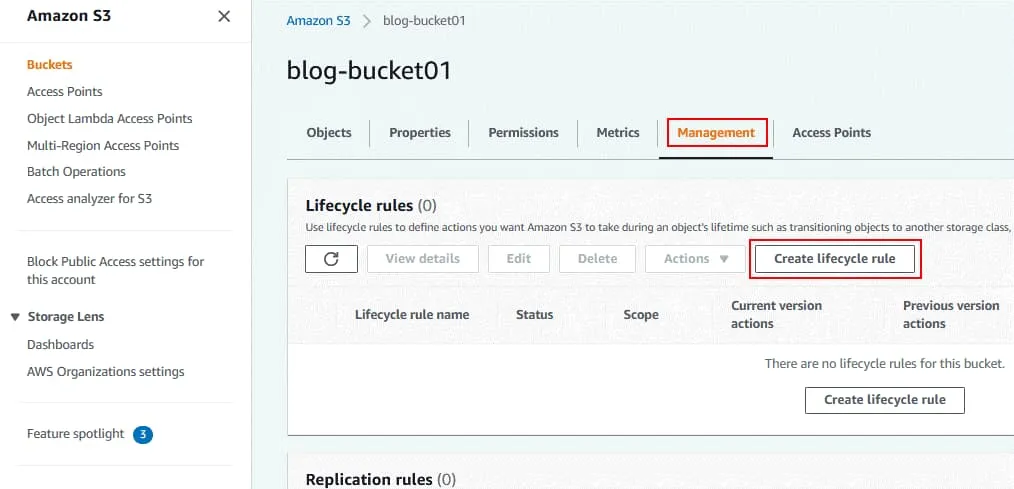
The Create lifecycle rule page is opened.
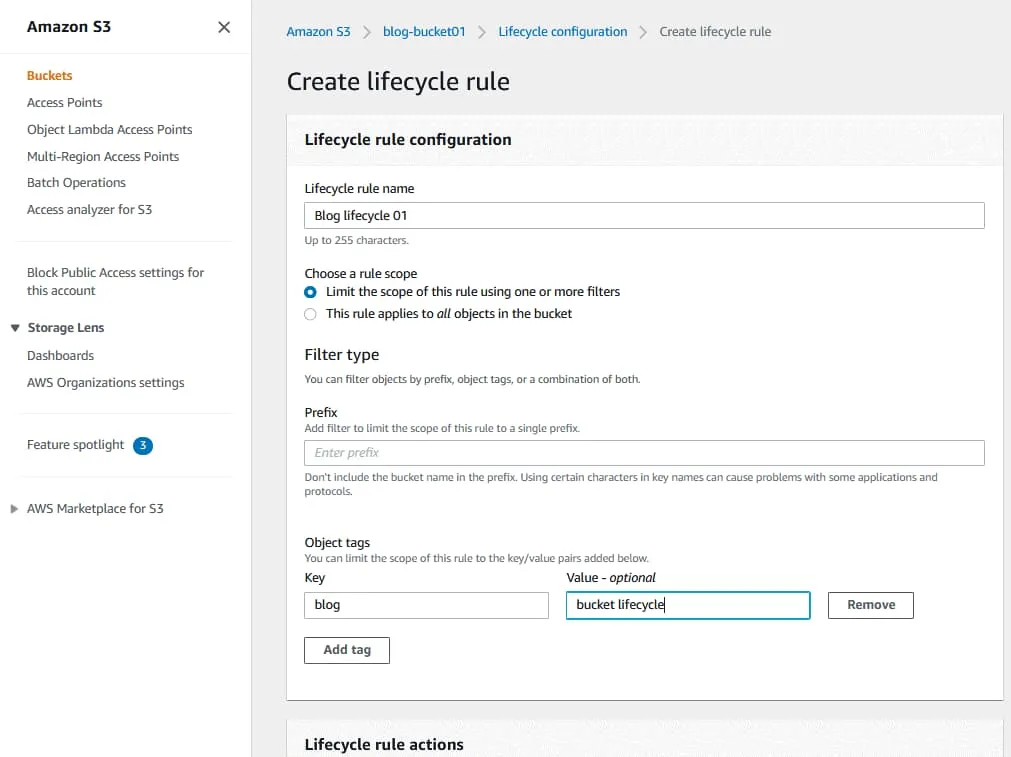
Lifecycle Rule configuration. Enter the lifecycle rule name, for example, Blog lifecycle 01.
Choose the rule scope. You can apply filters to apply lifecycle rules to specific objects or apply the rule to all objects in the bucket.
Define object tags to point objects for which lifecycle actions must be applied. Enter a key and value in the appropriate fields and click the Add tag button to add the tag or the Remove button to remove the tag.
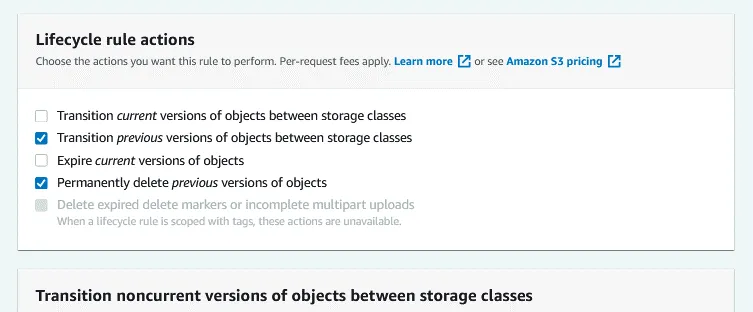
Lifecycle rule actions. Choose the actions you want this rule to perform:
- Transition current versions of objects between storage classes
- Transition previous versions of objects between storage classes
- Expire current versions of objects
- Permanently delete previous versions of objects
- Delete expired delete markers or incomplete multipart uploads
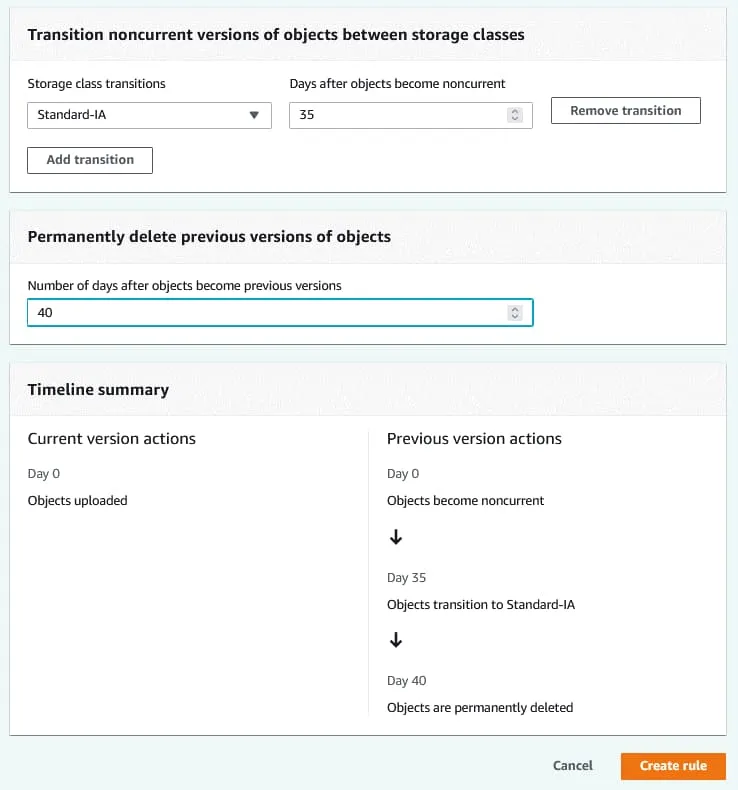
Transition noncurrent versions of objects between storage classes.
Select storage class transitions and the number of days after which objects become noncurrent.
In my example, the objects are moved from the current S3 storage class to Standard-IA after 35 days.
Permanently delete previous versions of objects.
Enter the number of days after which previous versions must be deleted. The value must be higher than the number of days after which objects become noncurrent. In my example, objects are permanently deleted after 40 days.
Click Create Rule to create a lifecycle rule.
Replicating the Bucket
As an alternative to Amazon S3 automatic backup, you can replicate the bucket across regions. You need to create a second bucket that is the destination bucket in another region and create a replication rule. After creating the replication rule, all changes made in the source bucket are automatically reflected in the destination bucket.
Locate the Replication rules section in the Management tab for your source bucket and click Create replication rule.
The Create replication rule page opens.
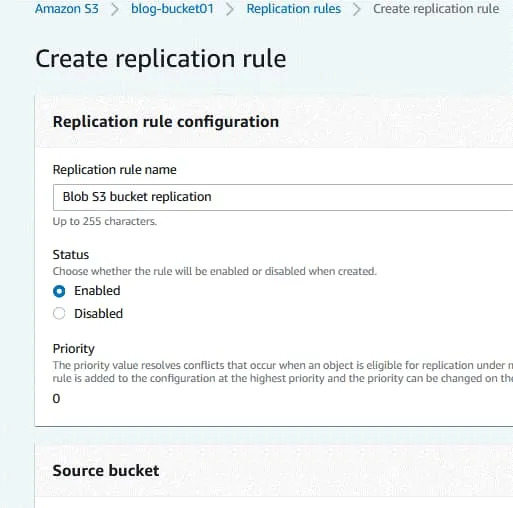
Enter a replication rule name, for example, Blog S3 bucket replication.
Define the rule status when the rule is created (enabled or disabled).
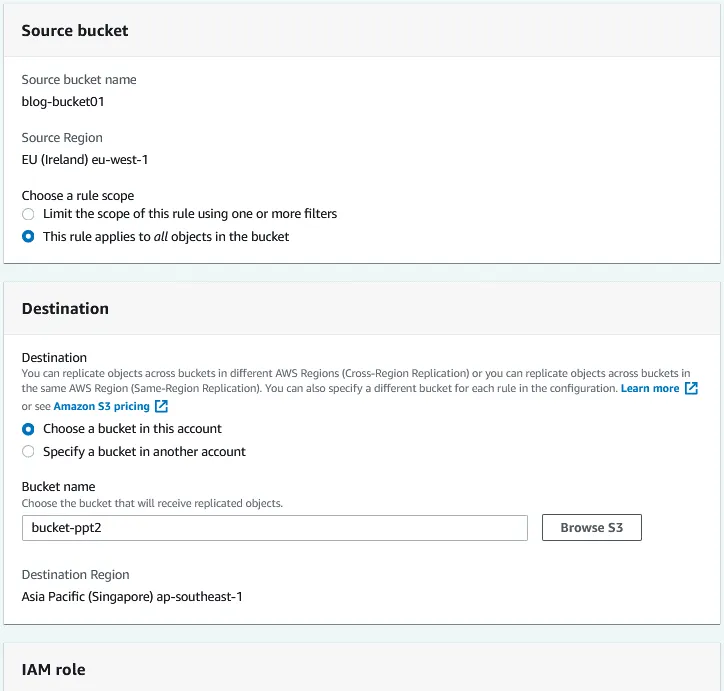
Source bucket. The source bucket has been selected already (blog-bucket01).
Choose a rule scope. You can use the replication rule for all objects in the bucket or configure filters and apply the rule to custom objects.
Destination. Enter the destination bucket name or click Browse S3 and select a bucket from the list. You can select a bucket in this account or in another account. If AWS S3 versioning is enabled for the source bucket, object versioning must also be enabled for the destination bucket. A destination region is displayed for the selected destination bucket.
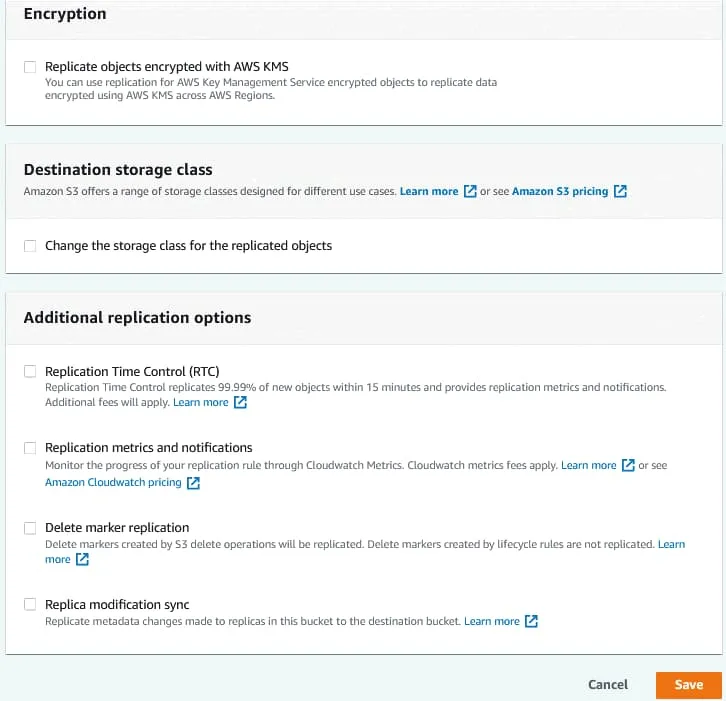
Configure the identity and access management (IAM) role, then select a storage class and additional replication options. Click Save to save the configuration and create a replication rule for the bucket.
AWS S3 Backup in the CLI
AWS CLI is the powerful command-line interface to work with different Amazon services, including Amazon S3. There is a useful sync command that allows you to back up Amazon S3 buckets to a Linux machine by copying files from the bucket to a local directory in Linux running on an EC2 instance.
A feature of the sync command in AWS CLI is that files in a local file system (Amazon S3 backup destination) are not deleted if these files are missing in the source S3 bucket and vice versa. This is important for AWS S3 backup because if some files were accidentally deleted in the S3 bucket, the existing files are not deleted in the local directory of a Linux machine after synchronization.
Advantages:
- Support of large S3 buckets and scalability
- Multiple threads are supported during synchronization
- The ability to synchronize only new and updated files
- High synchronization speed due to smart algorithms
Disadvantages:
- Linux running on an EC2 instance consumes the storage space of EBS volumes. Storage costs for EBS volumes are higher than for S3 buckets.
Commands for Ubuntu Server are used in this tutorial.
First, you need to install AWS CLI.
Update the tree of repositories:
sudo apt-get update
Install AWS CLI:
sudo apt install awscli
or
Install unzip:
sudo apt install unzip
curl “https://awscli.amazonaws.com/awscli-exe-linux-x86_64.zip” -o “awscliv2.zip”
unzip awscli-exe-linux-x86_64.zip
sudo ./aws/install
Check the AWS credentials in Linux running on your EC2 instance.
aws configure list
Add credentials to access AWS with AWS CLI from the Linux instance if credentials have not been set:
aws configure
Enter the following parameters:
AWS Access Key ID
AWS Secret Access Key
Default region name
Default output format
Create a directory to store your Amazon S3 backup. In my example, I create the ~/s3/ directory to store S3 backups and a subdirectory with a name identical to the bucket name. Files stored in the S3 bucket should be copied to this local directory on the Linux machine. ~ is the home directory of a user, which is /home/ubuntu in my case.
mkdir -p ~/s3/your_bucket_name
Replace your_bucket_name with the name of your bucket (blog-bucket01 in our example).
mkdir -p ~/s3/blog-bucket01
Synchronize the bucket contents with your local directory on the EC2 instance running Linux:
aws s3 sync s3:// blog-bucket01 /home/ubuntu/s3/ blog-bucket01/
If the credential configuration, bucket name, and destination path are correct, data should start downloading from the S3 bucket. The time needed to finish the operation depends on the size of the files in the bucket and your internet connection speed.
Amazon S3 automatic backup
You can configure Amazon S3 automatic backup jobs with AWS CLI sync. Create a sync.sh script file to run AWS S3 backup (synchronize files from an S3 bucket to a local directory on your Linux instance) and then run this script on schedule.
nano /home/ubuntu/s3/sync.sh
#!/bin/sh
# Display the current date and time
echo ‘—————————–‘
date
echo ‘—————————–‘
echo ”
# Display the script initialization message
echo ‘Syncing remote S3 bucket…’
# Running the sync command
/usr/bin/aws s3 sync s3://{BUCKET_NAME} /home/ubuntu/s3/{BUCKET_NAME}/
# Echo “Script execution is completed”
echo ‘Sync complete’
Replace the {BUCKET_NAME} with the name of the S3 bucket you want to back up.
The complete path to aws (AWS CLI binary) is defined to make crontab execute the aws application correctly in the shell environment used by crontab.
Make the script executable:
sudo chmod +x /home/ubuntu/s3/sync.sh
Run the script to check whether the script works:
/home/ubuntu/s3/sync.sh
Edit crontab (a scheduler in Linux) of the current user to schedule Amazon S3 backup script execution.
crontab -e
You may need to select a text editor to edit crontab configuration.
The format of crontab for scheduling tasks is the following:
m h dom mon dow command
Where: m – minutes; h – hours; dom – day of month; dow – day of week.
Let’s add a configuration line for the task to run synchronization every hour and save AWS S3 backup results to the log file. Add this line to the bottom of the crontab configuration.
0 * * * * /home/ubuntu/s3/sync.sh > /home/ubuntu/s3/sync.log
Amazon S3 automatic backup is configured. The log file can be used to check execution of synchronization tasks.
Conclusion
There are multiple methods to perform Amazon S3 backup and two of them have been covered in this blog post. You can enable object versioning for a bucket to preserve previous versions of objects, which allows you to get files if unwanted changes were written to the files. Amazon S3 replication is another native tool to make a copy of files stored in an Amazon S3 bucket as objects. In this case, objects are replicated from one bucket to another. You can also create a backup of an Amazon S3 bucket by using the sync tool in AWS CLI, which allows you to synchronize files in a bucket with a local directory of a Linux machine running on an EC2 instance. Amazon S3 automatic backup can be scheduled by using a script and crontab.
In general, Amazon S3 cloud storage is very reliable and backup to Amazon S3 is a common practice. If you have a strong data protection strategy and AWS backup strategy, you should have a backup copy. In this case, it is recommended that you back up data to Amazon S3 and another destination location. Use NAKIVO Backup & Replication to protect your data on physical and virtual machines. NAKIVO Backup & Replication is robust virtualization backup software that can be used to protect VMs, as well as Amazon EC2 instances and physical machines.