The Differences Between VMFS 5 vs VMFS 6 and How to Migrate
VMware VMFS is a reliable cluster file system optimized to store virtual machine files. The most recent versions of VMware VMFS – VMFS 5 and VMFS 6 – are widely used in VMware vSphere environments. However, VMFS 6 differs significantly from the older version, and it was designed to meet the most modern virtualization requirements.
In this post, we’ll compare the features of both versions and explain how to upgrade VMFS 5 to 6.

VMFS 5 vs VMFS 6 Features Comparison
Let’s look at the VMFS 5 vs 6 comparison table and then review the acronyms and terms used in this post.
| Features | VMFS 5 | VMFS 6 |
| Access for ESXi 6.0 and 5.x | Yes | No |
| Access for ESXi 6.5 and later | Yes | Yes |
| 512e storage devices | Yes, but not supported on local disks | Yes, by default |
| 512n storage devices | Yes | Yes, by default |
| 4Kn storage devices | No | Yes |
| Datastores per ESXi host | 512 | 512 |
| MBR partitioning scheme | Yes | No |
| GPT partitioning scheme | Yes | Yes |
| Manual space reclamation in ESXCLI | Yes | Yes |
| Automatic space reclamation | No | Yes |
| Space reclamation from a guest OS | Limited | Yes |
| Snapshot mechanisms | SEsparse for virtual disks larger than 2 TB
VMFSsparce for virtual disks smaller than 2 TB |
SEsparse |
| Block size | 1 MB | 1 MB |
| Virtual disk emulation type | 512n | 512n |
| RDM | Yes (Max 62 TB) | Yes (Max 62 TB) |
- A Logical Unit Number (LUN) is used to identify a logical unit on a SCSI-based disk by using an addressing scheme: Bus > Address (ID) > LUN. LUN is limited storage space on a disk or disk array and is presented as a block storage device accessed with SCSI. LUNs are logical devices created on the storage system side and allow you to identify multiple devices on a single address. A LUN can occupy the entire SCSI-based storage array or a physical disk drive, and a disk drive can contain multiple LUNs.
Partitions and VMFS datastores (VMFS volumes) are created on a LUN to store files. Creating more than one VMFS datastore on a single LUN is not recommended and cannot be done in the web interface of VMware vSphere Client and VMware Host Client. The term LUN is often used interchangeably with the terms disk or drive.
- 512n. Traditionally, hard disk drives (HDD) supported 512 byte-sized physical sectors. When physical and logical sectors are aligned, no additional actions are needed. The 512-byte sector size is referred to as the legacy sector size.
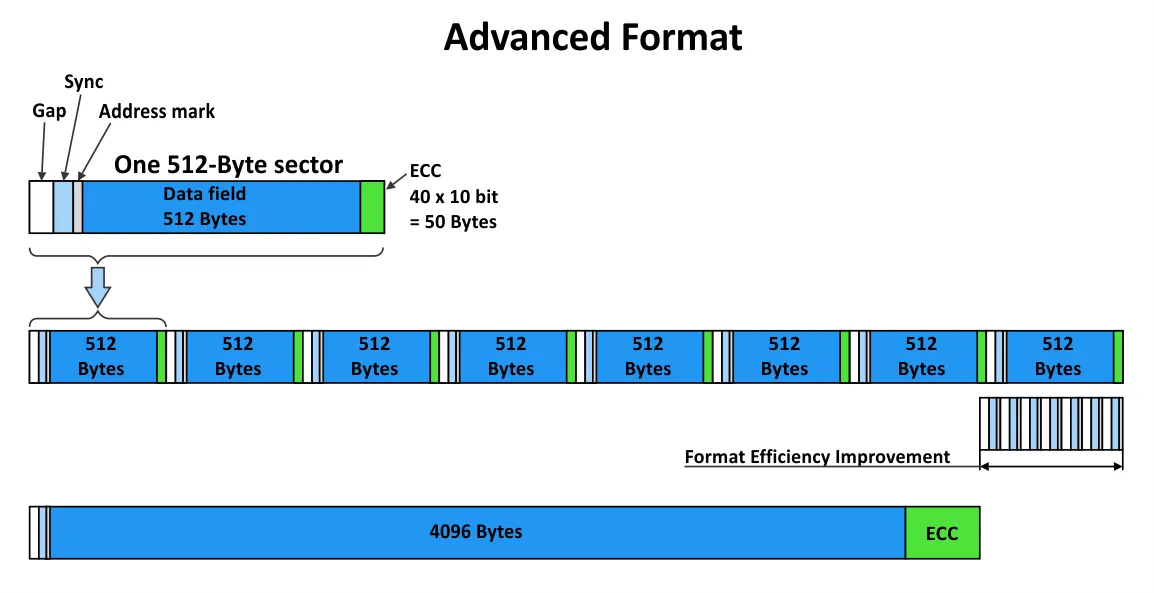
- 512e. Later storage vendors introduced the Advanced Format for the disks that they produce, and they increased the sector size to 4 kilobytes. Increasing the sector size allows vendors to use less space to store service information for each sector in the appropriate sections (Gap, Error Correction Code (ECC), Sync, Address Mark) and, as a result, improve efficiency for large disk drives (4 TB and more). The reduction of the geometric size of sectors on magnetic plates and the need to preserve the efficiency of error correction are taken into account.
To preserve compatibility with existing hardware and software (including operating systems), 512-byte sectors are emulated by physical 4-KB sectors on hard disk drives and solid-state drives (SSD). The disadvantage is that older operating systems don’t support sector alignment for disks with Advanced Format.
- 4Kn. 4K-native disk drives don’t emulate 512-byte sectors. The size of both physical and logical sectors is 4096 bytes. Hardware (including storage controllers, like a RAID controller) and software (an operating system or hypervisor, device drivers, and a file system) working with 4Kn disk drives must support native 4K sectors.
This rule is also true for VMware ESXi and VMFS.Starting from v6.7, VMware vSphere supports 4Kn disk drives. The advantage of using 4Kn disk drives is no overhead to emulate 512-byte sectors, and, as a result, performance is slightly improved.
- Master Boot Record (MBR) is a partition table format used for disk drives that are not larger than 2.2 TB. MBR supports up to four primary partitions on a disk.
- GUID Partition Table (GPT) is a new partition table format that supports creating partitions larger than 2 TB and allows you to create more than four primary partitions.
- Raw Device Mapping (RDM) is a feature that allows you to attach a physical storage device or LUN to a VM directly.
As you can see from the VMFS 5 vs VMFS 6 comparison, there are reasons to upgrade to the newer file system version, at least given the improvements in automatic space reclamation on disks.
How to Upgrade VMFS 5 to VMFS 6 with Datastore Migration
To convert VMFS 5 to 6 or perform a VMFS 5 to 6 upgrade, you need to transfer data from a VMFS 5 datastore to a VMFS 6 datastore. Online and offline file system upgrades are not supported. This is because VMFS 6 uses another structure of metadata to make this file system 4K-aligned.
For this reason, the only way to upgrade VMFS 5 to 6 is deleting the old VMFS 5 datastore from a storage volume and creating a new VMFS 6 datastore in its place. In practice, datastores that are in use are not empty and contain VM files and other files. Hence, the migration of VMs and other files is required from the old VMFS 5 datastore to another one.
In our example, we have one vCenter Server and ESXi hosts managed by this vCenter. We have one VMFS 5 datastore (DS01) with VMs and another VMFS 6 datastore (DS02) with enough free space. These datastores are attached to ESXi host 192.168.101.208. This is the environment in which we will perform the VMFS 5 to 6 upgrade.
Let’s go over the workflow steps in the graphical user interface (GUI).
- Ensure that your vCenter Server version is 6.5 or higher. Ensure that the ESXi version is 6.5 or higher on the host whose datastore you want to upgrade from VMFS 5 to VMFS 6. If multiple ESXi hosts use a shared VMFS datastore, all of them must run ESXi 6.5 or higher.
Note: Don’t go on to upgrade VMFS 5 to 6 if at least one ESXi host using the shared VMFS 5 datastore is running version 6.0 or lower. This can lead to data loss.
- To check the VMFS version in VMware vSphere Client, select a datastore in the Datastores section and view the Summary tab (see the screenshot below). You can also use VMware Host Client for this purpose.
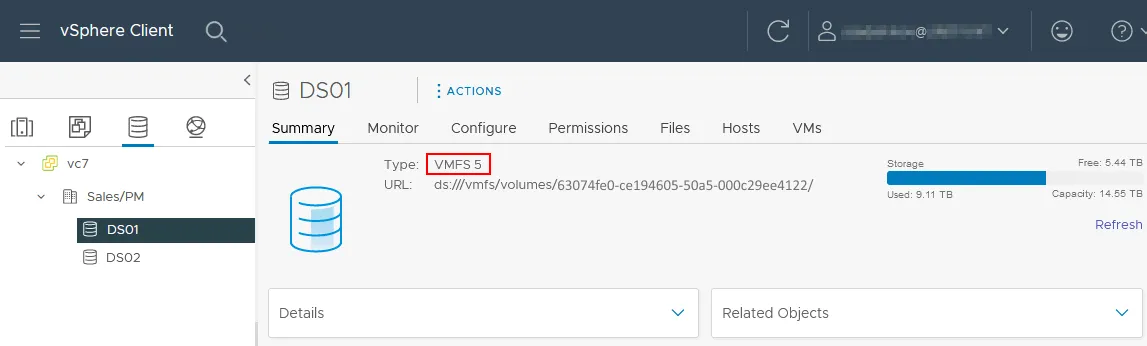
- Check free disk space on the second datastore, which must be a VMFS 6 datastore (DS02 in our case). Make sure that there is enough free space to migrate VMs from the first datastore.
You can check the free space in the GUI of VMware vSphere Client by going to Inventory > Datastores, selecting the needed datastore and viewing information in the Summary tab (see the right side of the screenshot above).
To check the files stored in the datastore, open the Files tab.
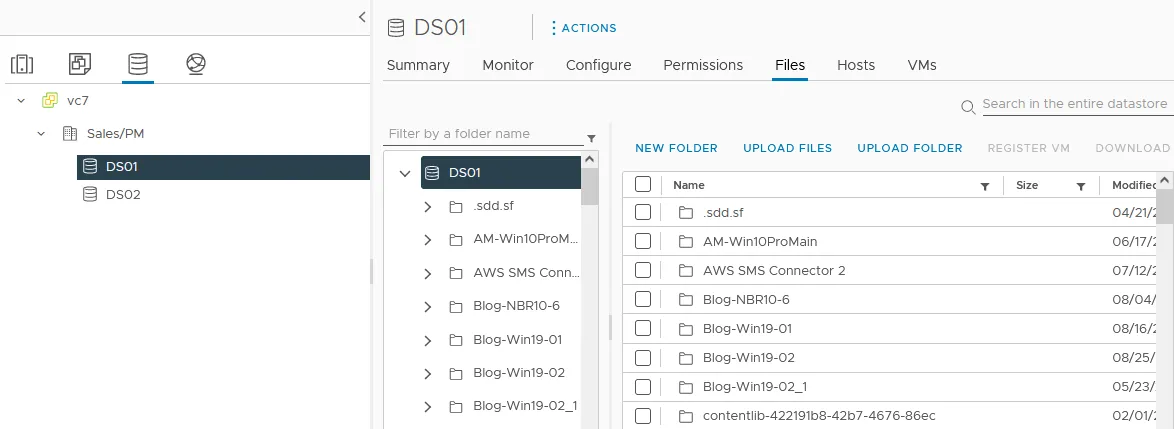
Note: If you perform operations for datastores mounted to the same ESXi host, you can also use the GUI of the embedded VMware Host Client.
- Define all virtual machines whose files are stored on the VMFS 5 datastore. You need to migrate these VMs from this datastore to upgrade the VMFS version.
- Select VMs to migrate in VMware vSphere Client (use the Hosts and Clusters view). You can use the CTRL key to select multiple VMs. However, it is recommended that you migrate one VM at a time to avoid performance degradation, especially when migrating running VMs.

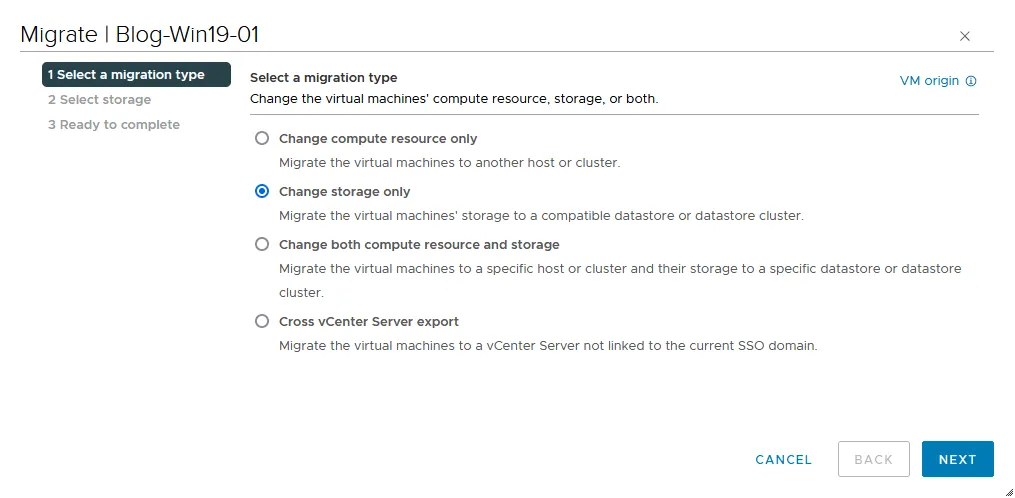
- Right-click the selected VM(s), and in the menu that opens, hit Migrate. A migration wizard opens.
- Select a migration type. Select Change storage only. In some cases, you can also change both compute resources and storage.
- Select storage. Select the VMFS datastore to which you will migrate the VM(s).
- Ready to complete. Check the summary and finish the migration process.
To copy the files of VMs that are not registered and other files, use the ESXi command line interface or the Files tab for a datastore in VMware vSphere Client (the commands are explained in this article below).
- Select a migration type. Select Change storage only. In some cases, you can also change both compute resources and storage.
- Ensure that DS01, which is the VMFS 5 datastore, is empty and all needed files are copied from there. Continue only if this datastore is empty because the following operations will erase the data on this VMFS 5 datastore during the VMFS 5 to 6 upgrade.
- Unmount the VMFS 5 datastore (DS01) from all ESXi hosts to which this datastore was mounted.
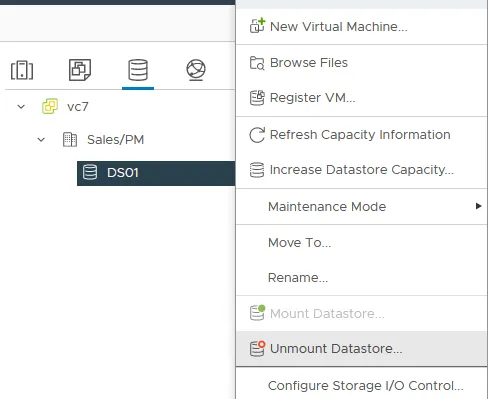
- Delete the VMFS 5 datastore (DS01). Right-click the datastore name, and in the context menu, click Delete Datastore.
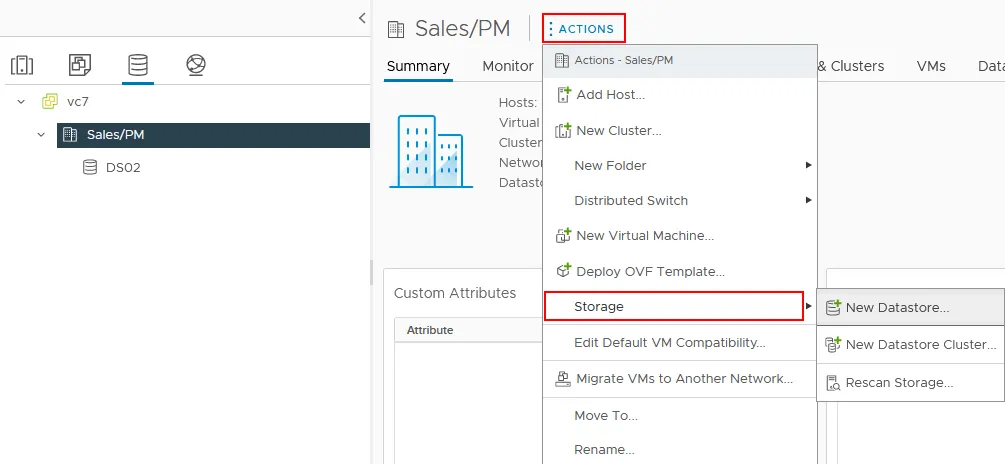
- Create a new VMFS 6 datastore on the same LUN/partition where your VMFS 5 datastore was located (DS01 in our example).
Select your data center and click Actions > Storage > New Datastore.
 Follow the five steps of the New Datastore wizard.
 - Type. Select the VMFS option.
- Name and device selection. Enter a name for your datastore (DS01 in our case) and select the appropriate disk/LUN that was used by the old VMFS 5 datastore before.
- VMFS version. Select VMFS 6 (because you upgrade VMFS 5 to 6).
- Partition configuration. Set your partition configuration, including space reclamation options for the VMFS 6 datastore.
- Ready to complete. Check configuration and hit Finish.
- Launch storage rescan on all ESXi hosts. Select your data center, click Actions > Storage > Rescan Storage.
- Check the new VMFS datastore that you just have created to upgrade VMFS 5 to 6 and ensure that the file system is VMFS 6 now.
- When the new VMFS 6 datastore is created and mounted, migrate VMs back to this datastore from DS02. The steps to migrate VMs are similar to the ones explained above.
- The VMFS 5 to VMFS 6 datastore upgrade is finished.
How to Upgrade VMFS 5 to 6 in the Command Line
The graphical user interface in VMware vSphere is convenient, but sometimes you may need to use the command line interface for VMFS 5 to 6 upgrade. Let’s go over the workflow in the command line.
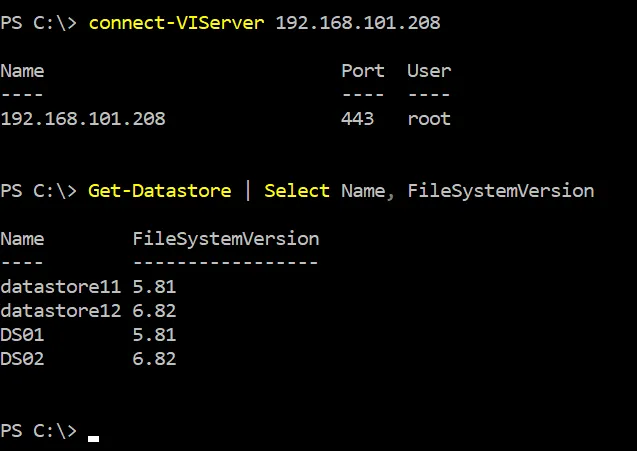
- Check the VMFS version on datastores. Use one of the commands below for this purpose:
- In vSphere PowerCLI:
Get-Datastore | Select Name, FileSystemVersion
- In the ESXi command line interface (ESX CLI) use the command:
esxcli storage filesystem list
Note: Use the SSH client for more convenience when working in ESXCLI.

- You can also get a list of datastores and check the devices identifiers (IDs):
esxcfg-scsidevs -m
We note the disk device identifier mpx.vmhba0:C0:T4:L0:1 and the datastore UUID that is 63074fe0-ce194605-50a5-000c29ee4122.

- In vSphere PowerCLI:
- Check free disk space on the VMFS 6 datastore and used disk space on the VMFS 5 datastore.
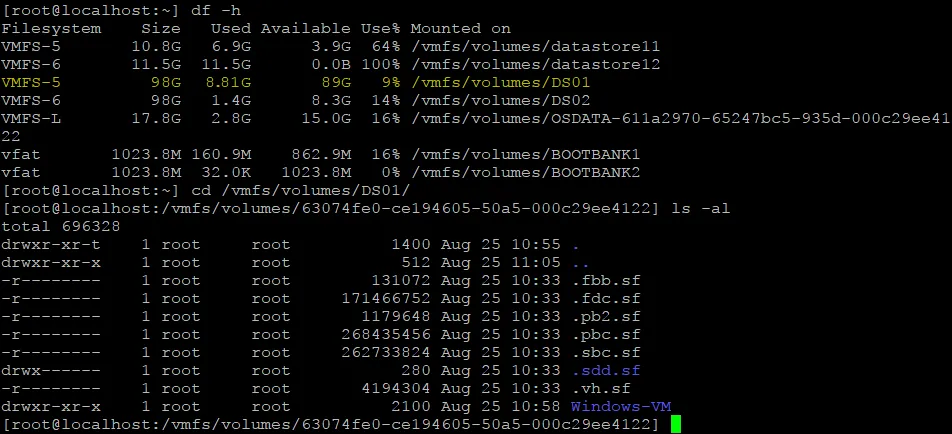
In the command line, use the df -h command to see used and free disk space on datastores. You can go to the datastore and see stored folders and files:
cd /vmfs/volumes/DS01/
(where DS01 is the datastore name)
The ID of the selected datastore will be placed in the selected path automatically instead of the datastore name (63074fe0-ce194605-50a5-000c29ee4122 in our case).
Use the ls -al command to list the contents of the directory.
- The command line interface allows you to copy VM files, including virtual disks, other files, and directories.
- The command to migrate VMs with vMotion and Storage vMotion is Move-VM, but it works only in vSphere PowerCLI. You can find the syntax of this command on the VMware website.
- The command to copy a directory with all subdirectories and files is like this. We copy ISO installation images:
cp -R /vmfs/volumes/DS01/ISO /vmfs/volumes/DS02
If you use the cp command to copy VMDK files of thin provisioned disks, the thin provisioned format will not be preserved and the destination file will be a thick provisioned disk. The point is how the VMDK header is copied (whether the old header is preserved or a new one is generated).
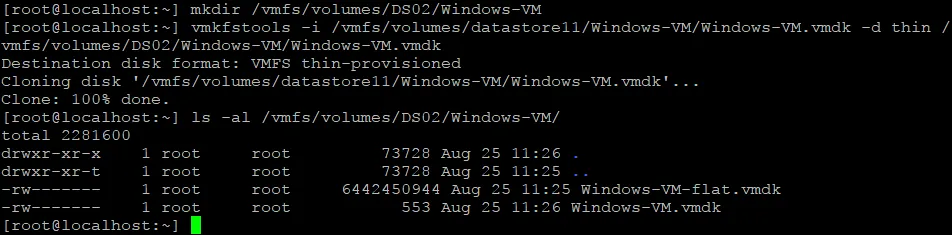
- To copy thin provisioned disks, use vmkfstools and the command:
vmkfstools -i <source.vmdk> -d thin <target.vmdk>
For example:
vmkfstools -i /vmfs/volumes/datastore11/Windows-VM/Windows-VM.vmdk -d thin /
vmfs/volumes/DS02/Windows-VM/Windows-VM.vmdk
Note: The destination directory must be created before copying the virtual disk with the above command.
- You need to register VMs after copying them in the command line interface as files. This action should be done after you finally store VM files on the VMFS 6 datastore, after you finish your VMFS 5 to 6 upgrade.
- We have evacuated all needed files from the old VMFS 5 datastore (DS01).
Warning: After running the next step, all data on the VMFS datastore will be deleted! Ensure that you have copied all needed data from the VMFS 5 datastore before formatting this datastore to upgrade VMFS 5 to 6.
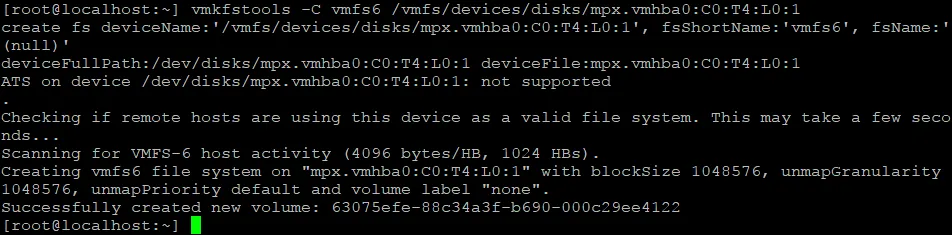
- In the command line, you can format the disk partition / LUN with the command:
vmkfstools -C vmfs6 /vmfs/devices/disks/<disk_identifier>
Where <disk_identifier> is the value we received with the esxcfg-scsidevs -m command.
In our case the command is:
vmkfstools -C vmfs6 /vmfs/devices/disks/mpx.vmhba0:C0:T4:L0:1
- Check whether upgrade of VMFS 5 to VMFS 6 has been completed successfully:
esxcli storage filesystem list
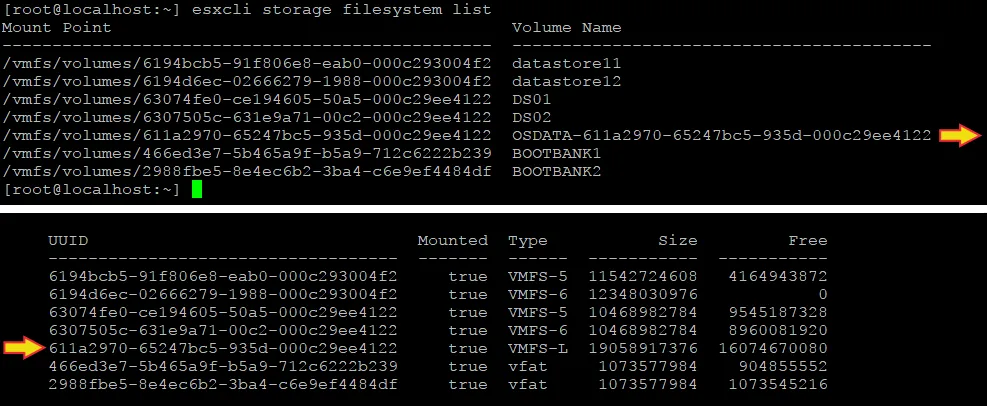
The name of the datastore is the same as its UUID. Set the name of the datastore that should be DS01 in our case. It is better to rename the upgraded VMFS 6 datastore.
The easiest way is to use VMware Host Client if an ESXi host is not managed by vCenter. If the ESXi host is managed by vCenter, use VMware vSphere Client. Just right-click the datastore name and hit Rename in the context menu.
Conclusion
The VMFS 5 vs 6 comparison demonstrates the list of advantages of the newer VMFS version. VMFS 6 supports automatic free space reclamation and datastore and has extended limits compared to VMFS 5. You cannot directly upgrade a VMFS 5 datastore with files on it to the sixth version. To upgrade VMFS 5 to 6, you need to evacuate all VMs and copy files to another datastore, delete the VMFS 5 datastore and create a new VMFS 6 datastore instead. You can perform the VMFS upgrade process in the GUI by using VMware vSphere Client or VMware Host Client and in the command line interface.
VM backup is recommended before undertaking any actions related to VM storage to avoid data loss. Consider NAKIVO Backup & Replication which is a reliable solution for protecting VMware VMs along with other workloads.