Hyper-V Checkpoints Best Practices
Virtualization has significantly changed the way businesses conduct their operations and provide services to customers. One of the most significant virtualization technologies is snapshots. This technology has transformed the way data is protected in virtual environments. In this blog post, we will cover the snapshot technology used in Hyper-V and describe how you can manage and configure Hyper-V checkpoints in your virtual environment.

What Is a Hyper-V Checkpoint?
Hyper-V checkpoints allow you to save the VM state at a particular point in time. Checkpoints can be very helpful if you plan to adopt some new changes to the system, such as software updates or a program installation. If an unexpected error occurs, you can revert a VM to a previous state, thus discarding all the changes made.
It is worth noting that the term ‘snapshots’ is currently used only in reference to Hyper-V snapshots created on older Windows operating systems, which were introduced prior to Windows 10.
Types of Hyper-V Checkpoints
Prior to Windows 10, Hyper-V provided only standard checkpoints. Currently, there are two types of Hyper-V checkpoints available:
- Standard Checkpoints (formerly known as Hyper-V snapshots) take a snapshot of the VM and its memory state, which allows you to capture the VM state at a particular point in time. A standard snapshot doesn’t enable application consistency, which may result in incomplete data transactions. This is crucial for VMs running Active Directory, Microsoft Exchange, SQL Server, or any other application/database which transfers data between different nodes. Also, note that this snapshot type shouldn’t be regarded as a full backup.
- Production Checkpoints can create a data-consistent backup with the help of Volume Shadow Copy Service (for VMs running on Windows) or File System Freeze (for VMs running on Linux). Thus, production checkpoints are created in accordance with the backup technology inside the guest OS. When creating a production checkpoint, no snapshot of the VM memory state is taken. Note that production checkpoints are enabled by default. However, if you want to change the checkpoint type, you can use either Hyper-V Manager or PowerShell.
Managing Hyper-V Checkpoints
The following excerpt will provide guidance on how you can manage various aspects of Hyper-V checkpoints: from changing the checkpoint type to configuring the checkpoint location.
How to change the checkpoint type
As mentioned above, you can change the checkpoint type through Hyper-V Manager or PowerShell. Both approaches are described below.
Using Hyper-V Manager
- Open Hyper-V Manager.
- Right-click on a VM that you want to configure and select Settings.
- Find the Management section and select Checkpoints.
- Choose the checkpoint type. If you have selected Production checkpoints, click the checkbox below in case your guest VM doesn’t support creation of production checkpoints. This allows you to capture checkpoints with full-application state.

If you have selected Standard checkpoints, you can enable the feature of Automatic checkpoints, which automatically takes checkpoints of VMs when they’re started and deletes them as soon as they are stopped.
Using PowerShell
To change the checkpoint type, run the following commands in PowerShell:
- To enable the Standard Checkpoint type, insert: Set-VM -Name <vmname> -CheckpointType Standard.
- To enable the Production Checkpoint type, insert: Set-VM -Name <vmname> -CheckpointType Production. In case a production checkpoint fails, a standard checkpoint will be taken.
- If you want to ensure that only production checkpoints are created, use the following command: Set-VM -Name <vmname> -CheckpointType ProductionOnly.
How to create checkpoints
Hyper-V checkpoints can be created using one of two ways: Hyper-V Manager or PowerShell.
Using Hyper-V Manager
- Open Hyper-V Manager.
- Select the VM for which the checkpoint will be created.
- Right-click the name of the VM, and then click the Checkpoint.

- The checkpoint is created and can be accessed in the Checkpoints section below.
Using PowerShell
Run the following command to create Hyper-V checkpoints: Checkpoint-VM -Name <VMName>. After the checkpoint has been created, you can see a full list of VM checkpoints by using the command: Get-VMCheckpoint -VMName <VMName>.
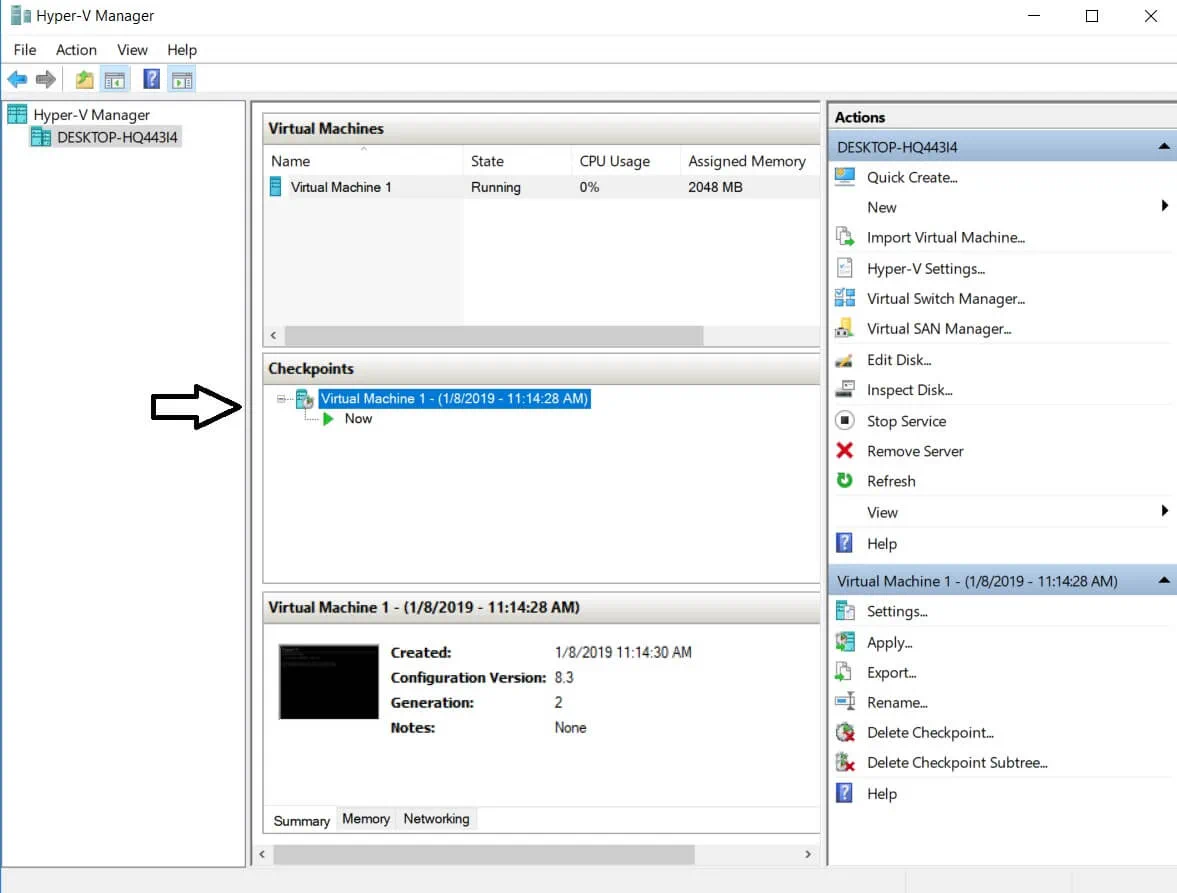
How to revert a VM to a previous state using checkpoints
Hyper-V checkpoints are primarily used to revert a VM to its previous state. Use the steps below to apply the checkpoint for this purpose.
Using Hyper-V Manager
- Open Hyper-V Manager.
- Select the VM which you want to revert.
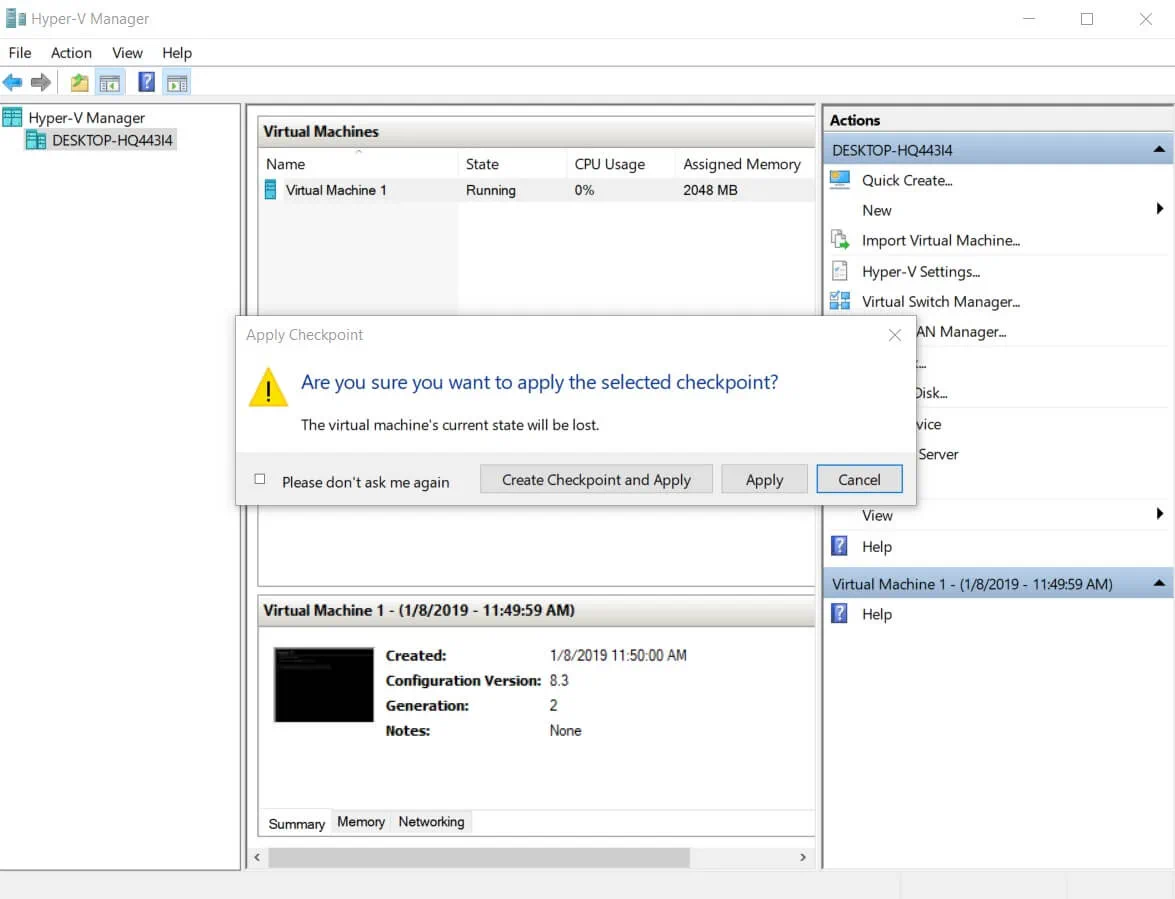
- In the Checkpoints section, you will see the list of checkpoints created for that VM. Right-click the checkpoint that you want to use and click Apply.
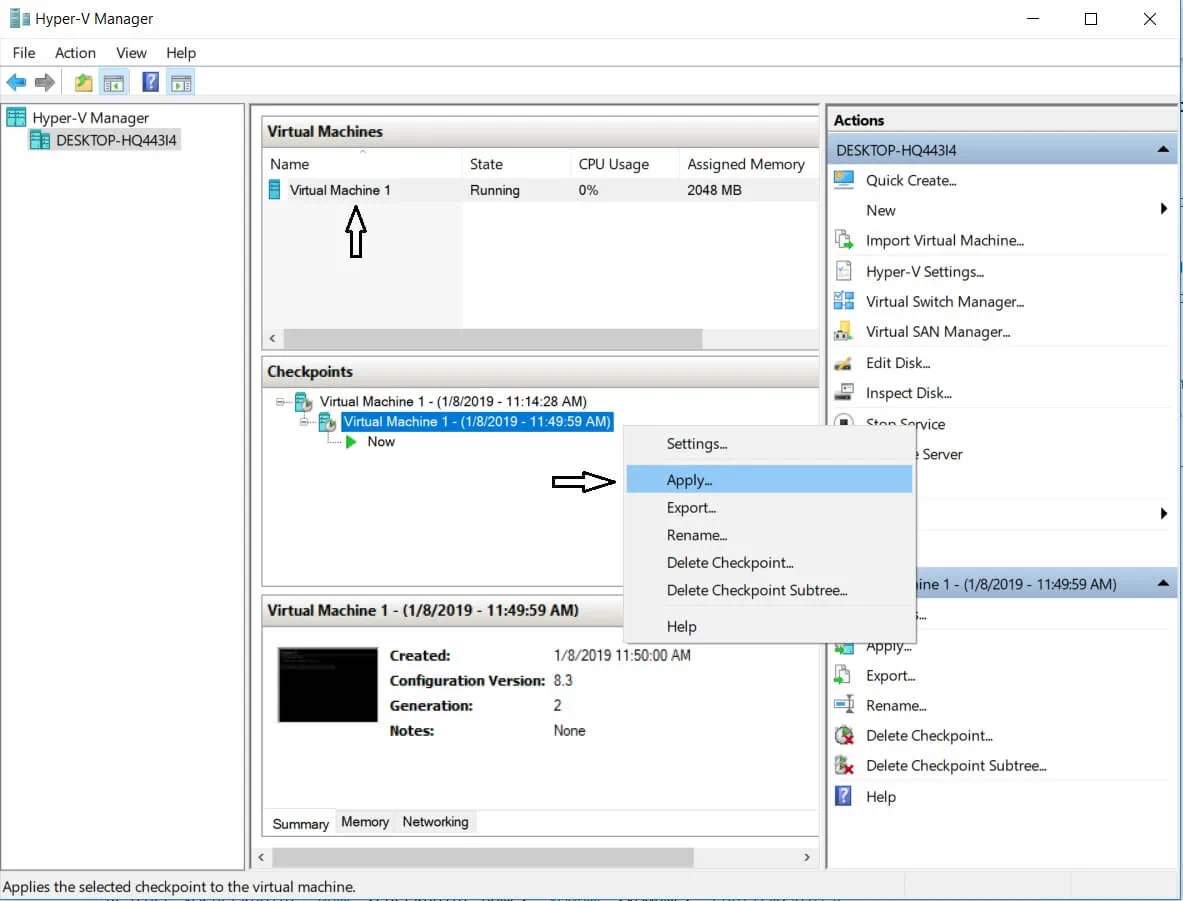
- After that, a dialog box including the following options will appear:
- Create Checkpoint and Apply: Before the chosen checkpoint is applied, a new checkpoint of the VM is created. This way the VM is protected, even if this operation fails.
- Apply: Only the chosen checkpoint is applied. Note that this action cannot be undone.
- Cancel: The dialog box will be closed without applying any changes.
Using PowerShell
To apply the checkpoint via the PowerShell command-line interface (CLI), run the following command: Restore-VMCheckpoint -Name <checkpoint name> -VMName <VMName> -Confirm:$false.
How to delete checkpoints
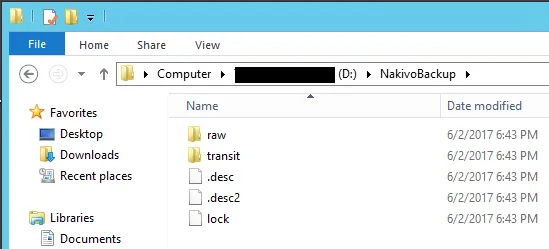
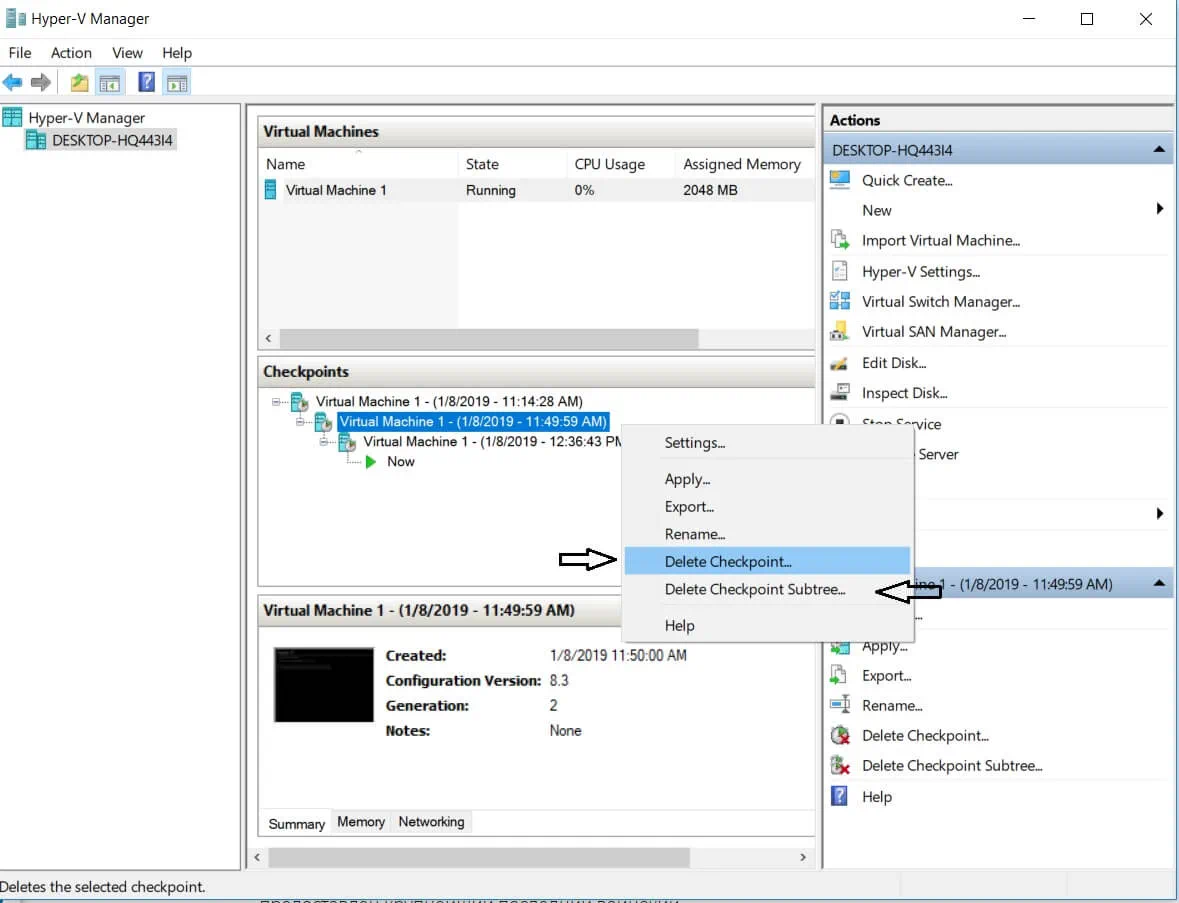
In Hyper-V, checkpoints are stored as .avhdx files in the same location as the .vhdx files of the VM. As a result of deleting checkpoints, the .avhdx and .vhdx files are merged so as to save space and ensure that no critical data is lost. After that, the checkpoint’s .avhdx file is completely deleted from the file system.
To delete checkpoints using Hyper-V Manager, do the following:
- After opening Hyper-V Manager, select the required VM.
- In the Checkpoints section below, right-click the checkpoint that you want to delete. The drop-down menu will appear with a number of options. Click Delete Checkpoint.
If you want to delete a checkpoint tree containing the primary checkpoint and all subsequent checkpoints, right-click the earliest checkpoint that you want to delete and click Delete Checkpoint Subtree.
How to enable or disable checkpoints
Using Hyper-V Manager, you can manually set up whether you want checkpoints to be taken off this VM or not. For this purpose, do the following:
- Open Hyper-V Manager, right-click the name of the needed VM, and click Settings.
- In the Management section, find the Checkpoints option and select it.
- In the right pane, you will see the Enable Checkpoints checkbox. You can either select or deselect it in order to enable or disable checkpoints.

- Click Apply.
How to set up a checkpoint location
Hyper-V allows you to configure where the checkpoint configuration and checkpoint saved state files will be stored. To set up a checkpoint location, follow the steps below:
- Open Hyper-V Manager, right-click the name of the required VM, and click Settings.
- In the Management section, find the Checkpoints option and select it.
- In the right pane, find the Checkpoint File Location section and click Browse, or manually enter the path to the folder where the checkpoint files will be stored.
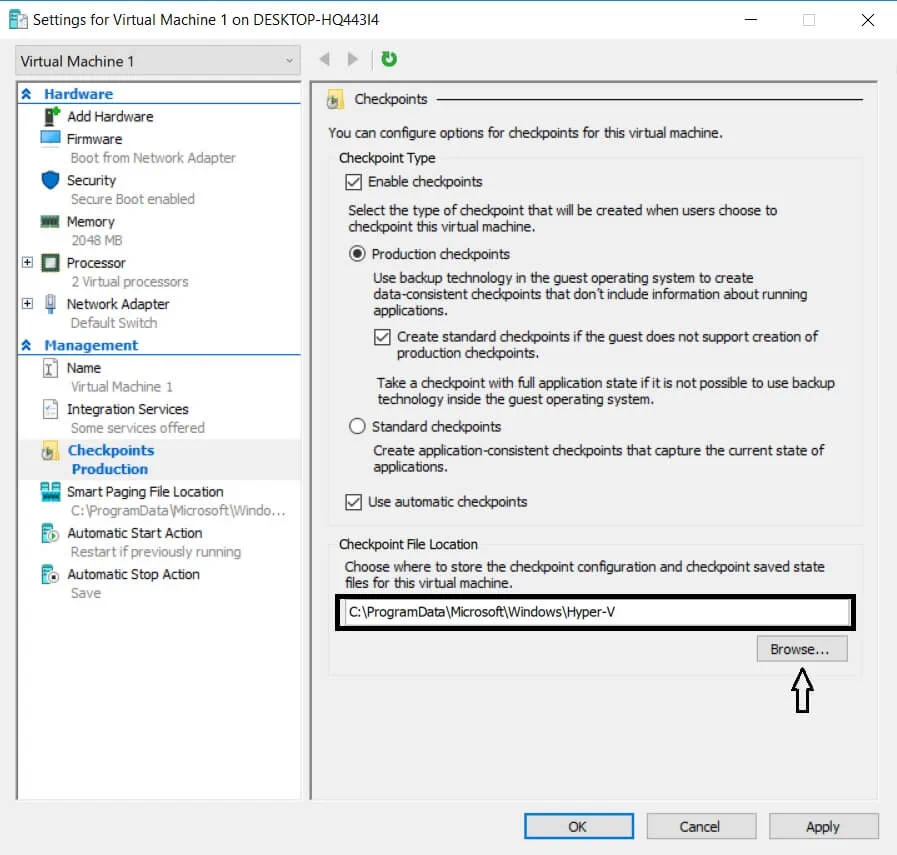
- Click Apply.
How to rename checkpoints
The standard checkpoint name includes the name of the VM, the date, and the time when the checkpoint was created (e.g. Virtual Machine – (1/5/2019 – 8:17:35 AM)). To make it more distinguishable, you can rename the selected checkpoint using either Hyper-V Manager or PowerShell.
Using Hyper-V Manager
- Open Hyper-V Manager and select the required VM.
- Right-click the needed checkpoint and select the Rename option, which appears in the drop-down menu.
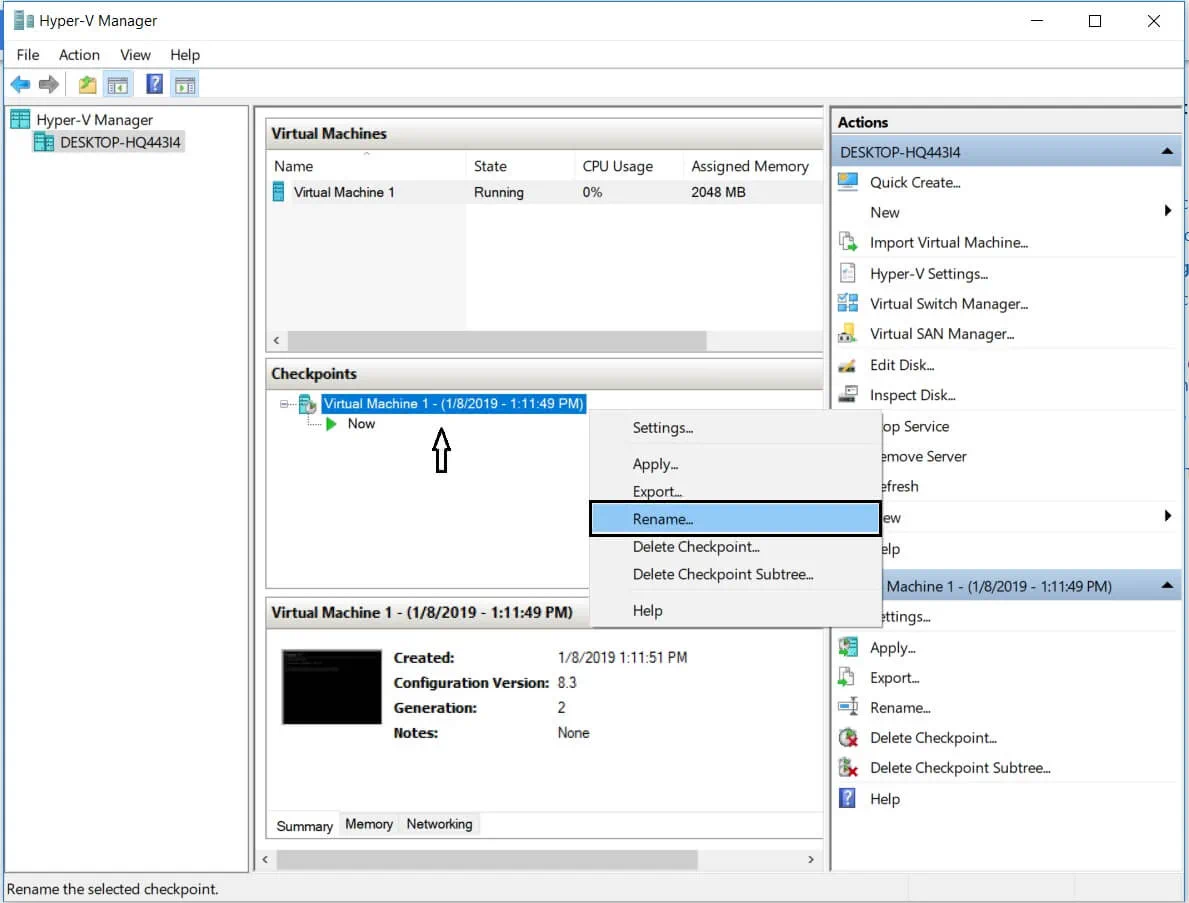
- Type in the new checkpoint name and click ENTER.
Using PowerShell
To rename the checkpoint in the PowerShell CLI, run the following command: Rename-VMCheckpoint -VMName <virtual machine name> -Name <checkpoint name> -NewName <new checkpoint name>.
Hyper-V Backup Best Practices with NAKIVO Backup & Replication
Even though Hyper-V checkpoints are used for saving the VM state at a particular point in time, they still do not provide the same level of data protection as backups. Checkpoints can pile up with time and lead to storage overhead. Checkpoints are stored in the production datastore, meaning that if the datastore gets damaged, checkpoints will be lost as well. Moreover, checkpoints can also negatively affect server performance due to increased I/O demands of having multiple checkpoints. Therefore, checkpoints can’t really be considered a reliable means of data protection and recovery.
To ensure that your data is securely protected, consider installing NAKIVO Backup & Replication, which is an efficient as well as reliable data protection solution. The product allows you to run Hyper-V backup, requiring minimal input on your part.
The following excerpt will describe the best approaches to backing up Hyper-V with NAKIVO Backup & Replication.
Create backup copies
NAKIVO Backup & Replication can be easily integrated with Hyper-V environments of any complexity, thus ensuring native Hyper-V backup. With the use of Microsoft’s Volume Shadow Copy Service (VSS), the product can create application-aware backups for Microsoft Exchange, Active Directory, SQL, and other applications. Moreover, Hyper-V backups are agentless, meaning that you can back up live VMs without disrupting your production environment.
However, Hyper-V backups can get accidentally lost or damaged, leaving no hope for recovery. To deal with such issues, NAKIVO Backup & Replication provides the opportunity of creating backup copies. Backup copy jobs can create copies of backups and send them from one backup repository to another, without involving source VMs. You can create multiple backup copies of a single backup and send them for storage to one or multiple locations.
Enable Resilient Change Tracking
To perform backup jobs in Hyper-V environments as fast as possible, NAKIVO Backup & Replication applies Hyper-V’s native Resilient Change Tracking (RCT) technology. Backup jobs in NAKIVO Backup & Replication are forever-incremental, meaning that only the initial backup is full, whereas all subsequent backups are incremental. RCT identifies the VM data that has changed since the previous backup and stores only unique data blocks to your backup repository. This allows you to increase the speed of backup jobs and optimize the use of storage space.
Send backups offsite
As mentioned above, you can keep backups and backup copies locally or you can send them offsite. The primary condition is that the secondary location should have an Internet connection to ensure fast and reliable data transfer. NAKIVO Backup & Replication guarantees that the process is safe because backup data can be transferred via AES 256 encrypted link, which ensures that only authorized users can access the data.
Moreover, you can use public clouds (Amazon Web Services or Microsoft Azure) for storing your Hyper-V backups and their copies. Even if a disaster affects your production center, you can be sure that the data stored in the cloud is safe and can be easily accessed from anywhere and at any time. Moreover, cloud environments can be easily scaled up or down, depending on your storage space requirements.
Check data integrity with backup verification
In the process of creating Hyper-V backups, there is a possibility of backup jobs getting corrupted or damaged. However, checking the state of VM backups manually can be an extremely challenging task. To this end, NAKIVO Backup & Replication has introduced the feature of block-level backup verification.
This feature is used to check VM backups at the block level and verify that the data stored in the backup repository is identical to the data stored in the source VM. The product reads each data block in a backup repository, makes a hash of each data block, and then identifies whether the new hashes match the original ones that were created during the backup. Even though this process can be time-consuming, by following it, NAKIVO Backup & Replication can prove that VM backups are functional and can be easily recovered if needed.
Moreover, NAKIVO Backup & Replication includes the feature of near-instant backup verification, also known as screenshot verification. After the backup job is completed, the product recovers the VM, disables networking, makes a screenshot of the test-recovered VM’s OS, and then discards it. The results can be viewed in the solution’s interface or received in an email report with the attached screenshot. Screenshots of test-recovered VMs serve as proof of their recoverability and data integrity.
Schedule backup jobs
If you have a large virtual environment, managing all backup jobs at once can be extremely difficult and resource-intensive. To lighten the unnecessary burden, NAKIVO Backup & Replication allows you to perform jobs not only on demand, but also on schedule. Backup jobs can be set up to run daily, weekly, monthly, or yearly. Alternatively, you can create a custom periodic schedule, which allows you to run jobs every 20 minutes or every three days, depending on your needs.
Even though NAKIVO Backup & Replication can run more than one Hyper-V backup job at once, it is better to avoid any overlaps during the jobs. To see all past, current, and future backup jobs, use our Calendar Dashboard feature. This way you can ensure that all your Hyper-V backup jobs run as planned and they are properly scheduled. Calendar Dashboard is an easy-to-use feature which helps you properly structure your backup jobs and improve the overall performance of you virtual infrastructure.
Encrypt backup data
To ensure that your backup data is securely protected both in flight and at rest, NAKIVO Backup & Replication applies AES 256 encryption when transferring the data over the network, or when the data is stored in the backup repository. This feature allows to protect created Hyper-V backups against an unauthorized access and ensures that VM data will not get corrupted by hackers.
Set up backup policies
NAKIVO Backup & Replication has recently introduced the feature of policy-based data protection, which minimizes the level of manual VM management. This is especially challenging in large-scale virtual environments, with multiple jobs running at the same time. With policy-based data protection, you can set up policies that can scan your infrastructure on a regular basis and automatically protect VMs that match policy rules. The policy rules can include the VM name, size, location, power state, configuration, or a combination of these parameters. This feature lets you save considerably on time and effort.

Conclusion
Hyper-V checkpoints are extremely useful when it comes to backing up your virtual infrastructure. Creating checkpoints allows you to revert the VM to a previous state so as to discard all the unwanted configuration changes and updates, which have caused issues within the system.
However, checkpoints can’t be regarded as a substitute for backups. Unlike backups, Hyper-V checkpoints can’t be used for long-term data protection and they do not guarantee the system recovery if too many items have been changed. Therefore, it is advisable to find a reliable and efficient data protection software which provides a full-fledged tool set for a fraction of the price.