How to Merge Hyper-V Snapshots: A Step-By-Step Guide
There are times when you need to install OS updates or security patches on one of your guest virtual machines (VMs). However, the update process can sometimes go wrong, resulting in a system failure, loss of configuration data, or the uninstallation of certain programs. Microsoft Hyper-V has provided the opportunity to create Hyper-V snapshots, which allow you to save the VM state at a particular point in time and roll back the system to its previous state if a system error occurs.
In this blog post, we will describe how to merge Hyper-V snapshots using Hyper-V Manager or PowerShell and how they can be used. However, to learn how to manage Hyper-V snapshots, you first need to understand the technology behind them.

What Is a Hyper-V Snapshot?
A Hyper-V snapshot is a point-in-time copy of a VM, which contains all the information required to restore your data. With the use of Hyper-V snapshots, you can revert the VM to a point when the VM state was captured and the snapshot was taken. Hyper-V snapshot technology is enabled by default when the Hyper-V role is installed on your computer and your first VM is created. Hyper-V snapshots of a selected VM can be taken in any state (Off, Running, Paused, and Saved) and the operation is typically complete in a few seconds.
Note that Hyper-V snapshots are currently known as Hyper-V checkpoints, but both of these terms are equally valid.
Types of Hyper-V Snapshots
Microsoft Hyper-V provides two types of snapshots:
- Production snapshots apply backup technology inside the guest OS to create data-consistent snapshots of the VM. For this purpose, Windows Volume Shadow Copy Service (VSS) or Linux File System Freeze are used. Hyper-V production snapshots can be used to capture the state of the production environment as they improve data consistency of applications and the guest OS. Note that Hyper-V production snapshots do not capture the VM memory state, the information about its CPU activity, or hardware configuration.
In the new OS versions (Windows Server 2016 and Windows 10), production checkpoints are the default option for the checkpoint type. However, you can change it in Hyper-V Manager or Windows PowerShell.
- Standard snapshots capture the VM state, including its CPU activity and memory, and hardware configuration at a specific point in time. Thus, a standard Hyper-V snapshot allows for capturing the current state of applications and rolling back the VM to a specific point-in-time state or condition. They are mostly applicable in development and test scenarios. Creating Hyper-V standard snapshots can’t be considered a reliable backup strategy as they might cause some data inconsistency issues in applications that are not VSS-aware.
How Hyper-V Snapshots Work
As you know, Hyper-V VMs are stored in the virtual disks, which are of the .vhd(x) file format. At the same time, snapshot files created on those Hyper-V VMs are stored in the .avhd(x) file format and they are kept in the same folder as a hard disk image file. Hyper-V snapshots are basically differencing virtual disks and each of them has a parent-child relationship with the corresponding parent virtual hard disk. You can create up to 50 snapshots for each VM. All Hyper-V snapshots are organized in a hierarchical order, thus constituting a checkpoint subtree.

However, the problem is that .avhd(x) files have a tendency to pile up and take up a lot of disk space, which consequently affects VM performance. If you want to remove unnecessary .avhd(x) files, you need to delete Hyper-V snapshots. This option doesn’t imply that you are actually deleting the snapshots. Instead, you simply merge Hyper-V snapshots and the data which they contain into a parent disk or another virtual disk. It is not recommended that you delete Hyper-V snapshots directly from the computer. After you merge Hyper-V snapshots, all .avhd(x) files will be deleted from the disk. This way, you can create additional space on your Hyper-V host.
How to Merge Hyper-V Snapshots
In one of our previous blog posts, we have covered how to manage Hyper-V snapshots (create, apply, rename, enable/disable, etc.). However, today’s blog post serves as a guide to manually merging Hyper-V snapshots.
In order to merge Hyper-V snapshots, you need to use either Hyper-V Manager or PowerShell. Both of these approaches will be described below.
Using Hyper-V Manager
Before we start to describe how to merge Hyper-V snapshots, we should first determine which snapshots will be merged. Hyper-V snapshots should be merged in a specific order: from child to parent. Therefore, it is important to establish the structure of the checkpoint tree by establishing the order of their creation: from the newest to the oldest ones.
As mentioned above, each snapshot has a parent-child relationship with another snapshot that was created before it. All of them combined can be represented in the form of a chain. For example, 3 snapshots were created for 1 virtual hard disk. The main virtual disk on which the VM is running acts as a parent of the first checkpoint, this checkpoint acts as a parent of the second checkpoint, and the second checkpoint acts as a parent of the third checkpoint.
To establish the checkpoint structure, take the following steps:
- Open Hyper-V Manager.
- In the center pane, select the VM whose snapshots you want to be merged.
- In the Actions section on the right, click Inspect Disk.
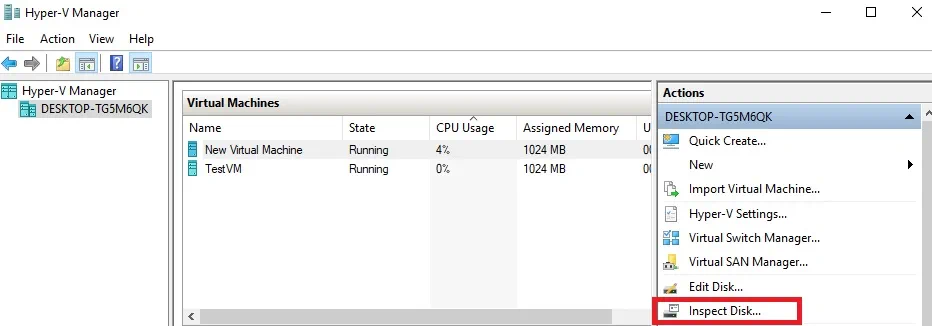
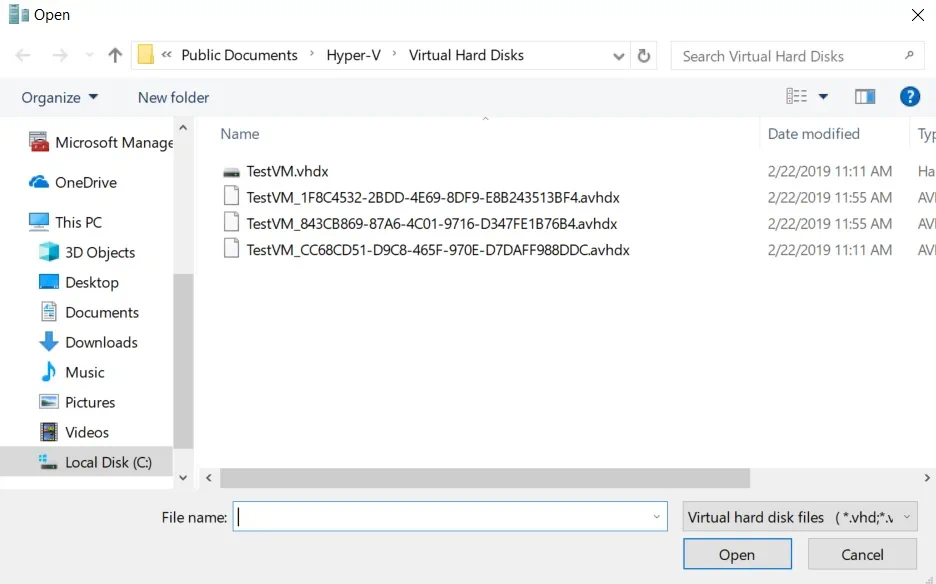
- Select the .avhd(x) file and click OK.
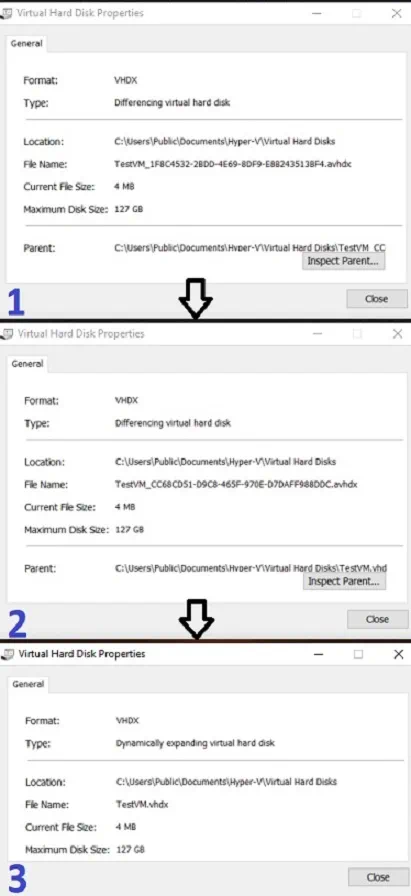
- Next, you should see a general overview of the virtual hard disk properties, including its name, location, and the parent’s name. Determine the parent of the selected .avhd(x) file.
- Repeat steps 3-5 for each .avhd(x) file and identify their order for merging.
After that, you can start the process of merging Hyper-V snapshots. Note that your VM must be turned off to avoid any issues during the merging operation.
To merge Hyper-V snapshots, do the following:
- Open Hyper-V Manager.
- Select the required VM.
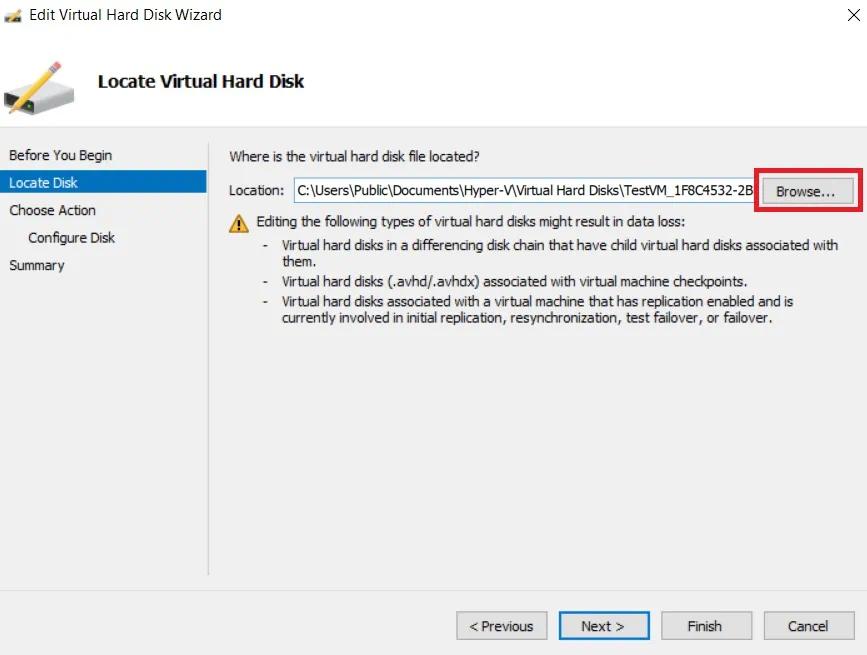
- Click Edit Disk. The Edit Virtual Hard Disk Wizard will open. Click Next.
- Click Browse to select the latest .avhdx file. Click Next.
- Select Merge to merge the changes stored in a differencing disk into the parent or another disk. Click Next.
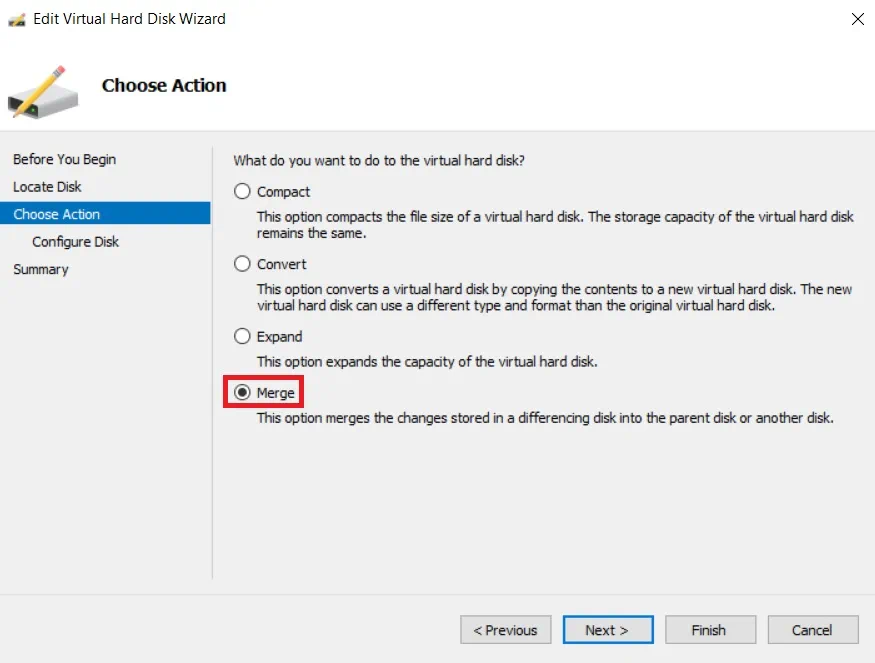
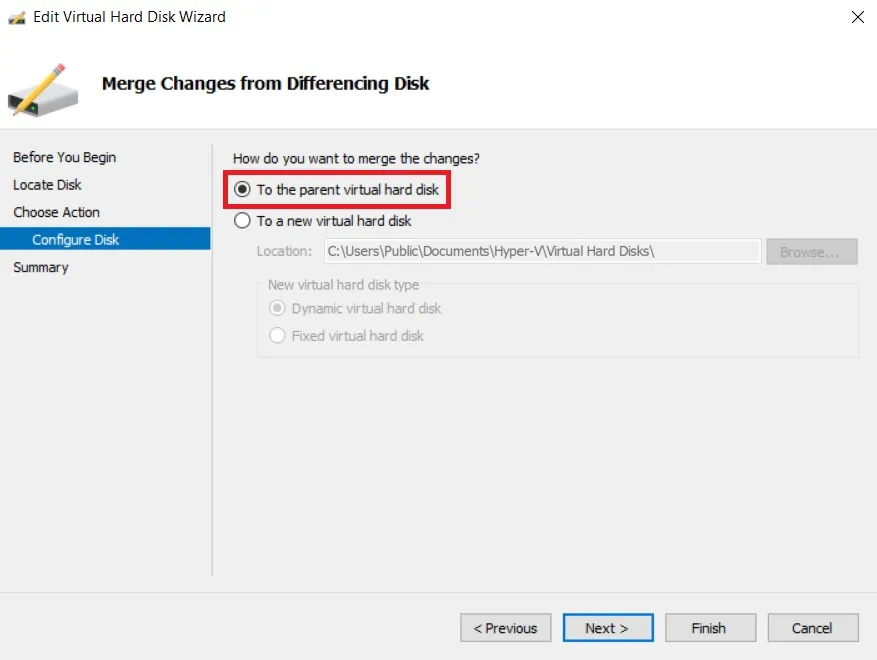
- Select To the parent virtual hard disk and click Finish.
- To fully complete the process of merging Hyper-V snapshots, repeat steps 1-5 for each .avhd(x) file, until all of the changes have merged into the original parent disk.
- The final step is to reboot the VM to adopt the implemented changes.
Using PowerShell
Before you can start to merge Hyper-V snapshots, ensure that your computer has the Merge-VHD cmdlet enabled. If not, the following error will appear on the screen:
The term 'Merge-VHD' is not recognized as the name of a cmdlet, function, script file, or operable program.

Check the spelling of the name, or if a path was included, verify that the path is correct and try again.
To remove this issue, open PowerShell as an Administrator and run the following command:
Enable-WindowsOptionalFeature -Online -FeatureName Microsoft-Hyper-V-Management-PowerShell
If everything is correct, you should see the following:

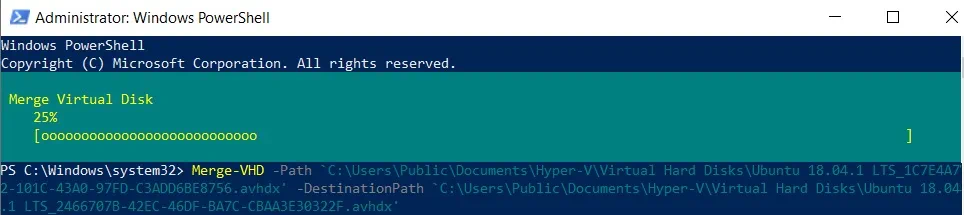
Now, you are ready to run the Merge-VHD cmdlet. Note that this operation is conducted offline.
To merge Hyper-V snapshots, run this cmdlet:
Merge-VHD Path = '' DestinationPath = ''
In this case, the data from several child disks, beginning from the newest one, can be merged into the oldest parent disk. On the screen, you will see the following:
After the operation is complete, shut down the guest VM and reboot the system. Unlike Hyper-V Manager, which requires you to merge each layer of the disk chain separately, PowerShell allows you to perform such a complex operation with a single command.
Why You Should Use Hyper-V Snapshots
Hyper-V snapshots allow for saving the state of the VM before applying configuration changes, installing new software, running any OS updates, upgrading security patches, etc. If you are about to perform an operation that might change your virtual infrastructure or there’s a high risk of it failing, create a Hyper-V snapshot of your VM beforehand. It will serve as a safety net in case something goes wrong and you need to revert the system to it previous state.
However, Hyper-V snapshots deliver the best results when used in development and testing environments. They are not an effective and reliable backup alternative and we do not recommend using them in the production environment. Instead, consider using a full-featured Hyper-V backup solution, which includes multiple data protection options and can save you considerable time, money, and effort spent when compared with traditional infrastructure maintenance.