How to Manage AWS EC2 Instances via AWS Command Line Interface
AWS provides a convenient web interface called AWS Management Console. You can use this console to perform all needed operations in the AWS cloud. However, performing many identical operations in the web interface can be repetitive and time-consuming. In this case, you can use AWS CLI to automate AWS management tasks and perform bulk operations. This blog post covers the installation of AWS CLI and the basics of using this tool. The post also focuses on AWS CLI EC2 commands illustrated with examples.

What Is AWS CLI
Amazon Web Services Command Line Interface (AWS CLI) is an open source command line tool for managing environments in the Amazon cloud. This tool works through integration with the command line shell of the operating system on which AWS CLI is installed. You can manage AWS EC2 instances with AWS EC2 commands, as well as manage EBS volumes, S3 buckets, and other Amazon services.
AWS CLI is run in a Linux command line shell, macOS terminal, Windows command prompt (CMD), and PowerShell. This CLI allows you to create scripts and automate your tasks.
There are two main versions of AWS CLI:
- AWS CLI version 1 is the old version available for backward compatibility. This version is supported, but new features may not be available.
- AWS CLI version 2 is the latest version that supports all available features of AWS. It is recommended that you install the latest version.
Both versions use the same aws command to run AWS CLI. However, there are changes that can make it not possible to use scripts made for AWS CLI v1 in AWS CLI v2.
Requirements
Now let’s look at the requirements you should meet for using AWS CLI.
General requirements
- You need to have an AWS account and AWS access keys (AWS Access Key ID and AWS Secret Access Key).
- Python 2 version 2.6.5+ or Python 3 version 3.3+ must be installed. AWS CLI v2 has an embedded copy of Python, and you don’t need to install Python manually to install AWS CLI v2.
Linux
- A tool to extract zip archives
- glibc, groff, and less must be installed
Windows
- Windows XP or later
- Administrator rights on the Windows machine
macOS
- 64-bit macOS version supported by Apple
Installation
You need to install AWS CLI before you can run commands to manage AWS EC2 instances and other Amazon services. Let’s look at how to install AWS CLI version 2 on different operating systems.
Installing AWS CLI on Linux
There are three methods to install AWS CLI on Linux:
- Using the bundle installer (the official method)
- Using Linux software repositories
- Installing AWS CLI as a Python module
Amazon recommends that you use the official method to install AWS CLI. In this case, you always get the latest version of the software. I am using Ubuntu 20 in this workflow.
Using the official installer archive
This is the preferred method to install AWS CLI. Proceed as follows:
- Install curl:
apt-get install curl
- Download the AWS CLI installer archive:
curl “https://awscli.amazonaws.com/awscli-exe-linux-x86_64.zip” -o “awscliv2.zip”
- Extract the bundled installer files from the downloaded archive:
unzip awscliv2.zip
- Run the installer with the root privileges:
sudo ./aws/install
- After the installation has completed, check the version of the installed AWS CLI tool to make sure that this tool has been installed successfully:
aws –version
Using Linux software repositories
AWS CLI is available in official software repositories for Ubuntu. Proceed as follows:
1. Update the repository tree:
sudo apt-get update
2. Install AWS CLI with a package manager from Linux software repositories:
sudo apt-get install awscli
3. Verify that AWS CLI has been installed successfully:
aws –version
Installing with Python PIP
You can install AWS CLI as a Python module by using a Python PIP package manager. Note that Python PIP is not installed on Ubuntu by default. Proceed as follows to install as the Python module:
1. You need to install Python PIP first.
- For Python 2.x:
sudo apt-get install python-pip
- For Python 3.x:
sudo apt-get install python3-pip
2. Install AWS CLI by using Python PIP.
- Using Python 2.x PIP:
pip install awscli –upgrade –user
- Using Python 3.x PIP:
pip3 install awscli –upgrade –user
3. Check the installed version.
- In Python 2.x:
python -m awscli –version
- In Python 3.x:
python3 -m awscli –version
Note: If you use AWS CLI installed with Python PIP, the commands you should use differ from the standard main aws command used for a packaged version of AWS CLI:
- Packaged version:
aws
- Module for Python 2:
python -m awscli
- Module for Python 3:
python3 -m awscli
Installing AWS CLI on Windows
To install AWS CLI in Windows, you need to download the installer, install AWS CLI, and make post installation configuration in Windows.
Download the installer
Download the 64-bit AWS CLI installer by using one of the links below and save the file to a custom location, for example, C:\temp\
- The 64-bit installer is available in AWS: https://awscli.amazonaws.com/AWSCLIV2.msi
- The 32-bit installer is available at this link: https://s3.amazonaws.com/aws-cli/AWSCLI32PY3.msi
- The universal installer file is available here: https://s3.amazonaws.com/aws-cli/AWSCLISetup.exe
I use Windows Server 2016 in this example and download the AWSCLIV2.msi file.
You can download the installer file in PowerShell with the command:
Invoke-WebRequest -Uri https://awscli.amazonaws.com/AWSCLIV2.msi -OutFile “C:\temp\AWSCLIV2.msi”
Launch the installer
Launch the downloaded AWSCLIV2.msi file.
If you use PowerShell, note that the .msi file location (C:\temp\ in my case) and run the command:
C:\temp\AWSCLIV2.msi

Follow steps of the installation wizard. You can use default settings for installation. The installation process is straightforward, so I won’t go over each step of the wizard.
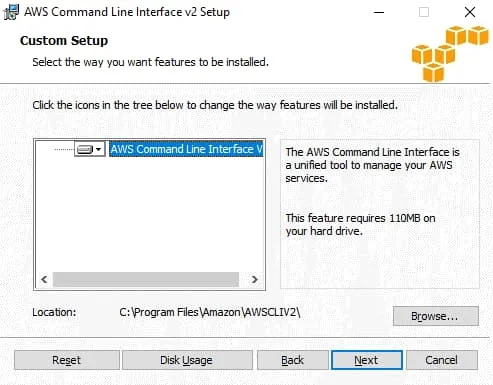
If you try to run the aws –version command to check whether AWS CLI has been installed successfully, you can get an error. This is because there is no entry related to the AWS CLI tool in the PATH environment variable. Now you can change the directory to the directory in which AWS CLI is installed (C:\Program Files\Amazon\AWSCLIV2 by default) and run AWS CLI manually.
cd “C:\Program Files\Amazon\AWSCLIV2”
.\aws –version
![]()
Configure PATH
Add the entry to the PATH variable because changing the directory in the command line manually each time when you need to run AWS CLI commands is not convenient.
Using the Windows GUI
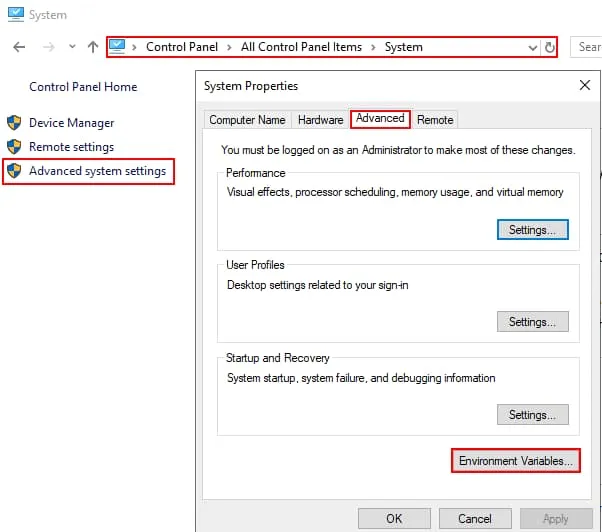
1. Open Control Panel > System > Advanced system settings, and in the Advanced tab of the System Properties window, click Environment Variables.
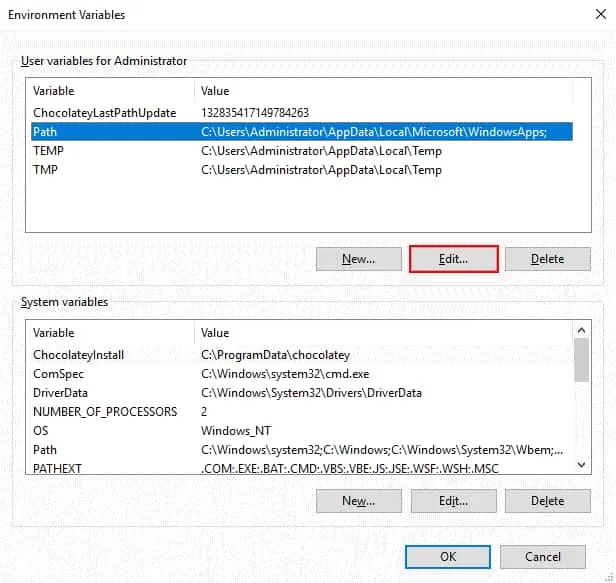
2. In the Environment Variables window, select the PATH variable and click Edit. Note that there are options to edit User variables for Administrator and System variables.
3. In the Edit environment variable window, click New.
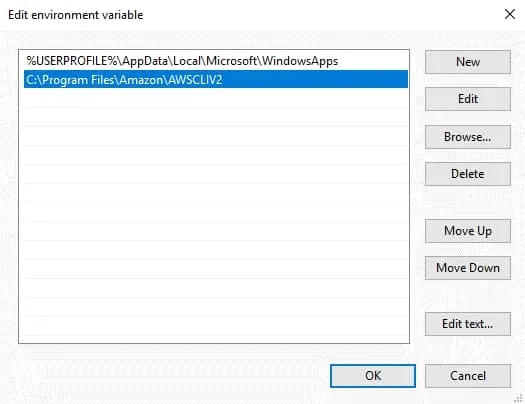
4. Specify the path of the directory where AWS CLI is installed and press Enter. In my case, this directory is “C:\Program Files\Amazon\AWSCLIV2”.
5. Hit OK to save settings and close the windows.
Note: you may need to reopen the console window (PowerShell or CMD) for the changes to take effect.
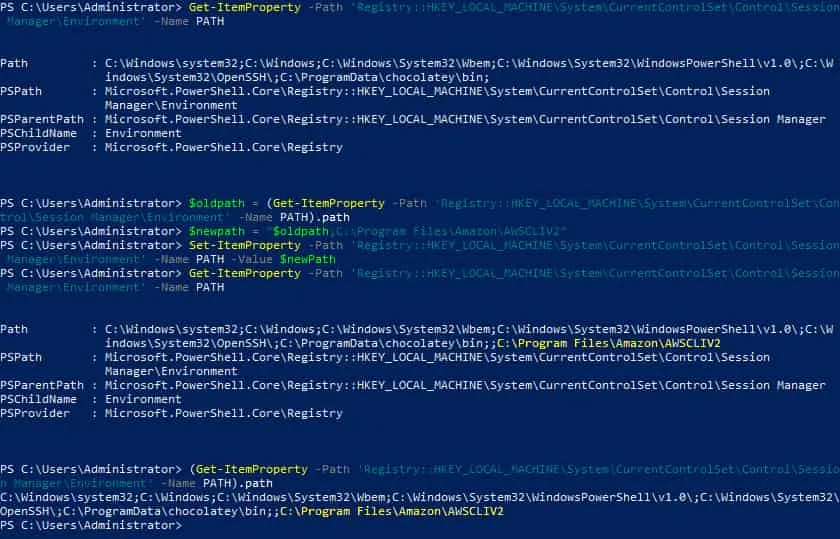
Using PowerShell
You can also edit environment variables in PowerShell. Follow these steps to add a value to the PATH variable in PowerShell.
1. Capture the original PATH value that you want to modify:
$oldpath = (Get-ItemProperty -Path ‘Registry::HKEY_LOCAL_MACHINE\System\CurrentControlSet\Control\Session Manager\Environment’ -Name PATH).path
2. Define the new PATH by adding the needed value. In my case, the value that I need to add is the path to the AWS CLI directory. The semicolon (;) character is used as a separator between path values in the PATH variable.
$newpath = “$oldpath;C:\Program Files\Amazon\AWSCLIV2”
3. Apply the value to the Windows Registry to make changes permanent:
Set-ItemProperty -Path ‘Registry::HKEY_LOCAL_MACHINE\System\CurrentControlSet\Control\Session Manager\Environment’ -Name PATH -Value $newPath
4. Check whether the new PATH configuration is correct:
Get-ItemProperty -Path ‘Registry::HKEY_LOCAL_MACHINE\System\CurrentControlSet\Control\Session Manager\Environment’ -Name PATH
or
(Get-ItemProperty -Path ‘Registry::HKEY_LOCAL_MACHINE\System\CurrentControlSet\Control\Session Manager\Environment’ -Name PATH).path
Using Chocolatey
As an alternative to downloading and running the MSI installer file, you can install AWS CLI with Chocolatey, which is a Windows software management tool running in PowerShell. Chocolatey supports installing applications from Windows online repositories. Run this command to install AWS CLI:
choco install awscli
Check installation results
Now you can run the aws command (and related AWS EC2 commands) from any directory in PowerShell.
aws –version
![]()
Note: If you have AWS CLI version 1 and AWS CLI version 2 installed on your operating system, your operating system executes the first one set in the PATH variable.
Installing AWS CLI on macOS
Perform the following steps to install AWS CLI on macOS.
Go to the /tmp/ directory, which will be used to store downloaded files:
cd /tmp
Method 1
- Download the installer file:
curl -o awscli.zip https://s3.amazonaws.com/aws-cli/awscli-bundle.zip - Extract contents from the downloaded zip archive:
unzip awscli.zip - Install AWS CLI:
sudo ./awscli-bundle/install -i /usr/local/aws -b /usr/local/bin/aws
Method 2
- Download the installer package:
curl “https://awscli.amazonaws.com/AWSCLIV2.pkg” -o “AWSCLIV2.pkg” - Run the installer:
sudo installer -pkg AWSCLIV2.pkg -target / - You can run the following command to make sure that AWS CLI has been installed successfully:
aws –version
Initial AWS CLI Configuration
Now you need to specify AWS credentials, and configure region and output parameters. Run the command below to configure AWS CLI. The syntax of AWS CLI commands is the same on Linux, Windows, and macOS. In my example, I am using Ubuntu Linux.
aws configure
Specify four parameters (the first two are required):
- AWS Access Key ID, which is a 20-character alphanumeric string. Letters are uppercase.
- AWS Secret Access Key, which is a 40-character alphanumeric string like a hash.
- Default Region name. Select this parameter if you don’t need to specify a region explicitly each time when running commands in AWS CLI. If you need to use a region different from your default region, you can specify the needed region in a command manually. Use –region <region_name> for this purpose.
- Default output format. There are three options: json, text, table, yaml, yaml-stream. JSON (JavaScript Object Notation) is used by default. You can select the needed format when running a particular command by using –output <output-format>.

AWS CLI configuration files are saved in the home directory. You can check these files with the command:
ls -l ~/.aws
The region and output settings are stored in the config file. Credentials (AWS Access Key ID and AWS Secret Access Key) are stored in the credentials file.
General Usage and Tips
Let’s get familiarized with general usage recommendations and tips for AWS CLI before going to practical AWS CLI for EC2 examples.
AWS CLI command structure
You can compose an AWS CLI command in two ways: using one line or using multiple lines.
Regular structure
A regular command structure presumes that you compose a command as a one-line command.
aws [options and parameters]
Where:
aws is the base command to call the aws program
is the top level command that corresponds to the appropriate AWS service, for example, EC2 or S3.
specifies the operation to perform such as get object, describe instances, etc.
[options and parameters] specifies options and parameters for the operation.
Multi-line command structure
Sometimes using a multi-line command structure can be more convenient if you need to specify multiple options and parameters.
aws \
[options and parameters] \
[options and parameters]
The wait command
You can use the wait command to pause execution of the entire command for resuming the operation when it is ready to run and when all conditions are satisfied.
aws wait [options and parameters]
Example:
aws ec2 wait instance-status-ok \
–instance-ids i-1234567890abcdef0
Command completion
Enable command completion. Command completion makes entering commands faster and more convenient. Use this command to enable auto completion in Linux:
complete -C ‘/usr/local/bin/aws_completer’ aws
Verify that command completion works:
aws s[press Tab]
aws e[press Tab]
If auto-completion works, a partially entered command is completed automatically when you press Tab if there is the only command starting with the characters that you have typed. If there are multiple commands starting with the entered characters, all these commands are displayed below. You can read the list of available commands and continue to enter the needed command. Then use the Tab key for command completion.
Filters
Use filters to display only the needed data. Filtering is done on the Amazon server side. As a result, less data is sent over the network, and you get output data faster. Scripts including AWS EC2 commands and AWS CLI filters work faster.
AWS help
Use the help command to display available commands and options.
aws help
aws help
aws help
Parsing JSON
Use jq, which is a lightweight utility for processing JSON data.
jq is the analog of sed to transform the input stream but for a JSON format. You can install jq as the JSON parsing tool with the command:
apt-get install jq
By default, you can use the built-in –query option to parse the JSON returned by the executed command.
Remote access
You can connect to a Linux machine on which AWS CLI is installed via SSH and run commands to manage your services in the Amazon cloud.
AWS EC2 Commands in AWS CLI
Now that you have installed AWS CLI and are familiarized with AWS CLI tips, you can run AWS CLI EC2 commands to view information about AWS EC2 instances and manage them. Let’s now go over practical examples for using the command line interface in AWS.
Describe AWS EC2 instances
You can use AWS EC2 commands in AWS CLI to describe Amazon components (get information about them) for your account without performing any actions with them. AWS CLI describe instances commands help you check the state of AWS EC2 instances, EBS volumes, Amazon machine images, and other components. You can also use the provided functionality for monitoring.
Example 1
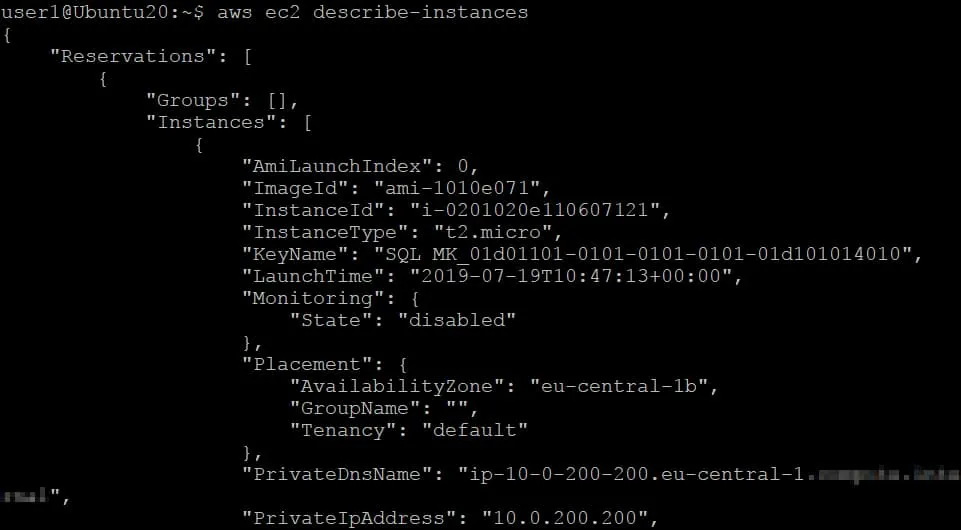
Let’s start from this simple command to display information about existing Amazon EC2 instances:
aws ec2 describe-instances
This command returns data that describes all AWS EC2 instances in the output by using a JSON format (because we have set JSON as the default format earlier). As a result, we have a big array of data, including metadata. This output is not practical for users to read but is practical for scripting and applications.
Press the down arrow key to scroll down the data in the console/terminal window.
Press q to exit the viewer mode (similarly as when you use less).
Example 2
We can display full information only for one instance by using the instance ID with the command:
aws ec2 describe-instances \
–instance-ids i-0201020e110607121
Example 3
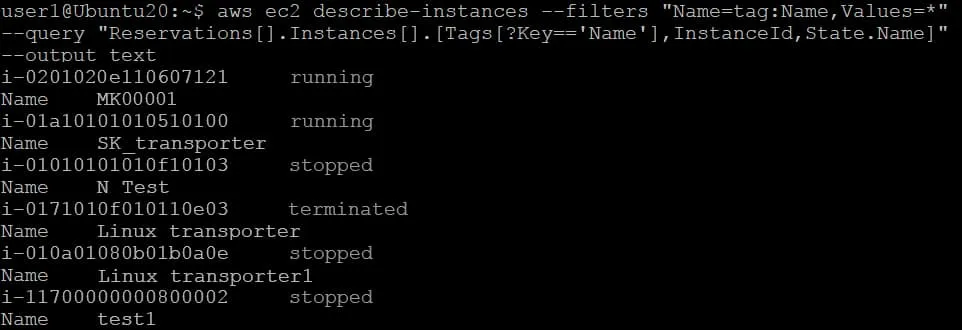
Now we are going to check the instance IDs, their names, and state for all available instances in our region. We can display only the needed data with the command using AWS CLI filters and the –query option. This AWS CLI filters example contains the –filter option that returns the requested filtered data. We use the –output text option to display the result as text.
aws ec2 describe-instances –filters “Name=tag:Name,Values=server*” –query “Reservations[].Instances[].[Tags[?Key==’Name’],InstanceId,State.Name]” –output text
Compared to the unfiltered output, which contains all available data for all instances, filtered output is more convenient and can be read by users.
Example 4
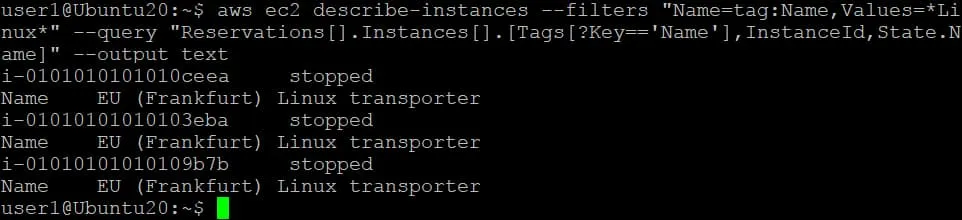
Now let’s filter AWS EC2 instances once again and display only instances with “Linux” in the name by using an AWS CLI filter.
aws ec2 describe-instances –filters “Name=tag:Name,Values=*Linux*” –query “Reservations[].Instances[].[Tags[?Key==’Name’],InstanceId,State.Name]” –output text
In the screenshot below, you see the command output after using the command with EC2 instances filter. I have found three Linux instances with the NAKIVO Backup & Replication Transporter installed. The Transporter is a component for transferring data when performing AWS backup and AWS disaster recovery operations.
Example 5
You can describe instances of particular AWS EC2 instance types. In this example, I run the command to display instances of the t2.micro type:
aws ec2 describe-instances \
–filters Name=instance-type,Values=t2.micro
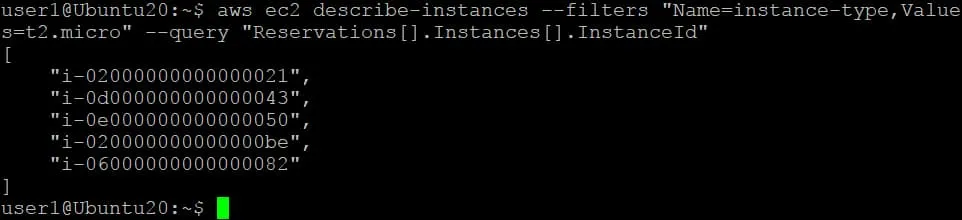
Example 6
Use an EC2 instance filter to display only instance IDs.
aws ec2 describe-instances –filters “Name=instance-type,Values=t2.micro” –query “Reservations[].Instances[].InstanceId”
Example 7
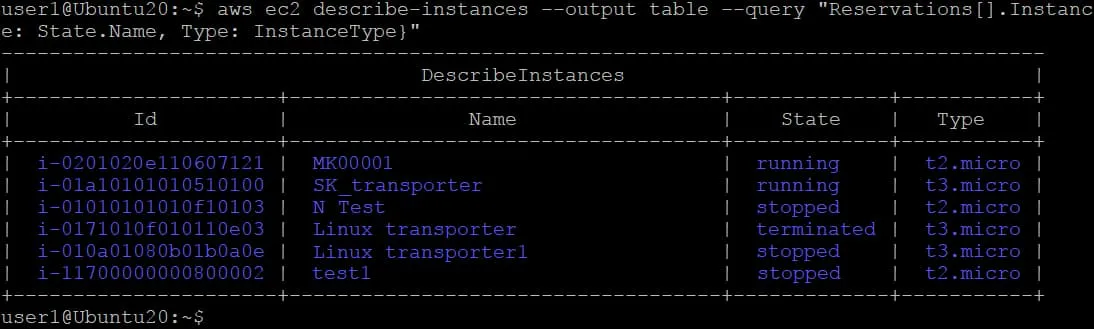
As an alternative you can use the table view for the output data by adding the –output table option. Below you can see the command with an AWS CLI filter to display the instance ID, name, state, and type of AWS EC2 instances as a table.
aws ec2 describe-instances –output table –query “Reservations[].Instances[].{Name: Tags[?Key == ‘Name’].Value | [0], Id: InstanceId, State: State.Name, Type: InstanceType}”
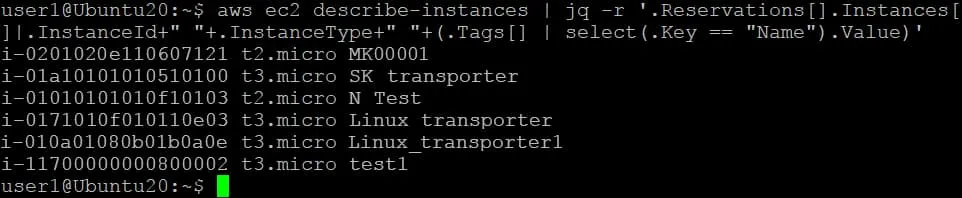
Example 8
There is another command for displaying the output data (instance ID, type, and name) for AWS EC2 instances in a convenient view:
aws ec2 describe-instances | jq -r ‘.Reservations[].Instances[]|.InstanceId+” “+.InstanceType+” “+(.Tags[] | select(.Key == “Name”).Value)’
Example 9
Check the external IP address of a running instance:
aws ec2 describe-instances –instance-ids i-0201020e110607121 –query “Reservations[].Instances[].PublicIpAddress”

To check the external IP addresses of multiple AWS EC2 instances, define instance IDs for the instances by separating them with a space.
Example 10
Check the stopped instances and a reason for each instance to stop with the command that includes the AWS CLI filter:
aws ec2 describe-instances –filters Name=instance-state-name,Values=stopped
There is an alternative example:
aws ec2 describe-instances –filters Name=instance-state-name,Values=stopped –region eu-west-1 –output json | jq -r .Reservations[].Instances[].StateReason.Message
Example 11
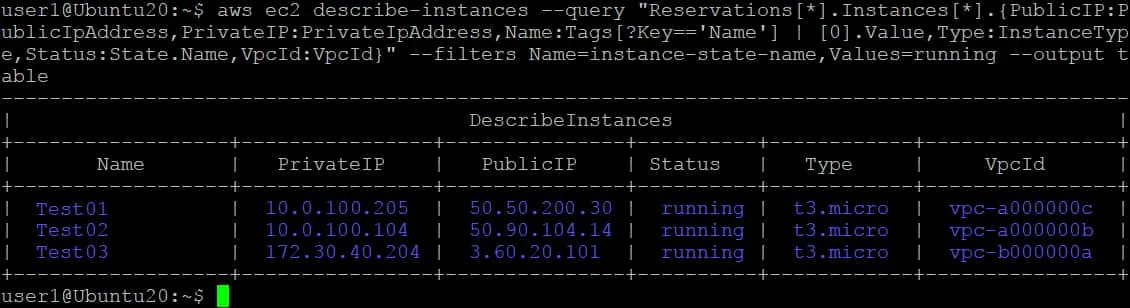
This is the command to list running Amazon EC2 instances with more details, including the instance name, private IP address, Public IP address, status, type, and VpcID as a table:
aws ec2 describe-instances –query “Reservations[*].Instances[*].{PublicIP:PublicIpAddress,PrivateIP:PrivateIpAddress,Name:Tags[?Key==’Name’] | [0].Value,Type:InstanceType,Status:State.Name,VpcId:VpcId}” –filters Name=instance-state-name,Values=running –output table
Start AWS EC2 instances
When you know the instance ID, you can start the Amazon instance by using AWS EC2 commands.
aws ec2 start-instances –instance-ids i-1a3b5c7d9ea0c1ef0
You can start multiple AWS EC2 instances by using the AWS EC2 start instances command and entering their instance IDs separated with spaces.
aws ec2 start-instances –instance-ids i-1a3b5c7d9ea0c1ef0 i-1a3b5c7d9ea0c1ef1 i-1a3b5c7d9ea0c1ef2
Stop AWS EC2 instances
You can stop one or multiple AWS EC2 instances. The syntax is similar to the syntax of the ec2 start-instances command.
The AWS CLI stop instance command for one instance is provided below:
aws ec2 stop-instances –instance-ids i-1a3b5c7d9ea0c1ef0
The AWS CLI stop instance command for multiple (three) instances is the same, but you need to specify multiple IDs of AWS EC2 instances separated by spaces:
aws ec2 start-instances –instance-ids i-1a3b5c7d9ea0c1ef0 i-1a3b5c7d9ea0c1ef1 i-1a3b5c7d9ea0c1ef2
This is the list of possible state codes and state names in the output:
0 – pending
16 – running
32 – shutting-down
48 – terminated
64 – stopping
80 – stopped
Reboot AWS EC2 instances
With the aws ec2 reboot-instances command you can reboot one or multiple AWS EC2 instances. The logic of using this command is the same as for AWS CLI start instance and AWS CLI stop instance commands. This is the command to reboot one instance:
aws ec2 reboot-instances –instance-ids i-1a3b5c7d9ea0c1ef0
This is the command to reboot three instances:
aws ec2 reboot-instances –instance-ids i-1a3b5c7d9ea0c1ef0 i-1a3b5c7d9ea0c1ef1 i-1a3b5c7d9ea0c1ef2
Add tags
Tags allow you to classify AWS EC2 instances and identify or find them with more convenience. Let’s have a look at two AWS EC2 commands to work with tags.
Run this command to add a tag to the instance by defining the instance ID:
aws ec2 create-tags –resources i-1a3b5c7d9ea0c1ef0 –tags Key=Department,Value=Marketing
Then you can use a command to display information about the needed instances by using tags:
aws ec2 describe-instances –filters “Name=tag-key,Values=Name”
Describe EBS volumes
During the operation of Amazon EC2 instances, you may need to check information about EBS volumes, attach volumes to EC2 instances, and detach them. Below you can see some examples of AWS EC2 commands to get information about EBS volumes.
Example 1
This is a simple command to describe EBS volumes and display all the information about existing volumes for your Amazon account:
aws ec2 describe-volumes
This command is similar to the AWS EC2 describe instances command we used above. We can see detailed information for all available volumes in the output. Press the down arrow on your keyboard to scroll down and view all data. Searching for the information you need in this data array is not convenient. Use AWS CLI filters to display only the needed data.

Example 2
This an example of the AWS CLI EC2 command to display volume IDs of all EBS volumes:
aws ec2 describe-volumes –output table –query ‘Volumes[*].VolumeId’
Example 3
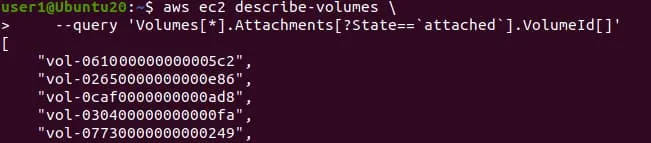
Let’s filter the Volume IDs for all Amazon EBS volumes which are in the attached state:
aws ec2 describe-volumes \
–query ‘Volumes[*].Attachments[?State==`attached`].VolumeId[]’
You can use the same logic for applying filters when running AWS CLI commands to work with EBS volumes and other AWS objects.
Example 4
You may need to view volumes that are not attached and are in the available state. In this case, use the command:
aws ec2 describe-volumes –filters Name=status,Values=available –output table
Attach EBS volumes to AWS EC2 instances
After you get the needed information about AWS EC2 instances and EBS volumes, you can attach an EBS volume to an EC2 instance with the aws ec2 attach-volume command.
Use the –device option to specify the disk name used by a guest operating system. In the example below, I use the command to attach an EBS volume as a disk drive identified as /dev/sde in guest Linux.
aws ec2 attach-volume –volume-id vol-0034567890abcdef0 –instance-id i-1a3b5c7d9ea0c1ef0 –device /dev/sde
After the EBS volume is attached to the EC2 instance, the volume state changes from “Available” to “Attached”.
Operations with snapshots
Snapshots of EBS volumes allow you to preserve the volume state and roll back to that state if needed. This is an example of the command to create a snapshot of an EBS volume:
aws ec2 create-snapshot –volume-id <your_volume_ID> –description ‘Volume Snapshot for ATA Blog via the AWS CLI’ –tag-specifications ‘ResourceType=snapshot,Tags=[{Key=Name,Value=FileServer01},{Key=Purpose,Value=Enterprise File Storage}]’
To display snapshot IDs use this command:
ec2 describe-snapshots –owner self
Check a snapshot status with the command:
aws ec2 describe-snapshots –snapshot-id <your_snapshot_ID>
If the snapshot progress is 100% and status is “completed”, then the snapshot has been created successfully.
This information allows you to select the right data protection strategy. Download the white paper to learn more.
Describe images
Similarly to AWS EC2 describe instances and volumes commands, you can use a command to describe Amazon Machine Images. This is a simple AWS CLI EC2 command to view information about Amazon Machine Images (AMI):
aws ec2 describe-images
You can view information about a particular image:
aws ec2 describe-images –image-ids ami-0034567890abc4140
Based on the displayed information you can select the needed AMI to create a new Amazon EC2 instance.
Launch new EC2 instances
You can create (run) a new instance based on the needed image by using the AWS CLI EC2 commands below.
First you need to generate keys:
aws ec2 create-key-pair –key-name MyKeyPair –output text > MyKeyPair.pem
Create a new Amazon EC2 instance with the AWS EC2 run instances command by specifying an AMI, instance type, and key pair:
aws ec2 run-instances \
–image-id ami-0abcdef1234567890 \
–instance-type t2.micro \
–key-name MyKeyPair
This is a simple example. You can define more options when creating a new EC2 instance with the AWS EC2 run instances command including:
–subnet-id
–security-group-ids
–block-device-mappings
–tag-specifications
Delete EC2 instances
The recommended practice is to delete AWS EC2 instances that have not been in use for a long time to save costs. Be careful because you cannot get a terminated EC2 instance back. If you are not sure whether you will need a terminated instance later, back up the EC2 instance with NAKIVO Backup & Replication to a local backup repository or to Amazon S3.
You can delete multiple instances by specifying their instance IDs with the command:
aws ec2 terminate-instances –instance-ids i-0abcdef1234567890 i-0abcdef123456789a i-0abcdef123456789b
Conclusion
AWS CLI is a powerful command line tool that can help you automate running a large number of similar tasks. AWS EC2 filters allow you to configure the output and get only data you need. There are commands to view information about Amazon services and commands to make changes with them.
To prevent human error caused by incorrect configuration of scripts created with AWS CLI, it is highly recommended that you regularly perform AWS EC2 backup using a dedicated third-part solution.