How to Set Up Dell EMC Data Domain Deduplication as Backup Repository
When considering backup storage for virtual and physical environments, maximizing storage space to save costs and store more recovery points is essential. Companies try to reduce the space consumed by backups by different means, including using compression and deduplication technologies. NAKIVO Backup & Replication can be fully integrated with Dell EMC Data Domain storage appliances to leverage the DD Boost protocol for highly effective source-side data deduplication.
In this post, we explain what Dell EMC Data Domain and DD Boost are. In addition, we provide a step-by-step guide on how to configure NAKIVO’s solution to use this deduplication technology.
What Are Data Domain Storage and DD Boost?
Data Domain storage system is one of the industry’s leading backup storage appliances, offering best-in-class data deduplication, security, and cloud services. Dell EMC Data Domain comes with the DD Boost software that provides network and storage efficiencies for backup data.
Dell EMC DD Boost is a protocol designed to enhance the interactions of backup applications with Data Domain appliances. DD Boost offloads part of the deduplication process off the Data Domain storage device to the source side, that is, the server where the backup application is installed. DD Boost efficiencies shrink backup windows, accelerate data transfers, and can offer up to a 50:1 storage capacity reduction.
Note: The deduplication ratio can vary between 2:1 and 50:1, depending on several factors such as type of data, change rate, frequency of backups, type of backup (full or incremental), etc.
Working Principle and Use
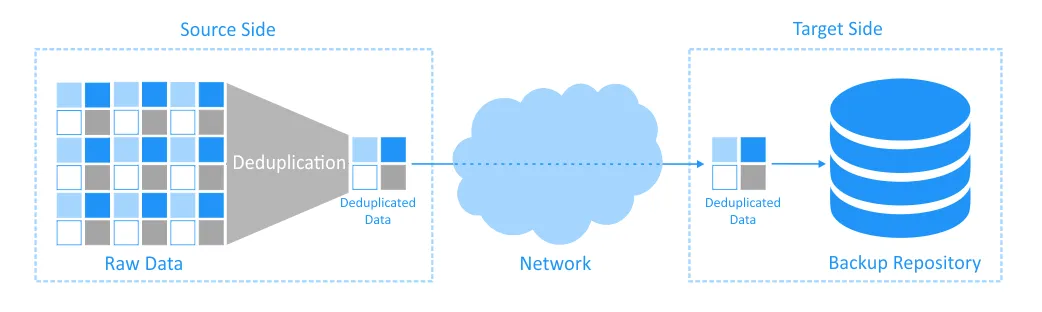
There are two general types of deduplication: source-side and target-side.
- A classic target-side deduplication approach involves copying all portions of data from a source (the server or VM to be backed up) to a target (a backup server with a backup repository) during the backup process. Once the data has been copied to the backup server, deduplication of this data is carried out.

- With source-side deduplication, the data is deduplicated on the backup server and only then copied over the network to the storage appliance (see the diagram below). As the data size is reduced after deduplication, data transfers take less time, and the load on the network is reduced.Souce-side data deduplication can be achieved with deduplication appliances using specialized software. Dell EMC Data Domain storage systems use the DD Boost protocol to facilitate source-side deduplication.
Support for Dell EMC DD Boost in NAKIVO Backup & Replication
NAKIVO Backup & Replication can be integrated with Dell EMC DD Boost to reduce the size of backups stored on Dell EMC Data Domain storage appliances and to shorten backup windows. DELL EMC Data Domain appliances can be added as a backup target in the solution.
Benefits of Dell EMC DD Boost
Integrating NAKIVO Backup & Replication to use DELL EMC DD Boost for source-side data deduplication provides the following benefits:
- Reduced network load. Less data is copied over the network from the source host to the backup repository. Avoiding transferring unnecessary data offloads the production network.
- Faster data transfers. With less data to transfer over the network, you get faster backup processes.
- Space for more recovery points. Using a deduplication appliance, you can achieve a reduction of storage space consumption of up to 20 times according to Dell. You can significantly save disk space on your backup repository that is located on a DELL EMC Data Domain appliance. As a result, you can store more recovery points and create more frequent backups to reduce recovery point objectives (RTOs).
- Less CPU load on the destination backup server. The CPU resources of the source server (from which the data is copied) are used because deduplication is a processor-consuming process. However, the CPU on the destination backup server is offloaded.
How to Configure Dell EMC Data Domain as a Backup Repository
Let’s go over the steps for configuring a deduplication appliance for source-side deduplication in NAKIVO Backup & Replication.
Requirements
You must meet the following requirements to create a Backup Repository with DD Boost support on a Dell EMC Data Domain device:
- Dell EMC Data Domain (physical or virtual) with DD Boost OS versions 6.1-7.9 deployed.
- A physical Data Domain is a physical server with storage with DD Boost OS installed.
- Data Domain Virtual Edition (DD VE) is a pre-configured virtual machine with all required software, which can be run on VMware vSphere, Microsoft Hyper-V, KVM platforms, and in AWS or Azure cloud environments.
- One of the Enterprise editions of NAKIVO Backup & Replication deployed as a full solution (with all components) or a Transporter-only installation (solution component responsible for data transfers). The product must be deployed as a Linux-based virtual appliance or manually installed on a Linux operating system.
Installing BoostFS plugin on Linux
The BoostFS plugin must be installed on the Linux machine on which NAKIVO Backup & Replication is deployed. Installing this plugin allows the configuration of a Dell EMC Data Domain Boost storage device as a backup repository for NAKIVO Backup & Replication.
- Log in to Linux. You can create the directory from which a BoostFS plugin package would be downloaded, for example, boost_fs_plugin (type mkdir boost_fs_plugin for doing this).
- Download the archive with the BoostFS plugin: you can refer to the EMC support team to get the installer. We use the 1_0_0-06 version of the BoostFS plugin (see the screenshot below). The version that you use may differ from ours.
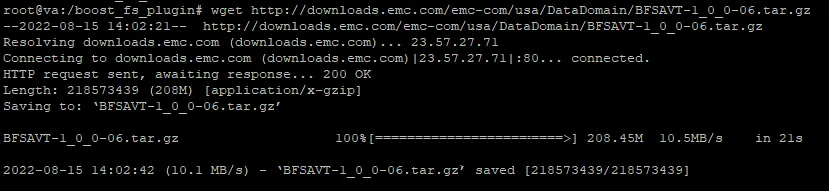
- Unpack the archive:tar -xzvf BFSAVT-1_0_0-06.tar.gz

- Change the directory to bfsprofiler/boostfs-pkgcd bfsprofiler/boostfs-pkg
- Type ls -al to check the content of the directory and the correct package version.
- Install the plugin:dpkg -i DDBoostFS_<ddboostfs_version>_amd64.deb

In this example, we use Ubuntu Linux with the DPKG (Debian Package) package manager. SUSE Linux and Red Hat Linux have a different package manager ‒ RPM (Red Hat Package Manager). So, the installation packages will differ.
- If you use SUSE, you can install the appropriate package with the command:rpm -Uvh DDBoostFS-<ddboostfs_version>.sles.x86_64.rpm
- If you use Red Hat, use the following command:rpm -Uvh DDBoostFS-<ddboostfs_version>.rhel.x86_64.rpm<ddboostfs_version> is your package version (version 1.0.0.5_556666 is used in this example).
Configuring Storage on the Data Domain Server
Now you should prepare the Data Domain storage device to be used as a Backup Repository in NAKIVO Backup & Replication. Open the web interface for managing the Data Domain storage device. Command Line Interface (CLI) is also available.
- Open the Data Domain System Manager. Then go to Data Management > File System.
- Create the file system if it has not yet been created. In order to create the file system, click Create and follow the instructions in the wizard.
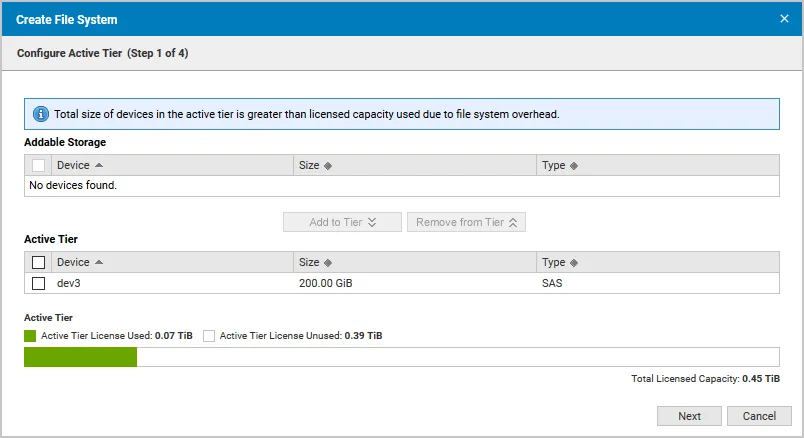
- Step 1. Select the device and click Add to Tier.
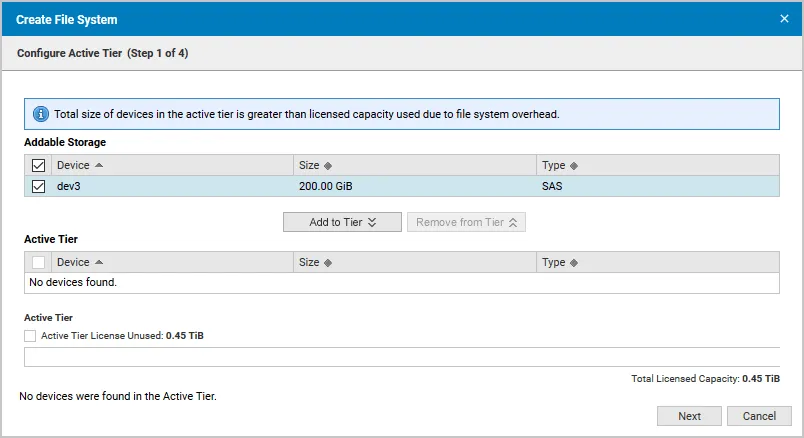
Now the device is added to the active tier. Click Next.
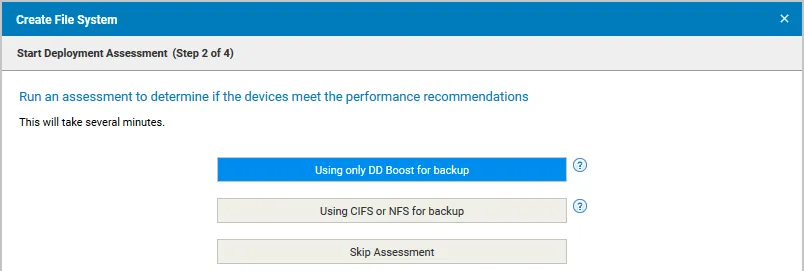
- Step 2. Click Using only DD Boost for backup.
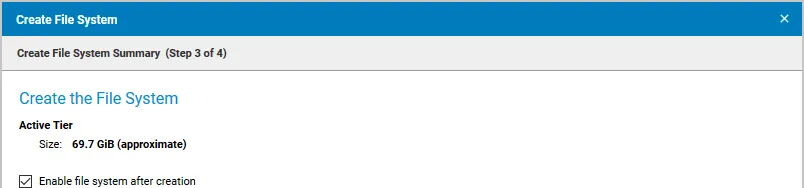
- Step 3. Select the checkbox Enable file system after creation.
- Step 4. You can see that file system creation has been completed.

- Step 1. Select the device and click Add to Tier.
- Enable the DD Boost protocol:
-
- Open Data Domain System Manager.
- Go to Protocols > DD Boost.
- Click Enable.
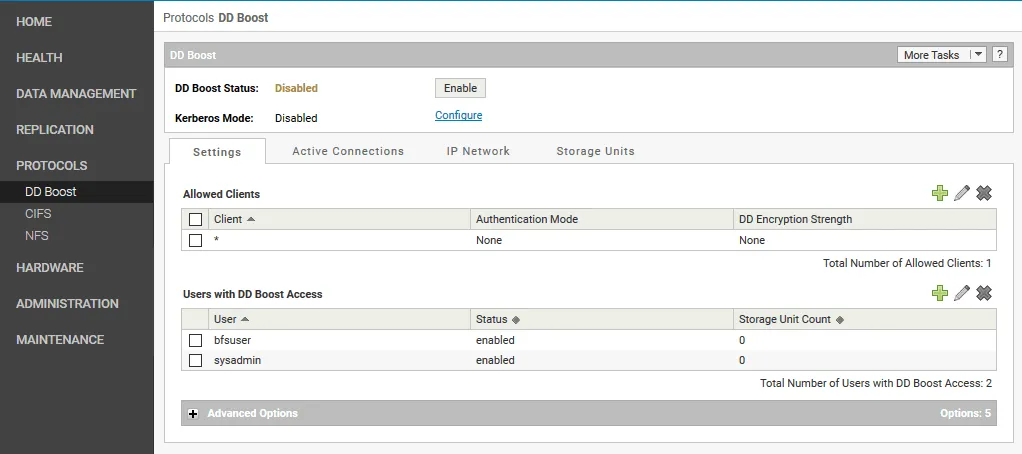 After that, the DD Boost Status is changed to Enabled.

-
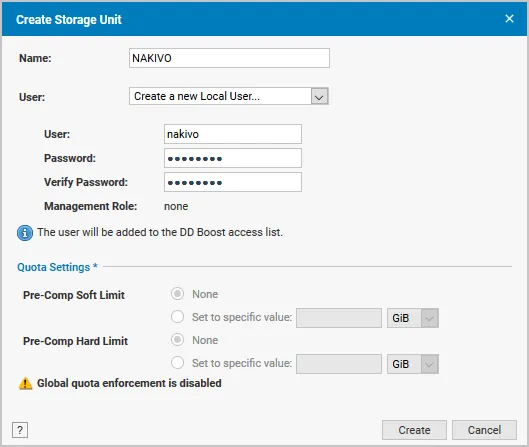
- Create a new storage unit. Do the following:
- On the DD Boost page, open the Storage Units tab.
- Then, in Storage Units, click Add. The Create Storage Unit window appears.
- Enter the name of the storage unit, username, and password. You can use an existing user or create a new user by clicking Create a new Local User.
- Click Create in the Create Storage Unit window.
If the operation is completed successfully, you will see the created storage unit in the list of Data Domain storage units.
Adding the NAKIVO Backup & Replication Backup Repository
When the storage unit has been created, create a Backup Repository for NAKIVO Backup & Replication on the Data Domain storage unit.
- Access the console of your Linux machine on which NAKIVO Backup & Replication is deployed.
- Go to the directory /opt/emc/boostfs/bin/ (to do this, type cd /opt/emc/boostfs/bin/).
- Enter the command:
./boostfs lockbox set -u <user> -d <backup_appliance> -s <storage_unit>
- where <user> is the name of the user account for accessing the storage unit, for example, nakivo
- <backup_appliance> is the IP address of the Data Domain storage unit, for example, 10.30.30.60
- <storage_unit> is the name of the DD Boost storage unit, for example, NAKIVO
- Enter the storage unit user password and then enter the user password once again to confirm it.

- Open the web interface of NAKIVO Backup & Replication.
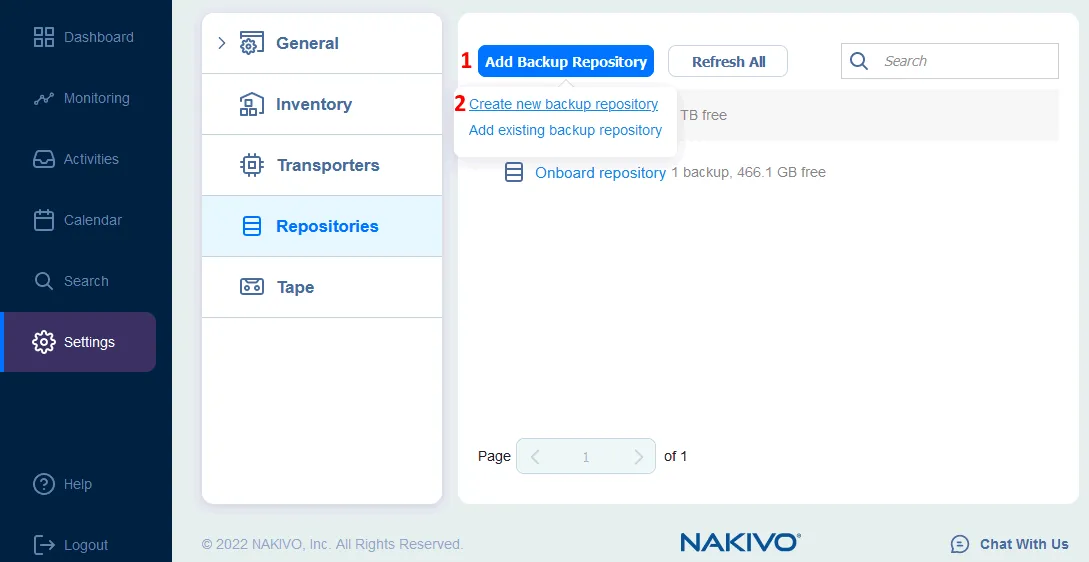
- Go to Settings > Repositories.
- Click Add Backup Repository > Create new backup repository.
The Create Backup Repository wizard opens.
- Select Deduplication Appliance as the repository type. Click Next at each step to continue.
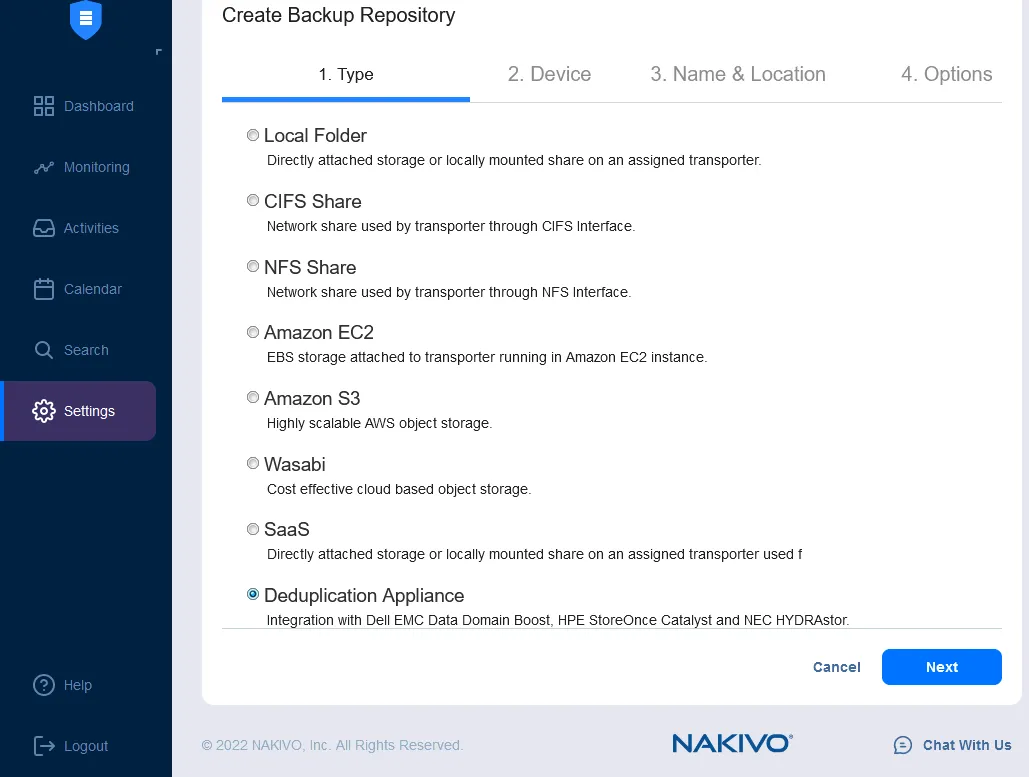
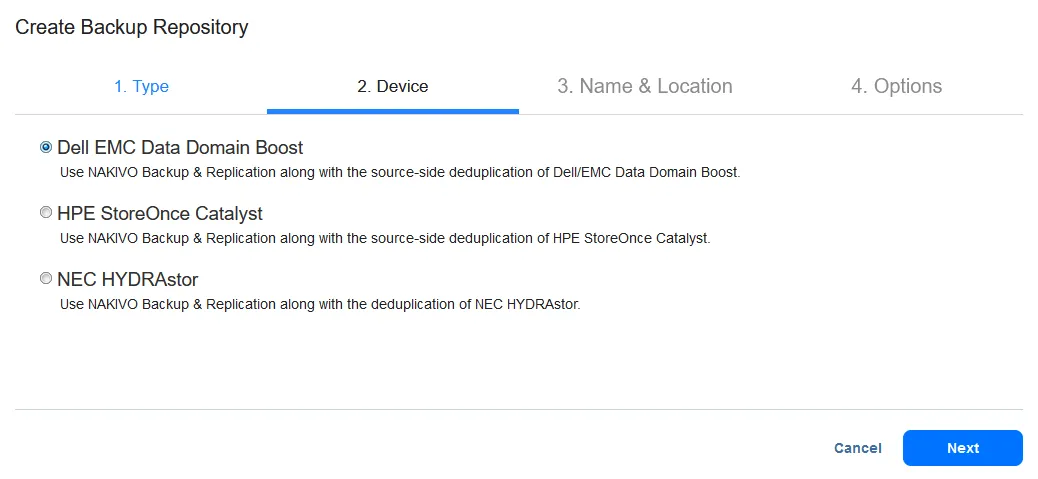
- Select Dell EMC Data Domain Boost as the deduplication appliance.
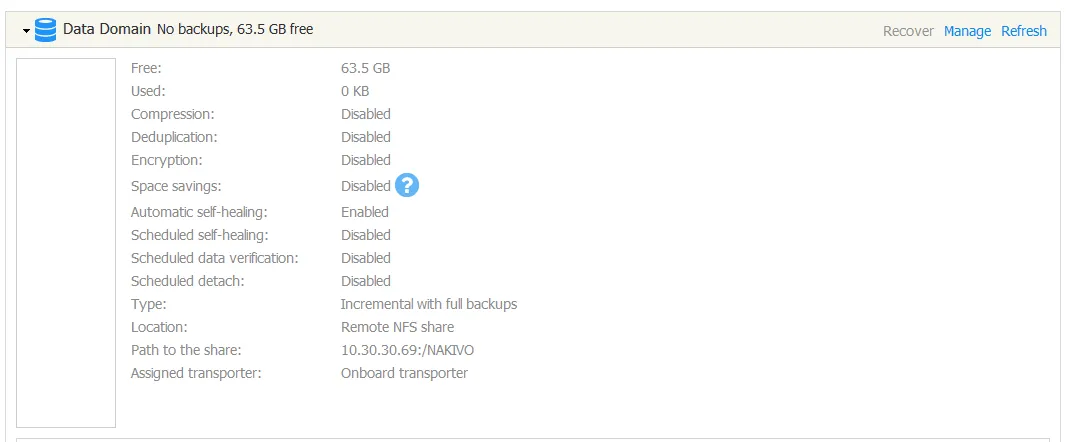
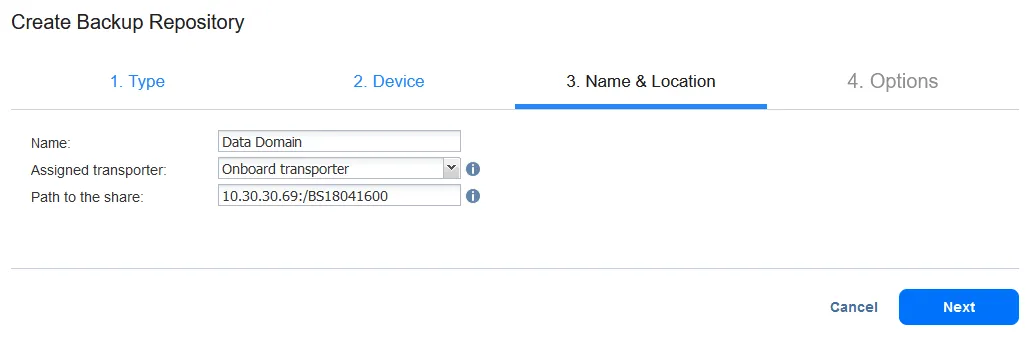
- Define the name and location for your new backup repository:
- Enter the name of the repository, for example, Data Domain
- Select an assigned Transporter, for example, onboard transporter
- Define a path to the share. In this example, the path is 10.30.30.69:/BS18041600
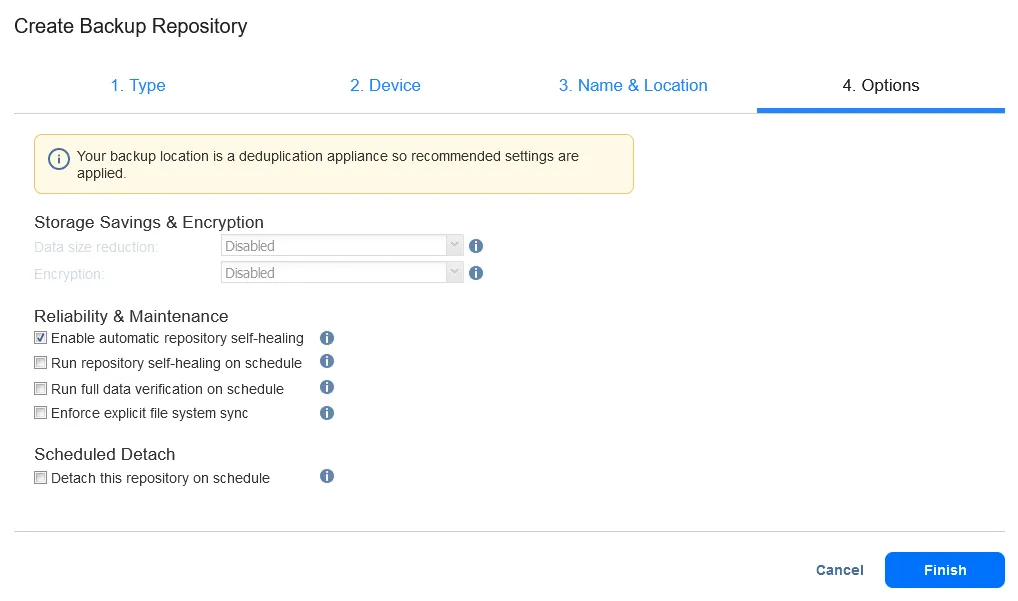
- Configure options for the backup repository. The recommended settings are automatically applied because the backup location is a deduplication appliance. You can change Reliability & Maintenance settings if needed.Check the defined repository options and click Finish.
- The backup repository has been created. Now you can see the attached repository on the Repositories page.