How to Set Up Windows Server for File Sharing
If you want to configure access to files over the network for one or more users, you need to configure file sharing on the computer on which these files are stored. A common way to deploy a shared resource for storing files is by configuring a Windows file share. In this case, we are talking about a Windows SMB share, and this file share can be configured on any Windows version.
This blog post explains how to configure a Windows file share on Windows Server 2019 to allow multiple users to access this share.
What Is a Fileshare
A file share is a directory on a computer, server, or virtual machine that contains files and directories that are accessible to other users via the network by using one of the supported file sharing protocols. A file share can be configured on any operating system supporting the appropriate file sharing protocol, for example, SMB or NFS. We have already covered the SMB protocol and its dialects.
Both client Windows versions (Windows XP, 7, 8, 10, etc.) and server Windows versions (Windows Server 2003, 2008, 2012, 2016, 2019, etc.) support Windows file sharing via the SMB protocol. However, Windows Server versions provide more capabilities compared to the client versions. For example, the maximum number of concurrent connections. Recently, we have compared a file server and NAS. In this blog post, we will explain how to set up a server for file sharing in Windows or, in other words, how to configure a file server.
Our Window Server Environment
We configure a Windows SMB share in Windows Server 2019 that is in a workgroup. The configuration principle for Windows machines in an Active Directory domain is identical, but you need to specify (determine) domain users and local users on computers when setting share permissions.
The parameters of our Windows file server are:
- IP address: 192.168.101.209
- Computer name: Win2019
The workflow in this article can be used for older Windows Server versions. As for client Windows versions, you can mostly follow the same Windows file sharing workflow for top editions like Windows XP Pro, Windows 7 Ultimate, Windows 10 Pro, etc. However, note that there may be certain limitations.
Creating Users and Groups
First of all, we need to create users. Using existing user accounts in Windows for file sharing is technically possible, but this approach is not recommended for security reasons. That is why, we will not use the existing administrator and user accounts to configure a Windows file share, and we will not provide these credentials to users accessing the share.
We will create special accounts for users who need to access the file share server. If a username and password on a file server are the same as a user’s username and password on a remote client computer for Windows logon, then credentials are not prompted when accessing a Windows SMB share. This feature makes accessing a file share more convenient for users and optimal for administrators.
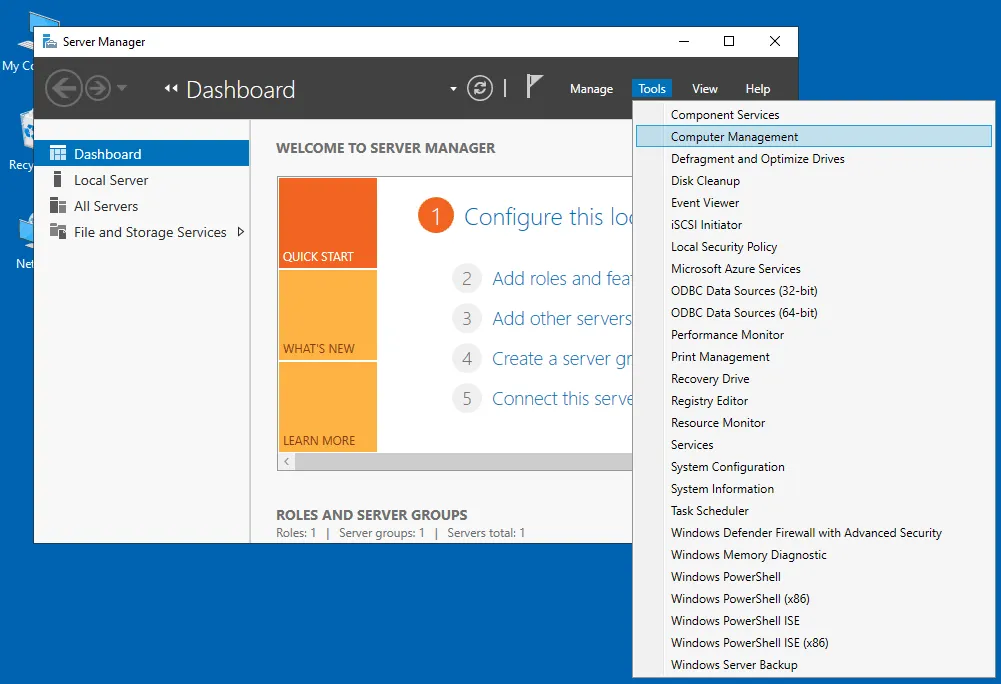
Open the Computer Management window, which you can access by going to Server Manager > Tools > Computer Management. Alternatively, you can simply run the compmgmt.msc command in CMD.
Note: In an Active Directory domain, you need to open the Active Directory Users and Computers window on a domain controller to create domain users and groups. You can do it by running dsa.msc in the command line or the Run (Win+R) prompt. Use Active Directory Users and Computers instead of Computer Management on a domain controller.
Creating users
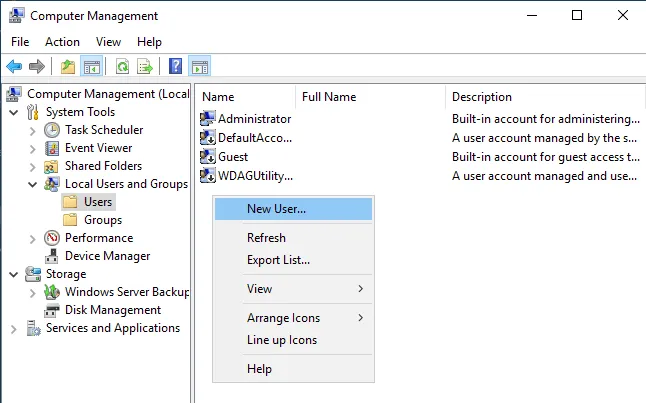
- In the Computer Management Window that opens (that can also be called a collection of Microsoft Management Console snap-ins), go to System Tools > Local Users and Groups > Users.
- After selecting Users, right-click in the empty space of the right pane and click New User in the context menu.
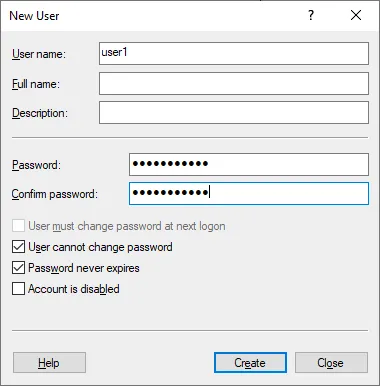
- Enter a user name, which will be used for user authentication when accessing a Windows file share. Keep in mind that this account can also be used for login on the current Windows Server machine. The name of our user is user1.
- If your file server is a domain member, the created domain user accounts can be used to log in to domain computers.
- Enter a password and confirm the password.
- Click Create
- We create more users the same way. The users that we create for accessing the file share server are:
- user1, user2, user3, user4
- user11, user12, user13, user14
Creating groups
When you need to configure access with the same settings for several users, it is more convenient to manage groups of users.
We create two groups in our fileshare server configuration example:
- Group_A – for providing full access to the file share (Read, Write, Change). The group contains the following members: user1, user2, user3, user4.
- Group_B – for providing read-only access to the share. The group contains the following members: user11, user12, user13, user14.
You can create a group, add users to the group, and configure access to a Windows SMB share for a group rather than adding each user separately in the share configuration and configuring the same settings for each user manually.
To create a new group:
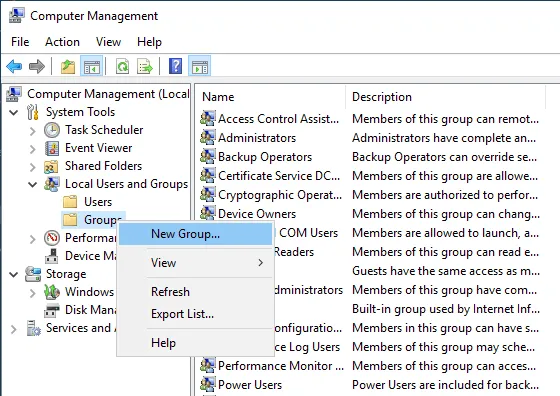
- Right-click Groups in the Computer Management window and click New Group in the context menu.
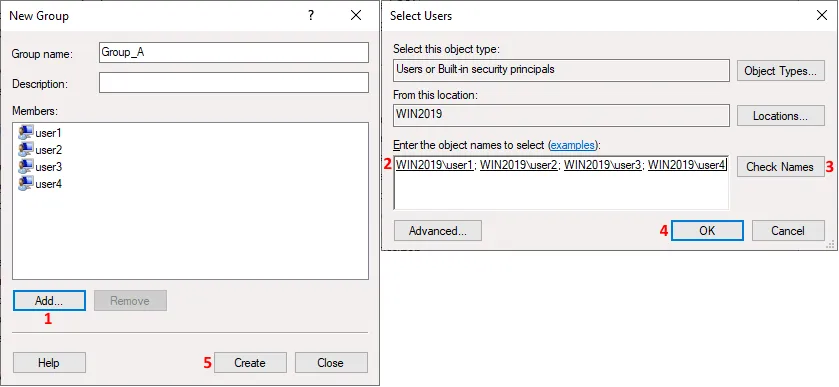
- Enter a group name (which is Group_A in our case) in the New Group window (see the screenshot below).
- Click Add to add users to the group.
- In the Select Users window, enter a user name such as user1, then click Check Names. When the user name is entered correctly, this user name is underlined and displayed as a full name (ComputerName\UserName or DomainName\UserName). To continue adding users, press Space or add semicolon and enter the next user name, then click Check Names, and so on.
If you want to set access for a local user account created on the computer that is a domain member, enter the full user name manually, like this: ComputerName\UserName. You can similarly enter the full name of a domain user.
- After entering all needed user names and checking them, click OK to save settings and close the Select Users window.
- Click Create in the New Group window to finish group creation.
Windows File Sharing Setup
Once we have created the needed users and groups, we can move forward to set up the Windows file share.
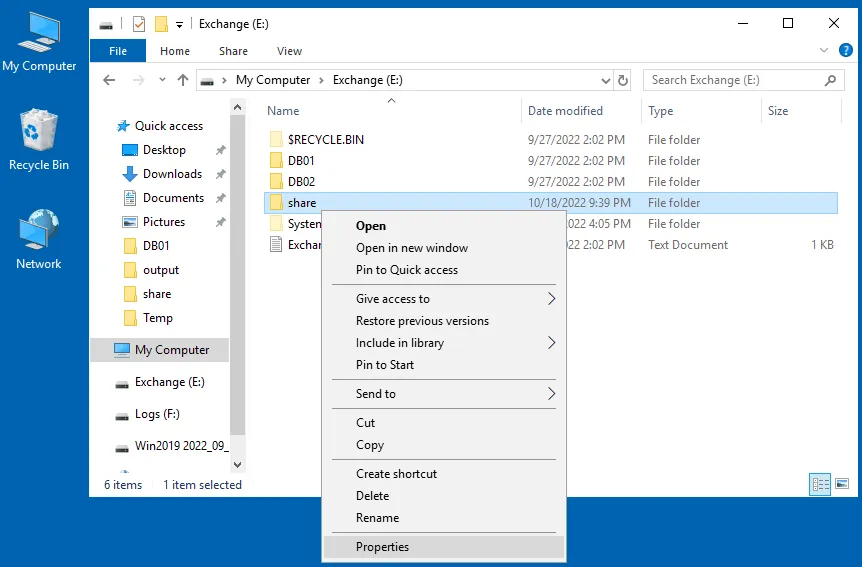
- Select the directory that you want to share or select a new directory. We create a new directory in our example and the path to this directory is:
E:\share
- Right-click this directory (folder) and in the context menu, hit Properties.
Setting up sharing permissions
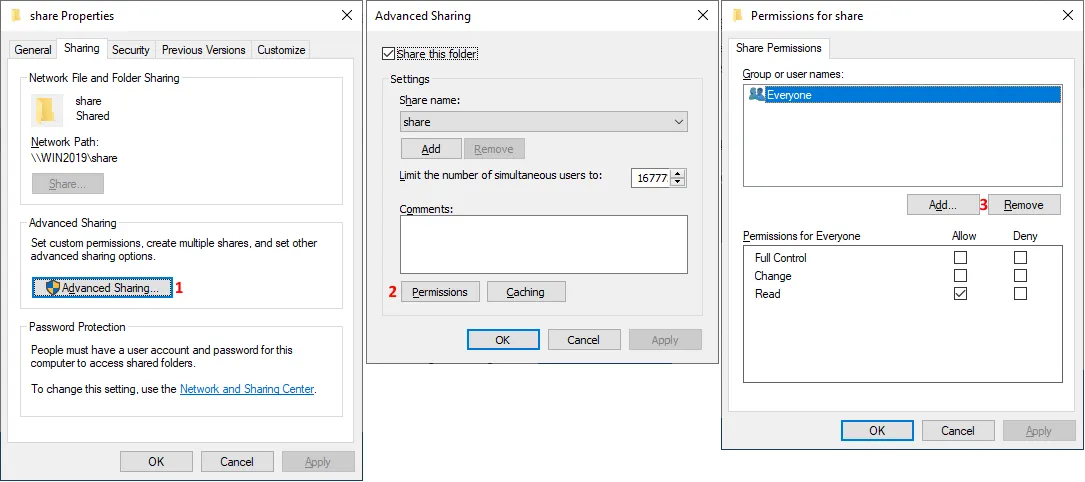
- Select the Sharing tab in the directory Properties window and click the Advanced Sharing button.
- Select the Share this folder checkbox in the Advanced Sharing window and click Permissions.
You can see that everyone can read the contents of the shared folder by default. Everyone is the default group containing all users on the current computer. In our example, we select Everyone and click Remove because we need to create a custom configuration.
- Click Add to add the needed users and groups for configuring access to the Windows SMB share for them.
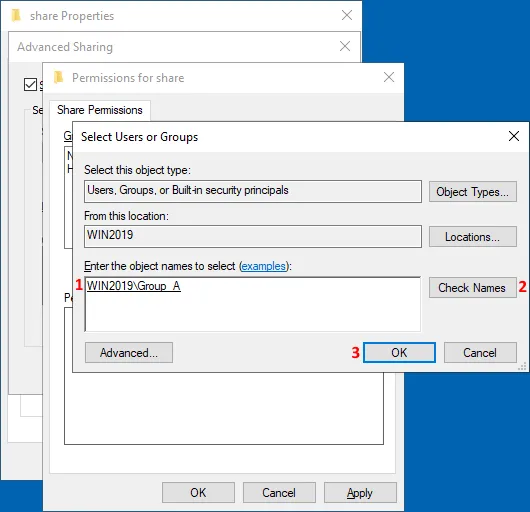
- The Select Users or Groups window is opened.
- Enter the name of users and groups for which you want to configure access. In our case, we enter Group_A.
- Click Check Names like you did when adding users to a group. An entered name is underlined and displayed in the full format if the name is correct (and exists). You can enter multiple user or group names if needed.
- Click OK to save settings and close this window.
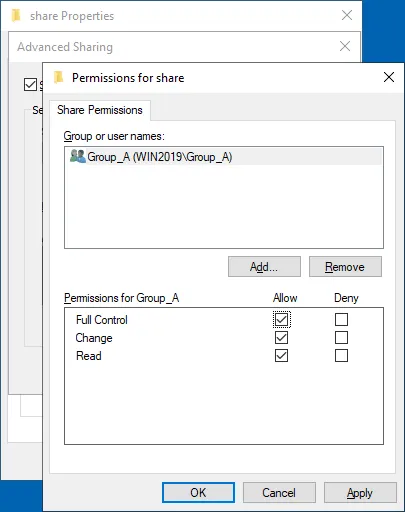
- We can see Group_A in the list of group or user names in the Permissions window for our share folder.
- Select this user/group (Group_A in our case) and select the Allow Full Control checkbox.
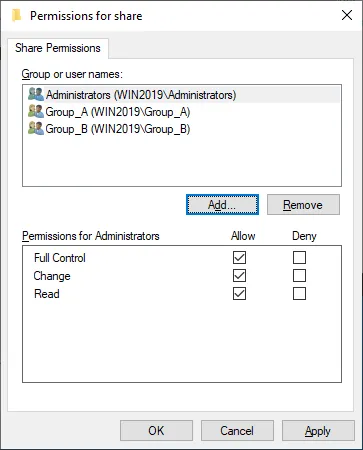
- Then we add Group_B just like we added Group_A. Let’s keep the read-only sharing permissions for Group_B.

- We also add the built-in Administrators group and enable full access for administrators. (If a computer is a domain member, you can use the Domain Administrators group).
- Click OK to save permissions for the Windows file share and close the Permissions window.
Setting file system permissions
We have now configured file sharing permissions for the shared folder. In addition to that, we must configure file system permissions for this folder to set the appropriate access for users. NTFS is the file system we use on Windows volumes.
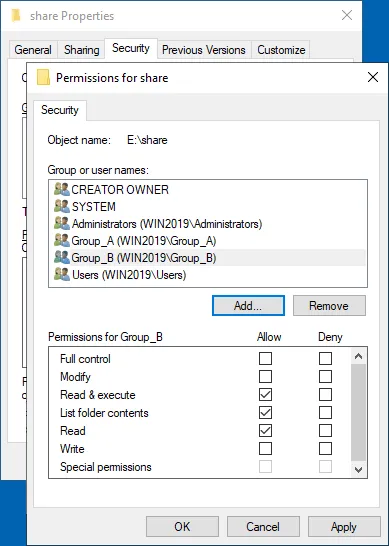
- Select the Security tab in the Properties window for the shared folder. Default NTFS permissions are set for CREATOR OWNER, SYSTEM, Administrators and Users.
- Click Edit to set permissions for a folder on the file system level.
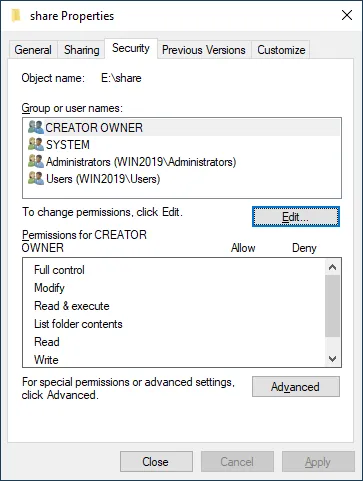
- As you can see, users in the Users group have read access to this folder by default.
- Click Add to add the needed group or user and set permissions for them at the file system level.
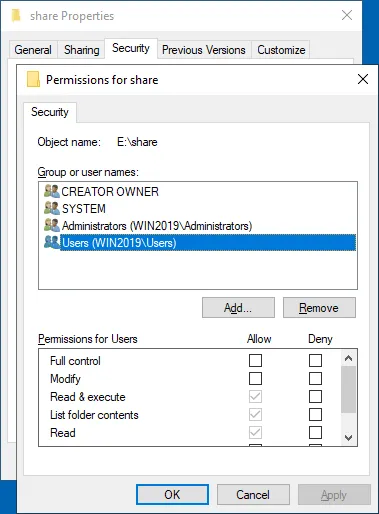
- The Select Users or Groups window opens.
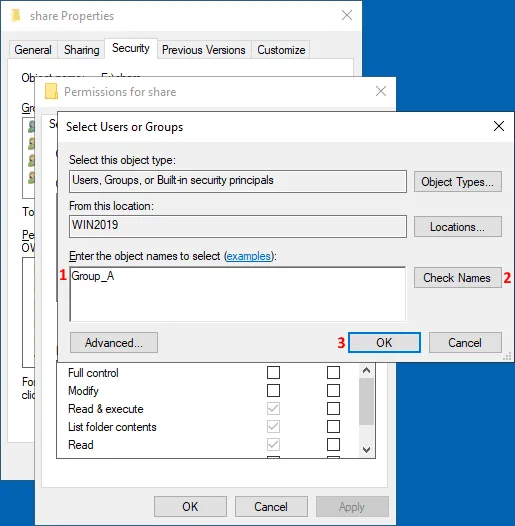
- Enter the name of the user or group that you want to add (Group_A in our case).
- Click Check Names.
- Hit OK to save settings.
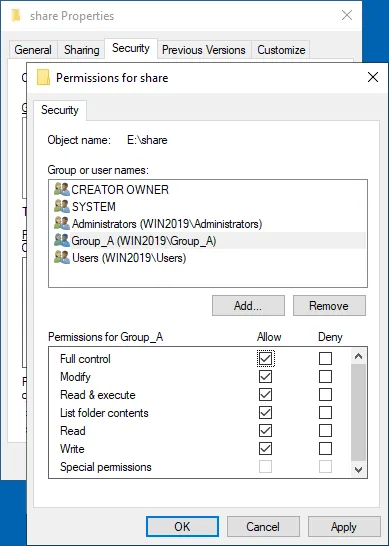
- Select Group_A in the list of users and groups. Select the Allow Full Control checkbox to grant full access to Group_A.
- Add Group_B just like you added Group_A.
- We preserve the default permissions, which include Read & Execute, List folder contents, and Read for Group_B.
- Click OK in the Permissions window. Click OK in the shared folder Properties window.
We have configured sharing permissions and file system permissions for the shared folder. Similarly, you can create other shares on file sharing servers.
Accessing a Windows SMB Share
Now users can access the Windows file share (SMB share) from their computers.
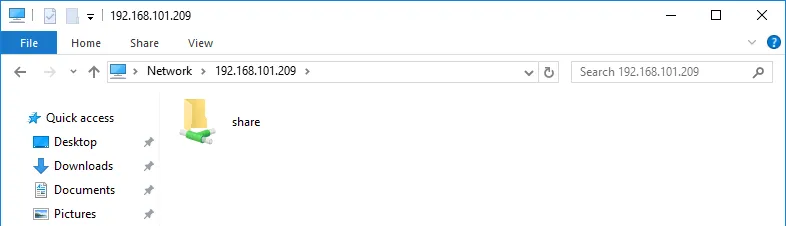
To access the Windows SMB share from another computer, open Windows Explorer (click the My Computer or This PC icon) and enter the network address of the file server in the address bar in the format: \\Server-IP-Address or \\Server-Name
We enter the path:
\\192.168.101.209
We access this file share from a Windows machine after logging in as user1.
We can see a shared folder with the name share on our shared file server.
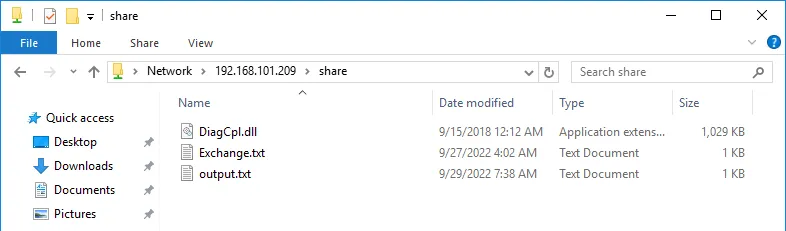
Double-click the shared folder to access its contents. We see the files in the shared folder. Our user1 is a member of Group_A and has full access to the shared folder contents. This user can write, edit and delete files in this shared folder.
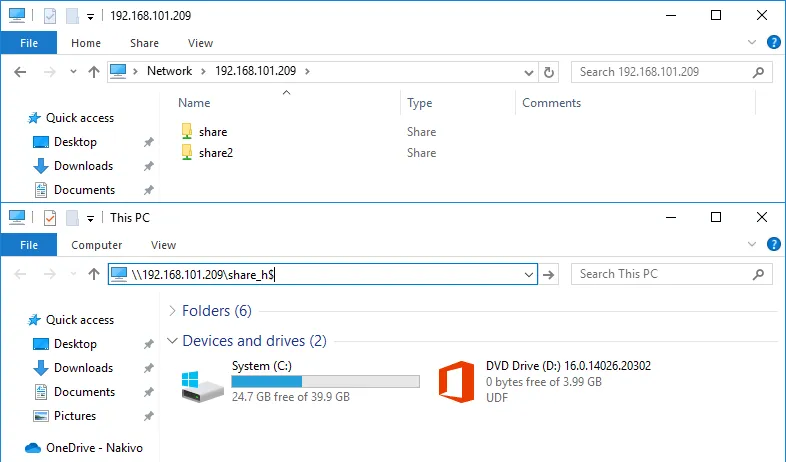
How to Create a Hidden File Share
The workflow to create a hidden Windows SMB share is the same. The difference is in the file share name. Append the $ character at the end of a share name to make this shared directory hidden, for example, share_h$. A hidden file share is not displayed when you browse a file server over the network by adding the server IP address or name (\\192.168.101.209 or \\Server2019, for example).
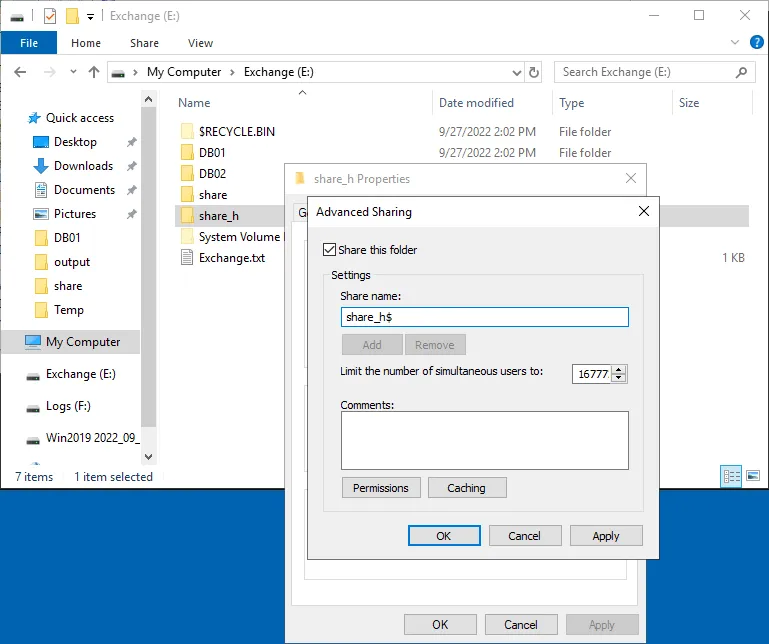
To access a hidden file share, you must enter the full path to the share, for example:
\\192.168.101.209\share_h$
Note: There are hidden shares created by default in Windows for system purposes and administrative access.
- C$ for a system volume and similar shares for each disk volume
- Admin$ – access to the %SystemRoot% directory (usually C:\Windows)
- IPC$ – remote IPC used in named pipes
Advanced Sharing Settings
There are advanced sharing settings in the Network and Sharing Center in the Windows GUI.
To access these settings, go to Control Panel > Network and sharing center > Advanced sharing settings.
If you want to make a Windows machine visible over the network when sharing files and allow users to access shared resources, select the following options in the network profile you are using:
- Turn on network discovery
- Turn on file and printing sharing
These settings impact Windows Firewall settings to allow ICMP and SMB traffic.
TCP ports 445 and 139 must be opened in the firewall on the server for file sharing. Ensure that the File and Printer Sharing (SMB-In) rule in Windows Firewall is enabled to avoid issues.

Note that the Server service must be running in Windows to make a Windows file share work.
How to Map a Network Drive
As mentioned above, users can enter the path to the share to access shared files and folders. It is also possible to make shortcuts to the shared folders. However, this way may not be the most convenient for some users. In this case, you can map a file share as a network drive and access this network drive in My Computer or This PC (Windows Explorer) just like you would access local disk volumes.
Do the following to map a network drive:
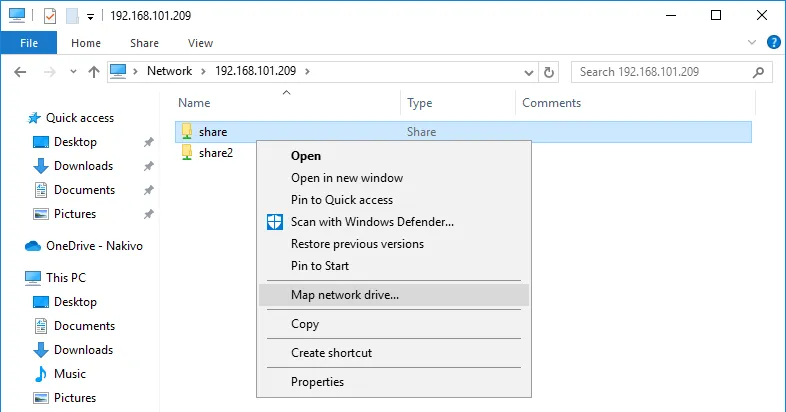
- Access the file share server in Windows Explorer as explained above. Enter the server name or IP address in the address bar, for example, \\192.168.101.209
- Wait until the list of shared folders is displayed. You may need to enter a username and password if the credentials on the client and server don’t match.
- Right-click a shared folder you want to connect as a network drive and click Map network drive.
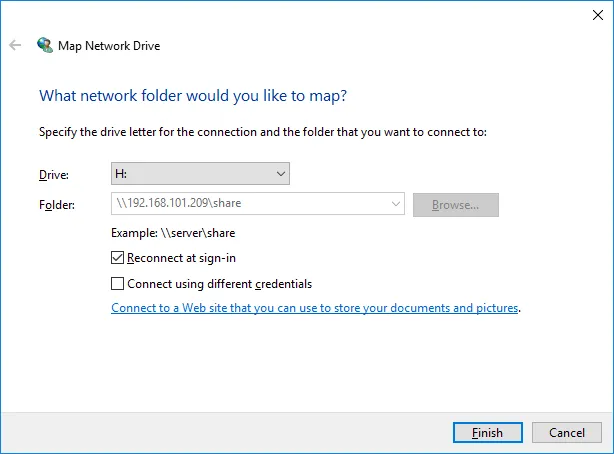
- Set the network drive parameters for the shared folder in the opened window.
- Select a drive letter, for example, H:
- The path to the shared folder has been automatically selected.
- Reconnect at sign-in – the shared folder is connected automatically when a user logs into Windows on a client machine.
- Connect using different credentials – use this option if the credentials of the user account you use to log in on a client computer don’t match the credentials of the user account configured on the file server to access the file share. An alternative use case is using the credentials of a user who has more permissions than the current logged-in user.
- Hit Finish to save settings and close this window.
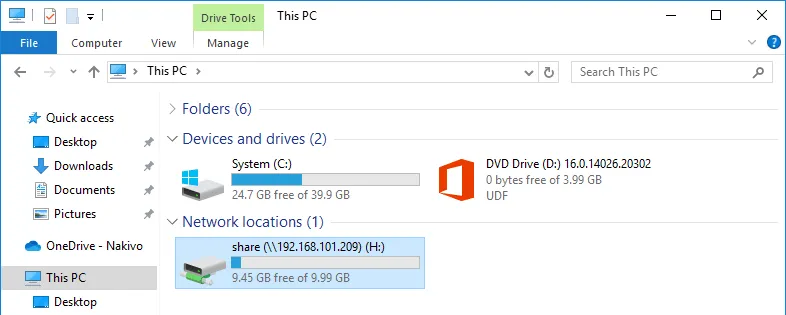
Now you can see the mapped network drive in Windows Explorer and use it for accessing the folder on the fileshare server (file server).
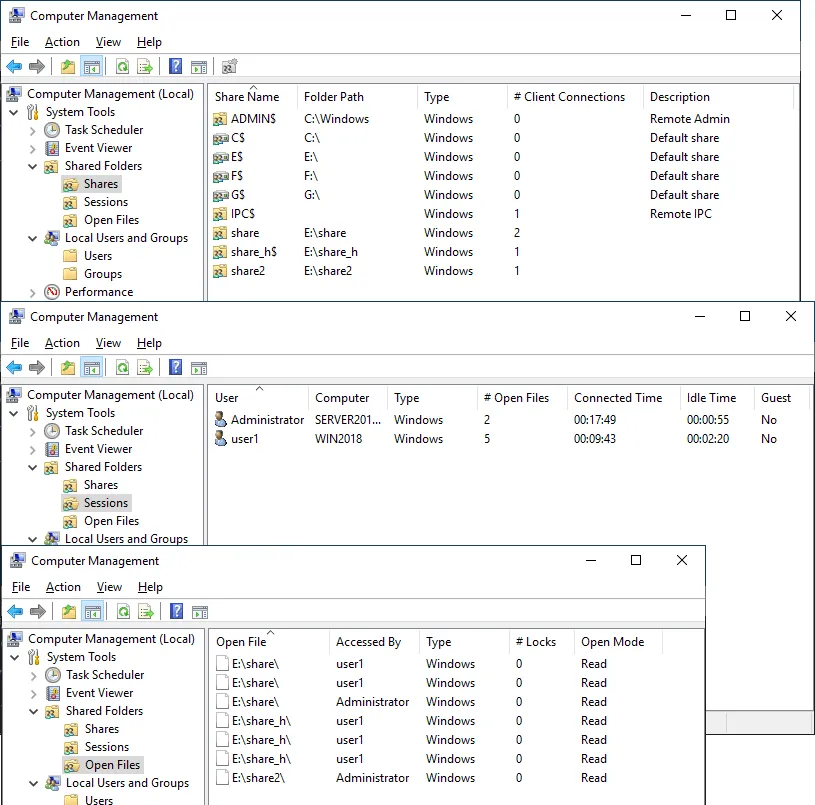
How to Check the Windows SMB Share Status
Configuring a Windows file share is the main point for setting up a file server. However, you need to know how to monitor shared resources, including shared folders, connection status, and opened files. This information is also useful for troubleshooting.
You can get Windows file sharing status in the Computer Management window, which you can access by running the compmgmt.msc command in CMD.
Go to System Tools > Shared Folders in the Computer Management window. There you can locate three items: Shares, Sessions, and Open Files.
- Shares. This item shows you all folders shared on the current Windows machine, including hidden shares.
- Sessions. This item displays all active sessions by showing connected users, computers and connection time.
- Open files. Displays which files stored in shared folders are opened and in which mode (read/write).
You can right-click the needed item, such as an opened session or file and close this session or file (disconnect a connected user and remove the file lock).
Configure Windows File Sharing in the Command Line
Actions we made in the graphical user interface (GUI) to set up a Windows file share can also be performed in the command line interface (CMD). Knowing how to configure a Windows SMB share in CMD can help you automate the configuration process.
Let’s configure a file share with settings identical to the settings we configured before in the GUI.
- Press Win+R. In the Run prompt type cmd and hit Enter to open Windows Command Line.
- Add a user with setting the username and password.
The command syntax is:
net user username userpassword /addWe add user21 in CMD:
net user user21 Password-21 /add - The command to add a group is as follows:
net localgroup groupname /add We add group2 in this case:
net localgroup group2 /add - Add the user to the group by using the command like:
net localgroup groupname username /add In our case, we add user21 to group2:
net localgroup group2 user21 /add
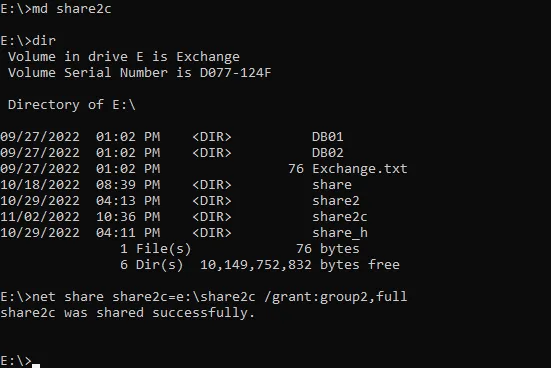
- Now we need to create a new directory, which we will share. We go to drive E: and create the share2c directory (c means command line or console for more clarity in our directory name).
e:
md share2c - List directory contents to ensure that the directory has been created:
dir - Share the share2c directory by setting the folder path, user or group name and permissions for this user or group. The general command syntax is:
net share sharename=folderpath /grant:username,permissionsPermissions can be read, change, or full.
In our case the exact command is:
net share share2c=e:\share2c /grant:group2,fullWe grant full permissions to group2.
- Set NTFS permissions for the shared folder with icacls.
- We set full permissions to group2 for the E:\share2c directory:
icacls “E:\share2c” /grant group2:(OI)(CI)F /T
You can see how these settings applied in the command line are displayed in the GUI in the screenshot below.

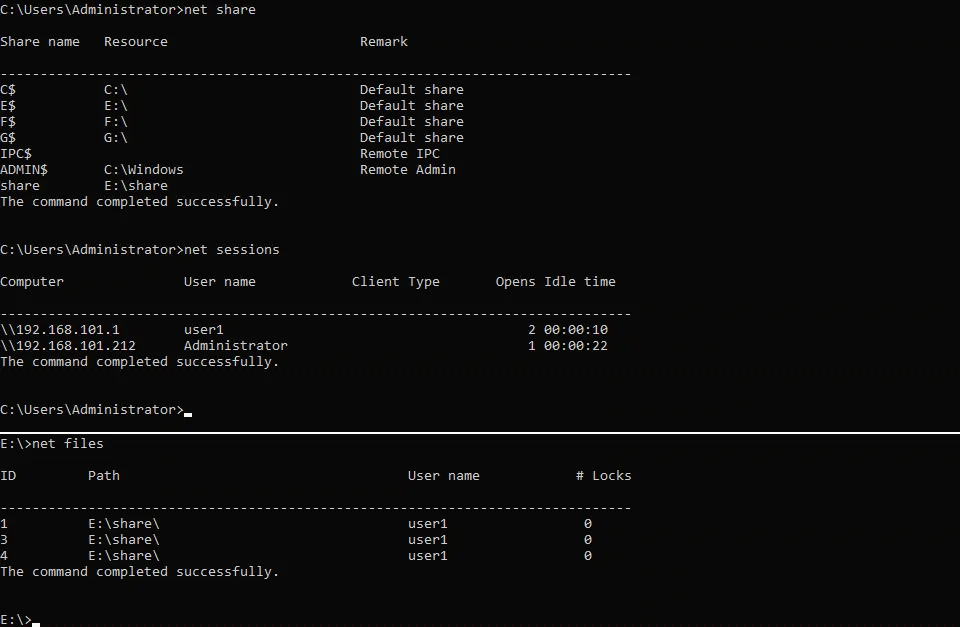
- Check the Windows file share status.
- Check existing file shares:
net share - View sessions opened by users connected to the shares:
net sessions - View files opened by users over the network:
net files
- Useful commands to manage working Windows file shares.
- Close the files opened by users by defining the file id (the id is displayed with the net files command that you can see in the screenshot above):
net file id /close - List opened sessions for the appropriate computer name:
net session \\ComputerName - Disconnect incoming SMB connections for the selected machine:
net session \\ComputerName /delete - Connect to a file share and map the file share as a network drive using the logged-in credentials:
net use H: \\FileServer\SharedFolderIf a file share contains spaces, you must enclose the path in quotes (“path”).
- The alternative command:
pushd \\FileServer\SharedFolder
Conclusion
Configuring a server for file sharing is not difficult, especially on Windows Server 2019. Keep in mind that with access granted to multiple users, files on Windows SMB shares as well as NFS shares can get corrupted or permanently deleted. Make sure to use a dedicated solution to backup Windows servers and file sharing servers. The best choice is a solution that supports multiple platforms like NAKIVO Backup & Replication.