How to Backup VMs to Azure with NAKIVO Backup & Replication
One of the requirements of successful virtual machine backup and recovery is storing backup data in the cloud as an offsite copy. Offsite backups are essential as they protect organizations from potential data loss when the onsite backup infrastructure as well as the production site are unavailable. This best practice to ensure resiliency is known as the 3-2-1 backup rule. According to it, you need to store 3 copies of data on 2 different types of storage media with 1 copy maintained offsite.
Microsoft Azure is a great cloud storage option for backups especially in Microsoft environments, as it offers integration with other services like Active Directory and Microsoft 365 among other benefits. In this blog post, we take a look at configuring VM backup to Microsoft Azure with NAKIVO by using two methods.
Note that this blog post covers backup to Azure file storage not backup to Azure Blob Storage.

Methods to Connect NAKIVO Backup & Replication to Azure
NAKIVO Backup & Replication is a comprehensive backup and recovery solution for different infrastructures, including VMware vSphere and Microsoft Hyper-V. You can use the solution to create direct backups to public object cloud storages like Azure Blob, Amazon S3, Wasabi and Backblaze B2. The solution is made up of 3 main components:
- Director, the main component providing the interface
- Transporter, the service responsible for data transfers
- Backup Repository
Sometimes you may want to use cloud file storage and avoid the costs of cloud object storage in your Azure environment. There are two methods we can use to send backups from NAKIVO Backup & Replication to the Azure cloud:
- Method 1:
- Creating an Azure VM and deploying a Transporter on that VM
- Connecting this Transporter to the on-premises machine running the full deployment of NAKIVO Backup & Replication (Director and Transporter)
- Creating a backup repository on the Azure VM on which the Transporter is installed.
- Method 2:
- Creating a storage account and SMB share in Azure, configuring a Transporter on-premises and creating a backup repository on the SMB share in Azure.
The guide uses VMware backup to Azure as an example, but you can use the same workflow for Hyper-V backup to Azure and for backing up other workloads to Azure with the NAKIVO solution.
Method 1: Provisioning a VM in Azure
The first method for creating VM backups in Azure involves a NAKIVO solution installation on an onsite machine and then installing another solution component for data transfer – Transporter – on a VM in Azure. Let’s go over the steps in detail.
Creating a VM in Azure
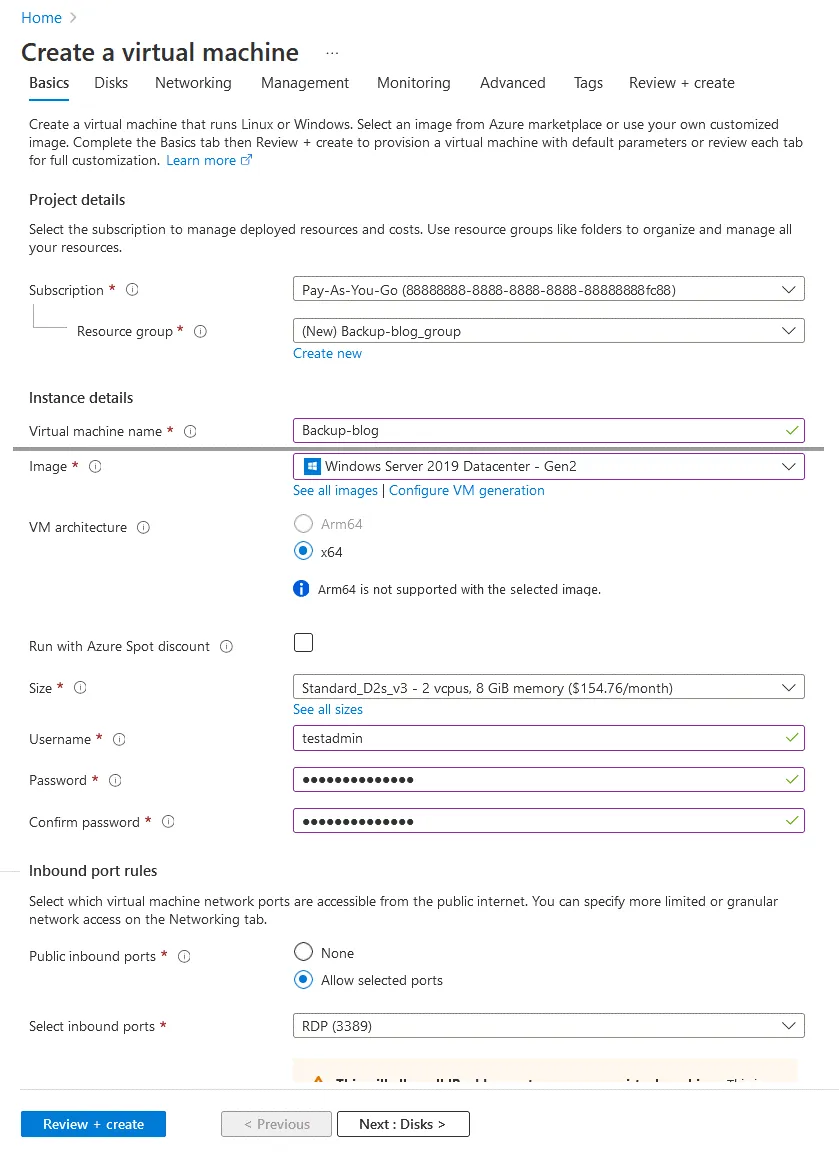
First, we provision a new virtual machine (name, disk type, user name, password, resource group, etc.). In our example, we provision a Windows Server 2019 VM in Azure:
- In the Azure web interface, go to All services and click Virtual machines.
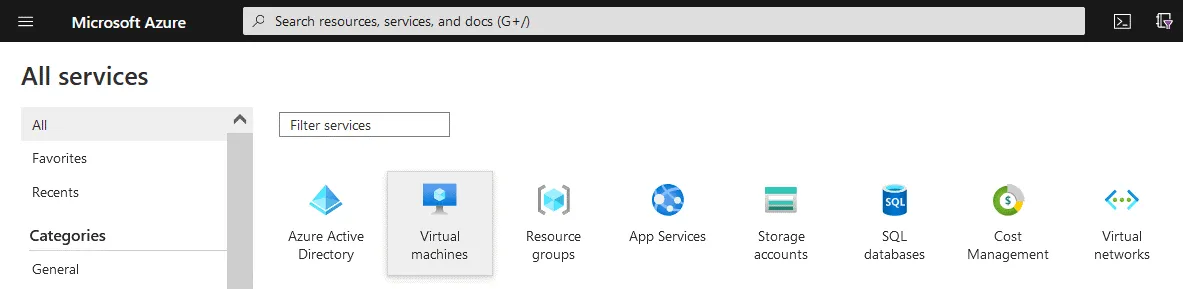
- Click Create > Azure virtual machine to create a new VM in Azure.
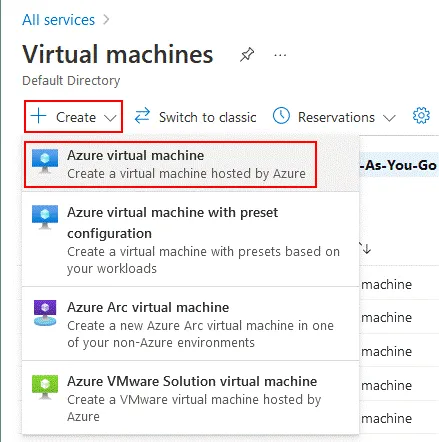
- A new wizard opens for creating a VM. Here are the steps that you need to configure:
- Basics
- Give the VM a name (Backup-blog in our case).
- Select image (we use Windows Server 2019), VM architecture, and VM size.
- Set username for Windows login and password.
- Specify allowed public inbound ports. We temporarily allow TCP 3389 for remote desktop connections to manage our Windows Server VM during configuration.
Note: For security reasons, it is highly recommended that you disable Remote Desktop Protocol or RDP for public access (on WAN network interfaces) after finishing the configuration.
- Disks. By default, one virtual disk is created for the operating system (C: volume), and a non-persistent disk is attached for temporary files and VM operation (D: volume). We will create an additional virtual disk to be used for only storing VM backups and use this disk storage for VMware backup to Azure (or for other workloads like Hyper-V backup to Azure).
Note that it is not necessary to select SSD storage with the highest performance for storing backups. Using HDD is sufficient in this case and allows you to save costs in Azure.
Click Create and attach a new disk to create a dedicated persistent disk for VM backups in Azure.
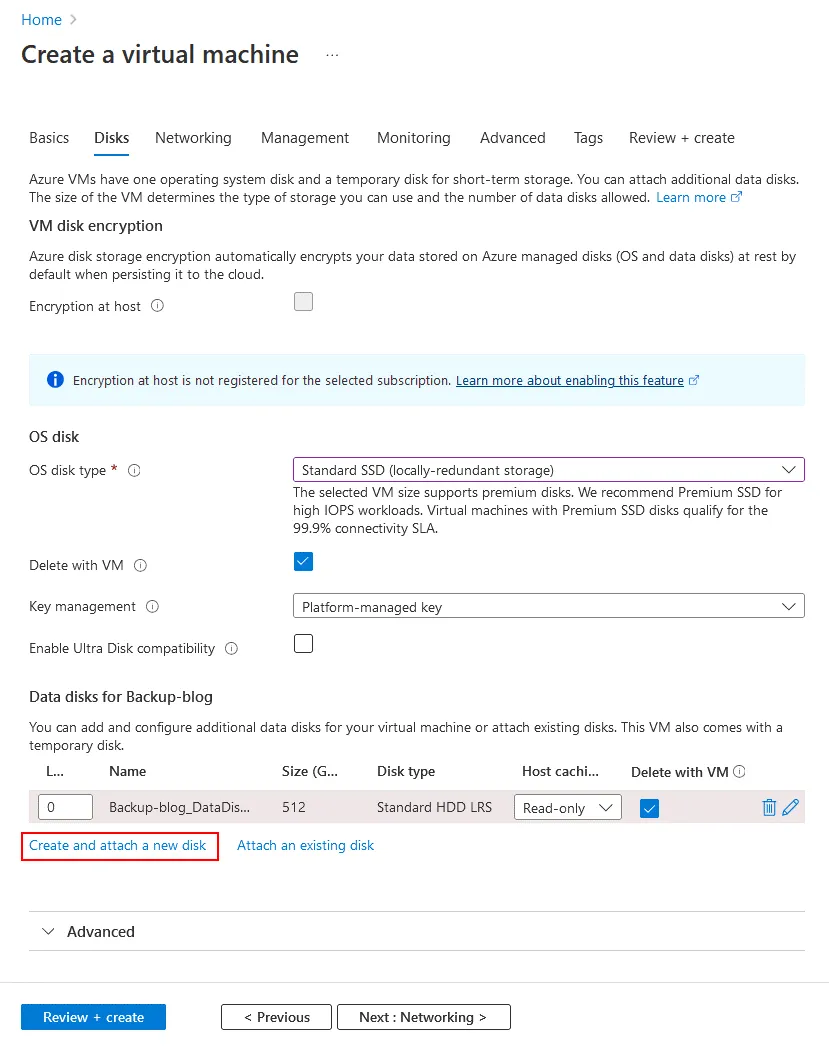
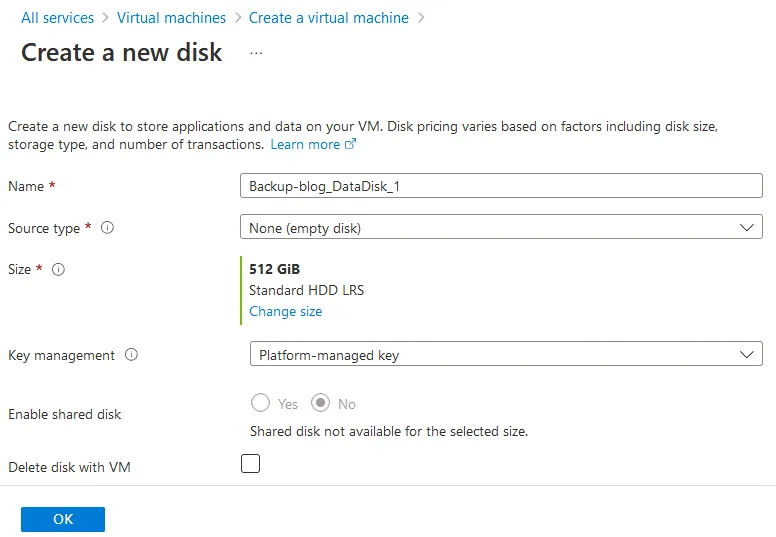
On the Create a new disk page, check or edit the disk name, select a source type, and select a size (make sure it is enough to store your VMware backups to Azure).
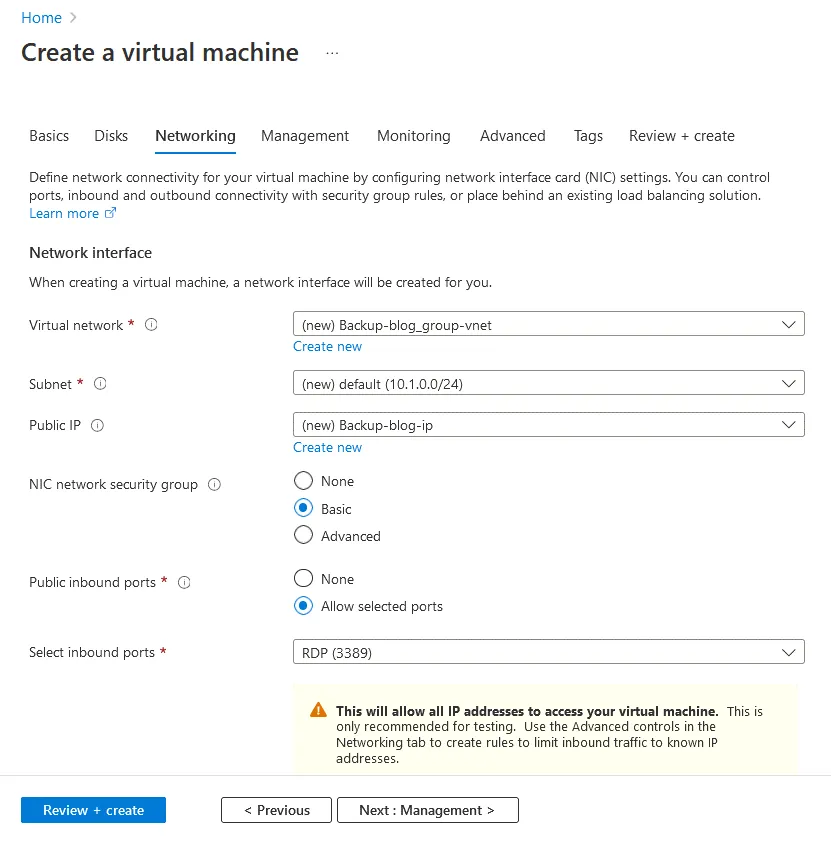
- Networking. You can configure the needed network interfaces and related settings based on your requirements. We will come back to the network settings later because we must adjust them to allow NAKIVO-specific traffic through to our Azure VM.
- Management, Monitoring, Advanced, and Tags. There are no special settings that need to be configured for VMware backup to Azure, and you can keep the default settings for these steps.
- Review + create. Review the settings here and make any adjustments needed. A warning about the port opened for RDP access is also displayed. Click Create to finish VM creation.
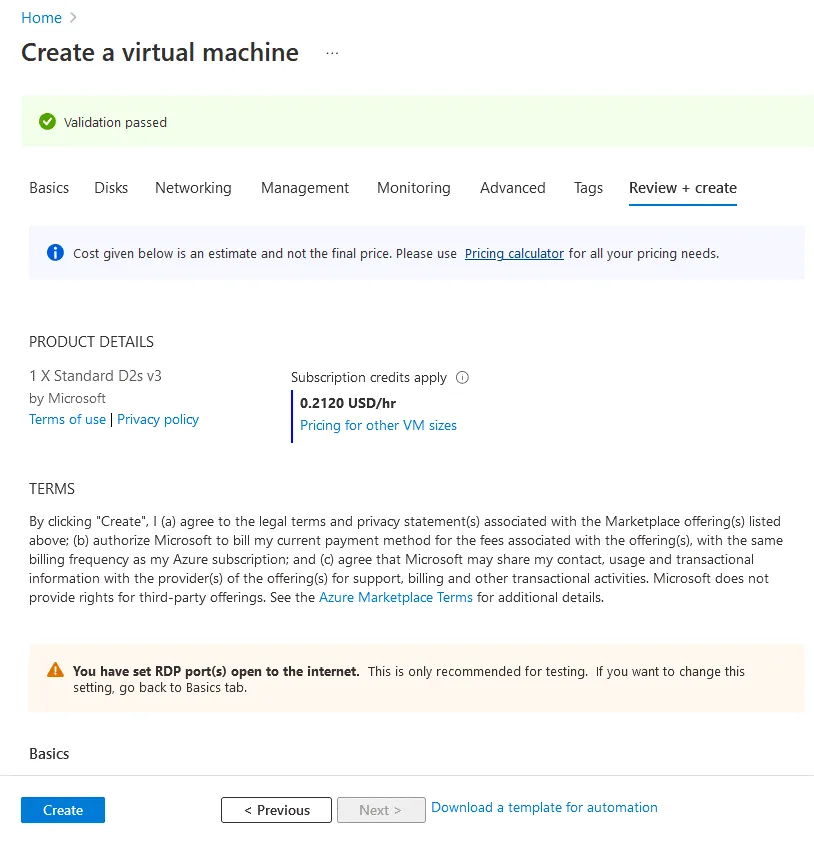
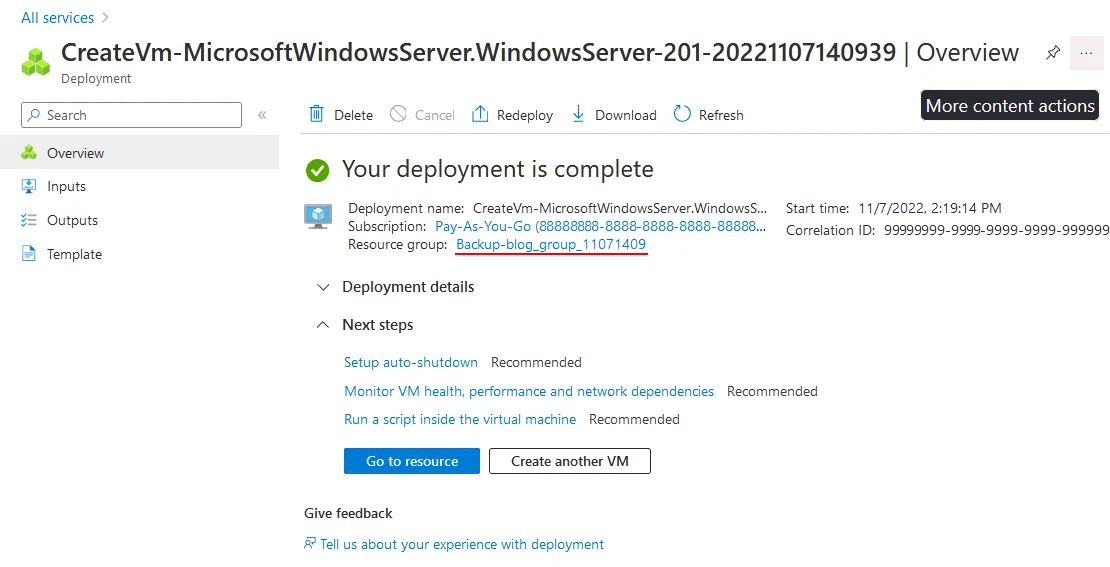
- The Azure VM has been created. You can see a link to the VM’s resource group and the Go to resource button to open the VM page with the settings.
Network settings for the Azure VM
After creating the Azure VM, you should adjust network settings to meet the network requirements for NAKIVO Backup & Replication.
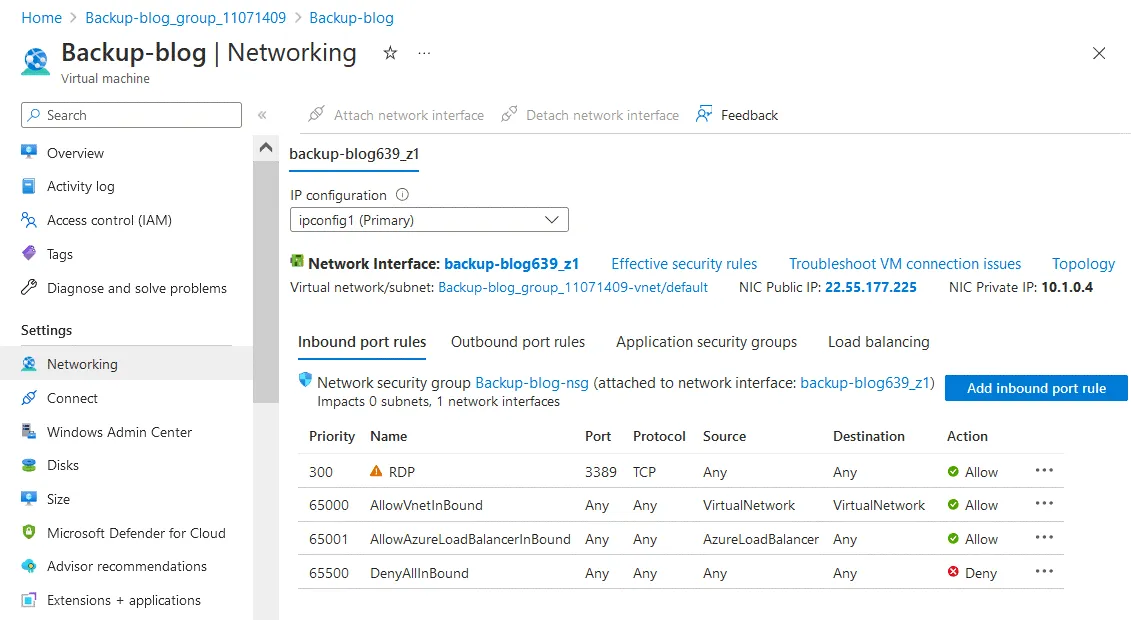
- On the VM resource page, go to Settings > Networking to adjust firewall settings in Azure.Note the NIC public IP (22.55.177.225 in our case). We will need this WAN IP address later when configuring settings for Hyper-V or VMware backup to Azure in the NAKIVO solution.For stronger security, you can edit the inbound RDP rule and set only your WAN IP address (or your organization’s WAN IP) as the only source IP address for which to allow connections to the Azure VM.
We need to configure the firewall to allow inbound traffic to TCP ports used for communication between NAKIVO Transporters.
- TCP 9446 is a port used for communication between Transporters.
- TCP 9448-10000 is a port range used for data transfer.
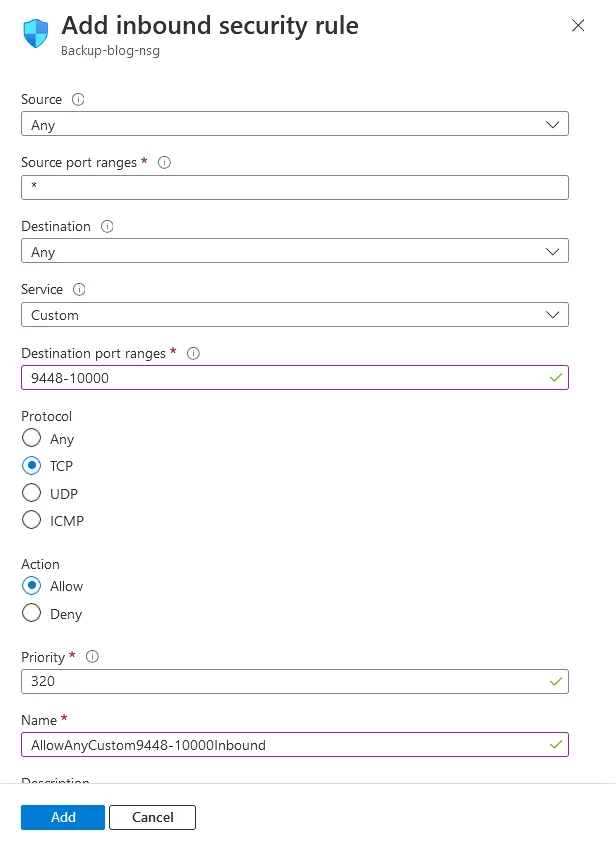
- Click Add Inbound port rule to create a new firewall rule.
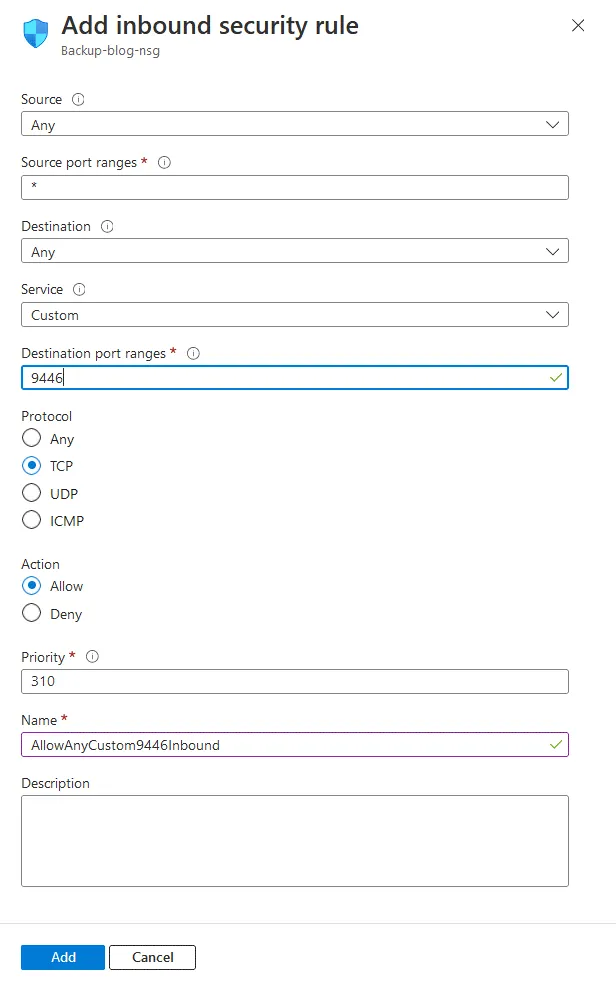
- The Add inbound security rule window opens. Set the following parameters:
- Source: Any (or set a WAN IP address from the location where your NAKIVO solution with the Transporter is installed)
- Source port ranges: *
- Destination: Any
- Service: Custom
- Destination port ranges: 9446
- Protocol: TCP
- Action: Allow
- Name: Enter rule name or leave a default nameClick Add to finish.
- Follow the same steps to add a new rule for the port range for data transferring traffic and set the Destination port ranges:
9448-10000
We configured the firewall in Azure to meet the backup requirements.
Windows Firewall configuration for the Azure VM
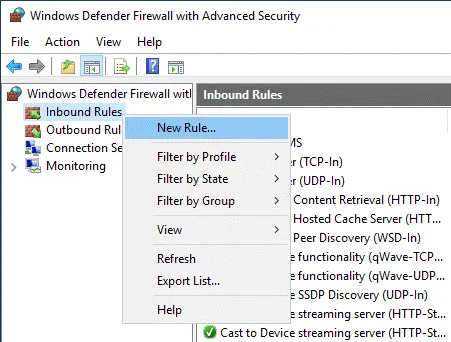
Next, we should configure similar firewall settings inside the Windows Server 2019 VM running in Azure. Add a firewall rule in the Azure Windows VM. Connect to the Azure VM via RDP using the public VM IP address for this purpose.
- Open Windows Firewall: Start > Control Panel > Windows Defender Firewall.
- Right-click Inbound Rules and click New Rule in the context menu.
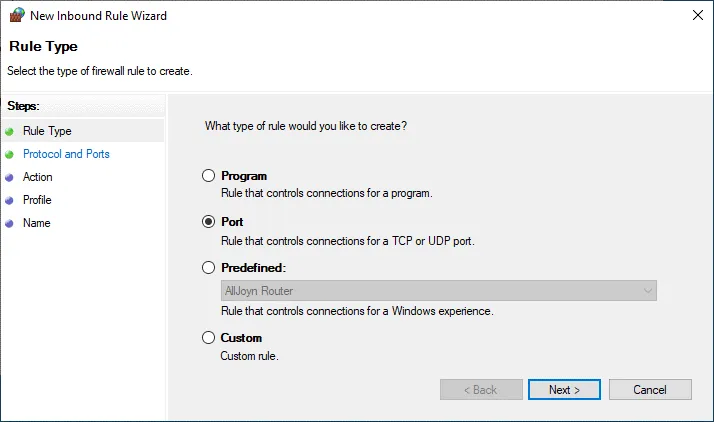
- The New Inbound Rule Wizard Here are the steps you need to complete:
- Rule type. Select Port to control connections for a TCP or UDP port.
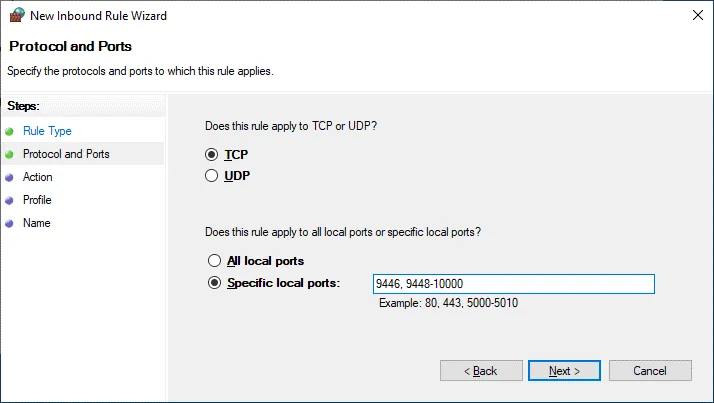
- Protocols and Ports.
Set the parameters as follows:
TCP
Specific local ports: 8446, 9448-10000
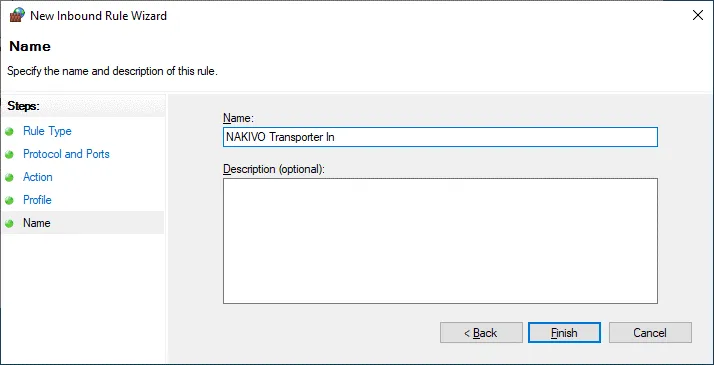
- Action. Select Allow the connection.
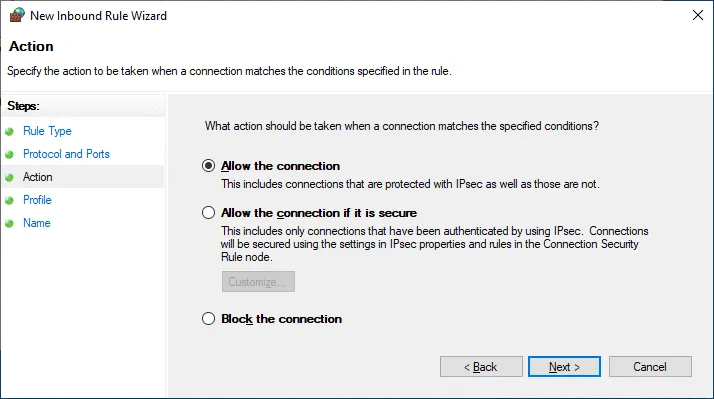
- Profile. Select Windows Firewall network profiles to which this rule must be applied.
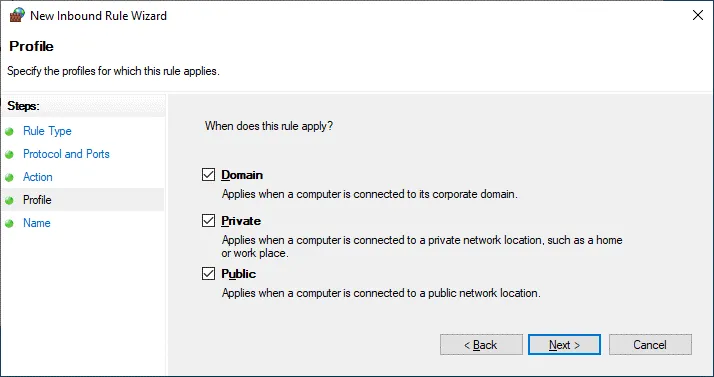
- Name. Enter the firewall name, for example, NAKIVO Transporter In
After configuring the firewall in Azure and inside the Azure Windows VM, we can go on to configure VMware backup to Azure in NAKIVO Backup & Replication.
Installing the NAKIVO Transporter
Now, we run the NAKIVO Backup & Replication Windows installer on our virtual machine in Azure.
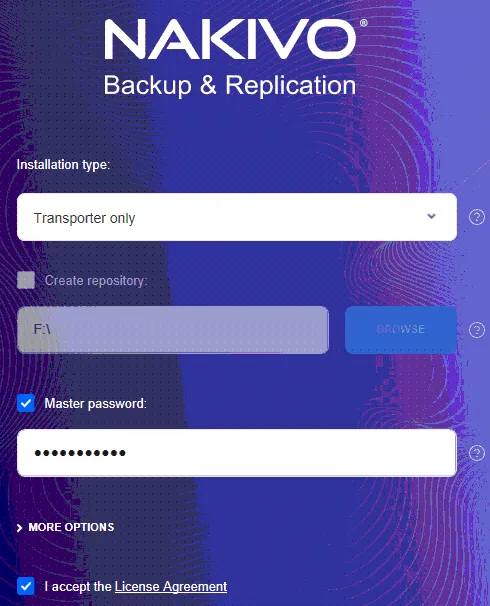
- For installation type, choose the Transporter only installation. If we choose the Full solution, we would also be installing the Director component, which would need its own connection to our VMware or Hyper-V inventory. However, we want to use our existing Director server and inventory connection to our production environment and only use our cloud resource as a Transporter and Backup Repository.
The Director is installed on a local machine in the office in our case. Enter the master password for better security.

- To see additional details about the installation, you can click More Options on the installation screen. As mentioned above, there are network connectivity considerations to be made in our configuration for cloud. We will keep the default Transporter port at 9446.
If you need to use a different port, you can set that here as well. You need to make sure that the firewalls in between the machines running Transporters and Director will allow the traffic through to this port. This includes our Azure network security group configuration.

- After we click Install and the installation is completed, we will see the next steps be completed on our Director server. Basically, we need to add the new cloud Transporter to our NAKIVO environment and then create a new repository in the cloud using that cloud Transporter.

Attaching the Transporter running in Azure
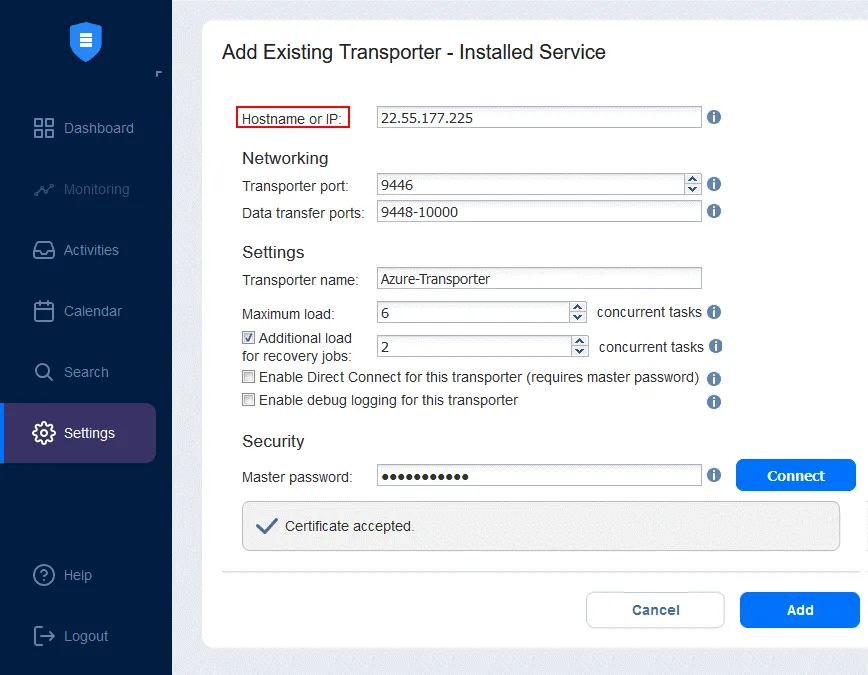
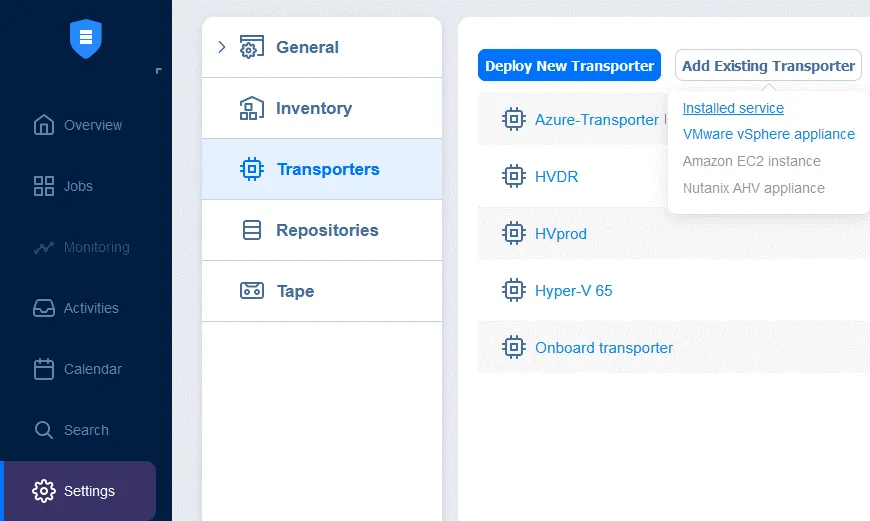
Below, we have logged into the NAKIVO Backup & Replication Director server appliance and navigated to the Transporter configuration by going to Settings > Transporters > Add Existing Transporter > Installed service.
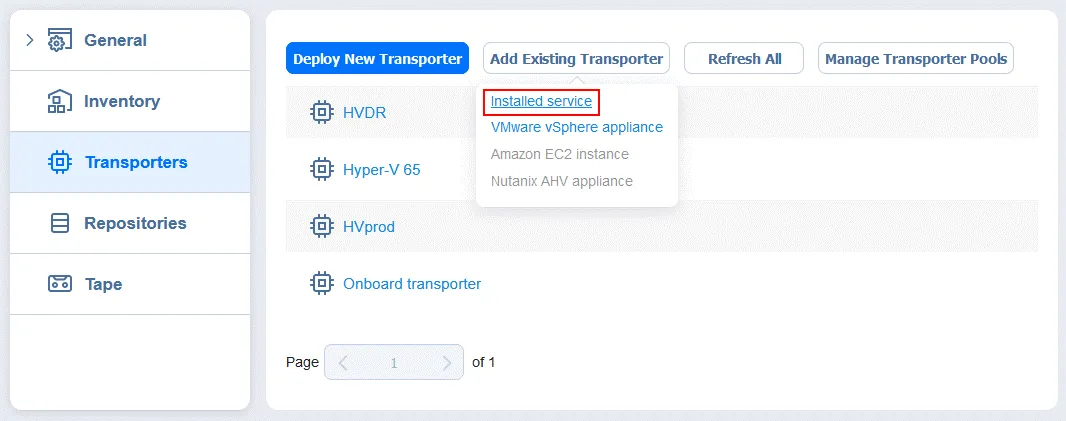
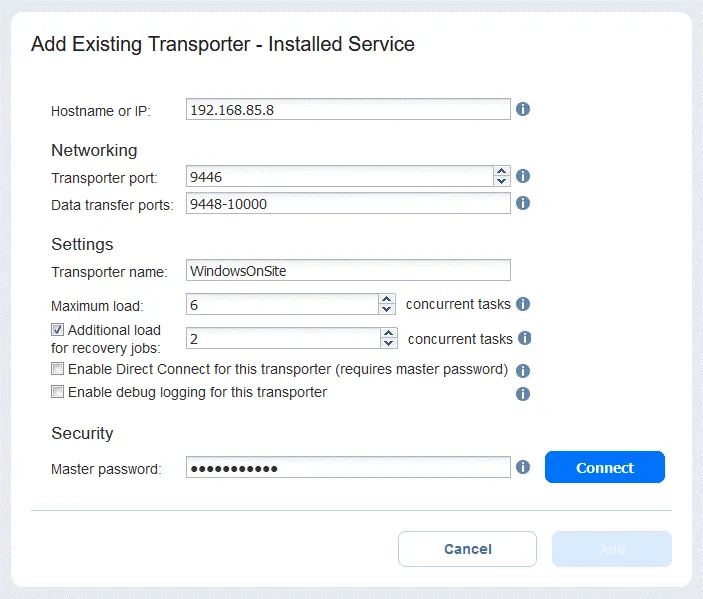
- Enter the IP address of the Azure Transporter virtual machine that we have provisioned above (the public IP address of our Azure VM is 22.55.177.225).
Make sure to match the Transporter port to the port you specified in the Transporter installation if it is different from the default (we use the default 9446, 9448-10000 TCP ports).
- Enter the master password if you have set this password on the Transporter installed on the Azure Windows VM.
- Finally, name the Transporter. For easier identification, we are simply calling it Azure Transporter.
Once the Azure Transporter installation is completed successfully, you can expand this Transporter and see the configured properties.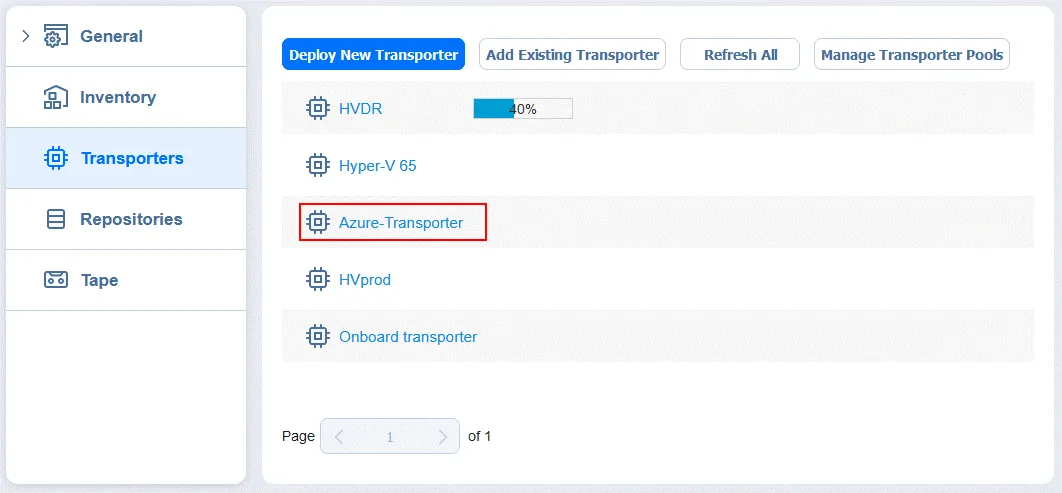
Creating a backup repository in Azure
Now, we can create a new repository in the Azure cloud that is required for VMware or Hyper-V backup to Azure. Go to Settings > Repositories and click Add Backup Repository > Create new backup repository.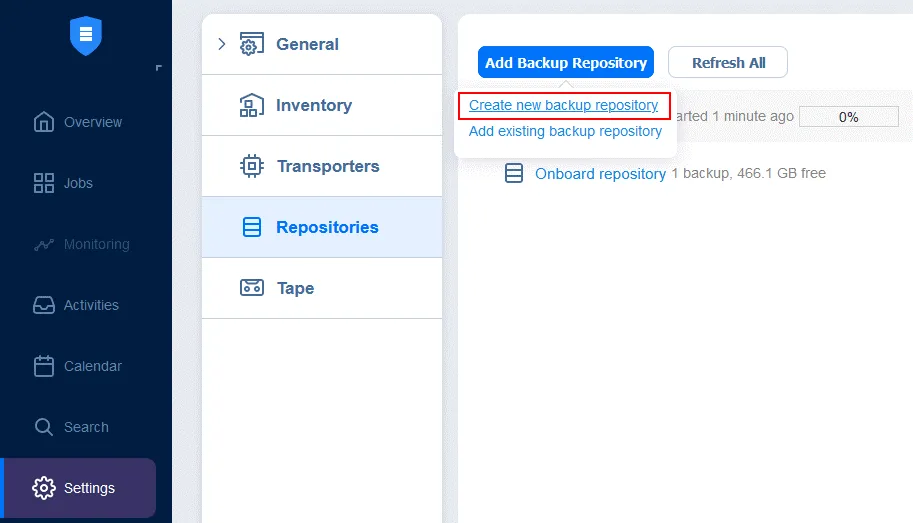
- Select Local folder as repository type.
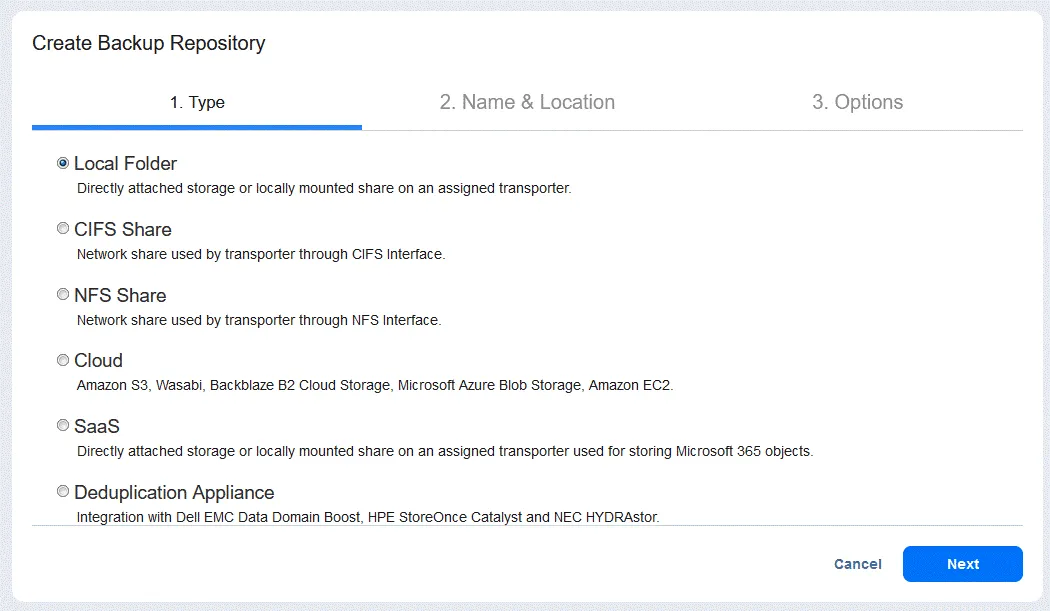
- Specify name and location.
Here we choose to use our Assigned transporter, that is, Azure Transporter. Also, note that the Path to the local folder is set to F:\ which is the volume located on the dedicated virtual disk attached to our Azure VM. NAKIVO Backup & Replication will automatically create a NAKIVOBackup directory under the directory that we specify.
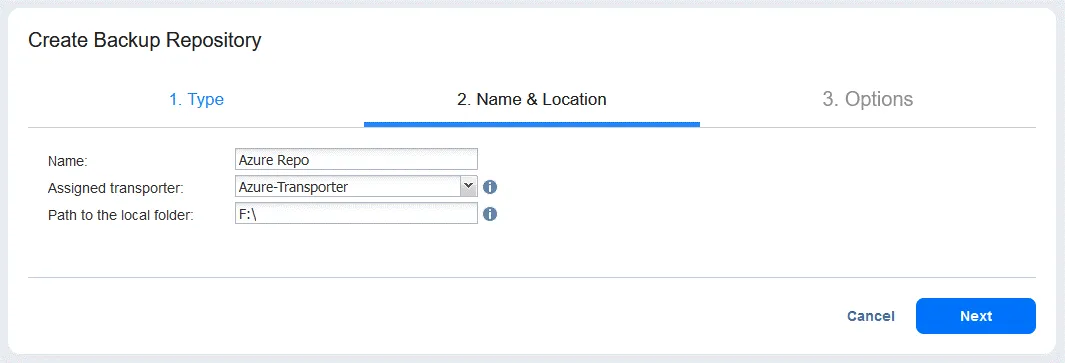
- You can leave default settings in the Options.
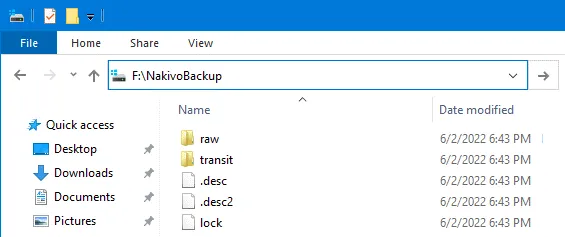
Below, after we specified the F:\ drive for our repository, we see the NAKIVOBackup directory created along with the default files and folders for the repository. (C: is system, D: is for temporary files, E: is the virtual DVD drive and F: is the disk for backups).
Running a backup to Azure
At this point, we have a functioning Transporter and repository located in our Azure cloud. We can now select it as the destination for our backup and backup copy jobs as we would with any other backup target.
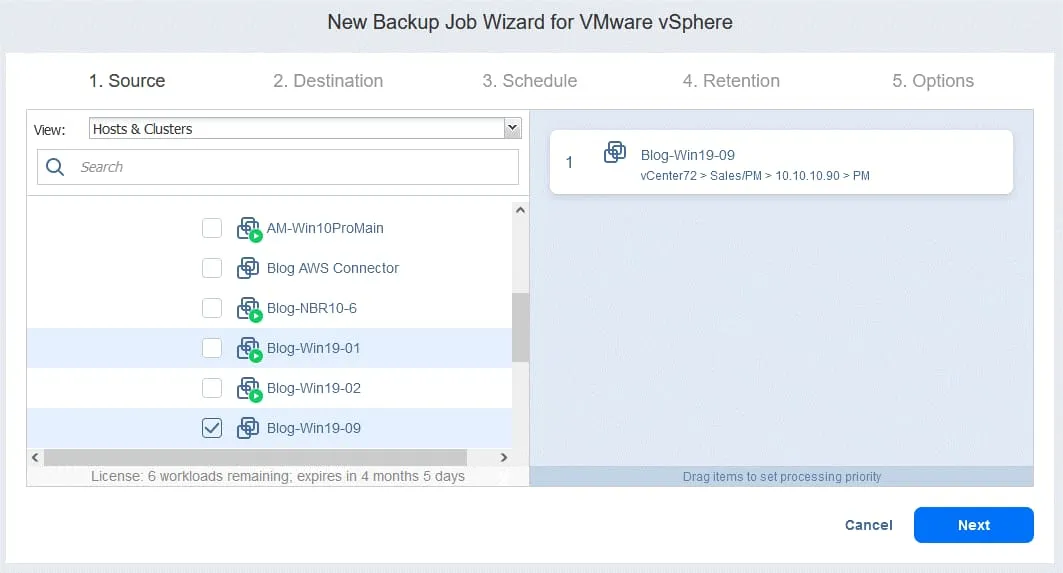
- Go to Jobs in the NAKIVO dashboard and click Create > VMware vSphere backup job to proceed with VMware backup to Azure. If you need to run a Hyper-V backup to Azure, select the corresponding option in this menu. Similarly, you can start a backup job for all supported sources.
- Select the needed items to back up. We select a VMware VM in our example.
- For Destination, select your backup repository located in Azure. We select Azure Repo.
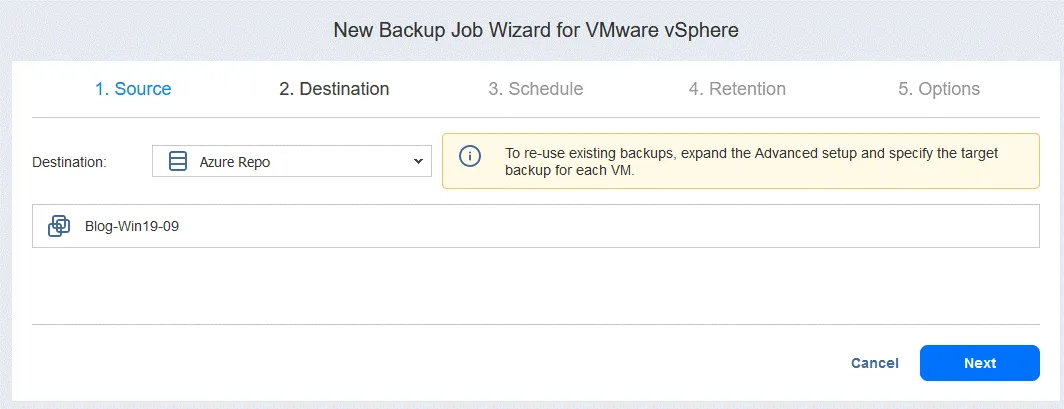
Complete the other steps of the backup wizard to finish the configuration of VMware backup to Azure.
Method 2: Copying Backups via SMB Protocol
This method uses the SMB protocol to copy the NAKIVO backups to the cloud file share. The file share can be provisioned without using a virtual machine in Azure – we simply provision a file share under a storage account.
The file share method relies on an on-premises Windows Transporter used to connect to a cloud file share. The reason we have to use a Windows Transporter is the technical limitations of Linux and NAS-based Transporters with Azure file shares.
Let’s take a look at how to set up this method for Azure cloud backups.
Provisioning an on-premises Windows Transporter
The first step is to provision a Transporter service on a Windows server to connect to the Azure file share.
Take note of the Transporter port and make the appropriate firewall exceptions in all the firewalls in between to avoid issues with network communication. We can see this by selecting the Options link in the installation dialog box, which expands the details, including the port used.

Creating an Azure file share
Now that we have an on-premises Windows Transporter, we can create the file share in Azure.
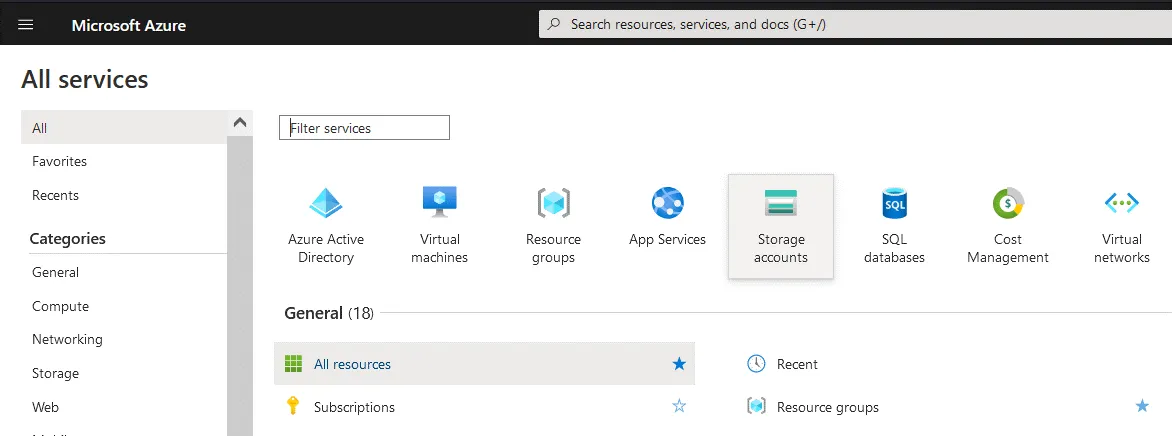
- To do that, navigate to Storage > Storage accounts.
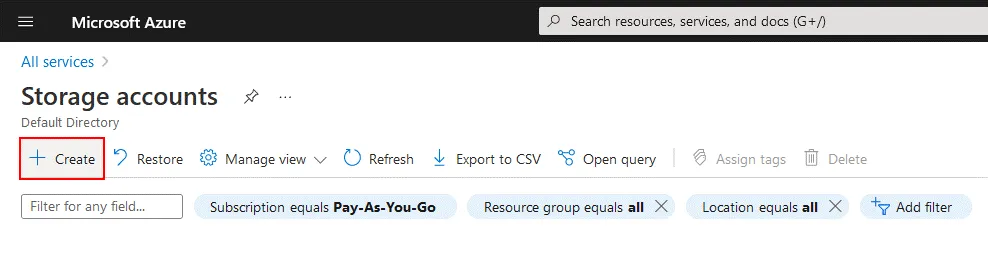
- Now, create a new storage account to be used to create a file share. We are using an existing Resource group.
Click Create to create a new storage account.
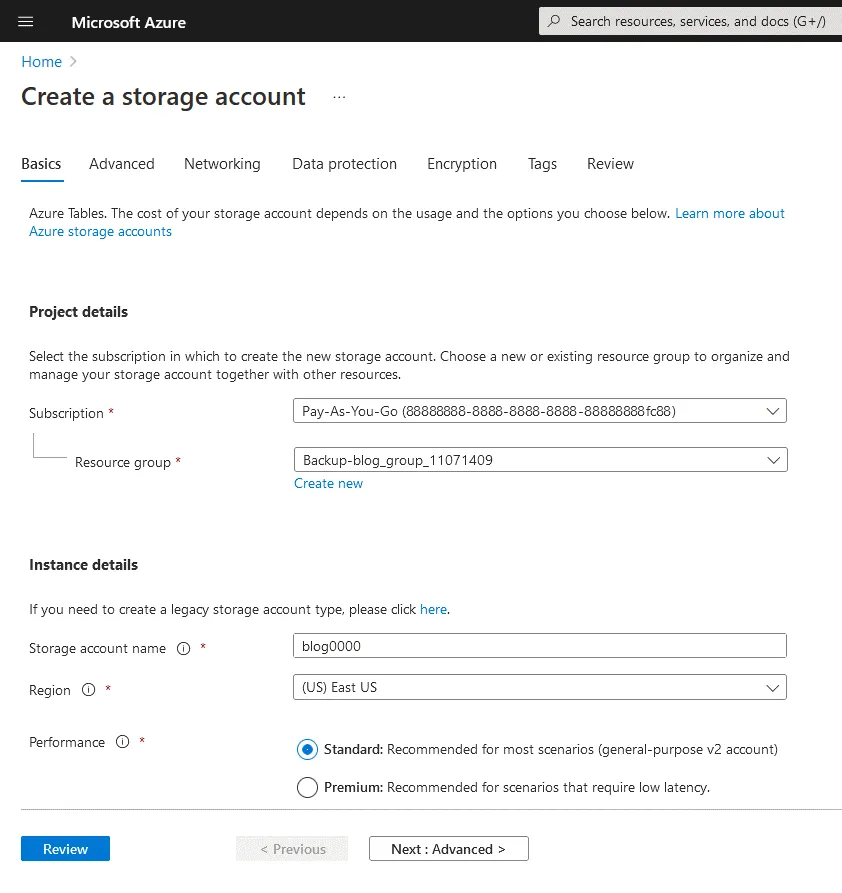
- Create a storage account by completing the steps. The main steps are defining a storage account name and selecting a region.
The storage account name will be used as the username for accessing the share. We name the account blog0000.
- Once we have created the storage account, we can see the account details on the corresponding page of the Azure web interface.
After selecting the created storage account, go to Data storage > File shares.
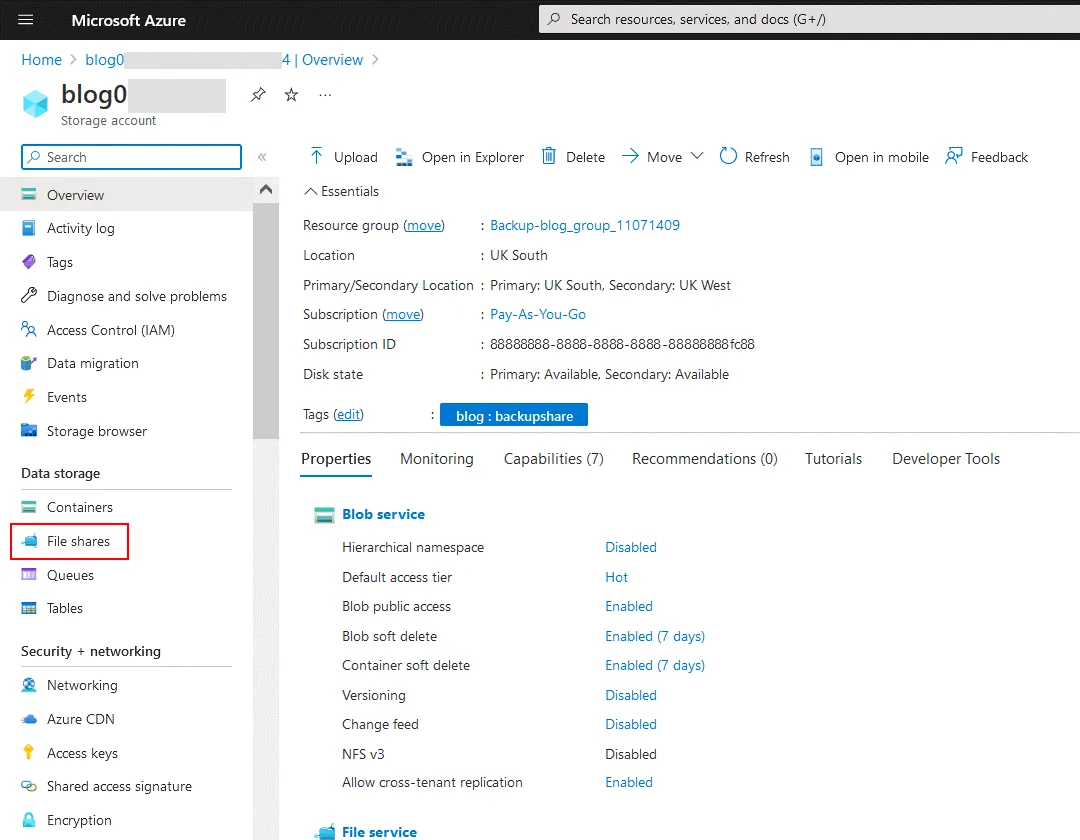
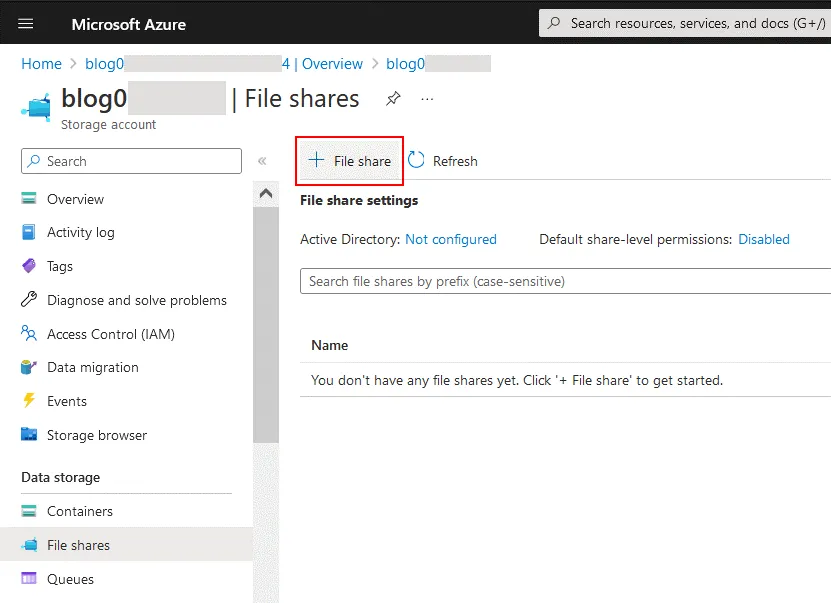
- On the File Shares page of your storage account, click File share to add a new file share.
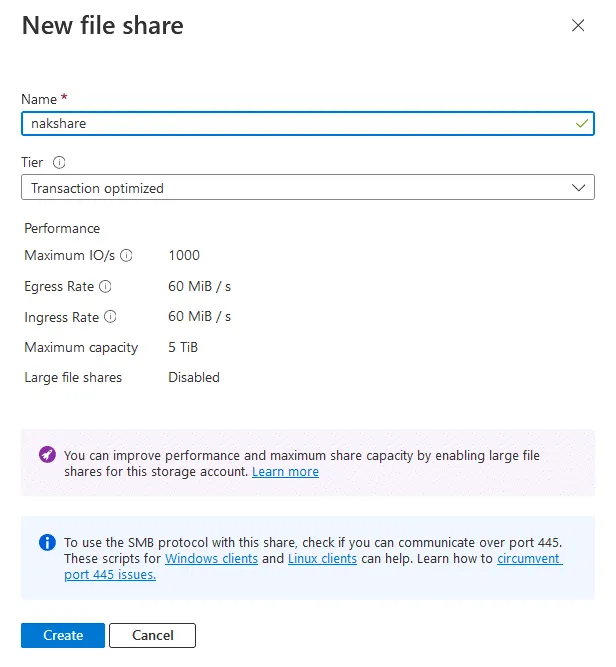
- Enter a file share name and select a tier.
Here we have created a new file share called nakshare. The quota basically sets the storage limit on the file share so you can control the maximum amount of data that is copied to the share. Click Create.
- Now we need to find the username and password. To do that, click the new file share and then click Connect.
A panel on the right side of the window opens. This panel contains three tabs: Windows, Linux and macOS. As we installed a Transporter on a Windows machine, we select the Windows tab. Select a drive letter to which you want to mount the SMB file share on your Windows machine, for example, S. Then click Show script to get a script with the address and credentials for connecting to the created share.
 This will open a box containing an actual net use statement with the file share path as well as the user name and password exactly as you would enter it in a command line with net use. As mentioned in the connection box, we need to make sure we have port 445 open for incoming traffic. TCP port 445 is required for the operation of the SMB protocol.
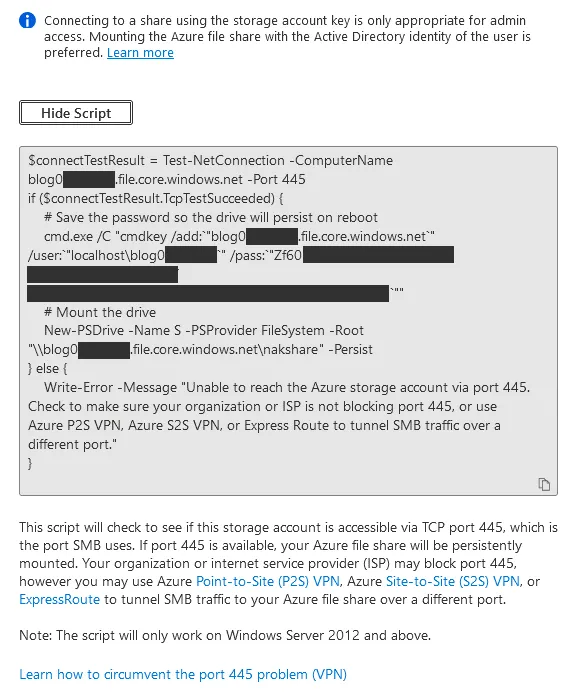
An example of the script for connecting to the SMB share in Azure for Windows:
$connectTestResult = Test-NetConnection -ComputerName blog0000.file.core.windows.net -Port 445
if ($connectTestResult.TcpTestSucceeded) {
# Save the password so the drive will persist on reboot
cmd.exe /C “cmdkey /add:`”blog0000.file.core.windows.net`” /user:`”localhost\blog0000`” /pass:`”Zf60****************************************************************************`””
# Mount the drive
New-PSDrive -Name S -PSProvider FileSystem -Root “\\blog0000.file.core.windows.net\nakshare ” -Persist
} else {
Write-Error -Message “Unable to reach the Azure storage account via port 445. Check to make sure your organization or ISP is not blocking port 445, or use Azure P2S VPN, Azure S2S VPN, or Express Route to tunnel SMB traffic over a different port.”
}
Copy the share path, username and password, which you will need later.
NOTE: You can also find your password information to connect by clicking on the storage account name > Access keys and then you will see your access keys, that is, passwords, in the right-hand window under the corresponding key sections.
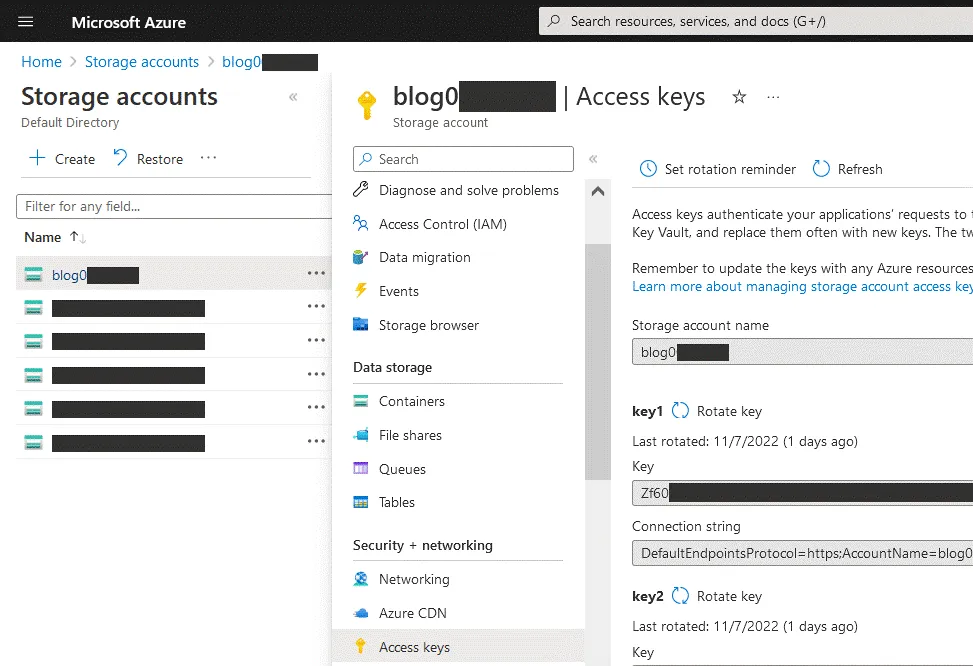
Thus, the storage account name is a username for accessing the SMB share, and the access key is the password.
We can also test our connection by creating a network drive mapping to the Azure file share to make sure that we have the correct connection information.
Adding the existing Transporter
Now, we can configure NAKIVO Backup & Replication to use the new Azure file share as a new backup repository. First, we add the onsite Windows Transporter previously created by going to Settings > Transporters > Add Existing Transporter > Installed service.
Enter the IP address of the machine on which the local (onsite) Transporter is installed. Enter the Transporter name, for example, WindowsOnSite. Enter the master password if needed.
Creating a backup repository
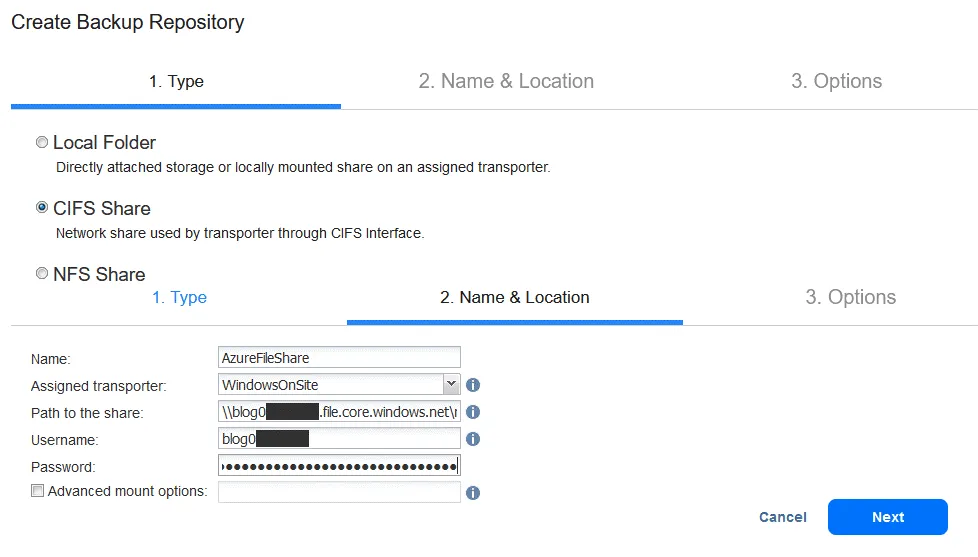
Next, we create a new backup repository and use the same connection information we found above (in the Azure web interface). To create a backup repository on the remote SMB share, select the CIFS share option in the web interface of NAKIVO Backup & Replication at the first step of the Create Backup Repository wizard and complete the other steps of the wizard.
In this example, we enter the following settings, which we have copied from the SMB connection script for Windows displayed in Azure:
- Path to the share: \\blog0000.file.core.windows.net\nakshare
- Username: blog0000
- Password: Zf60**************************************
Once we add the connection information, we should see the new repository successfully added.
Now we can run VMware backup to Azure and restore VM from Azure backup.
Advantages and Disadvantages of the Two Methods
| Method 1: Provisioned VM in Azure | Method 2: SMB copy method | |
| Advantages |
|
|
| Disadvantages |
|
|
Final Thoughts
NAKIVO is a cloud diverse platform that allows us to use different cloud providers, including Amazon S3, Wasabi, Azure Blob storage and Microsoft Azure. If you want to back up your data directly to Microsoft Azure Blob or any other cloud storage (such as Amazon S3 or Wasabi), use NAKIVO Backup & Replication and try out many more data protection features that the solution offers.