A Step-by-Step Guide to Setting Up Office 365 AD Sync
Organizations use Active Directory to centrally manage Windows computers and users. Configuring an Active Directory Domain Controller (ADDC) on Windows Server is convenient, and admins can use this server to authenticate users, configure permissions, and manage access to shared resources.
Many companies already using Windows have moved to a Microsoft cloud platform such as Microsoft 365 (previously Office 365) or Azure. In this case, a system administrator has to create accounts for users in Microsoft 365. Sometimes organizations prefer to use the same credentials for local user accounts and cloud user accounts. Administrators can synchronize the users of a local domain on-premises with Office 365 and Azure Active Directory (Azure AD) so as to use the same user account for both local and cloud authentication. This is known as a hybrid deployment, and it is popular among organizations using Microsoft software products.
This blog post covers Office 365 AD sync and explains how you can perform Office 365 Active Directory sync to synchronize on-premises and cloud user accounts for Microsoft products.
Office 365 and Azure AD
Office 365 is a tenant in Azure Active Directory and uses the portal to store data used for authentication and to configure permissions for access to the Microsoft cloud environment. The administrator for the Office 365 tenant can access the Azure portal to manage permissions and configure other settings. If you have a running ADDC (Active Directory Domain Controller) on-premises, you can sync Office 365 with AD (synchronize your on-premises Active Directory and Azure Active Directory with Office 365) and, as a result, achieve Office 365 Active Directory integration.
This approach provides you with a hybrid identity and allows users to use the same credentials to access Office 365 services and local resources in your office/data center. Active Directory data such as users, groups, and contacts are synchronized in this case. Directory synchronization is an important step in moving to the cloud if you want to have a hybrid environment.
What is Azure AD Connect?
Azure AD Connect is a lightweight tool that is installed on a local server, which acts as an ADDC. Azure AD Connect synchronizes your local Active Directory identity data with Azure Active Directory used by Office 365 in the cloud. This tool can be installed on a domain controller or on a Windows Server that is a member of the domain. Azure AD Connect has replaced Directory Synchronization Tool (DirSync), which was deprecated.
Azure AD Connect supports the following functionality:
- Synchronization of password hashes
- Pass-through authentication
- Federated authentication. Authentication can be requested for another identity provider by a client computer.
By default, directory sync is performed from the on-premises AD to the Azure AD used by Office 365. However, you can configure Active Directory sync in the reverse direction and synchronize the change from Azure AD to your on-premises AD. By default, synchronization is scheduled to run every 30 minutes. You can edit the scheduling configuration, and force the Office 365 directory sync in PowerShell. You can configure delta sync to sync only the data changed since the previous Office 365 AD sync. The recommendation is that a delta sync should be performed within 7 days from the last sync.
Requirements
To install and run Azure AD Connect, ensure the following:
- An Active Directory Domain Controller running the Windows Server operating system must be installed in configured on-premises.
- The on-premises Active Directory functionality level must be Windows Server 2003 or later.
- You must have domain administrator permissions or the permissions for a local administrator on a computer that is a domain member.
Supported Operating systems: Windows Server 2012, Windows Server 2016, Windows Server 2019 with a GUI. Windows Server Core is not supported. The edition of Windows Server must be Standard or higher. Essentials editions are not supported.
.NET Framework 4.5.1 or later must be installed on a Windows Server machine that runs Azure AD Connect.
PowerShell 3.0 or later. The script execution policy must allow you to run scripts. The recommended policy is RemoteSigned.
You must have an external domain associated with your Office 365 tenant.
You need to have access to an Azure tenant (for your Office 365 tenant/admin account). Global administrator permissions are required.
A directory in Azure AD must be created. A domain controller in Azure AD must be configured as writable.
Network requirements:
- An outbound HTTPS connection to Microsoft servers
- TCP 80. HTTP protocol is used to download Certificate Revocation Lists for the verification of TSL/SSL certificates
- TCP 443. HTTPS is used to synchronize data with Azure Active Directory
- TLS 1.2 must be enabled on a Windows machine.
Preparing the Environment
Check the UPN (or User Principal Name) suffixes for your local domain used by the on-premises Active Directory. The local domain must be routable, and the local domain suffix should not be .local, .test, etc. Domains that have this type of suffixes are classified as non-routable, and these domains can be synchronized only with an .onmicrosoft.com domain. For example, if you have the .nakivo.test domain in your on-premises Active Directory and nakivo.onmicrosoft.com in Azure Active Directory, user1@nakivo.test should be synchronized to user1@nakivo.onmicrosoft.com. If you have a domain.net name in your local Active Directory, and the name of the external domain used in Office 365 and Azure is also domain.net, then user1@domain.net from on-premises Active Directory can be synchronized with user1@domain.net in Azure AD used by Office 365 for authentication and for configuring permissions. Thus the domain name must be valid and must have correct suffixes such as .com, .net, .uk, .us, .edu, etc. for complete synchronization and for matching names. UPNs of local users in your Active Directory can be synchronized with Azure AD and Office 365.
Note: Domain names used in this blog post are used as examples. Please use the correct domain names according to your environment’s configuration.
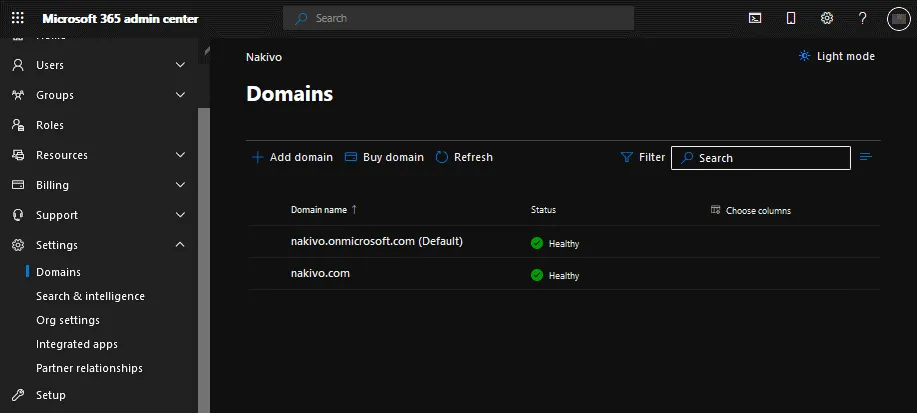
You can check your domain names for Office 365 in the Microsoft 365 admin center. Go to Settings > Domains to see available domains that can be linked to your Office 365 tenant.
Making a domain routable
You can edit the settings of your on-premises domain to make the domain routable for better synchronization capabilities by adding the needed UPN suffixes. Add UPN suffixes to your existing on-premises domain to match the names of users on-premises and in Microsoft 365 (Azure). First, register a new suffix, and then update Active Directory users on-premises to use the updated suffix.
Adding the new UPN suffix
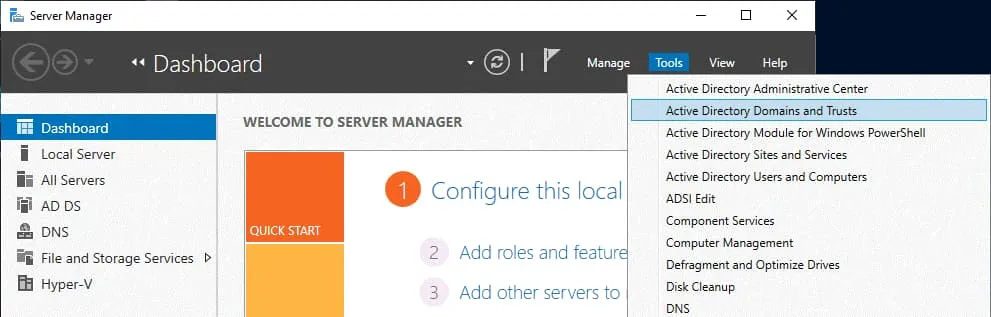
Go to Active Directory Domains and Trusts on your on-premises domain controller. In order to do this, open Server Manager, click Tools, and, in the menu that opens, click Active Directory Domains and Trusts. As an alternative, run domain.msc in the Run menu (press Win+R to open the Run menu) or in the command prompt (CMD).
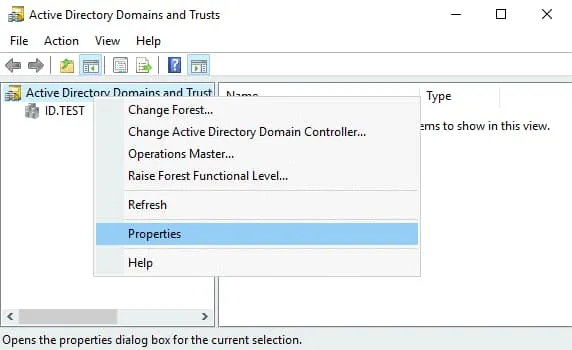
The Active Directory Domains and Trusts window opens. Right-click Active Directory Domains and Trusts and, in the context menu, click Properties.
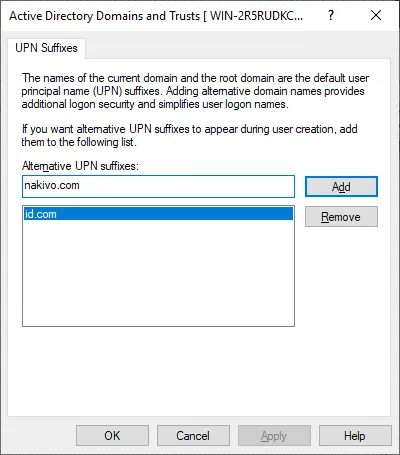
Enter the correct standardized domain name with the correct suffix, for example, id.com, or nakivo.com. Click Add, then click OK to save settings and close this window.
Editing UPNs for existing users
Now you should edit UPN suffixes for existing users on the on-premises Active Directory domain controller.
Go to Active Directory Users and Computers by opening Server Manager and going to the Tools menu (just as you did before). As an alternative, press Win+R to open the Run menu, type dsa.msc in the Run dialog box, and click Enter.
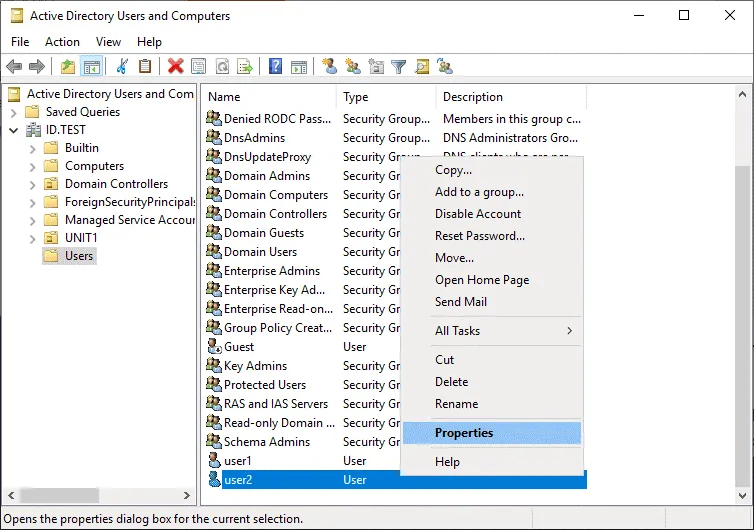
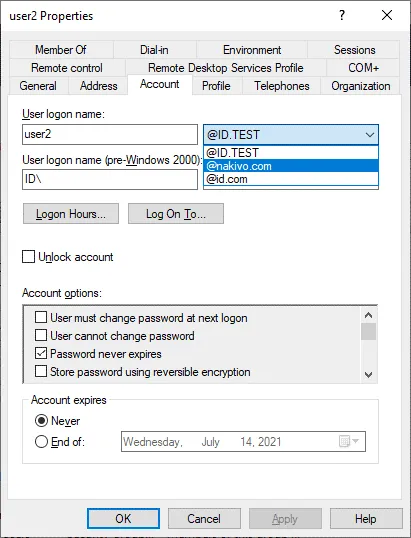
In the Active Directory Users and Computers window, expand your domain and click the Users directory. Select a domain user, right-click the domain user, and hit Properties in the context menu.
Select the Account tab in the user properties window. In the drop-down menu, select the correct domain name with the correct suffix. Hit OK to save the settings and close the window.
Repeat this operation for all users that are members of your on-premises domain (users for whom you want to perform Office 365 AD sync). If you have a large number of users in your on-premises Active Directory, use PowerShell for bulk editing instead of editing properties of each user manually. Use commands above for this purpose:
$LocalUsers = Get-ADUser -Filter “UserPrincipalName -like ‘*domain.local'” -Properties userPrincipalName -ResultSetSize $null
$LocalUsers | foreach {$newUpn = $_.UserPrincipalName.Replace(“@domain.local”,”@domain.com”); $_ | Set-ADUser -UserPrincipalName $newUpn}
Set your correct domain names instead of domain.local and domain.com based on the configuration in your environment.
You can change a UPN and the address in PowerShell with the MSOnline PowerShell module (Azure AD PowerShell module).
Set-MsolUserPrincipalName -UserPrincipalName user@olddomain.com -NewUserPrincipalName user@newdomain.com
After you update the UPNs, you are ready to synchronize on-premises Active Directory Domain Services with Microsoft 365 and Azure Active Directory.
Editing email proxy attributes
Edit the email attribute for each user and set an SMTP proxy email address.
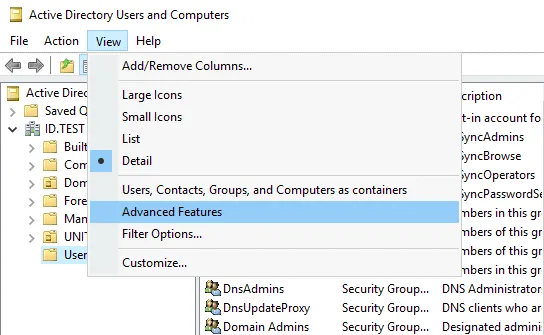
To display the Attribute Editor tab where you can set the SMTP proxy (in the user properties window), in the Active Directory Users and Computers window, click View > Advanced Features.
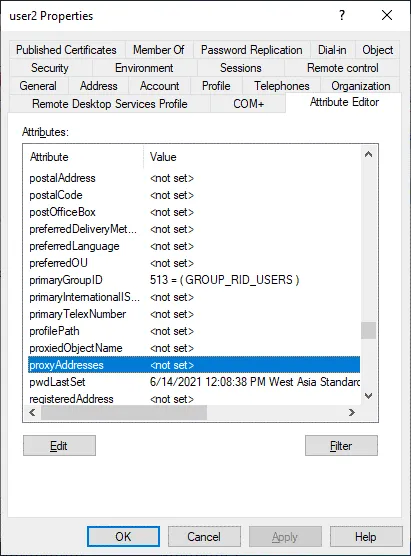
Now select a user, open user properties, click the Attribute Editor tab, then double-click the proxyAddresses attribute.
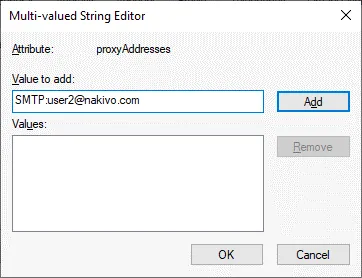
Office 365 email addresses should be defined as SMTP proxy addresses for Active Directory users on the on-premises domain controller, for example:
SMTP:user2@nakivo.com
The primary email address must contain SMTP in uppercase. Other proxy addresses for emails can begin with smtp in lowercase.
Hit Add to add the value, then hit OK to save the settings.
Repeat this action for each needed user for Office 365 sync.
Checking user names in the Office 365 admin center
Open the Microsoft 365 admin center, go to Users > Active users and check user names and domain suffixes used in their names. If you have a custom domain such as nakivo.com, opt for using these user principal names rather than the names with the nakivo.onmicrosoft.com domain.
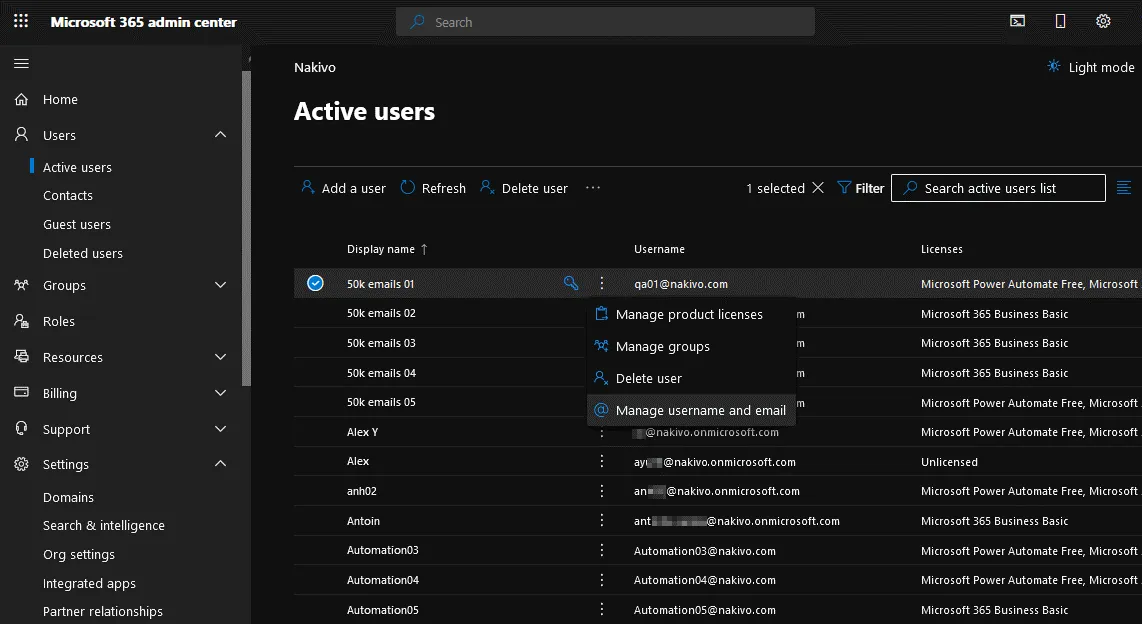
Click three dots near the appropriate user, and in the menu that opens, hit Manage username and email to select the needed domain for a user name. The ideal situation is when domain names and user names in Office 365 match user names in the on-premises Active Directory.
Open Groups in the Microsoft 365 admin center and edit addresses of groups just like you edited the user email addresses.
Installing Azure AD Connect
Download Azure AD Connect from the Microsoft website by using the link:
https://www.microsoft.com/en-us/download/details.aspx?id=47594
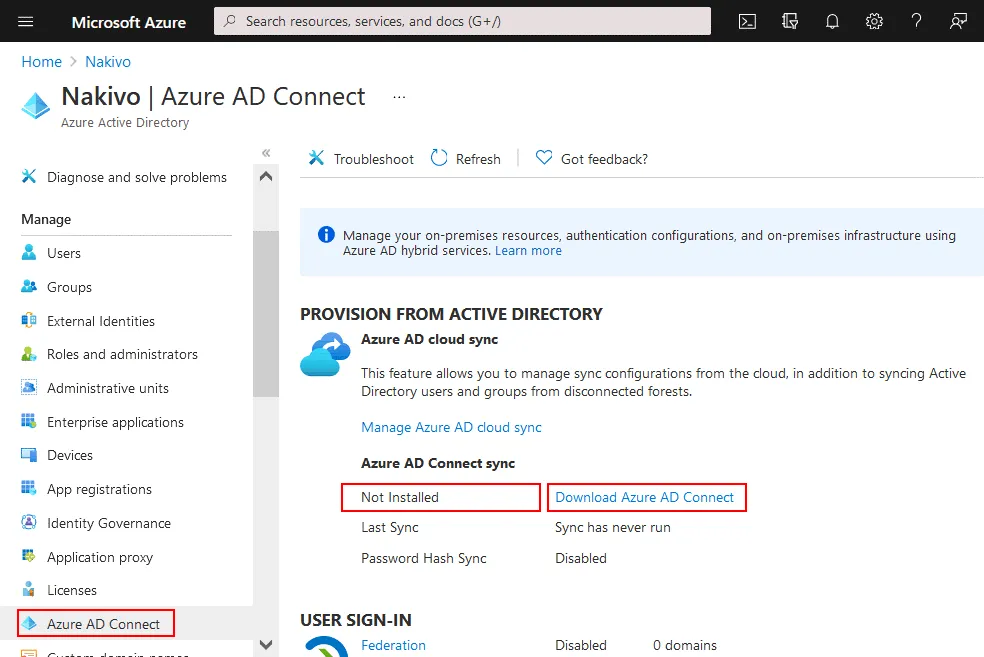
You can check the Azure Connect status and get a download link from the Azure AD Connect page in the Microsoft Azure portal. To do this, go to Azure Active Directory > Azure AD Connect in the Azure portal.
Store the Azure AD Connect installer file on the server on which you are going to install this tool, for example, on a domain controller.
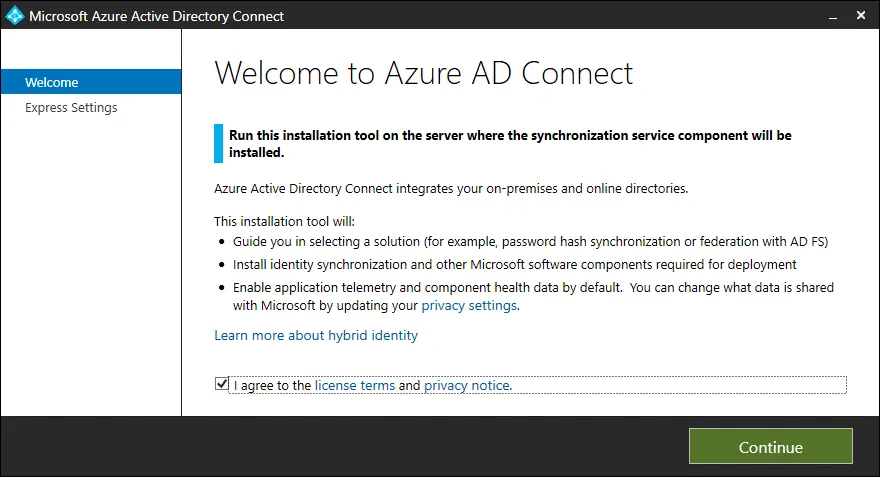
Run the Azure AD connect installer file (AzureADConnect.msi). The Azure AD Connect wizard opens.
Welcome. On the Welcome stage select “I agree to the license terms and privacy notice” and click Continue.
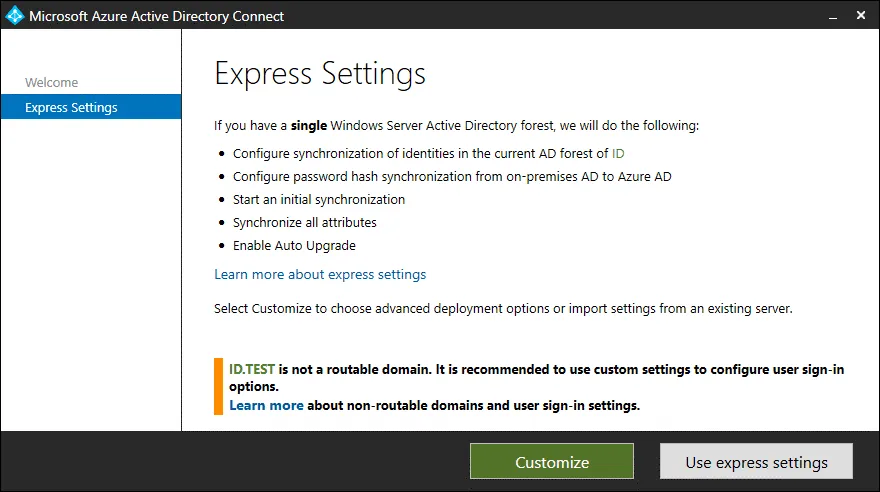
Express Settings. Select one of the two available options – Customize or Use express settings. The Customize option provides you with more control when configuring Office 365 Active Directory sync.
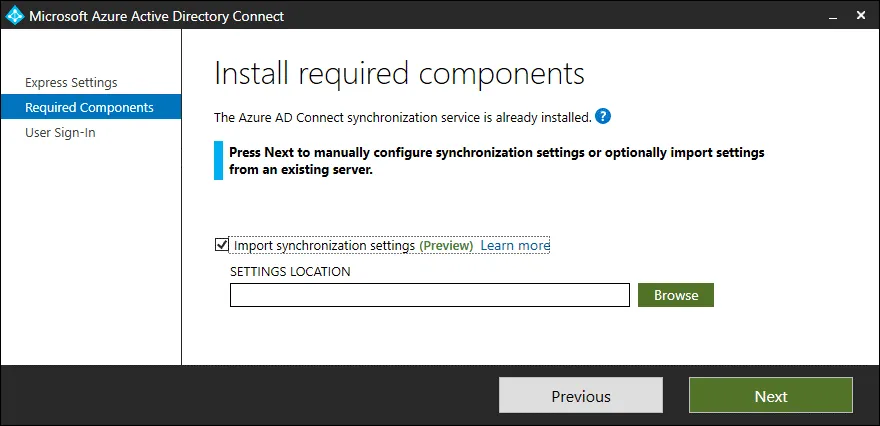
Required Components. Select required components to install and define configuration settings for selected options.
- Specify a custom installation location
- Use an existing SQL Server
- Use an existing service account
- Specify custom sync groups
- Import synchronization settings
Click Install to continue.

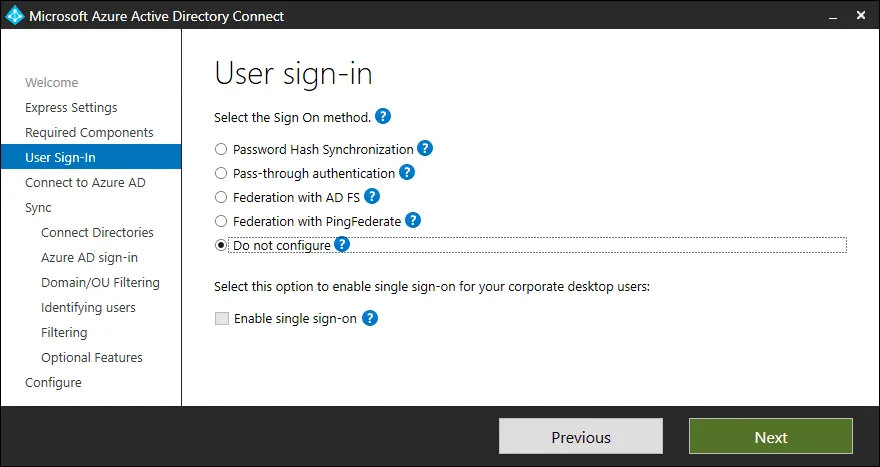
User Sign-In. Select one of the available sign-on methods. Some options require additional steps to configure.
- Password Hash Synchronization. A hash of a user’s password from the on-premises Active Directory is synchronized with Azure Active Directory.
- Pass-through authentication. Users can use the same password in the on-premises AD and in the cloud (Office 365, Azure) but no additional infrastructure and federated environment are required.
- Federation with AD FS. A hybrid environment should be configured by using Active Directory and Active Directory Federation services deployed on-premises. Certificate renewal and additional AD FS server deployments are supported.
- Federation with PingFederate. This option can be used if an enterprise PingFederate server is deployed in your infrastructure to provide a single sign-on for user authentication.
- Do not configure. You can use a solution that is not managed by this wizard for federated sign-in. Users logged into an enterprise network are able to access cloud resources after you sync Office 365 with AD without the need to enter passwords again.
Read the blog post about Active Directory Federation Services.
Select Password Hash Synchronization or Do not configure as the recommended option if you are not sure about what to do.
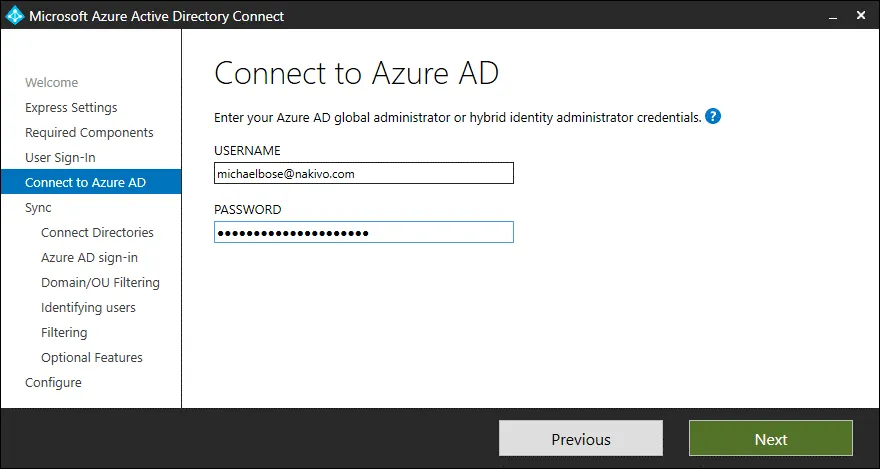
Connect to Azure AD. Enter a user name and password of your Microsoft 365 user account that has global administrator privileges in Microsoft Azure/Office 365 (office 365 administrator credentials). This administrator account is needed to configure Azure AD Connect to make the application possible to perform Office 365 AD sync. Hit Next at each step to continue.
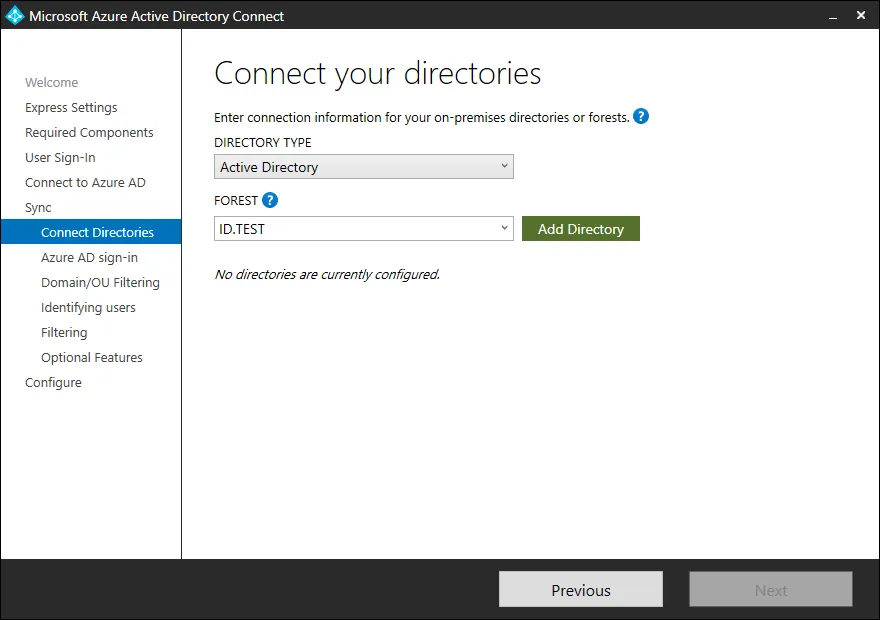
Connect Directories. Enter information for your current Active Directory used in the on-premises domain environment. Select the directory type (Active Directory), specify the domain forest, click Add Directory, and enter domain administrator credentials. If you need to synchronize a domain forest, use the Enterprise administrator credentials.
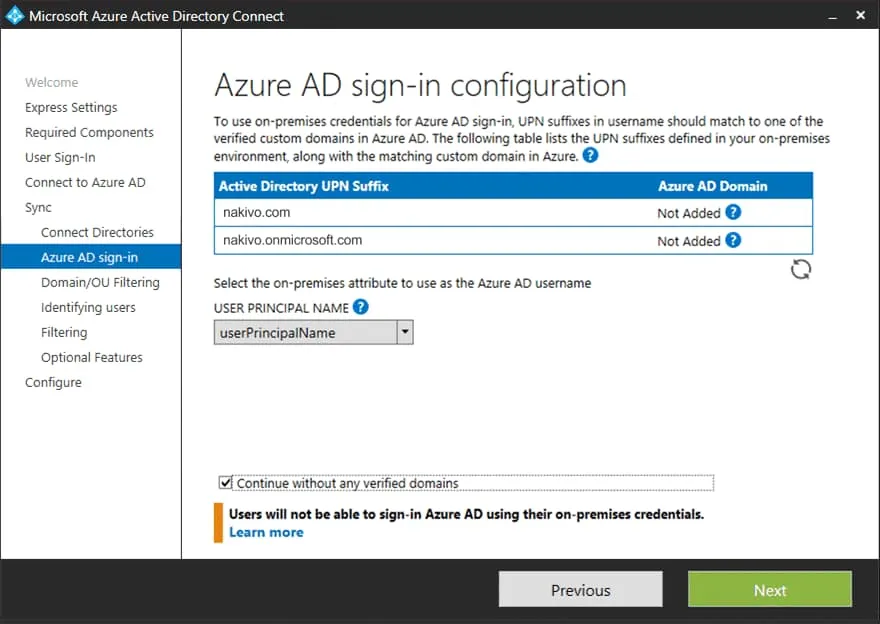
Azure AD sign-in. Check your domains and Active Directory UPN suffixes. Select the on-premises attribute to use as the username in Azure AD and Office 365. We select userPrincipalName. Select the Continue without any verified domains checkbox if your domain is not verified. You can complete the verification process later to allow users to log in to Azure AD and Office 365.
Domain and OU filtering. Leave default settings on this screen to perform Active Directory sync of the entire AD data. Select custom domains and organization units if you need to customize the settings. You can deselect domains or organization units that you don’t want to synchronize.

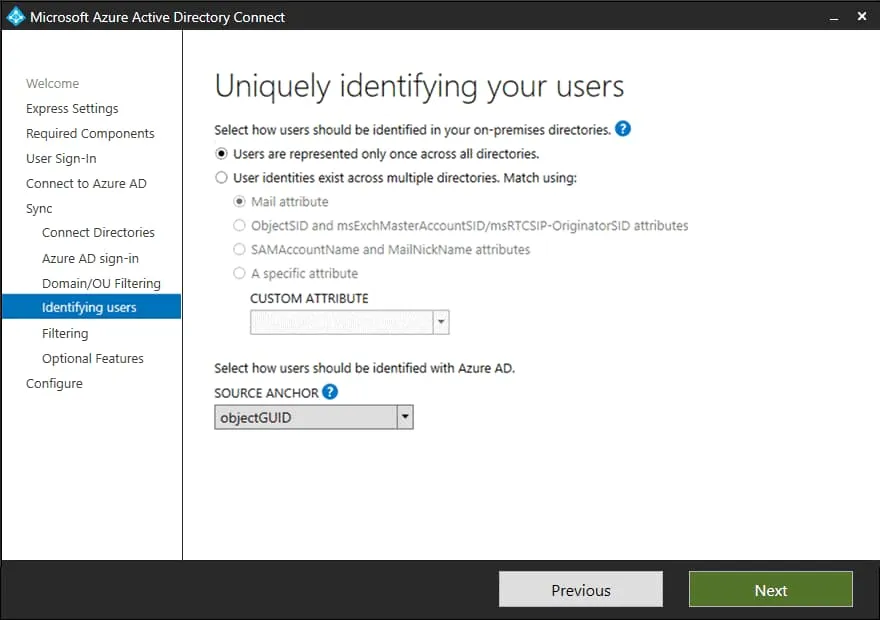
Identifying users. It is recommended that you leave default settings at this step for a basic setup of Active Directory sync with Office 365 (for one Azure AD, one domain, and one AD forest). If you need to perform a more complicated setup, select custom options for user identities across directories. In the SOURCE ANCHOR user identification options, select the default objectGUID option to generate IDs and map users.
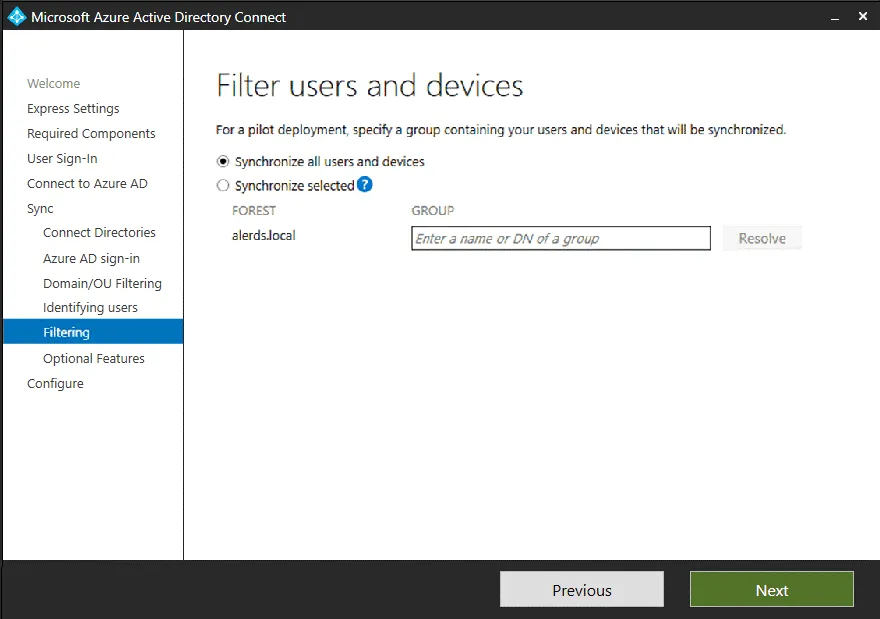
Filtering. Choose to synchronize all users and devices or select custom objects to synchronize. You can use group-based filtering.
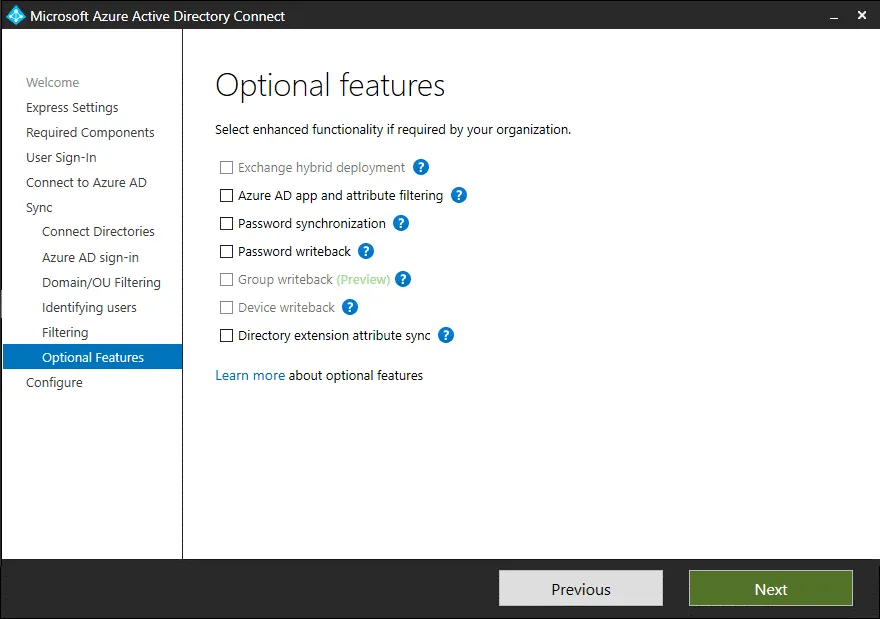
Optional Features. Select additional features if you need them. Hover over the ‘?’ icon next to the name of each feature for tips to help you make the right decision.
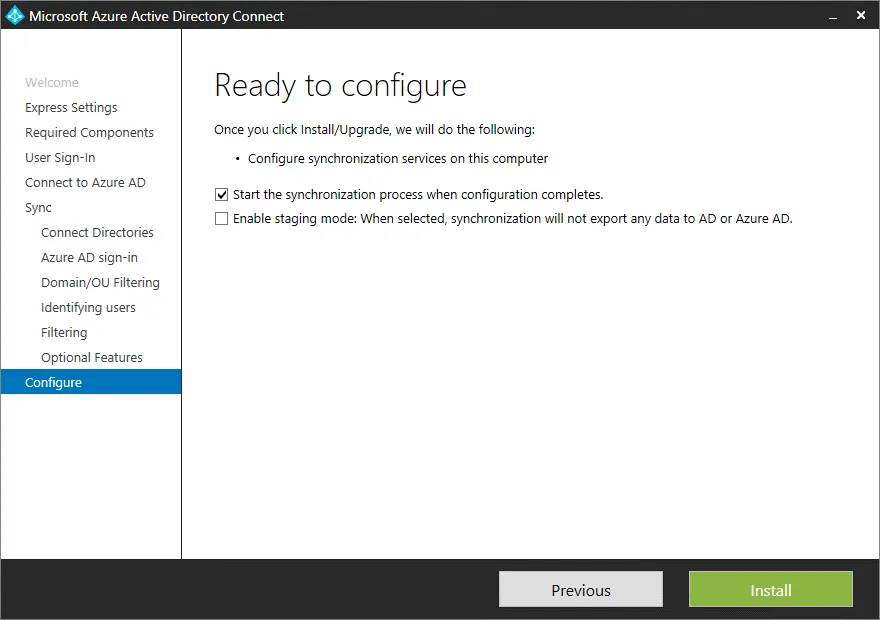
Ready to configure. Select the Start the synchronization process when configuration completes checkbox if you want to start synchronization immediately after finishing this wizard. You can deselect this checkbox and start the synchronization manually when you need it. Hit Install to finish the configuration.
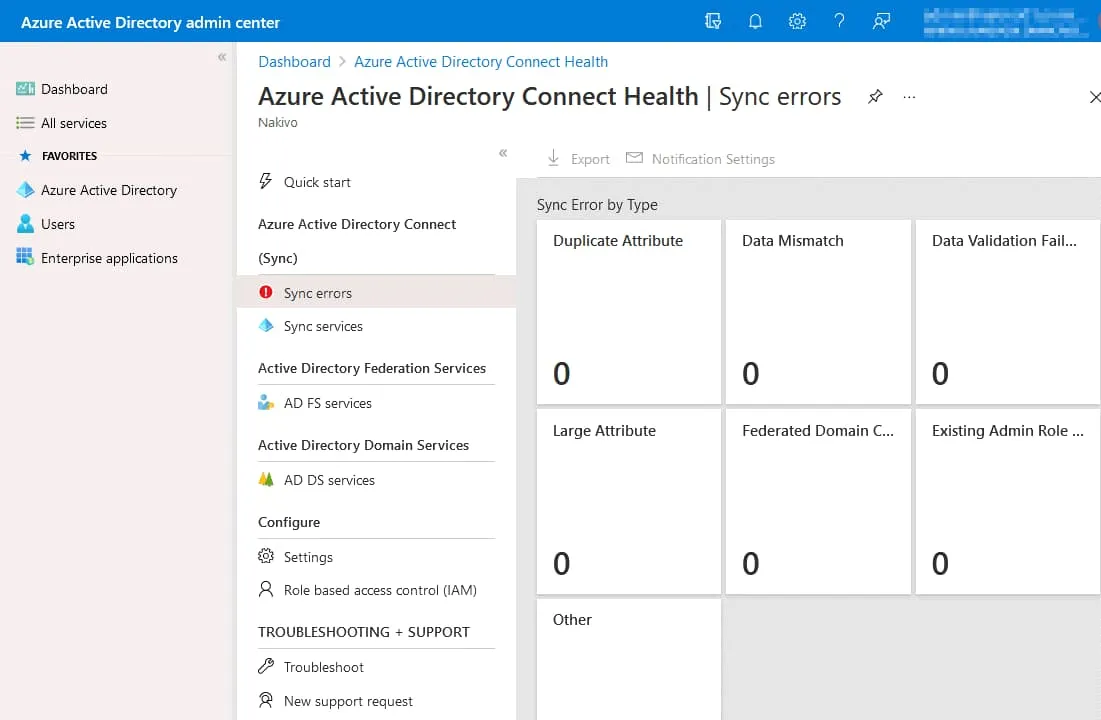
Wait until installation and configuration have finished. When you see the Configuration Complete message, you can click Exit to close the application. Short information about the finished Office 365 AD synchronization process is displayed on the Configuration Complete screen. Then open the Microsoft 365 admin center and check whether Active Directory synchronization with Office 365 was completed successfully. Open the Sync errors section in the Azure AD Connect Health page in the Azure portal to see detailed information about errors. If there are errors, read provided recommendations that can help you fix the errors.
If Office 365 AD sync was completed successfully, you can assign licenses to new Office 365 users that were added after Office 365 synchronization with on-premises Active Directory.
Exporting Azure AD Connect Configuration
You can deploy Azure AD Connect by using the Express mode or Customized mode. With multiple deployments using the same Azure AD Connect configuration to synchronize Active Directory on-premises and Office 365 / Azure, as well as synchronizing multiple AD forests, consider exporting/importing the Azure AD Connect configuration.
After you configure Azure AD Connect in the GUI using a wizard, the configuration is saved to a JSON file stored in the %ProgramData%\AADConnect folder. A JSON file name looks like Applied-SynchronizationPolicy-*.JSON where * means the date/time stamp that helps identify when the configuration was saved. Changes made in the GUI are exported automatically. However, changes made with PowerShell should be exported when needed manually.
In order to import settings, run Azure AD Connect, select the Customize option, on the Install required components screen, select Import synchronization settings, click Browse, and select the JSON configuration file.
Configuration import allows users to make a minimum amount of manual data input to configure Azure AD Connect in a short time and reproduce the identical configuration across multiple servers.
Tools for configuration migration
There are tools to export and import the configuration of Azure AD Connect from one server to another to have an identical configuration when you perform Office 365 Active Directory sync.
Copy the MigrateSettings.ps1 file from C:\Program Files\Microsoft Azure Active Directory Connect\Tools\ or a custom folder where Azure AD Connect is installed on the first server to a custom location, for example, C:\Programs\.
Run the MigrateSettings.ps1 script on the first (existing) server. If you see the output message that a parameter that accepts the “True” argument is not found, edit the script and remove $true from the script.

Run the script and check the directory in the output. Azure AD synchronization configuration is exported to this folder. Copy this Exported-ServerConfiguration-* folder and its contents to the second (new) server.
Run Azure AD Connect on the second server and on the Install required components screen select to import synchronization settings and select the MigratedPolicy.json configuration file (as explained above) located in the copied Exported-ServerConfiguration-* folder.
Other Office 365 AD Sync Options
If you cannot wait for 30 minutes, which is the standard interval between synchronization operations, force Office 365 AD sync by using PowerShell commands. The Azure Active Directory PowerShell module is usually installed with the Azure AD Connect tool.
Import the ADSync PowerShell module:
Import-Module ADSync
Check your current Office 365 AD sync settings:
Get-ADSyncScheduler
Force a delta sync to synchronize only changes made since the previous successful synchronization:
Start-ADSyncSyncCycle -PolicyType Delta
Force a full sync to sync all data:
Start-ADSyncSyncCycle -PolicyType Initial
Change the Office 365 AD sync interval to 10 minutes:
Set-ADSyncScheduler -CustomizedSyncCycleInterval 00:10:00
Keep in mind that manual Office 365 AD sync doesn’t synchronize user passwords. In this case, try to restart the AD sync Office 365 service on a local server running Azure AD Connect and then verify that the credentials are correct.
Configuration Recommendations
Protect a server on which Azure AD Connect is installed. Restrict access for users who are not administrators to the server running Azure AD Connect. Use strong passwords to protect service accounts used by this Active Directory synchronization tool. Knowing the power of this tool, strong passwords are critical in cases when someone gets access to the server running AD sync. You can add trusted users to the ADSyncAdmins group for convenient access management.
Check groups that you are going to synchronize from on-premises AD to Azure AD and Office 365. Not all groups should be synchronized. There can be groups that are useless in the cloud or that have no reason to be synchronized due to security or productivity reasons. Filter security groups and distribution groups that are not relevant for Microsoft 365 and Azure cloud environments. Exclude all administrators groups from Office 365 Active Directory sync.
Don’t consider Office 365 Active Directory sync with Azure AD sync as a backup solution. Some attributes of objects in the cloud are unique, for example, licensing information about Office 365 users. If this specific information is deleted in the cloud, you cannot recover this information by running Office 365 Active Directory sync from on-premises Active Directory. Synchronization of the on-premises Active Directory to Azure is not the same as Active Directory and domain controller backup. Use special tools and backup solutions to protect your Active Directory domain controllers running on-premises and Office 365 data in the cloud.
Office 365 Backup and Active Directory Backup
You should run Office 365 backup regularly and store these backups in a safe place. Office 365 backup should contain the needed data from Office applications such as Exchange Online email, OneDrive, and SharePoint. Office 365 data is stored in the cloud, but if some of this data is corrupted with ransomware or accidentally deleted, having a backup can be the only way to recover that data, especially if you notice the data loss when it is too late.
Active Directory is a centralized management system in a Windows network. The unavailability of an Active Directory Domain controller can bring operations to a halt across a company. Back up Active Directory domain controllers running on-premises to make it possible to recover data if a disaster strikes. Prefer using dedicated third-party backup solutions that support application-aware backup when backing up running servers with running applications.
NAKIVO Backup & Replication is an SMB and enterprise data protection solution that supports Office 365 cloud backup, including such apps like Exchange Online, SharePoint Online, Microsoft Teams and OneDrive for Business. You can back up multiple Office 365 tenants, select all users or custom users, and recover the items you need at a granular level.
NAKIVO Backup & Replication supports physical server backup including Windows servers that act as Active Directory domain controllers and can perform Active Directory backup. Support of application-aware backup allows you to back up domain controllers and have application-consistent data in a backup. Granular recovery is supported for physical server backup too.
Conclusion
Organizations migrating to the cloud are only doing so partially. They continue to use Active Directory services on-premises in combination with cloud services. This is known as a hybrid environment. An option to sync Office 365 with AD allows organizations to configure hybrid environments, and synchronize user accounts and authentication options between on-premises AD and Azure AD.
Office 365 Active Directory sync can be done with Azure AD Connect, which is a native tool developed by Microsoft. You have to prepare your on-premises Active Directory, configure domain settings for on-premises domain and external domain linked to your Office 365 tenant, and configure Office 365 directory sync options in AD Connect. Office 365 Active Directory integration allows users to use the same credentials for on-premises Windows environments and in Office 365.