How to Convert Hyper-V to VMware VM
VMware vSphere and Microsoft Hyper-V are both hardware virtualization platforms, but on some occasions, you might need to convert a Hyper-V virtual machine (VM) for use with VMware. VMware provides several useful unique features and generally offers better support for VMs with Linux-based guest operating systems (OS).
The best method to convert Hyper-V to VMware VM is using VMware vCenter Converter Standalone, which is a special free utility designed for V2V (virtual to virtual) conversion and P2V (physical to virtual) conversion.

Review of VMware vCenter Converter Options
Before you convert Hyper-V to VMware VM, let’s review the VMware vCenter Converter options. VMware vCenter Converter components can only be installed on Windows operating systems. The program is easy to use. The solution can help you automate your conversion process by creating multiple conversion tasks that can be executed in priority order (tasks with a lower-numbered job IDs are run first). You can set the number of tasks to run concurrently in the options of VMware vCenter Converter. This might be useful if you need to regulate the speed running tasks, for example. Post-conversion VM configuration can be also performed with this tool.
The table below displays the types of machines that can be converted to VMware formats.
| Source machines | Destination machines |
|
|
VMware vCenter Converter can be used for converting physical machines running Windows or Linux. Linux machines must be converted remotely, because the converter can only be installed on Windows. Both local and remote Windows machines can be converted. Destination virtual machines can be of the VMware ESXi format or the VMware Workstation format (the latter of which can also be run in VMware Fusion and VMware Player).
The VMware vCenter Converter can be viewed in terms of its components: the client, the agent, and the server, which includes a worker. The agent can be deployed on source physical machines running Windows or on the Hyper-V hosts. A snapshot is created on the running source Windows machine when conversion starts. The snapshot technique is used to preserve data consistency. The server performs the conversion process, and the worker is always installed with the server component. The client provides a user interface, is used for connecting to a local machine or a remote machine where a converter is running. The client interface provides access to Conversion and Configuration wizards.
When a physical machine running Linux must be converted, the agent is not installed on Linux; instead, a special empty helper VM is deployed on a destination host. A connection with the physical Linux machine is established via SSH (Secure Shell). At the moment of creation, the helper VM is empty and boots from a Linux image. The data is copied from the source Linux machine to the helper VM, and when the process is complete, the helper machine becomes the destination machine. The VM is ready to work as normal as soon as it is restarted.
For converting Hyper-V to VMware VMs, the agent is installed on the Hyper-V Server during the process of configuring the conversion job. Hyper-V VMs only in powered off state can be converted. If you want to convert running Hyper-V VMs (or VMs running on other hypervisors, such as KVM or XEN), you should use VMware vCenter Converter in the same way as described above for converting running physical machines.
Data copying can be disk-based or volume-based. VMware vCenter Converter does not support the following source disks/volumes:
- RAID disks
- GPT/MBR hybrid disks (GUID Partition Table/Master Boot Record hybrid disks)
- RDM (Raw Device Mapping) disks
- volumes mounted by Device Mapper Multipath in Linux.
MBR disks, GPT disks, basic volumes and dynamic volumes are supported. VM snapshots are not transferred from the source VM to the target VM.
Parameters Not Changed During Conversion
By default, the following parameters are not changed by VMware vCenter Converter:
- computer name
- security ID (SID)
- user accounts
- volume names for disk partitions
- application and data files.
Accordingly, running both the source and target machines in the same network can cause troubles. Network conflicts might arise if the IP addresses, computer names, and SID values are the same. To avoid this, you should disconnect the source VM from the network before powering on a VM created by the converter. Alternatively, you can customize Windows-based virtual machines in the Conversion or Configuration wizard of VMware vCenter Converter and alter the parameters.
Hardware Changes in the Target VM
Hardware virtualization works by emulating computer hardware to ensure that VMs function properly. Thus, some devices might change after conversion from a physical machine to a VM or after converting between hypervisor platforms. Hyper-V does not use the same emulated devices as VMware. Even Gen1 and Gen2 Hyper-V VMs use different virtual devices within the Hyper-V environment.
Hardware changes mean that some software that is hardware-related may not work after conversion. One common issue is the need for re-activation of software that uses activation algorithms linked to hardware. Converting machines running OEM (Original Equipment Manufacturer) licensed software may not be a smart decision in this case.
The following hardware might change after conversion:
- CPU model. This depends on the CPU model of the physical machine that hosts the new VMware VM.
- Ethernet adapters. The network adapters may change to VMXnet Ethernet adapters. The MAC address would also be changed in this case.
- USB adapters. These might be updated.
- Video card. This could be changed to VMware SVGA card after migration.
- Disk controllers. The target disk controllers might differ from disk controllers of the source machine.
- Disks and partitions. The model and manufacturer strings of disk devices might change (to VMware Virtual disk SCSI Disk device, for example). The number of disks and partitions may also be changed during the conversion process.
Supported Operating Systems
VMware vCenter Converter 6.2 supports Windows and Linux-based operating systems.
The following Windows versions are officially supported:
- 32-bit and 64-bit versions of Windows 7, 8, 8.1, 10, and Vista SP2
- Windows Server 2008 SP2 (32/64-bit)
- 64-bit versions of Windows Server 2008 R2, 2012, 2012 R2, 2016.
VMware vCenter Converter can be installed on any the listed operating systems. The VMs running these operating systems can be converted in powered-on or powered-off states, with the machine configuration being supported.
The following Linux distributions are officially supported:
- Ubuntu 12.04 LTS (32/64-bit), Ubuntu 14.04 LTS (32/64-bit), Ubuntu 16.04 LTS (32/64-bit)
- SUSE Linux Enterprise Server (SLES) 10.x (32/64-bit), SLES 11.x (32/64-bit)
- CentOS 6.x (32/64-bit), CentOS 7.0 (64-bit)
- Red Hat Enterprise Linux (RHEL) 4.x (32/64-bit), RHEL 5.x (32/64-bit), RHEL 6.x(32/64-bit), RHEL 7.x (64-bit).
VMware vCenter Converter can convert source machines (physical or virtual) with these Linux operating systems installed. The source machines can be converted whether they are in powered on or off at the time. The converter cannot be installed on Linux operating systems and cannot configure target machines with Linux OS. Only disk-based cloning is available for Linux machines, and VMware Tools cannot be automatically installed using the converter.
GRUB boot loader is supported for Linux machines. LILO is not supported.
Source machines running Windows/Linux with BIOS and UEFI are supported. The firmware interface is preserved after conversion. If a source machine uses BIOS, you can convert that machine to a VM that would use BIOS, but you cannot convert that machine to a VM that would use UEFI (and vice versa).
Network Requirements
Make sure that no firewall is blocking the network connection and VMware vCenter Converter Standalone can access the source machine as well as the destination host (check the table below). You may need to disable your antivirus software temporarily until the conversion process is finished. For Windows systems, File and Printer sharing must be enabled. UAC (User Access Control) must be disabled. Use an Administrator account for connecting to the source and destination machines as well as for running VMware vCenter Converter. For a source physical Linux machine, the SSH server must be enabled.
| Source (connecting from) | Target (connecting to) | Ports used for network connection |
| Converter Standalone server | Powered-on source machine | TCP 445, 139, 9089; UDP 137, 138 |
| Converter Standalone server | vCenter Server | TCP 443 |
| Converter Standalone client | vCenter Server | TCP 443 |
| Converter Standalone server | Destination ESXi | TCP 902 |
| Powered-on source machine | ESXi | TCP 443, 902.# |
Downloading and Installing VMware vCenter Converter
Download VMware vCenter Converter Standalone through VMware’s site. You need a VMware account to access the download link. If you don’t have a VMware account, you can create one; the process is free and takes just a few minutes.
For the purposes of this walkthrough, version 6.2 of the converter is used. The process may vary slightly for other versions.
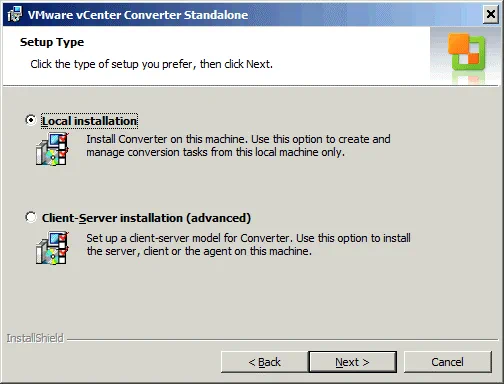
After downloading the converter, you can install it using the GUI (graphical user interface) or the command line. Installation in the GUI mode is straightforward – just run the .EXE file of the installer you have downloaded and follow the installation wizard’s recommendations. The most interesting step is selecting your setup type – you can choose Local installation or Client-Server installation. Local installation is used in this example, for simplicity. All the necessary components of the converter are installed on the local machine to create tasks from this local machine (e.g. remote access, converter server, converter agent, and converter client). If you opt for the Client-Server installation option, you can fine-time which components are installed.
Example: How to Convert Hyper-V to VMware VM
Once you have installed VMware vCenter Converter Standalone, run the converter (by default, a shortcut is automatically created on your desktop). The converter should be launched in a new window. Let’s explore how to convert a Hyper-V VM to a VMware ESXi VM with a detailed walkthrough.
1. Click Convert machine.

The conversion wizard is launched. On the Source System screen, you can select a Powered on state (for a remote Windows machine, a remote Linux machine, or this local machine) or a Powered off state (for a VMware Infrastructure virtual machine, a VMware Workstation virtual machine, another VMware virtual machine, or Hyper-V Server) for the source type. For our purposes, the Powered off option is selected and Hyper-V Server is chosen from the drop-down menu.
Specify the server connection information – enter the IP address or the name of your Hyper-V server, then input the username and password of an account with administrative permissions for the Hyper-V server. Click Next to continue.

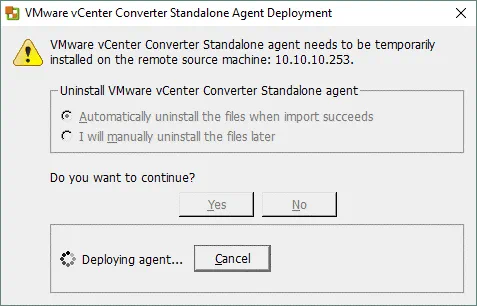
2. A pop-up window appears. The VMware vCenter Converter Standalone agent must be temporarily installed on the instance of Hyper-V Server. VMware vCenter Converter asks you how you want to uninstall the agent after conversion is completed (automatically or manually). Select your preferred option and click Yes to continue. Wait until the agent is deployed on the Hyper-V Server.
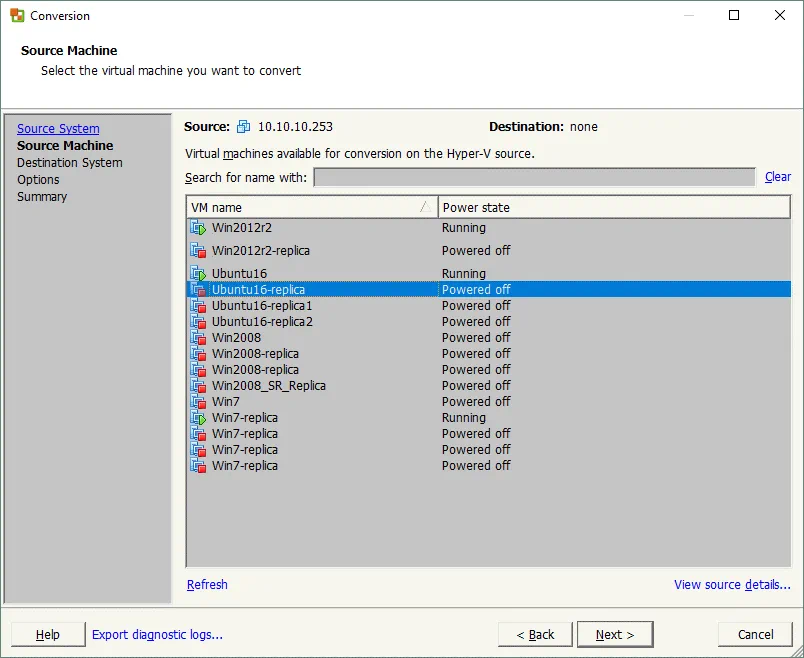
3. Select the source machine. Once the agent is deployed, you can see a list of virtual machines residing on your Hyper-V Server. In this walkthrough, the Ubuntu16-replica VM is selected for further conversion. This VM is powered off and meets the requirements. If you selected a VM in a powered-on state, the Next button would be inactive and a “Power off the selected virtual machine to continue” warning would be displayed. After selecting your source VM, click Next.
4. Set your destination system by choosing from the two options:
- VMware Infrastructure virtual machine
- VMware Workstation or other VMware virtual machine
Select the first option if you want to end up with a VM running on an ESXi host (as in this case).
Select the VMware Infrastructure server details:
- The IP address (or host name) of the vCenter Server or the standalone ESXi host
- The name of a user who has administrative permissions
- The password of that user
Once this is complete, click Next to proceed.

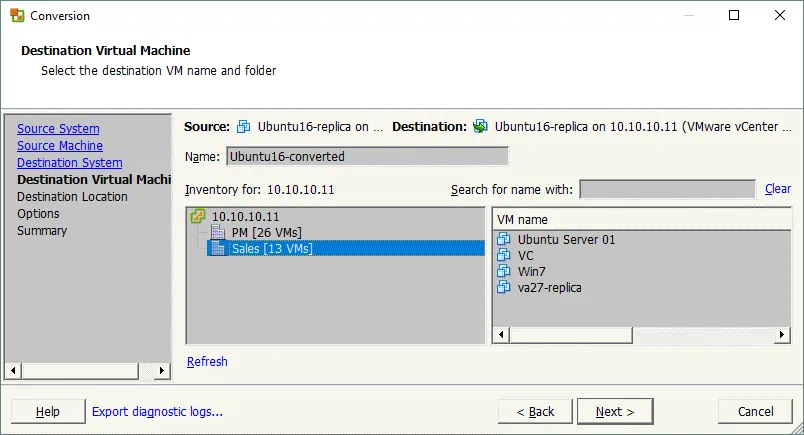
5. Set the parameters for the destination virtual machine – set the name and location of the VM (datacenter or folder). Then click Next to continue.
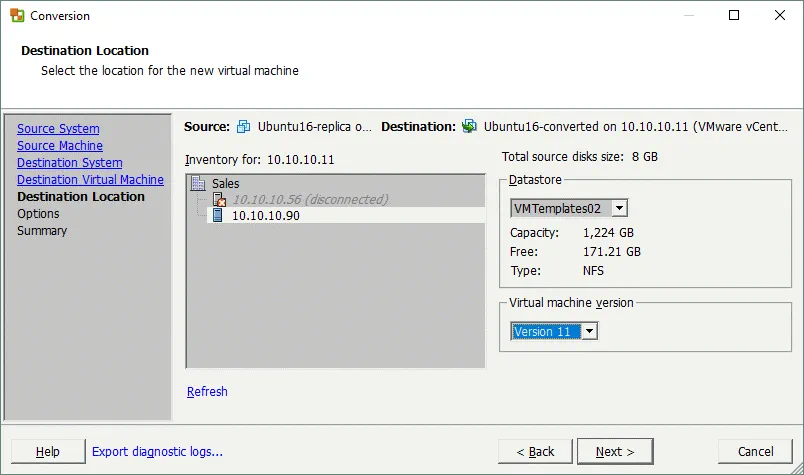
6. If you selected vCenter Server in previous steps, you must now select the ESXi host on which the VM should run. Select the datastore attached to that ESXi server and specify the virtual machine version. VM version 11 is suitable for ESXi 6.0 or later. In this example, the IP address of the ESXi host is 10.10.10.90, the datastore name is VMTemplates02, and the VM version is 11. Click Next.
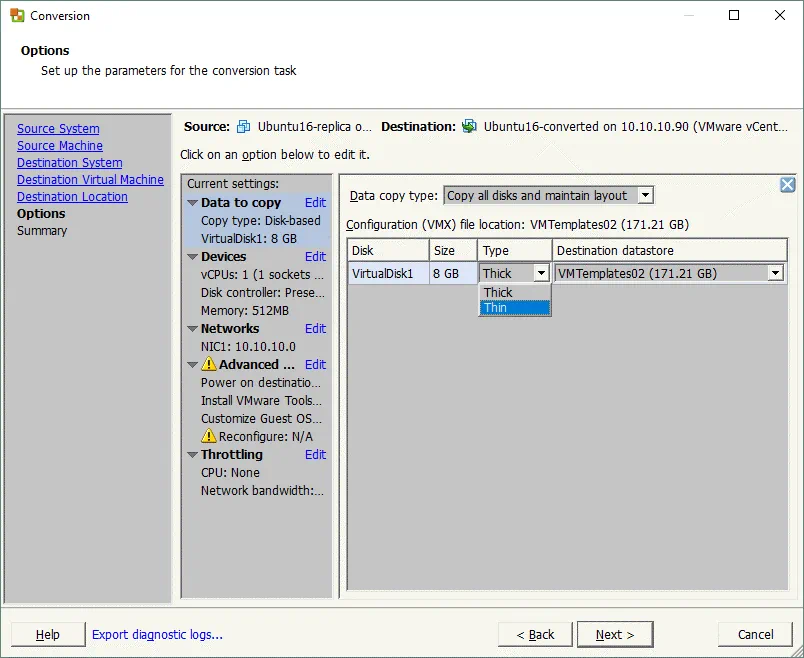
7. Set the parameters for the conversion task:
- Data to Copy. You can select the data copy type (disk-based or volume-based), the disk provisioning type (Thick or Thin), and the destination datastore for your virtual disks. The Thick disk type is selected by default.
- Devices. In this section, you can set the amount of virtual memory, the number of virtual processors, the number of cores per processor, and the disk controller for the VM.
- Networks. You can select the number of virtual network adapters for the VM and specify the networks to which they should be connected, as well as virtual network controller type.
- Services. This option is available only for Windows-based destination machines; it allows you to select a startup mode for each Windows service.
- Advanced options. These options can be configured for Windows OS machines. Tick the appropriate checkboxes for powering on the destination VM, installing VMware Tools, customizing guest preferences, removing System Restore checkpoints, and/or reconfiguring the destination VM after conversion.
- Throttling. You can set up CPU throttling if you want to control the CPU resources used by the converter for the current task. This option lets you preserve enough processor resources to run other tasks if need be. Network bandwidth throttling allows you to control network bandwidth; this can be useful in cases where you want to keep your network-related services and applications functioning properly during conversion.
After configuring the parameters to suit your needs, click Next.
Note: You can set VMware vCenter Converter to use a Thin disk type by default. This may be useful if you need to convert a large number of machines and the destination machines must have thin-provisioned disks. To this option, do the following:
- Go to C:\ProgramData\VMware\VMware vCenter Converter Standalone;
- Open the converter-worker.xml file in a text editor;
- Find the <preferThinDiskType> tag;
- Change the default false value to true in the string: <preferThinDiskType>false</preferThinDiskType>
- Save the converter-worker.xml file and restart the VMware vCenter Converter Standalone Worker service. To do so, open cmd and run the commands:
net stop “VMware vCenter Converter Standalone Worker service”
net start “VMware vCenter Converter Standalone Worker service”
Alternatively, you could run services.msc and use the GUI for service management.
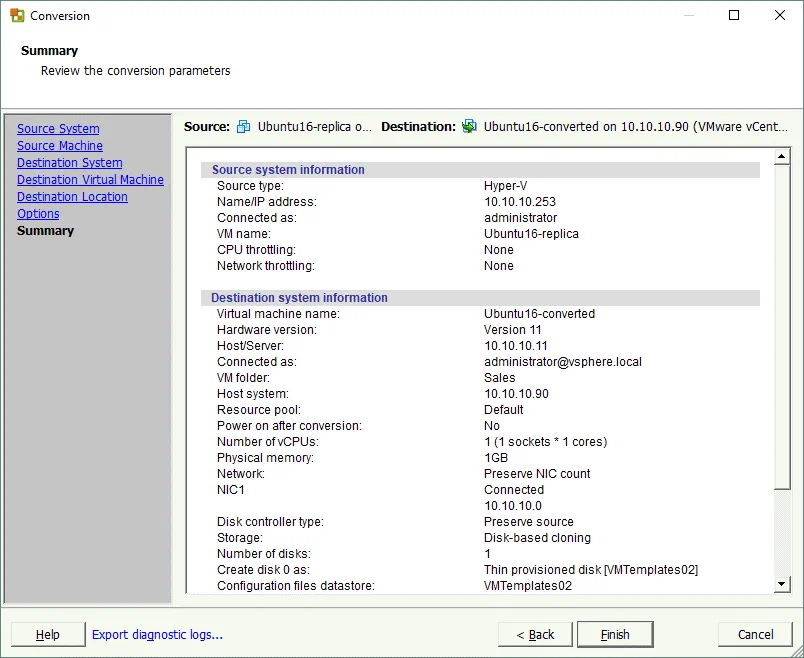
8. Check the summary. If you are satisfied that all the settings are correct, click Finish to start conversion.
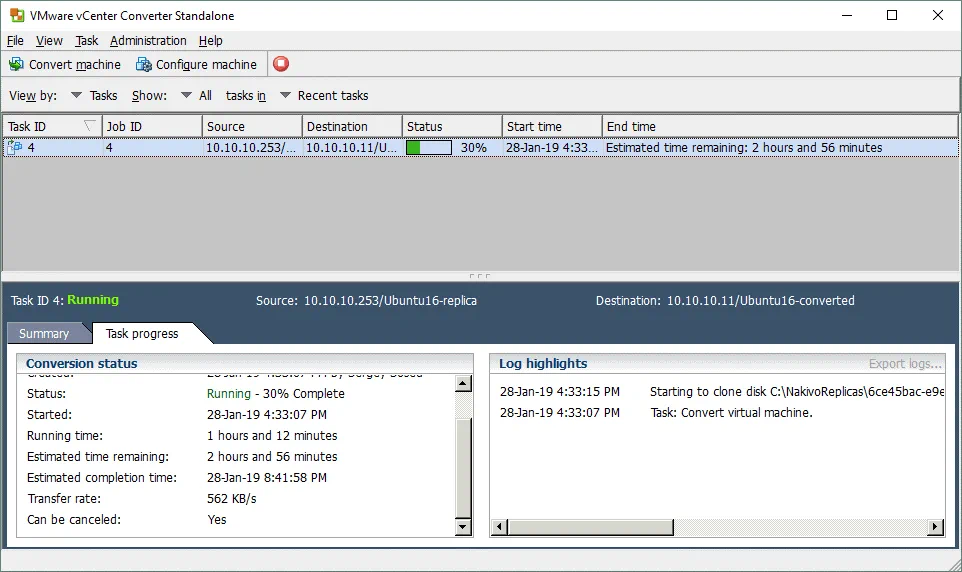
9. You can now view the status of your conversion job in the main windows of VMware vCenter Converter. Similarly, you can add more conversion jobs. Wait until your job has finished, then start the VM you converted from Hyper-V format on your VMware ESXi host (use VMware vSphere Client, VMware vSphere Web Client, VMware Host Client, VMware Workstation, or PowerCLI for this).
Conclusion
VMware vCenter Converter Standalone is a useful, compact tool that provides a wide variety of settings and stable functionality. This blog post has explored this tool along with its options and features as well as showing you how to convert Hyper-V VMs to VMware VMs with a comprehensive walkthrough.
Installation and configuration of the converter is not difficult due to the user-friendly graphical interface that is provided. The converter offers support for running multiple jobs, which can help you automate the conversion process. Use VMware vCenter Converter to convert your Hyper-V VMs to VMware VMs easily.