How to Configure MS SQL Server Replication
Microsoft SQL Server is a database management software that can be installed on Windows Server operating systems. Databases are used by companies in all industries, and many software solutions use databases – both centralized and distributed databases. Database availability and data consistency are critical for businesses, making backup and replication of databases a necessity.
Learn about SQL Server replication types, how replication works in SQL Server, and how to perform SQL Server replication.

What Is SQL Server Replication?
MS SQL Server replication is the process of copying data from one database to another, including specific database objects, and maintaining a synchronized copy of this data across the source and target database. With replication in SQL Server, you can create an identical copy of your primary database and synchronize changes between the two databases while maintaining data consistency and integrity.
The terminology used for MS SQL Server replication
Before diving into how to configure and set up MS SQL Server replication, let’s first briefly go over the main terms and the replication models.
Articles are the basic units to be replicated, such as tables, procedures, functions, and views. Articles can be scaled vertically or horizontally by using filters. Multiple articles can be created for the same object.
A publication is a logical collection of articles. This is the final set of entities from the database designated for replication.
A filter is a set of conditions for an article. MS SQL Server replication allows you to use filters and select custom entities for replication, which, as a result, reduces traffic, redundancy, and the amount of data stored in a database replica. For example, you can select only the most critical tables and fields by using filters and then replicate only this data.
Agents are MS SQL Server components that can act as background services for relational database management systems and are used to schedule automated execution of jobs, such as MS SQL database backup and replication. There are five types of agents: Snapshot Agent, Log Reader Agent, Distribution Agent, Merge Agent, and Queue Reader Agent.
Metadata is the data used to describe entities of the database. There is a wide range of built-in metadata functions that allow you to return information about the MS SQL Server instance, database instances, and database entities.
Roles in SQL Database Replication
There are three main roles in MS SQL database replication: Distributor, Publisher, and Subscriber.
- A Distributor is an MS SQL database instance configured for collecting transactions from publications and for distributing them to subscribers. A Distributor acts as the database for storing replicated transactions.
A Distributor database can be considered as the Publisher and the Distributor at once. In the local distributor model, a single MS SQL Server instance runs both the Publisher and the Distributor. A remote distributor model can be used when you want subscribers to be configured to use a single MS SQL Server instance to get different publications (centralized distribution). In this model, the Publisher and the Distributor run on different servers.
- A Publisher is the main database copy on which the publication is configured, making data available to other MS SQL servers that are configured to be used in the replication process. The Publisher can have more than one publication.
- A Subscriber is a database that receives the replicated data from a publication. One Subscriber can receive data from more than one Publisher and publication. A single-Subscriber model is used when there is one Subscriber. A multi-Subscriber model is used when multiple subscribers are connected to a single publication.
Subscription is a request for a copy of a publication that must be delivered to the Subscriber. The subscription is used to define the publication data that must be received and where and when this data will be received. There are two types of subscriptions:
- Push subscription: Changed data is forcibly transmitted from a Distributor to a Subscriber database. No request from the Subscriber is needed.
- Pull subscription: Changed data made on the Publisher is requested by a Subscriber. The Agent runs on the side of the Subscriber.
A subscription database is a target database in the MS SQL replication model.

In the multiple publishers–multiple subscribers model, the Publisher can act as the Subscriber on one of the MS SQL servers. Make sure you avoid any potential update conflicts when using this MS SQL Server replication model.
MS SQL Server Replication Types
MS SQL Server replication is a technology for copying and synchronizing data between databases continuously or regularly at scheduled intervals. As for the replication direction, MS SQL Server replication can be one-way, one-to-many, bidirectional, and many-to-one. There are four MS SQL Server replication types: snapshot replication, transactional replication, peer-to-peer replication, and merge replication.
Snapshot replication
Snapshot replication is used to replicate data exactly as it appears at the moment when the database snapshot is created. This type of replication is suitable for data that does not frequently change, when having a database replica older than the master database is not a critical issue, or when a large volume of changes is made within a short period of time. Change tracking is not used with snapshot replication.
For example, snapshot replication can be used when exchange rates or price lists are updated once per day and must be distributed from the main server to servers in branch offices.

Transactional replication
Transactional replication is periodic automated replication when the data is distributed from a master database to a database replica in real-time (or near-real-time). Transactional replication is more complex than snapshot replication. All transactions made as well as the final state of the database are replicated, which makes it possible to monitor the entire transaction history on the replica.
At the beginning of the transactional replication process, a snapshot is applied to the Subscriber, and then data is continuously transferred from the master database to a database replica as changes are made to this data. Transactional replication is widely used as one-way replication.

Use cases for transactional replication:
- Creating a database server with a database replica to use for failover if the main database server fails.
- Receiving reports about operations performed in branch offices by using multiple Publishers in branch offices and one Subscriber in the main office.
- Having changes replicated as soon as they happen.
- Data on the source database changes frequently.
Peer-to-peer replication
Peer-to-peer replication is used to replicate database data to multiple Subscribers at the same time. This MS SQL Server replication type can be used when your database servers are distributed across the globe. Changes can be made on any of the database servers. Changes are propagated to all database servers. Peer-to-peer replication can help scale out an application that uses a database. The main working principle is based on transactional replication.

Below you can see how MS SQL Server peer-to-peer replication can be used between database servers that are distributed across the globe.

Merge replication
Merge replication is a type of bidirectional replication that is usually used in server-to-client environments for synchronizing data across database servers when they cannot be connected continuously. When the network connection is established between both database servers, merge replication agents detect changes made on both databases and modify databases to synchronize and update their state. Merge replication is similar to transactional replication, but data is replicated from the Publisher to the Subscriber and the other way.

This type of database replication is the most complex of all MS SQL Server replication types and is rarely used. For example, merge replication can be used by multiple peer stores that work with a shared warehouse. Each store is permitted to change the information in the warehouse database and at the same time, all stores must have the updated state of their databases after the shipment of goods or delivery of supplies to the warehouse. Merge replication can be used in cases where the updated information must be available for the main (or central) database and branch databases simultaneously.
Requirements for MS SQL Server Replication
The following ports must be opened for inbound traffic:
- TCP 1433, 1434, 2383, 2382, 135, 80, 443
- UDP 1434
Make sure to configure the Windows firewall and enable the appropriate ports for inbound traffic on each host before installing MS SQL Server. Hosts attended in MS SQL replication must resolve each other by a hostname.
Before configuring MS SQL Server replication, the following software must be installed for MS SQL Server:
- .NET Framework – a set of libraries
- MS SQL Server – the database server software
- MS SQL Server Management Studio (SSMS) – software for managing MS SQL databases with the GUI (graphical user interface).
NOTE: MS SQL Server 2016 is used for configuration in this post. You can use the same principle to configure Replication in SQL Server of newer versions.
Keep in mind that if you install MS SQL Server 2016 on the first machine where the source database is located, you should have MS SQL Server 2016 installed on the second machine for the database to function properly.
For example, if you want to configure MS SQL transactional replication, you can use the second database server (where the Subscriber is configured) of a version within two versions of the source database server on which the Publisher is configured. If the Publisher version on MS SQL Server is 2016, the Distributor can be configured on the 2016, 2017, 2019, and 2022 versions, and the Subscriber can be configured on MS SQL Server 2012, 2014, 2016, 2017, and 2019. The version of the Distributor cannot be lower than the version of the Publisher. Replication will not work if you install MS SQL Server 2008 on the second machine, for example.
Basic Recommendations for MS SQL Database Replication
Before configuring the environment for MS SQL Server, here are some factors to consider:
- There are limitations to identity fields and triggers.
- Publications can contain only tables with the primary key.
- It is recommended that you do not use snapshot creation scheduling for large databases to avoid using a large amount of computing resources.
- Be careful when changing data in the database replica residing on the Subscriber. When a transaction that modifies data is coming and that data has been edited or deleted, replication can stop until this issue is resolved.
Configuring the Environment
When configuring MS SQL replication for the first time, it is recommended that you do it in a test environment first. For example, we configure replication in SQL servers running on virtual machines. Two hosts running Windows Server 2016 and MS SQL Server 2016 are used in this tutorial to explain MS SQL Server replication.
Let’s take a look at the configuration of the test environment used for writing this blog post to better understand the configuration of MS SQL Server replication.
Host 1
- IP address: 192.168.101.101
- Hostname: MSSQL01
- MS SQL Server Instance ID: MSSQLSERVER1
Host 2
- IP address: 192.168.101.102
- Hostname: MSSQL02
- MS SQL Server Instance ID: MSSQLSERVER2
Both machines have disk C: and disk D: in their disk configuration.
You can temporarily disable the Windows firewall when you install MS SQL Server to practice configuring MS SQL Server replication.
This blog post does not go into how to install MS SQL Server because this tutorial focuses on configuring MS SQL Server replication. In this example, both MS SQL servers are installed without PolyBase.
Check that you have installed the features required for MS SQL Server replication once the MS SQL Server installation is complete. Note that database engine services, such as SQL Server replication and R-Services, must be selected during MS SQL Server installation. The default installation path is used in this example (C:\Program Files\Microsoft SQL Server).

Other settings:
- Mixed authentication mode (Windows authentication and MS SQL Server authentication)
- Data root directory: D:\MSSQL_Server\
- System database directory: D:\MSSQL_Server\MSSQL13.MSSQLSERVER1\MSSQL\Data
- User database directory: D:\MSSQL_Server\MSSQL13.MSSQLSERVER1\MSSQL\Data
- User database log directory: D:\MSSQL_Server\MSSQL13.MSSQLSERVER1\MSSQL\Data
- Backup directory: D:\MSSQL_Server\MSSQL13.MSSQLSERVER1\MSSQL\Backup
Once MS SQL Server 2016 and SQL Server Management Studio are installed on the machines, you can prepare your MS SQL servers for database replication.
Preparing for MS SQL Server Replication
You have to configure the servers before you can start database replication. In our example, one Windows account will be used for MS SQL Server replication agents.
- Create the mssql user on both servers and set the same password.
- The mssql user is a member of the following groups in this example:
- Administrators (local administrators on local machines, not domain administrators)
- SQLRUserGroupMSSQLSERVER1
- SQLServer2005SQLBrowserUser$MSSQL01
- You can edit users and groups by pressing Win+R, opening CMD, and running the
lusrmgr.msccommand.
Two Windows Server machines used in this example are not in Active Directory. If you use Active Directory, you can create the mssql user on the domain controller.
Connecting to MS SQL Server
- Run SQL Server Management Studio.
- Log in (see screenshot) as sa by using the SQL Server authentication.
- MSSQL01\MSSQLSERVER1 is the hostname and the MS SQL instance name on the first server.
- MSSQL02\MSSQLSERVER2 is the hostname and the MS SQL instance name on the second server.

Similarly, you can connect on the second server (MSSQL02) to the second MS SQL server instance (MSSQLSERVER2). You can also connect to the second MS SQL Server instance (MSSQLSERVER2) from the first MS SQL Server (MSSQL01) by entering the credentials in SQL Server Management Studio. You can connect to both MS SQL Server instances (MSSQL01 and MSSQL02) in a single instance of SQL Server Management Studio.
To do this, in the object Explorer, click Connect > Database engine. In this tutorial, we will connect to MSSQLSERVER1 from MSSQL01 and to MSSQLSERVER2 from MSSQL02 by using SQL Server Management Studio to configure the MS SQL servers.
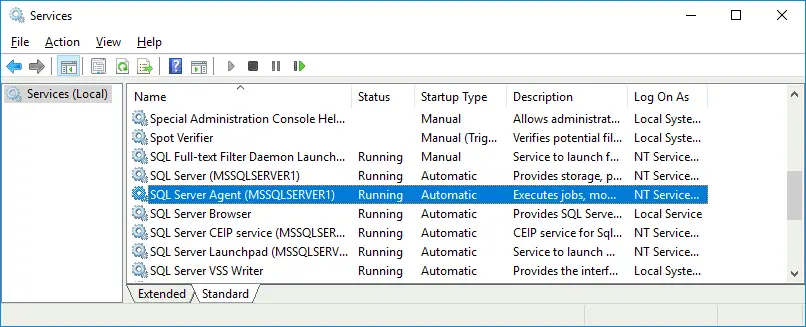
Starting the Agent
Once you log in to the MS SQL Server instance, you will see that the Agent is not running. By default, the SQL Server Agent doesn’t start automatically. You can start this service manually, but it is better to configure this service to start automatically after Windows boot.

To configure the Agent service to start automatically:
- Press Win+R, run cmd, and run the
services.msccommand. - Open the SQL Server Agent service properties and set Startup Type to Automatic.
Configuring users for MS SQL Server
After connecting to the MSSQLSERVER1 instance in SQL Server Management Studio, we need to configure users:
- Go to Object Explorer and open Security > Logins.
- Right-click Logins and select New Login. Select Windows authentication.
- Enter the login name mssql in the General section.
- Click Search, then hit Check names to confirm, and click OK twice to save the settings.

- Now the MSSQL01\mssql Windows user is added to the list of users who can log in to the database (similarly, add the mssql user to logins on the second machine MSSQL02 in the SQL Server Management Studio).
- Add the mssql user to the sysadmins server roles in the Security configuration of the database in the SQL Server Management Studio.
- Go to MSSQL01\MSSQLSERVER1 > Server roles, right-click sysadmin, and open Properties.
- In the Members page, click Add, enter the name of your user mssql, and click Check names.
- Select the checkbox of username MSSQL01\mssql and click OK.

- Do the same configuration on your second machine (MSSQL02 in this case).
- Reboot both machines.
Now you can log in by using Windows authentication on both servers.

Importing a database from a backup
Let’s import a sample database from a backup and then replicate the database from the first machine to the second machine. The AdventureWorks2016 database is used as a sample database in this example.
- Copy the AdventureWorks2016.bak database backup file to your MSSQL backup directory. In our case, this directory on the first server is D:\MSSQL_Server\MSSQL13.MSSQLSERVER1\MSSQL\Backup\
- Import a sample database. On the first machine in SQL Server Management Studio, go to MSSQL01\MSSQLSERVER1, right-click Databases, and select Restore Database in the context menu.

- In the Restore Database window, select the needed parameters:
- Source: Device.
- Click on the three dots to browse the database backup file.
- In the Select Backup Devices window, select backup media type: file.
- Click Add.
- Select the needed .bak file – D:\MSSQL_Server\MSSQL13.MSSQLSERVER1\MSSQL\Backup\AdventureWorks2016.bak
- Hit OK, and then hit OK once again.
- The AdventureWorks2016 database was restored successfully.

You can import the database from a backup on the second machine, where the database replica will be running. This approach allows you to reduce network traffic because replication will start by copying the changes since the backup was created without copying the entire database data to an empty database.
Restore the database from a backup on the second server and rename the database to AdventureWorks2016r, where “r” means “replica”.
Finally, we have:
| Hostname\MSSQL instance name | Database name |
| MSSQL01\MSSQLSERVER1 | AdventureWorks2016 |
| MSSQL02\MSSQLSERVER2 | AdventureWorks2016r |
After importing the database, you have to perform some tuning to prepare your MS SQL servers
- On the MSSQL01 machine, go to MSSQL01\MSSQLSERVER1 > Security > Logins, select MSSQL01\mssql. Right-click (or double-click) mssql user and select Properties.
- In Server Roles, select the checkbox next to the dbcreator role.

- On the User Mapping page, select users mapped to this login and tick the AdventureWorks2016 database checkbox (select AdventureWorks2016r on the second server accordingly).
- In the database role membership section, tick the db_owner checkbox.

- Click OK to save the settings.
Do the same configuration on the MSSQL02 machine. Then, you can configure MS SQL Server components needed for database replication.
Configuring Database Replication
Configuring replication in the graphical mode is the most convenient method. The next configuration is performed in SQL Server Management Studio. Transactional database replication is explained in this example because it is one of the most used MS SQL Server replication types.
The view on the main database server (MSSQL01\MSSQLSERVER1) and the view on the second server (MSSQL02\MSSQLSERVER2) in SQL Server Management Studio are shown in the screenshot below.

Configuring Distribution
Distribution can be used for multiple Publishers and Subscribers. In this example, Distribution is configured on the main server on which the source database is stored. On the main server (MSSQL01\MSSQLSERVER1), right-click Replication and, in the context menu, select Configure Distribution.

The Configure Distribution Wizard opens.
- Distributor. Select the current database instance running on the main server (MSSQL01\MSSQLSERVER1) to act as the Distributor in this example. Click Next each time to proceed to the following step in the wizard.
- SQL Server Agent Start. If you have not configured MS SQL Server Agent to start automatically, as explained above, the following message will be displayed. Select Yes, configure the SQL Server Agent service to start automatically.

- Snapshot Folder. You can leave the default path here. A snapshot is needed for initializing replication. Make sure that there is enough free space on the disk where your snapshot directory is located. The amount of free space must correspond to at least the size of the replicated database.
- Distribution Database. Enter the distribution database name. You can leave the default name (distribution) and folders for the distribution database file and log file.

- Publishers. Define the MS SQL Server replication Publishers that can access the Distributor. Select the checkbox near the distribution database name on the primary MS SQL Server instance (that hosts a source database that will be replicated). In this example, this is the MSSQL01\MSSQLSERVER1 instance, and the distribution database name is distribution.
- Wizard Actions. Select Configure distribution to configure distribution during the final step of the wizard. In this example, we will not generate a script file to be executed later.

- Complete the Wizard. Check the Distribution configuration summary and click Finish to create the Distributor.

- The Success status should appear if the Distributor has been created and configured successfully.

If you see that an error occurred when configuring SQL Server Agent to start automatically, go to services configuration and check the startup mode of SQL Server Agent (see how to configure Agent Start above in this blog post).
You can also open the properties of SQL Server Agent in SQL Server Management Studio and check the service state and restart options. Right-click SQL Server Agent at the end of the list in Object Explorer and hit Properties to view or edit the agent properties.

Configuring the Publisher
Once Distribution is configured, you can configure the Publisher. The Publisher should be configured on the main server (MSSQL01\MSSQLSERVER1) where the master database to be replicated is stored. Select Replication, right-click Local Publications and, in the context menu, select New Publication.

The New Publication Wizard opens.
- Publication Database. Select the database you want to replicate (AdventureWorks2016 in this case). Hit Next at each step in the wizard to proceed.

- Publication Type. For this step, you can select MS SQL Server replication types for a database. Let’s select a transactional publication, which is a widely used type of replication.
- Articles. Select the needed objects, such as tables, procedures, views, indexed views, and user-defined functions to publish as articles. It is possible to select replication of the custom fields in the tables and select article properties if needed. In this example, some tables are selected.
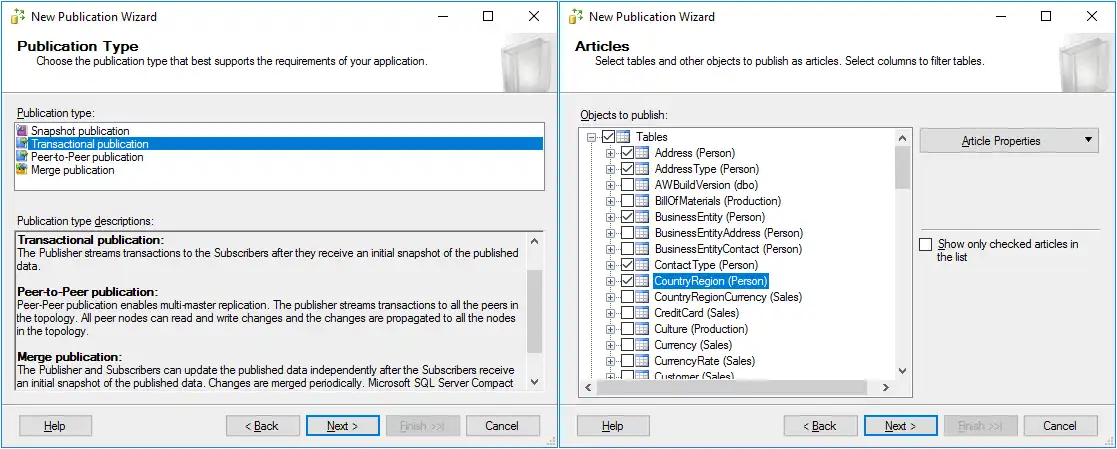
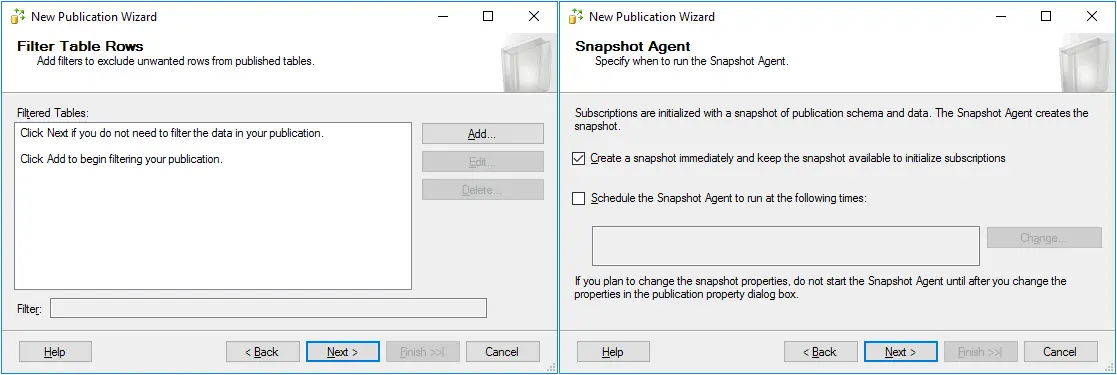
- Filter Table Rows. No filters are added in this example (this is the default configuration of filters). You can add filters if needed.
- Snapshot Agent. Specify when to run the Snapshot Agent. Let’s configure the Agent to run immediately. Select Create a snapshot immediately and keep the snapshot available to initialize subscriptions.
- Agent Security. Select Use the security settings from the Snapshot Agent. Click the Security Settings button to select the account under which the Agent will run.
In the Snapshot Agent Security window that opens, enter the credentials of the mssql Windows user you have created before. Select connect to the Publisher By impersonating the process account. Click OK to save settings and go back to the wizard.

After defining the needed user, you can see this user in the Snapshot Agent and Log Reader Agent sections.

- Wizard Actions. Select the upper checkbox to create the publication during the final step of the wizard.
- Complete the Wizard. Check your publication configuration and click Finish to create a new publication.

In the Creating Publication window, you can monitor the progress of creating a new publication. Wait for a while and you should see the success status if everything has been done correctly.

The publication is now created and you can see the publication in Object Explorer by going to Replication > Local Publications.

Configuring the Subscriber
As you recall, MS SQL Server replication can be either pull or push replication. If you configure push replication, you should configure the Subscriber to run agents on the main database server (MSSQL01 in this case). If you configure pull replication, the Subscriber must be configured to run agents on the second machine (MSSQL02), that is, the machine on which the database replica will be created.
Let’s configure push replication and create a new subscription on the first MS SQL Server (MSSQL01\MSSQLSERVER1) where the master database resides.
In Object Explorer, go to Replication, right-click Local Subscriptions and, in the context menu, select New Subscriptions.

The New Subscription Wizard opens.
- Publication. Select the publication for which to create a new subscription. In our example, the name of the Publisher is MSSQL01\MSSQLSERVER1 and the publication name (that was created earlier) is AdvWorks_Pub. Click Next at each step in the wizard to continue.
- Distribution Agent Location. Select the replication type by selecting either push subscription or pull subscription. In our example, we want all agents to run on the source server side, hence, the first option is selected to create a push subscription. This allows you to manage MS SQL Server replication centrally.

- Subscribers. By default, the server on which you run the wizard (MSSQL01\MSSQLSERVER1 in this case) is displayed as the Subscriber, and the subscription database is not defined. Let’s add a new Subscriber and select a subscription database located on the second database server (MSSQL01\MSSQLSERVER2). Click Add Subscriber and, in the context menu, select Add SQL Server Subscriber.
- In the popup window, enter the credentials for the second MSSQL Server instance (MSSQL01\MSSQLSERVER2 in our case) and click Connect.

- Select the checkbox of your second server on which your database replica will be stored (MSSQL02\MSSQLSERVER2) and, in the Subscription Database drop-down menu, select a new database or an existing database restored from a backup to be used as a database replica.
In our example, the AdventureWorks2016r was created on the second server by restoring the main (source) AdventureWorks2016 database from a backup to start replication. Replication is started by replicating only new data but not by copying the entire database after starting the replication process. Thus, AdventureWorks2016r is selected as a subscription database in the current example.

- In the popup window, enter the credentials for the second MSSQL Server instance (MSSQL01\MSSQLSERVER2 in our case) and click Connect.
- Distribution Agent Security. Click the button with three dots (…), and select the user and other security options for the Distribution Agent.
In the Distribution Agent Security window that opens, set the Distribution Agent to run on the MSSQL01 host under the mssql user account. Enter the password for the mssql Windows user. Select Connect to the Distributor by impersonating the process account and select Connect to the Subscriber by impersonating the process account. Hit OK to save settings.

Now your subscription properties are set.

- Synchronization Schedule. Select the Agent that is located on the Distributor to Run continuously for the current Subscriber.
- Initialize Subscriptions. Select the Initialize checkbox and in the drop-down menu, select Immediately for when to initialize the subscription. You can also select the Memory Optimized option if needed.

- Wizard Actions. Select the upper checkbox to create the subscription(s) at the end of the wizard.
- Complete the Wizard. You can check your subscription settings and click Finish to create the subscription.

- Wait until the subscription is created. If you see the Success status, it means that the subscription has been created successfully.

- After configuring replication in SQL Server, three jobs are displayed in Object Explorer, and you can see them by going to SQL Server Agent > Jobs.

Finalizing replication configuration
Once you have configured the Distributor, the Publisher, and the Subscriber, you can check the MS SQL Server replication status.
- On the first server (MSSQL01\MSSQLSERVER1), launch the replication monitor to see the MS SQL Server replication status. In SQL Server Management Studio, select your MS SQL Server instance (MSSQLSERVER1), go to Replication, right-click Local Publications and, in the context menu, select Launch Replication Monitor.

- There is a Log Reader Agent error in our case. To see error details, select the source database (the Publisher) in the left pane, select the Agents tab in the right pane, and double-click the error name.

- In the window that opens, you can see the agent history and error messages. The error messages are:
- The process could not execute sp_replcmds on MSSQL01\MSSQLSERVER1. Source: MSSQl_REPL. Error number: MSSQL_REPL20011).
- Cannot execute as the database principal because the principal “dbo” does not exist, this type of principal cannot be impersonated, or you do not have permission. (Source: MSSQLServer, Error number: 15517).

The second error message suggests that some kind of permission is missing. Let’s fix this error.
- Create a new query in MS SQL Management Studio and execute this query. In the main window, click the New Query button.
- In the SQL query section of the main window, enter the following query:
USE AdventureWorks2016GOEXEC sp_changedbowner 'sa'GOClick the Execute button.
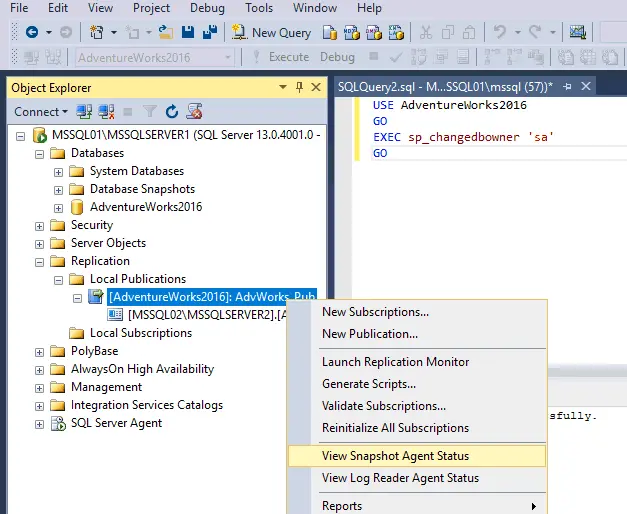
Command(s) completed successfully.
- Next, go to MSSQL01\MSSQLSERVER1 > Replication > Local Publications > [AdventureWorks2016]: AdvWorks_Pub. Right-click the publication name and, in the context menu, select View Snapshot Agent Status. You can click Action > Refresh to refresh the status and Reinitialize All Subscriptions to apply a snapshot to each Subscriber.
Now everything is resolved, no errors are displayed, and MS SQL Server replication should work.

Checking How Replication Works
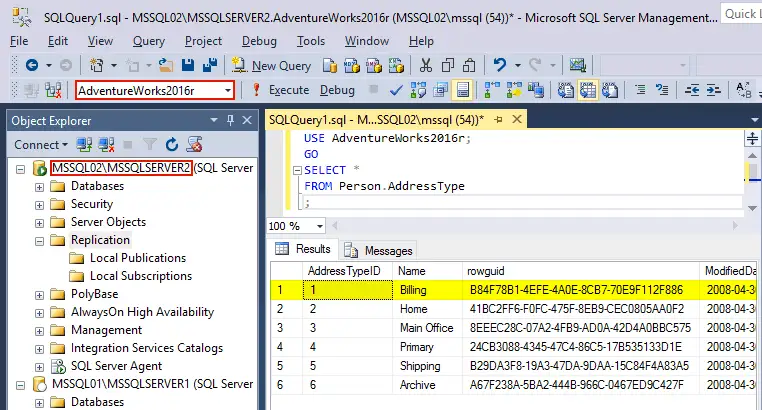
Let’s see MS SQL Server replication in action. View the content of a table of the AdventureWorks2016 database stored on the first MS SQL server (MSSQL01\MSQLSERVER1). In our example, we are going to select all data from the Person.AddressType table. In order to do this, execute the query:
USE AdventureWorks2016;
GO
SELECT *
FROM Person.AddressType
;
The result of executing the query is displayed in the screenshot below:

Execute a similar query on the second server to display all data of the Person.AddressType of the AdventureWorks2016r database stored on MSSQL02\MSSQLSERVER2.
USE AdventureWorks2016r;
GO
SELECT *
FROM Person.AddressType
;
If you compare the screenshots above and below, the contents of the Person.AddressType are identical on both databases (a source database on the first server and the target database that is a database replica on the second server).
Let’s delete one row in the PersonAddressType table from the AdventureWorks2016 database (source) on the first server (MSSQL01\MSSQLSERVER1). Run the query to delete a row that contains ‘Billing’ in the name and to display the contents of the table after that:
DELETE FROM Person.AddressType WHERE Name='Billing';
SELECT * FROM Person.AddressType;

As you can see, the first row with the AddressTypeID 1 and name ‘Billing’ was deleted from the Person.AddressType table in the AdventureWorks2016 database on the MSSQL01 machine.
Transactional replication is running. Let’s check the contents of the Person.AddressType table in the AdventureWorks2016r database on the MSSQL02 machine. Execute a similar query as above once again to see the contents of the table:
USE AdventureWorks2016r;
GO
SELECT *
FROM Person.AddressType
;
As a result of replication, the first line was also deleted from the Person.AddressType table in the secondary database that acts as the database replica (AdventureWorks2016r). You can see the results in the screenshot below.
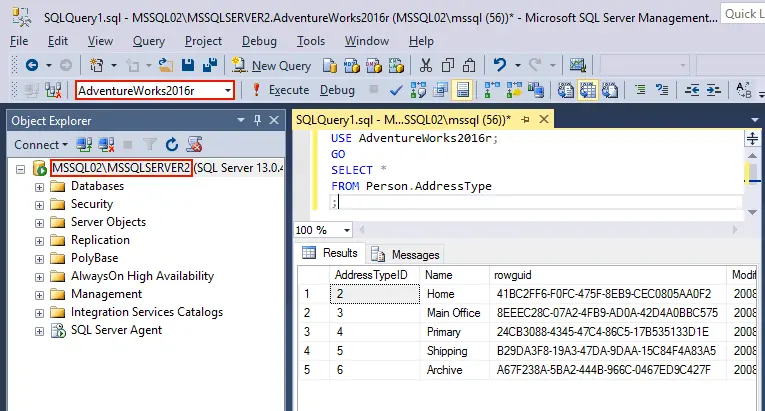
Database replication in SQL Server is working properly.
Conclusion
There are four types of MS SQL Server replication — snapshot, transactional, peer-to-peer and merge replication. As transactional replication is widely used, we have configured this MS SQL Server replication type in this blog post. The Distributor, the Publisher, and the Subscriber must be configured to make database replication work. The Subscriber can be configured on a source server (push replication) and target server (pull replication).
However, you should consider using both replication and backup of MS SQL databases to increase the chances of successful database data recovery.