¿Cómo ejecutar Linux en Hyper-V?
Hiper-V is a tipo 1 hyperviso desarrollado por Microsoft that can be enabled on Windows machines o installed as a standalone operating system (Hyper-V Server 2016, por ejemploample). Hyper-V can ejecutar no sólo Windows sino also Linux virtual machines. Puede can ejecutar an unlimited número de Linux VMs en su Hyper-V Server because the majority of Linux distributions are free and open source. Installing Linux on a Hyper-VM has some features which compare to installing Windows.
Today’s blog post explores how to install Linux on Hyper-V using an example de Ubuntu Linux 18 LTS (Long Term Support).
Razones para ejecutar Linux en Hyper-V
The popularity de Linux is crecering and this operating sistema is time-probado. %e%e have a look at the más comunes reasons that might obligarle a install Linux en Hyper-V:
- Necesita probar a particular Linux distribution in su Hyper-V virtual environment. Por ejemploample, a nuevo Linux version has recientemente se haased and you want to test this version antes installing en physical servidores.
- Ustedwant para ejecutar contain ers. Linux has excelente container compatibilidad conhich may be a reason to install Linux on Hyper-V as a virtual machine.
- Testing multi-platform software o software that provides similar functionality. This is a great option when developers make their applications able para ejecutarse en multiple operating sistemas, such as Windows, Linux, and Solaris (for example, Oracle Database). Puedean install the appropriate software on Linux to test it. Si the experiment is éxito, can install Linux and software compatibleare in su productoion environment.
- Licensing. This point is related a the previonos uno. You have to pay for Windows while Linux is free. Si no have a Datacentrar Edition license para su Windows Server, debe pay para each installed en a Hyper-VM that excede the número de Windows licenses included in your edition of the host Windows system.
- Linux requires menos hardware recursos than Windows. Windows is a resource-intensive operating system whereas Linux is light-weight.
- Linux is seguro. Los usuarios dehose aware that Windows systems are vulnerable to a variety de harmful viruses while Linux usuarios may sienten safe, especially if their sistema is configured correctamente. Incluso if usted hace download a virus, usted necesita ir a great lengths a actually ejecutar the virus en Linux. Es necesario configure file permissions, for example. Tu privacy is respetado if usas Linux.
- Linux shell such as bash is essential for automating tasks. Usted can use regular expressions, scripts and other tricks to manage Linux. Tú manage Linux, Linux no manage ti. The community of developers is amazing – developers like Linux. Si any vulnerabilities are encontrado, they are always fixed quickly.
- Youwant to learn Linux and migrate de Windows to Linux.
%e%nSi desea convertir su physical servidores a Hyper-V VMs, utilice conversores. Convertiring a physical Linux machine a a VM in the forma Hyper-Vat can realizarse in dos pasos. Utilice VMware vCenter Converter para convertiring a physical machine a a VMware VM, then uso Microsoft Virtual Machine Converter para convertiring a VMware VM a a Hyper-V VM.
%n%e
Antes deempezarin
Installing Ubuntu Linux is considered a focal poay’s blog post. Si no necesita the GUI (graphical usuario interface), can install Ubuntu Server. The installation principle is similar. The número de Linux distributions is high and you can select any distribution you like and install it by using the explained logics. Una de the main differencias entre differentes Linux famil%e%es is differentes package managers que se requiereired utilizar. Package managers are intendían a install, configure, upgrade and delete programs on Linux systems.
Package managers help para resolver such tasks as:
- Downloading packages. The packages are automatically downloaded from the most suitable software repository when entra the command a install a particular necesario package o application. Packages include metadata such as version de software, %e%rchitecture the package is built for, checksums, other necesarios packages to work properly etc.
- Resolvering dependencies. When you install software, that software may require its own appropriate packages including libraries. Finding, downloading and installing all this manually consume a mucho time and esfuerzos. Package managers te dicen that there are dependencies and sugieren que install automatically the necesario depending packages.
- Quality control. Software packages that are almacenados in authorized software repositories are probado para provide high quality, stability and the absencia de errores.
- The standard of file locations is respected. Linux contains a high número de files and directories. Sometimes, different Linux distributions use different paths for storing files as well as using different configuration file names. Package managers allow you to follow the standards and store files in the required locations for each Linux distribution.
Antes de seleccionaring a Linux distribution a install en Hyper-V,%ck%eyou can familiarize yourself with the information about Linux page managers. Algunos de los the más popular Linux distributions and package managers are listed in the table abajo.
| Linux distributions | Package managers utilizados |
| Debian, Ubuntu, Kubuntu, Xubuntu, Lubuntu, Mint | APT (Advanced Packaging Tool), DPKG (Debian Package Management System) |
| OpenSUSE, SLES (SUSE Linux Enterprise Server) | Zypper, YaST |
| Red Hat, CentOS, Fedora | RPM (Red Hat Package Manager), YUM (Yellowdog Updater Modified) |
| Gentoo | Puertoage |
As mentioned in the very beginning of this blog post, the installation of Linux on Hyper-V will be demonstrateated using an example of Ubuntu Linux. Download the ISO image de Ubuntu 18 LTS de the official site.
Crear una nueva máquina virtual Hyper-V
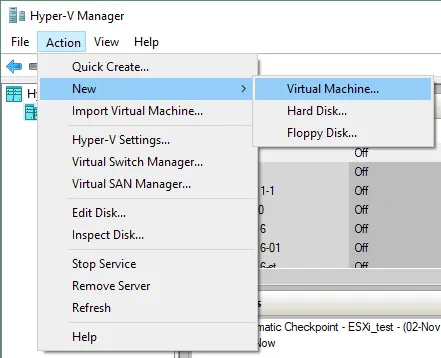
First, make seguro that the Hyper-V rol ( feature) is enabled en su Windows machine (ir a Control Panel > Programs and Fe%e_x_386 %tures > Turn Windows features on or off and verify whether the check box near the Hyper-V string is ticked). Para create a nuevo virtual machine, open Hyper-V Manager and click Action > New > Virtual Machine. The New Virtual Machine Wizard should appear.
Antes de suplicarin. There is nohing a configure at this paso.
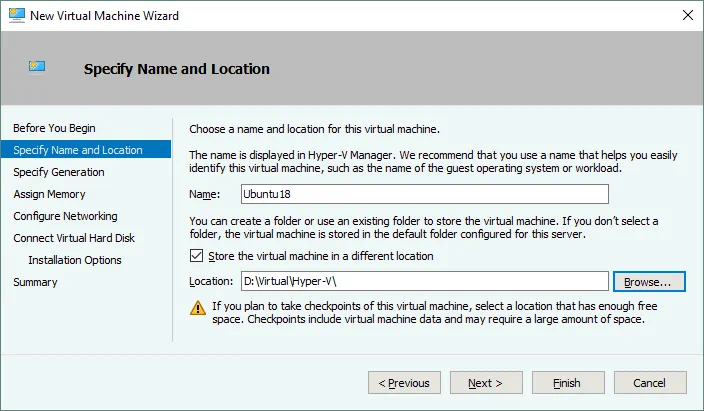
Specify Name and Location. Introduzca su VM name, por ejample, Ubuntu18 and seleccione a carpeta where usted will almacenar a nueva VM. Intenta utilizar volúmenes that are differentes al volumen C: de tu sistema. En this case a directory on disk D: is utilizado(D:\Virtual\Hyper-V). Usted can entrar the path manually o seleccionar a location por clicking the botón Examinar.
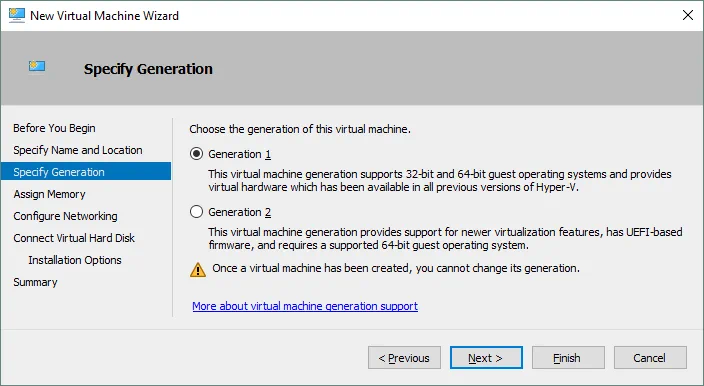
Specify Generation. Choose the generation of this virtual machine – Generation 1 o Generation 2. Generation 1 is seleccionado in this example debido a una mejor compatibility.
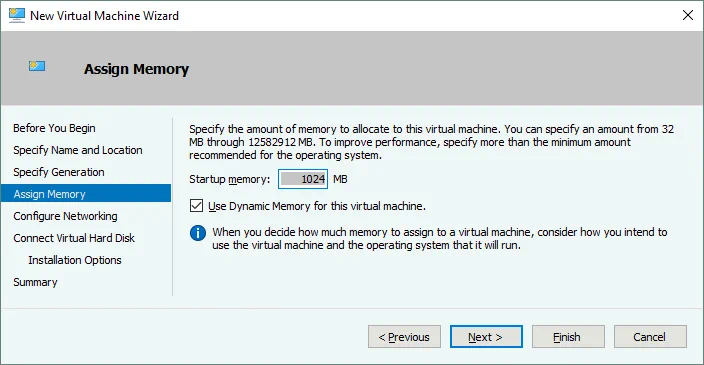
Assign Memoria. Especify at least 1 GB de memoria para su Ubuntu Linux machine with GUI. Usted can edit memoria settings after VM creation. Tick the Utilice Dynamic Memoria para this virtual machine checkbox utilizar sus hardware recursos de memoria más rationally.
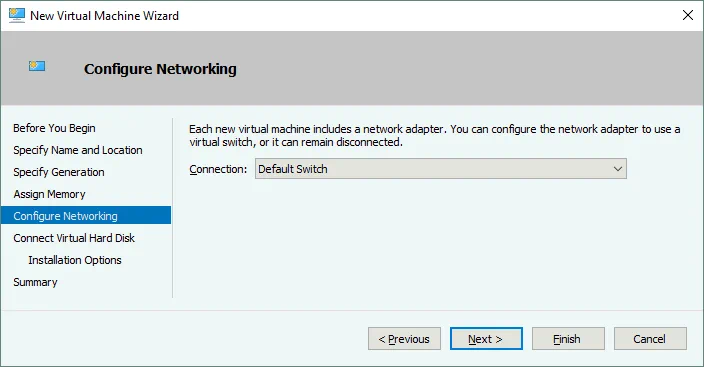
Config ure Networking. Seleccione a virtual switch to which the virtual network adapter of your VM will be connected. The Default Switch is usado in this case. Later you can create and configure other virtual switches and conecte su VM a the appropriate networks.
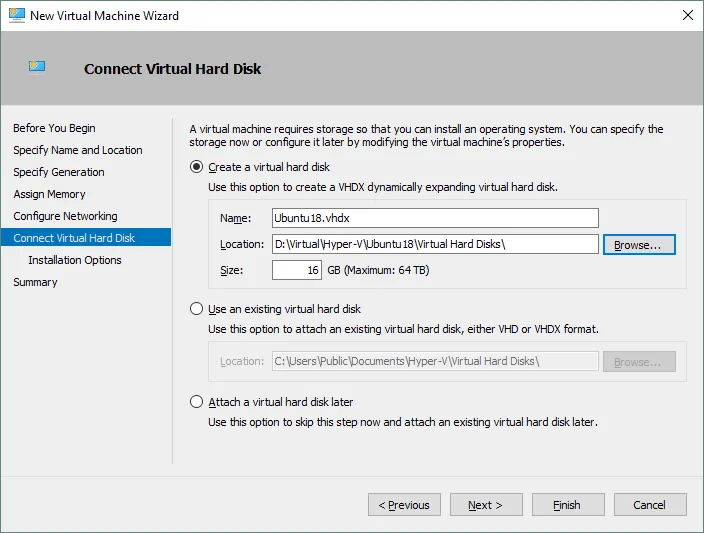
Conecte Virtual Hard Disk. Seleccione the Create a virtual hard disk option. A dynamic VHDX virtual disk is created by default. Introduzca the virtual disk name (por ej.ample, Ubuntu18.vhdx), seleccione the location and set the size of the virtual disk (at least 16 GB).
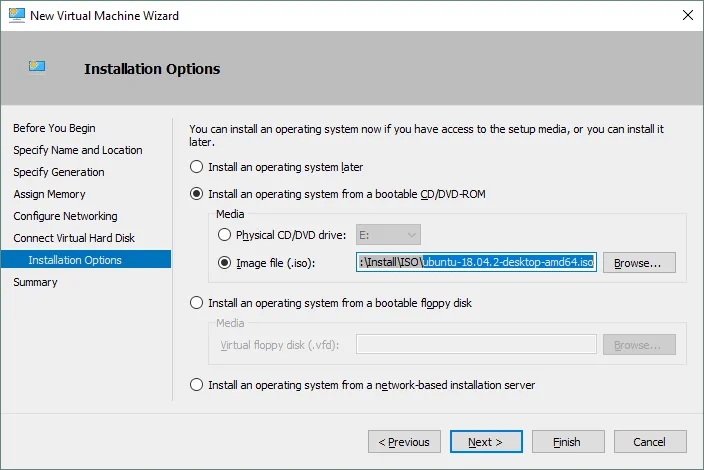
Installation options. Seleccione the Install an operating sistema desde a bootable CD/DVD-ROM. Seleccione Image file (. %e_x_387 %so) and browse the ISO installation image de Ubuntu18 that has been downloaded before.
Summary. Check su settings in the installation summary and click Finish to create a new virtual machine.
Set the Static MAC Address
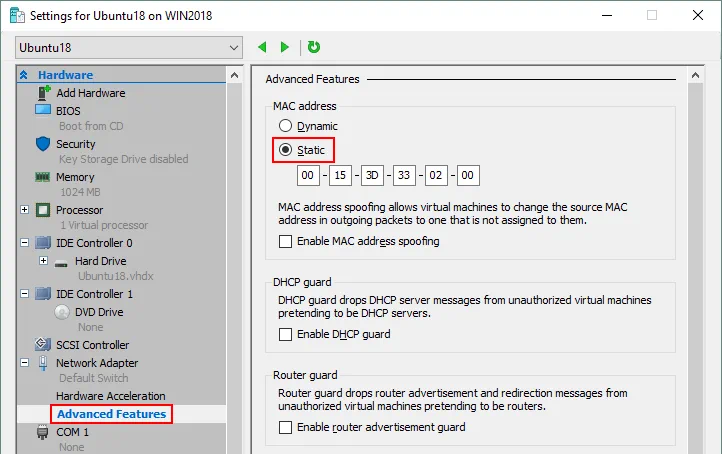
Ahora su nuevo vacío VM has ha sido creadoated and usted can edit the differente VM settings, such as MAC advestido. Es is mejor utilizar a static MAC advestido para Linux running en Hyper-V especially if your Linux VM needs to be migrated between Hyper-V hosts. Right click tu VM name and click Settings. En the Settings window, seleccione su redk adapter, and expand the network adapter options by clicking the + icon. Click Advanced Features and in the right section of the window select a static MAC address. Click OK to save changes.
Installing Ubuntu Linux on the VM
En Hyper-V Manager, seleccione su Ubuntu virtual machine, right click the VM name and in the menú contextual, seleccione Conectar para abrir VMConnect. As an alternative you can click Action > Connect in the menu bar of the Hyper-V Manager Window after selecting the VM.
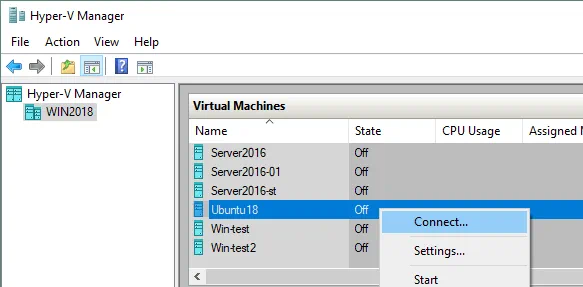
In the VMConnect window, click the Start botón para encender the VM. The virtual machine should be loaded from the ISO image. Then you can see the graphical user interface of the Ubuntu installer. The installer provides multiple configuration pasos in the wizard modo.
Bienvenido. En this pantalla, seleccione su desired language (English) and click Install Ubuntu.
Tecladoard layout. Seleccione su keyboard layout (for example, English US) and click Contin ue.
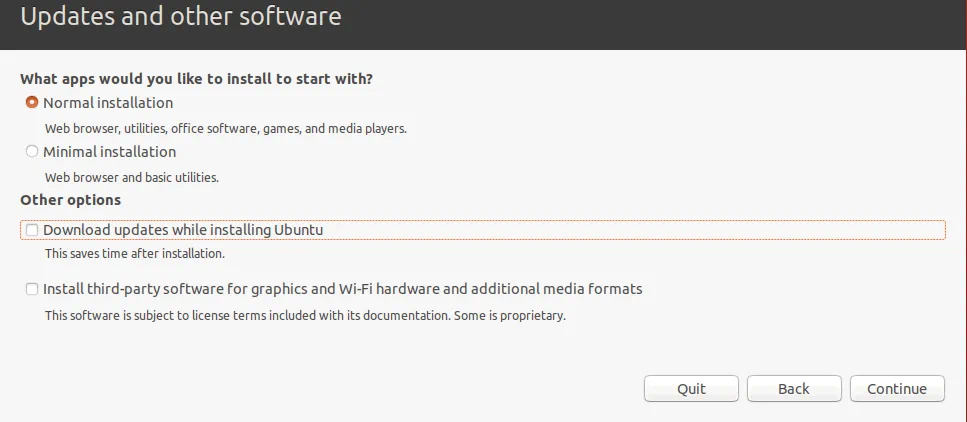
Actualizaciónates and other software. Usted can choose entre Normaal installation and Minimal installation. Normaal installation incluye a wider conjunto de installed applications.
Other options allow you to download updates while installing Ubuntu as well as installing third-party software for graphics, Wi-Fi hardware and additional media formats.
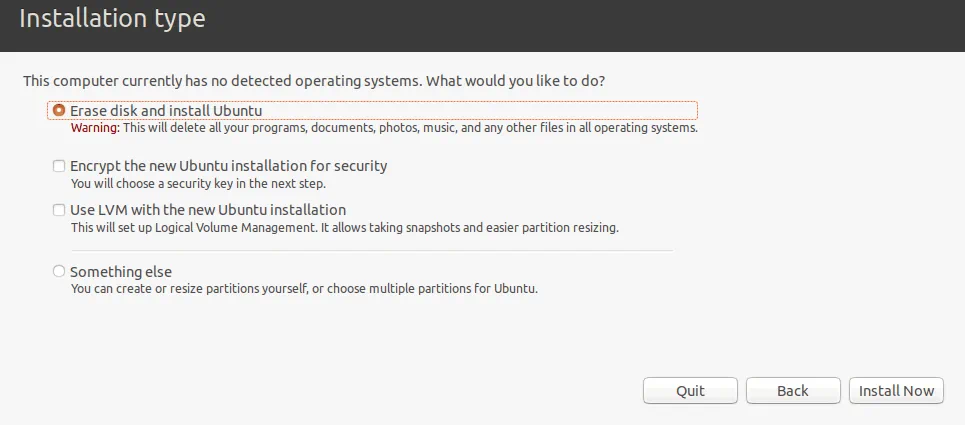
Installation tipo. Ahora usted should prepare a disk para installing Ubuntu. You should create a new partition scheme and format the partitions.
Erase disk and install Ubuntu. This option can utilizarse para partitioning disks automatically. Si are installing Ubuntu Linux for the first time, can select this option.
Cifradohe nuevo Ubuntu installation de seguridadity. This option will no ser enabled in the actual example.
Utilice LVM with the nuevo Ubuntu installation. LVM is the Logical Volumen Manager that allows you to use an abstraction layer and create a volume group por nosotrosing dos logical o physical disks (o dos virtual disks in the case de running a Linux on Hyper-V as a VM). Además, if usted have ningún sp libreace available en su volumen, can add uno más disk a the grupo de volumen and ampliar su grupo de volumen size. This approach adds much más flexibility that can ser útil para file servidores, database servidores, etc. LVM allote permite realizar resizing de grupos de volúmenes and the majority de other operations on the fly without powering off your Linux machine.
Algunoshing más. Seleccionandoing this option, you can manually create partitions de the necessary size and montar them a the appropriate directories. This option is widely utilized por skilled usuarios.
En Linux, disk partitions are no named as disk letras such as C: o D: as they serían in Windows. En Linux, disks are named as /dev/sda, /dev/sdb, /dev/sdc etc. Si the disk is named as /dev/sda and has three partitions, the nameses de partitions should be /dev/sd a1, /dev/sda2 and /dev/sda3.
sda means SATA Disk. A long time ago when IDE (parallel ATA) disks se utilizaron, hard disk devices eran named /dev/hda, /dev/hdb etc. and partitions eran named /dev/ hda1, /dev/hda2, /dev/hdb1 accordingly.
Disk partitions are montado a directories that are called montaje points in this case. The main directory of the Linux file system is the root directory that is named by the / symbol. The recomiendaations para creating the partitioning scheme manually for Linux are displayed in the table. Puede can utilizar a similar partitions scheme when you install Linux on Hyper-V.
| Monte point | Disk partition | Recomendado size | Comentario |
| /boot | /dev/sda1 | 500 MB – 1 GB | Contains the boot loader such as GRUB |
| / | /dev/sda2 | at least 12-20 GB | The most important partition that is required |
| /home | /dev/sda3 | Se utiliza para separate usuario files and sistema files | |
| swap | /dev/sda4 | 4-8 GB, dependeing on the amount of RAM | The swap partition is utilizado para the same propósito as the Windows swap file |
| /var/log/ | /dev/sdb1 | Creating a separate partition for storing logs is not necessary, but is recommended for servers. Si have applications that intensively write log files, tu disk may se llena. The operating sistema and applications can crash as a resultado. |
Nota that te can create sólo 4 partitions if the MBR (Master Boot Record) partitioning scheme is utilizado. GPT (GUID Partition Table) allows you to create more than 4 partitions.
Click Install Ahora a continue.
Write the changes to disk? A warning líoage is displayed. Click Contin ue to apply a new disk partitioning scheme.
Where are you? Seleccione su geographical location and time zona. Software repositories located in your region should utilizarse para una mejor availability and downloading velocidad.

Who a¿Eres tú? Introduzca su name, el n de su ordenadorame (a hostname para su VM in this case), pick a username and define the pasespada. You can select the appropriate option to login automatically if needed. A pasespada is required para registrar in por default – this is the opt más seguroion, and the una that is recomendada. Click Contin ue to start the installation process and copying files.
Wait until the installation proceso is completo. Usted can read útil tips and OS explanations while files are being copied.
Installation Completo. Necesita descansarart the ordenador in para poder utilizar the nuevo installation. Click Restart Now.
Después de descansararting the Hyper-V Linux virtual machine, usted can ver the login pantalla. Seleccione su usuario name and introduzca su pasespada para iniciar sesión in. Ver the window that demonstrates new features of the new vers%e%on de Ubuntu Linux usted have already installed en Hyper-V.
Configuring Linux
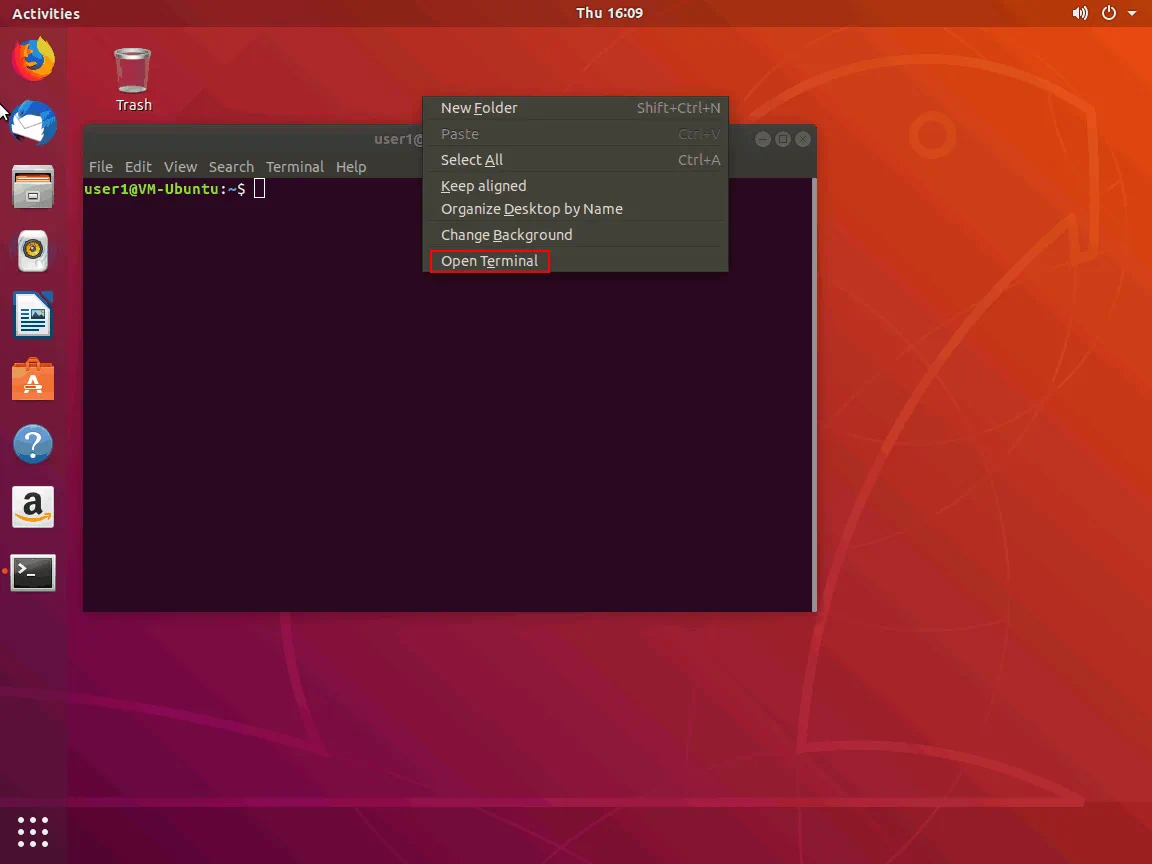
Usted have installed Ubuntu en Hyper-V VM, pero Ubuntu, %e%s with any other Linux, debe configured for further comfortable usage. The majority of settings can be configured in the Linux console (Terminal). Para abrir a Términoinal, click the nine puntos in the esquina inferior izquierda (Show Applications) and in the menú that appears, click the términoinal icon. Another way para abrir Término inal is para right click desktop and click Abrir Términoinal in the menú contextual o pulseing the Ctrl+Alt+T hotkey peineination.
Ahora ves an exquisite términoinal window de Ubuntu Linux. Be aware that commands and file names in Linux are case sensitive. Re adMe. txt and readme.txt are different file names in Linux while in Windows there is no differencia entre these file names.
Checking the network settings
Install the net-herramientas para convertirse en able to check network configuration por nosotrosing the command:
sudo apt-get install net-tools
Where sudo allows usted para ejecutar the command as a usuario root(substitute usuario do).
Escriba ifconfig a check the network configuration de su Ubuntu running en a Hyper-V VM.
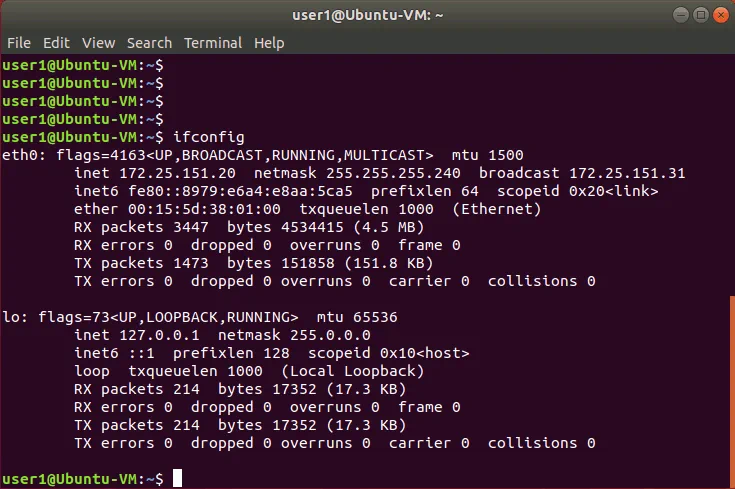
A default virtual Servidor DHCP conectado a the default virtual switch has distributed the IP configuration for the virtual redk adapter de the Ubuntu actual Linux VM running en Hyper-V. The name de the virtual Et hernet adapter in Linux is eth0. The obtained IP address is 172.25.151.20, netmask is 255.255.255.240 and the default gateway is 172.25.151.31 in this case.
Changing the network settings manually
Obtaining su IP advestido via DHCP is convenient, pero if usted are planning para utilizar su Linux running en Hyper-V as a servidor,%e%o%e%gdebe configurar su redkings manually. Sudo-iAdemás, if que wish para clonar su Linux VM utilizado as a servidor, changing the IP advestido and machine name is essential. Usted may also have a change IP adviste en su Linux VM after reconfiguring su Hyper-V virtual switch o after conectaring a virtual redk adapter a another virtual switch. %e%eind out how to configure network settings for your Linux VM manually.
Changing system settings such as network settings requires root privileges. Escriba sudo -i a have root rights in the console (you should enter your password) during the session (press Ctrl+D para exit the modo raíz when necesario). Usted may noice that the $ character is changed to the # character in the command line prompt. Introduzca a nueva IP advestido, then reload the network interface:
ifconfig eth0 172.25.151.21 netmask 255.255.255.240
ifconfig eth0 down
ifconfig eth0 up
The settings are applied until you restart the machine.
Para establecering up the static IP address permanently, use the netplan configuration that is utilizado para configure redks in Ubuntu Linux since the version 17 de Ubuntu. En earlier versions de Ubuntu and in algunos other Linux distributions you can edit your IP address configuration by editing the /etc/network/interfaces config file. Let’s edit the .yaml file with vim by using the command:
vim /etc/netplan/01-network-manager- %e_x_386 %ll.yaml
The file contains the following configuration in this case:
| network:
version: 2 renderer: NetworkManager |

You can change the IP address, net mask, gateway, and DNS servers by editing this file. You should preserve the file structure including the number of space characters.
Nota: Una redk mask can be written as the número de bits.
255.255.255.0 is equal a 11111111.11111111.11111111.00000000 and is a 24bit mask (24 ones in the decimal format, as you can see).
255.255.255.240 is equal a 11111111.11111111.11111111.11110000 and is a 28bit mask (28 ones in the decimal format are present).
Una IP advestido and red mask consist de 4 octetos. Each octeto (8bits) can ser transformado a the decimal formarat (ver the table abajo).
| 1 | 1 | 1 | 1 | 1 | 1 | 1 | 1 | 1+1+1+1+1+1+1+1=8 |
| 128 | 64 | 32 | 16 | 8 | 4 | 2 | 1 | 128+64+32+16+8+4+2+1=255 |
Usted can utilizar the table abajo para convertiring redk masks de una formaat a another de networks that can be classified as class C networks. The maximum number of hosts that can be connected to the network is shown in the right column.
| Bits | Net mask | Anfitriones |
| /30 | 255.255.255.252 | 2 |
| /29 | 255.255.255.248 | 6 |
| /28 | 255.255.255.240 | 14 |
| /27 | 255.255.255.224 | 30 |
| /26 | 255.255.255.192 | 62 |
| /25 | 255.255.255.128 | 126 |
| /24 | 255.255.255.0 | 254 |
Por nosotrosing the above explained logics, you can similarly transform any mask from one format to another format manually. Si deseaant a calculate the maximum número de hosts that can estar conectado a a network, utilice the formularioa:
2(32-m) – 2
Where m is the número de bits utilizadas para a red mask. Por ejemploample, usted have a /29 network and the maximum number of hosts for this network is:
2(32-29) – 2 =23 – 2 = 8 – 2 = 6
-2 shows that debe excluir the network advestido and the broadcast advestido. (Por ejemploample, para la red 192.168.1.0/24k debe excluir 192.168.1.0 and 192.168.1.255 advestidos). No olvide that at least una IP advestido debe utilizarse as a default gateway to enable a connection to other networks. Puedes can also divide tu redk ina subredes, pero por ahora, vamos a back a configtuing redk para Ubuntu running en a Hyper-V VM.
Change the renderer from NetworkManager to networkd and edit su red Ubuntuk configuration similarly as shown abajo. Be attentive when adding space characters para preservar the configuration formaat.
| network:
version: 2 renderer: networkd ethernets: eth0: dhcp4: no addresses: [172.25.151.21/24] gateway4: 192.168.151.17 nameservidores: advestidos: [192.168.151.17,8.8.8.8] |
Pulse Esc para exit de the editing modo a the navigation modo in vim. Escriba :wq and pulse Intro para write changes and quit the text editor.
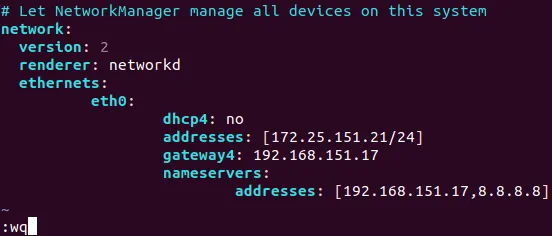
Nota. Si have más than una redk adapter (por ejample, et h0 and eth1) add the similar eth1: block a su redk configuration .yaml file under the et h0: block.
Check whether su configuration file format is correct after editing with the command:
netplan intente
Si todohing is correcto, pulse Intro para keep these settings.

¿Cómo change a hostname in Ubuntu?
Let’s check the actual hostname antes de changing it.
hostnamectl
Como can ver, en the pantallashot abajo, the actual hostname de the Linux machine is Ubuntu-VM. Set the new VM-Ubuntu ho stn%e _x_386%me:
hostnamectl set-hostname VM-Ubuntu
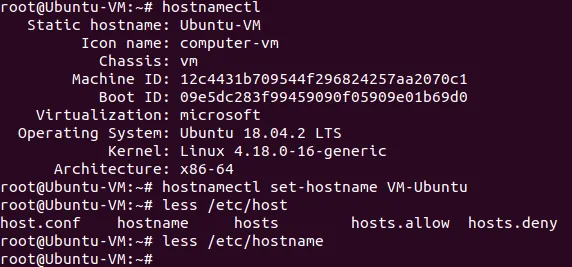
Make seguro that the hostname is ahora changed in the /etc/hostmane file.
less /etc/hostname
You should also edit the hostname in the /etc/hosts file.
vim /etc/hosts
vim %e%s aitor that has no analogs in Windows PowerShell. Por default, se are in the navigation modo. Puede can navigate pulsandoing h (izquierda), L (right), j (abajo), k (arriba) o arrow keys. Pulse a para entrar en the editing modo a append any characters after a cursor. Pulse i if te want a insert a character instead de an existing character highlighted por a cursor. Change the Ubuntu-VM a VM-Ubuntu, pulse Esc para exit de an editing modo a a navigation modo.
Tipo :wq to write changes to the file and quit.
Utilice the init 6 command para descansarart su Linux machine in fin de garantizar that changes are applied.
Configuring the servidor SSH en Ubuntu Linux
Para greater convenience, should enable remoto access via SSH. The Servidor SSH is utilizado para access the Linux consola remotamente via cifrado SSH (secure shell) protocolo. Para hacering this, should install the SSH server on your Ubuntu VM running on Hyper-V and the SSH client en su Windows machine utilizado as a Hyper-V host.
Open Terminal en su Ubuntu machine and run the command as the usuario root:
apt-get install -y openssh-servidor
The configuration de the servidor SSH is almacenado in the sshd_config file. Edit this file to enable the SSH connection with needed settings.
vim /etc/ssh/sshd_config
Uncomment this string (delete the # character)
PasswordAuthentication sí
Save the file and exit.
Restart the Servidor SSH daemon (service).
/etc/init.d ssh stop
/etc/init.d ssh start
Download the SSH client (por ejample, PuTTY) para su Windows machine. Abra PuTTY en su Windows machine, introduzca the IP advestido de su Ubuntu VM running en Hyper-V and click Open.
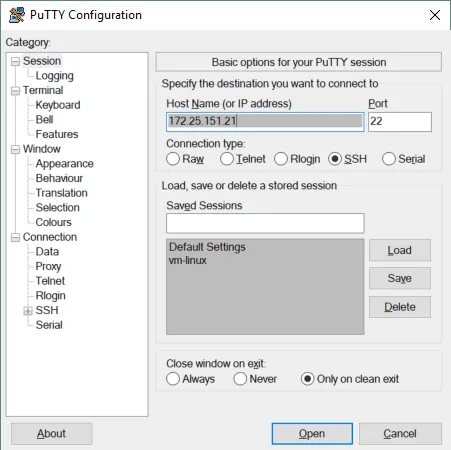
Introduzca su username and pasespada. Ahora usted consigue the consola de Ubuntu de forma remota.
Transferring files entre Linux VM and Windows host machines
Unlike VMware, usted canno drag and drop files entre the Windows host and Linux guest in Hyper-V. Como have configured the servidor SSH, can transfer files de su Ubuntu VM a su Hyper-V host and do the inverse by using an SFTP (Secure File Transfer Protocol) client such as WinSCP. WinSCP utiliza SSH para una conexión seguraion and can also utilizar SCP (Secure Copy Protocol) para file transferring.
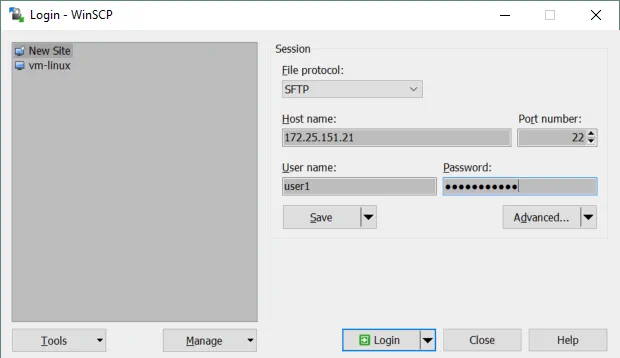
Ejecute WinSCP en su Windows machine. Seleccione SFTP as a file protocolo, introduzca su host name o IP advestido, usuario name and pasespada.
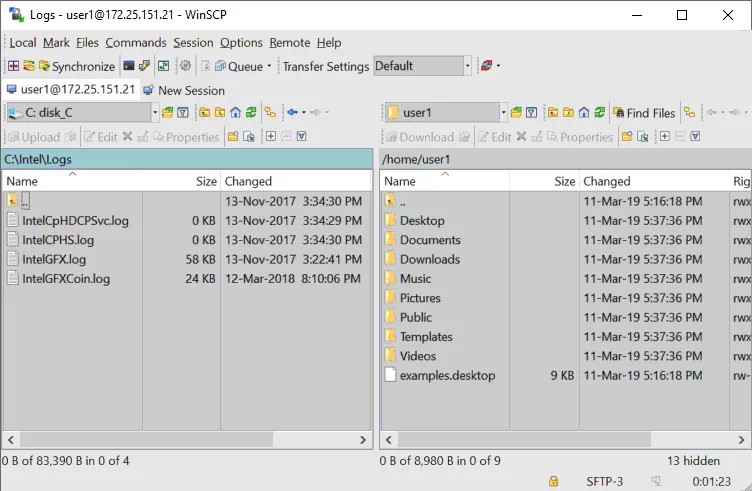
When you have logged in, usted can ver a window with dos panels – the first panel displays files on the Windows machine and the second panel displays files on the Linux machine. Ir a the designated directories en fuente and destination machines, seleccionar files and directories. Drag and drop the selected objects between panels to copy them.
¿Cómo install Hyper-V Integration Services on Linux?
Hyper-V Linux Integration Services have been built in Ubuntu since version 12.04. Si su Linux distribution no incluye Hyper-V Integration Services, can download them de the Microsoft’s site.
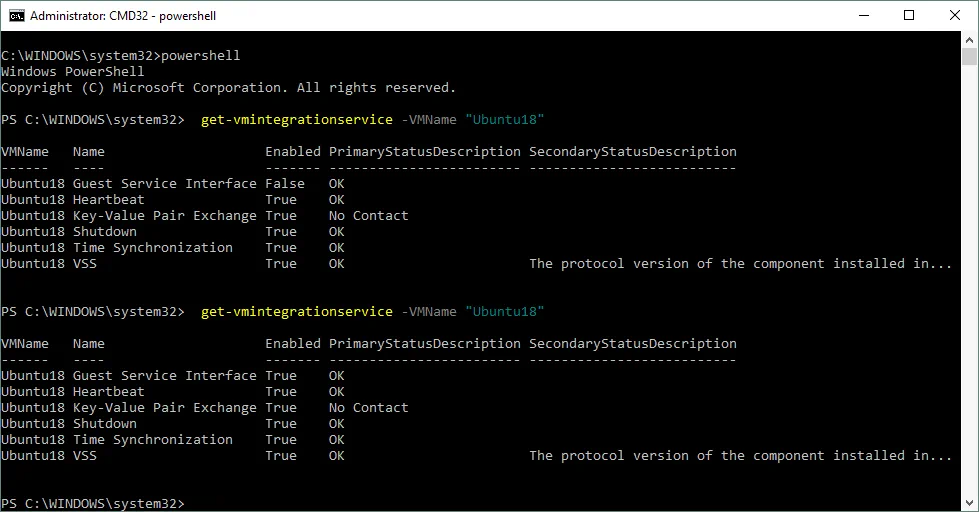
You can check which Integration Services are enabled for your Ubuntu VM running on Hyper-V in PowerShell. Type the following command in PowerShell on the Hyper-V host:
get-vmintegrationservice -VMName "Ubuntu18"
Usted can also seleccione the services que want Hyper-V para ofrecer a this VM in GUI. Abra Hyper-V Manager, right click su VM name, and click Settings. En the Settings window, select Integration Services in the left pane and tick the check boxes near the services that are necesarios(Guest services deben estar enabled in this example).
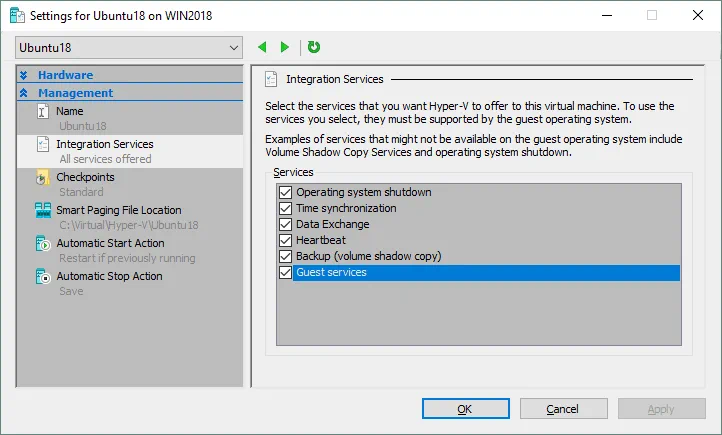
Click OK to save changes.
You can now re-check the enabled services in PowerShell (see the screenshot below).
get-vmintegrationservice -VMName "Ubuntu18"
Una vez que Hyper-V Integration services are installed en su Ubuntu Linux, they debe convertirse activated. The /etc/initramfs-tools/modules file contains a list of modules that you want to be included in your initramfs.
The initramfs is the initial RAM file sistema intendía a montar the root filesistema(/). Como a resultado, the initial raíz file sistema and init daemon (that is the fiprimer proceso that debe ejecutarse in Linux) can reside in kernel memoria cache (no en a ramdisk as para initrd filesistema that acts as a block device de a fixed size and consume más memoria para caching). %e_x_387 %nitrd was replaced by initramfs after Linux kernel 2.6 debido a its advantages such as flexibility, efficiency and simplicity. The initramfs is a conjunto completo de directories that que can ver en su raíz filesistema and is gzipped ina a cpio archive.
Linux kernel can be monolithic and modular. En la mayoría de los cases the módulo kernel is utilizados. Let’s enable loading de the necessary módulos.
vim /etc/initramfs-tools/modules
Edit the file and add these strings to enable loading de the appropriate modules.
| hv_vmbus
hv_storvsc hv_blkvsc hv_netvsc |
Update initramfs:
update-initramfs -u
Restart su Hyper-V VM running Ubuntu:
%e_x_387 %nit 6
Verify that Hyper-V related módulos para su Linux kernel are loaded.
lsmod | grep hv

Tuning Linux Disk Optimizer
Linux has an I/O scheduler mode that helps to optimize disk I/O (input/output) by default that is especially útil para magnetic (spinning) hard disk drives. Hyper-V has its propio mechanism para optimizing virtual disks I/O performance. Using dos disk optimizers is not necessary and you can disable the built-in Linux disk optimizer. L%e%nux kernel allos te permite utilizar differentes sc E/Shedulers, each de them using differentes algoithms. En this case, debe utilizarse the NOOP scheduler. NOOP is the simplest I/O scheduler that utiliza the First In First Out (FIFO) concepto para the cola. This is what necesita ejecutar Ubuntu en Hyper-V.
Para edit the I/O scheduler utilizado por Linux kernel, edit the grub configuration file with the command:
vim /etc/default/grub
Find the GRUB_CMDLINE_LINUX_DEFAULT string. En this case this string has the following view:
GRUB_CMD LINE_LINUX_DEFAULT="quiet splash"
Edit this string to get the following view:
GRUB_CMDLINE_LINUX_DEFAULT="elevator=noop"
Save changes to this GRUB configuration file.
Update the GRUB bootloader configuration.
update-grub2
Reinicie su Ubuntu Hyper-V VM.
init 6
Conclusionesion
Si have nunca utilizado Linux, installing Ubuntu on Hyper-V can be the first step to opening the gate to the world of Linux. Creating a new virtual machine is straightforward, pero algunos manual configurations should ser made after installation is finished.
Running Linux VMs en Hyper-V hosts allows usted para clonar and migrate VMs easily. Dos machines no deben have the same host name and IP advestido, and for this reason, basic network configuration was explained. Hyper-V Linux Integration Services can improve the performance de VMs.
While the operating sistema is running en a VM, both Windows and Windows virtual machines should be backed up to protect precious data. NAKIVO Backup & Replication can back up your Hyper-V VMs in the best way possible.


