How to Convert a Physical Linux Server to a VMware VM: Comprehensive Walkthrough
Running servers on virtual machines provides you with a list of advantages such as scalability, rational resource usage, high availability, load balancing, convenient management, data protection features, etc. For this reason, you may want to migrate some of your physical servers to virtual machines. This process is also known as physical to virtual conversion, and referred to by the acronym P2V. VMware is one of the leaders in the IT world in providing virtualization solutions and Linux is one of the most reliable operating systems running on servers. Today’s blog post explains the importance of Linux Server Backup and how to convert a physical Linux server to a virtual machine (VM) running on an ESXi host in vSphere. Two different methods of VMware P2V Linux conversion are considered on an example of Ubuntu 18.
One of the advantages of running servers as VMs in vSphere is ease of data backup. NAKIVO Backup & Replication can protect your VMware vSphere environment and perform backup, replication and site recovery. You can also try the Cross-Platform Recovery feature to recover Hyper-V VM backup to VMware virtual disks and attach the disk(s) to a corresponding VMware VM and vice versa. Also, this feature allows you to recover Physical machine backup to VMware/Hyper-V virtual disk(s) and attach the disks to a corresponding VM.
Method 1 – Using VMware vCenter Converter
VMware vCenter Converter Standalone is a free application that can be installed on Windows for converting Windows physical machines, Linux physical machines, Hyper-V VMs, VMware VMs, and VMs running under Red Hat KVM or RHEL XEN. Supported destination types include: VMs for unmanaged ESXi host; VMs for ESXi host managed by vCenter Server; VMs for VMware Workstation; VMs for VMware Fusion.
Converting a Hyper-V VM to a VMware VM residing on an ESXi host was explained in this blog post.
The working principle
When converting a powered-on physical Linux machine to a virtual machine of the VMware ESXi format, VMware vCenter Converter Standalone doesn’t install an agent on the source Linux machine (unlike Windows machines). The conversion process can be divided into two main stages.
Stage 1. VMware Converter connects to a source Linux machine via SSH and allows you to select the components to be copied, such as virtual disks and partitions. According to selected components of the source physical Linux machine and configured settings of the destination VM, the converter will create a helper VM.
Stage 2. When all necessary components are selected and network settings of the helper VM are configured, VMware Converter creates a helper VM on a destination ESXi host and datastores. Then, the converter starts the helper VM that boots from the helper VM ISO image, and copies all necessary data from a source Linux machine to a destination VM that has the status of helper VM until the conversion process is finished.
A helper VM is deployed from the Linux-based ISO image stored on the file system of the Windows machine on which the converter is installed. The location of converter-helper-vm.iso and converter-helper-vm-x64.iso files used to boot a helper VM on an ESXi host is “C:\Program Files (x86)\VMware\VMware vCenter Converter Standalone\” by default.
After copying data to the target VM, the VM can be reconfigured by VMware Converter if the appropriate options have been selected for the conversion job.
System requirements
There are some requirements that must be met to perform VMware P2V Linux conversion with VMware converter:
- A physical machine running Linux must be powered on.
- An ESXi host must be powered on and accessible via the network. vCenter Converter Standalone client and server must be able to access each other. TCP Ports 22, 443, 902 are used by default for network communication.
- The GRUB boot loader must be used on the physical Linux machine to be converted. LILO is not supported.
- Optical discs must be ejected from optical disc drives.
- The SSH server must be configured on a physical Linux machine (the source machine).
Note: The SSH server can be installed on Ubuntu Linux with the command:
apt-get install openssh-server
Remote access for the user with the password via SSH can be configured by editing the sshd_config file:
vim /etc/ssh/sshd_config
Create or uncomment the string:
PasswordAuthentication yes
Save the configuration file
:wq
Restart the sshd daemon (service)
service sshd restart
VMware Converter Linux P2V Conversion: Step-by-Step Walkthrough
To perform Linux P2V conversion, you should take the following steps:
1. Download VMware vCenter Converter Standalone from the official web site.
2. Install the converter on a Windows machine that can connect to your Linux machine via the network. The installation process is straightforward – just run the EXE file and follow the recommendations of the installation wizard. VMware Converter 6.2 is used in today’s example.
3. Run VMware vCenter Converter Standalone.
4. Click Convert machine.

5. Source System. Select the source system in the machine conversion wizard that is open. Select Powered on and Remote Linux machine. Specify the IP address, user name, and password used on the remote Linux machine. Remember that the SSH server must be configured on the Linux machine and a firewall must not block SSH connections on this step. Otherwise, the error message will be displayed: Unable to SSH to the source machine. Check if a firewall is blocking access to the SSH daemon on the source machine. The user you have specified must be able to log in to the Linux console via SSH by using the login/password combination or a private key file. A user called user1 with a password is taken for this example.

5.1. Click View source details to view details of your remote Linux machine which must be converted to a VMware virtual machine. Hit Next to continue and switch to the next step.

If you see the security warning (remote host thumbprint warning), click Yes to connect.
Sometimes the converter cannot run commands on your remote Linux machine and displays the warning: Unable to query the live Linux source machine. Make sure that you can run sudo without entering a password when logged in to the source machine over SSH as your_username.
In this case, you have to edit the /etc/sudoers file and make your user able to run sudo without entering the password. Instead of editing /etc/sudoers manually, use the following command:
visudo
Add the line in the end of the file as following:
user1 ALL=(ALL) NOPASSWD: ALL
Where user1 is the name of our user. You need to enter your user name. Press Ctrl+X to exit and press Y (Yes) to save changes to the file.

6. Destination System. Select the destination system. By default, the destination type is defined as VMware Infrastructure virtual machine if you are converting a physical Linux machine, and this is the only available option for converting a physical Linux machine to a VMware VM. This means that the destination VM will run on an ESXi server or in the VMware vSphere cluster. If your ESXi host on which you want to run the converted VM is managed by vCenter, select the IP address of your vCenter Server and define the credentials of vCenter administrator or another user who has administrative privileges for managing vCenter Server.
Note: You cannot convert a physical Linux machine to a VM of the VMware Workstation format with VMware vCenter Converter Standalone.

If you see certificate warnings, you can hit Ignore to continue.
7. Destination Virtual Machine. Select the datacenter to store the virtual machine and enter the name for the target VM, for example, Ubuntu18-04-vm.

8. Destination Location. Select an ESXi host to run the virtual machine and a datastore to store virtual machine files. You can also select the virtual machine version. By default, the highest supported virtual machine version is selected. In this case, it is version 13 because ESXi 6.5 is used.

9. Options. On this step, you can edit different conversion options.
Data to copy. You can select all volumes or custom volumes to copy and select the virtual disk provisioning type (thick or thin provisioning). It is also possible to store each virtual disk on a different datastore. Leave the “Create optimized partition layout” checkbox ticked. This option is used to optimize the alignment of disk partitions.

Devices. Set the necessary amount of memory for the destination VM on the Memory tab. Set the disk controller, the number of processors and processor cores in the Other tab.
Networks. Select the number of virtual network adapters to connect to a virtual machine. Then select the virtual network to which each network adapter must be connected, network controller type and tick the Connect at power-on checkbox if needed.
Advanced options. Post-conversion settings are located in this section. In our case, for converting a physical Linux server to a VMware virtual machine, only the Reconfigure destination virtual machine option is available. This option is used to configure the boot loader, update drivers used by the operating system to be more optimized for running a VM in the VMware virtual environment (with the appropriate virtual hardware).
Helper VM network. During the process of converting a Linux server to a VM, VMware vCenter Converter creates a helper VM on the destination host/datastore. The helper VM must have access via the network to the source physical machine running Linux in order to clone all files of the source machine. In this section, you can configure the IP address, netmask, gateway, and DNS servers used for network connection of the helper VM.
10. Summary. Check all conversion settings for your P2V Linux conversion and if everything is correct, hit Finish to start the conversion process.

11. Wait until the conversion process is finished. The duration of conversion depends on the amount of data stored on disks of the source Linux machine. If, after conversion is finished, you see the Completed status of the conversion job in VMware vCenter Converter, you can start the destination Linux virtual machine in the interface of VMware vSphere Client, VMware Host Client, or VMware Workstation.

However, sometimes the P2V conversion process of the Linux machine can end on 97% with the error:
FAILED: An error occurred during the conversion: ‘GrubInstaller::InstallGrub: /usr/lib/vmware-converter/installGrub.sh failed with return code: 127, and message: FATAL: kernel too old Error running vmware-updateGrub.sh through chroot into /mnt/p2v-src-root Command:
chroot “/mnt/p2v-src-root” /vmware-updateGrub.sh “GRUB2” “(hd0)” “(hd0,1)” /vmware-device.map “grub2-install” ‘

This issue can occur because the GRUB boot loader was not set up properly by VMware vCenter Converter on the target VM. If you try to start the Linux virtual machine after conversion, you will get the error: Error loading operating system.
![]()
How can you resolve this VMware Converter Linux issue?
1. You need to boot from the Ubuntu installation medium and use it as a rescue disk. Edit VM settings by using VMware vSphere Client, VMware Host Client or VMware Workstation (VM > Edit Settings).
2. In the Hardware settings, select the CD/DVD drive of the virtual machine and select the Ubuntu installation bootable medium. In our example, we use the Ubuntu 18.04 installation ISO disk image that is located on the datastore, accessible by the ESXi host on which the Linux VM resides after conversion. Don’t forget to tick the Connect at Power On checkbox.

3. After starting the VM, press F2 to enter the VM BIOS Setup. Select CD-ROM as the first boot device in the Boot section.
Then go to Exit > Exit Saving Changes.

As an alternative, you can change the boot order once by pressing Esc instead of F2 right after starting a VM.
4. After booting from the Ubuntu installation medium, select Try Ubuntu on the Welcome screen. Wait until Ubuntu is loaded from the Live DVD and you will see Ubuntu Desktop.

5. Open Ubuntu Console and get the root privileges.
sudo -i
6. List available disks.
ls -al /dev/sd*
fdisk -l
In our example, the simplest disk partitioning scheme is used for Ubuntu installed on the physical machine. Linux is installed on the single /dev/sda1 partition that represents the entire disk. You have to detect which partition is used for Linux booting and contains the /boot/ directory or is mounted to the /boot/ directory.
7. You can find the partition used to boot Linux with parted:
parted /dev/sda
unit MB
p free

Now you can see which partition is used to boot Linux (the boot flag is present in that string). After that, you can quit parted.
quit
Note: If you use a manual partitioning scheme and a separate boot partition to boot Linux, your list of partitions would be different, but you should similarly find the partition with the boot flag.
8. Create the directory on the RAM disk and mount the partitions used by Ubuntu. If Ubuntu is installed on a single partition, use commands like:
mkdir /mnt/ubuntu18
mount /dev/sda1 /mnt/ubuntu18
Note: If Ubuntu is using multiple partitions, create separate directories, and mount each partition to the appropriate directory:
mkdir /mnt/ubuntu18/boot
mkdir/mnt/ubuntu18/root
mount /dev/sda1 /mnt/ubuntu18/boot
mount /dev/sda2 /mnt/ubuntu18/root
and so on.
9. Install Vim (the text editor).
apt-get install vim
10. Check the disk identifier for each disk partition. You need to know the UUID of the partition that contains the /boot directory (or the partition mounted to the /boot directory). Remember this new UUID. In our case, this partition is /dev/sda1
blkid

11. Edit the /etc/fstab file on the virtual disk used by the installed instance of Ubuntu. The /etc/fstab file is located in the temporary directory to which we have mounted the root file system of Ubuntu (/mnt/ubuntu18/etc/fstab).
vim /mnt/ubuntu18/etc/fstab

Change the UUID of each partition in /etc/fstab to make automatic mounting the partition on Linux boot possible. Change the old UUID values used for disks on a physical Linux machine to the new UUID values used on a new virtual machine. In the current simple example, only one /dev/sda1 partition is used and must be mounted to the root (/) directory. Hence, we must change 2516177b-e9a9-4502-bdae-a3626fe3ab0a to dd05b02c-8772-4ec2-9340-2473ec8c2f8b.
Save changes and quit vim.
:wq
Note: If your Linux is using multiple partitions, you may need to change the UUID value for other partitions or just define them as sda2, sda3, sdb1, sdb2 etc. to make possible mounting those partitions automatically on Linux boot.
12. Edit the GRUB configuration file that is usually located in the /boot/grub/ directory. Remember the temporary directory to which you have mounted a partition that contains files of the /boot/ directory. After converting a physical Linux machine to a virtual machine, the UUID of the disk has been changed on the destination VM and, for this reason, the boot loader (GRUB) cannot boot from the necessary partition. In our case, we edit the grub.cfg file with the command:
vim /mnt/ubuntu18/boot/grub/grub.cfg
13. Replace the old UUID with the new one. The UUID occurs several times in the configuration file and editing this value manually is not convenient. The text editor vim allows you to do automatic replacement of the source text with the target text by using the command:
:%s/source_text/target_text/g
Where %s means that all matching values in the entire text file must be replaced.
In our current example, we use the command:
:%s/2516177b-e9a9-4502-bdae-a3626fe3ab0a/dd05b02c-8772-4ec2-9340-2473ec8c2f8b/g

Write changes in the read-only file and quit vim.
:wq!
Note: If your Linux use multiple partitions, replace the UUID values of all partitions whose UUIDs are mentioned in the grub.cfg file.
14. Now you have to reinstall GRUB to the boot loader to the same directory where the boot loader was installed before. In our example, GRUB was installed in the /boot directory and the /boot directory is now temporary accessible as /mnt/ubuntu18/boot in our example. The disk used to boot Ubuntu is /dev/sda accordingly.
grub-install –boot-directory=/mnt/ubuntu18/boot /dev/sda
15. Unmount all partitions mounted before:
umount /dev/sda1
16. Shut down the VM
init 0
17. Reconfigure boot settings to boot from a virtual hard disk, not from CD-ROM in the VM settings.
18. Power on the VM.
19. Now the VM can boot from its virtual hard disk with GRUB on an ESXi host.
Thus, you know how to perform VMware P2V Linux conversion with VMware vCenter Converter Standalone. Unfortunately, the VMware converter Linux version is not available but if you want to convert your physical Linux server to a VMware VM by using only Linux machines, you should familiarize with the second P2V Linux conversion method.
Method 2 – VMware P2V Linux Conversion Without VMware Converter
The second method of converting a physical Linux machine to a virtual machine of the ESXi format doesn’t require VMware vCenter Converter Standalone. This method can be used for users and administrators who doesn’t have a Windows machine in their environments (as you recall, VMware vCenter Converter can be installed only on Windows). The idea behind the second VMware P2V Linux conversion method is as follows:
- Create images of your physical disks used in a physical Linux server with the dd utility
- Convert the resulting images into images of the vmdk format
- Create a new VM in VMware Workstation (that can be run on Linux or Windows) using existing virtual disks for the new VM
- Export the VM from a VMware Workstation format to an OVF template
- Create a new VM on an ESXi host from the OVF template
In our example, Ubuntu 18 is installed on a physical machine that must be converted, ESXi 6.5 and vCenter 6.5 are used as destination, and VMware Workstation 15 is used as a transition point in the P2V Linux conversion process.
Step-by-step walkthrough
1. On the physical Linux Server, run the dd (data duplicator) utility for each physical disk (/dev/sda, /dev/sdb etc.) and create the image of each disk. You can attach a USB hard disk drive to your physical Linux machine and store the images made with the dd utility on that USB HDD. Later, you can attach that USB HDD to a machine on which a VM must be created. In the current example, all partitions used by Linux are located on the /dev/sda disk:
dd if=/dev/sda of=/media/user1/data/sda.img bs=8M conv=sync,noerror status=progress
Where:
if=/dev/sda – the input file that is the entire physical disk;
of=/media/user1/data/sda.img – the path for the output image file that is located on the external disk in this case.
bs=8M – block size is 8 MB. This option boosts speed since dd copies data by using 512-Byte portions of data by default
conv=sync,noerror – is used to prevent dd to stop on an error when reading data from a source disk (file).
status=progress – use this option to display the task progress in the console for more convenience

2. Install qemu that is an open-source application for hardware emulation. You can install qemu on any Linux machine.
apt-get install qemu
3. In the Linux console, go to the directory where the img files you created before are located. Convert images of your disks made with the dd utility from the img file format to the vmdk format. Qemu can be used for this task. We convert one disk image in our example:
qemu-img convert -o compat6 sda.img -O vmdk sda-vmware.vmdk
Now disk images are converted to the vmdk format and are ready to be opened in VMware Workstation. As you recall, the format of VMDK virtual disks is different for VMware Workstation and VMware ESXi. The details about VMDK file format are explained here. You need to export a VM from VMware Workstation to an OVF template and then import a VM from the OVF template to an ESXi host.
Make sure that VMware Workstation is installed on any of your computers. In our example, VMware Workstation 15 is installed on a machine running Ubuntu 18, but not on the source Linux machine that must be converted to a VM (we don’t use Windows for this P2V Linux conversion method). The algorithm for a Windows machines with VMware Workstation is similar.
4. Create a new directory on the machine with VMware Workstation installed, for example, /vms/P2V_Linux
mkdir /vms/P2V_Linux
5. Copy your vmdk files converted by qemu to that directory. We copy the sda-vmware.vmdk file to that directory in this case.
6. Create a new virtual machine in VMware Workstation:
File > New virtual machine

A New Virtual Machine Wizard is opened. You should pass all the configuration steps of this wizard:
Virtual Machine Configuration. Select Custom (advanced) to enable configuration of advances options. Hit Next to continue.

Virtual Machine Hardware Compatibility. Select the necessary virtual machine hardware version, for example, Workstation 15.x.
Guest Operation System Installation. Select I will install the operating system later.
Guest Operating System. Select Linux, then select Ubuntu 64-bit in the drop-down menu.
Virtual Machine Name. Enter the name and set the location for your virtual machine. In this example, the VM name is P2V Linux and its location is /vms/P2V_Linux_VM/

Processor configuration. Select the number of processors and the number of processor cores according to configuration used on your physical Linux machine that you are converting to a VMware VM.
Memory for the Virtual Machine. Set the amount of memory that is at least equal to the amount of memory on your physical Linux computer.
Network Connection. Select the network type, for example, Bridged networking. Make sure that the source Linux server is now disconnected so as to prevent network conflicts.
I/O Controller Types. Select the recommended value. In this example, SCSI Controller: LSI Logic (Recommended) is selected.
Virtual Disk Type. Select the recommended disk type. In our case, it is SCSI (Recommended).
Select a Disk. Choose the Use an existing virtual disk option.
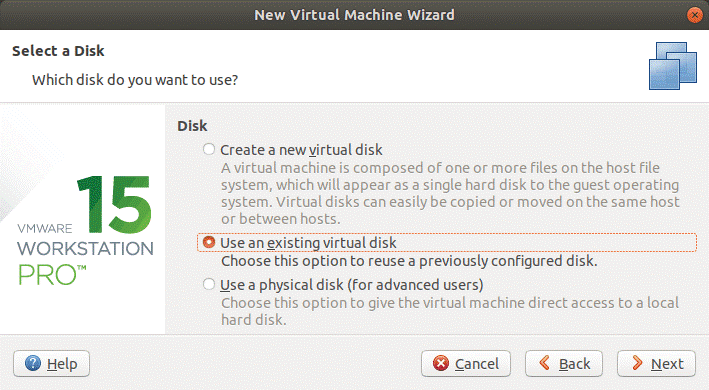
Select an Existing Disk. Browse the appropriate vmdk file of your converted /dev/sda disk. In the current example, the sda-vmware.vmdk file is selected as an existing virtual disk.
Note: If you have multiple hard disks on a source physical Linux server and multiple VMDK files after conversion, select the first vmdk file that is converted from the /dev/sda disk. Add other disks manually after VM creation by editing virtual machine settings.

Hit Keep existing format for better compatibility.
Ready to Create Virtual Machine. Check the configuration summary and if everything is correct, hit Finish.
Once the VM is created, you can check the VM configuration before starting the VM.
Note: If you have converted multiple physical disks to virtual disks, add remaining virtual disks by doing the following:
- Click VM > Settings
- Click Add on the Hardware tab
- Select Hard Disk
- Select the recommended option (SCSI in our case)
- Hit Use an existing virtual disk
- Select a virtual disk file
7. Power on the VM in VMware Workstation (make sure that all necessary virtual disks are added to the VM configuration).
8. Once your Linux guest is loaded on a VM, check the network connection:
ifconfig
9. Install VMware Tools on Linux running on the VM. In Ubuntu, VMware Tools can be installed from a virtual ISO disk image or from online software repositories.
apt-get install open-vm-tools
10. If everything is correct, shut down the VM and get ready to create an OVF template to migrate the VM to an ESXi host.
11. In the GUI of VMware Workstation, click File > Export to OVF.

12. Save the OVF file in the directory with your Linux VM, for instance. In the current example, the OVF template is saved to /vms/P2V_Linux_VM/
13. Open VMware vSphere Client in your web browser.
14. Go to Hosts and Clusters, then select your ESXi host on which you want to run a VM after conversion.
15. Create a VM from a template. Click Actions > Deploy OVF Template.

A new window of the Deploy OVF Template wizard is opened and contains 7 steps:
1. Select an OVF Template. Click Local File, then hit Browse. You should select two files – the OVF file of the VM template and the VMDK file (files) of the virtual disk (disks). If you select only one OVF template file, a message about missing files and their names will be displayed. The files must be accessible from a machine on which you have opened VMware vSphere Client (the files must be stored on local disks, SMB or NFS share, etc.).

2. Select a name and folder. Specify a unique VM name and target location (a datacenter or VM folder). In the current example, the VM name is P2V_Linux.
3. Select a compute resource. At this step, you should select an ESXi host or cluster on which your VM will run.

You can get the error on this step: Issues detected with selected template. Details: – -1:-1:VALUE_ILLEGAL: No supported hardware versions among [vmx-16]; supported: [vmx-04, vmx-07, vmx-08, vmx-09, vmx-10, vmx-11, vmx-12, vmx-13].
This error can occur when the hardware version set in the VM template is higher than the hardware version supported by an ESXi host.
Edit the OVF file in the text editor to fix this issue. You can use Vim in Linux. Go to the directory where the OVF template is located and edit the file:
vim P2V_Linux.ovf
Find the string like vmx-xx, where xx is the number of the VM hardware version. The highest supported hardware version for ESXi 6.5 is 13 and in our template, the VM hardware version 16 is set.
In order to find the necessary text in Vim , in the navigation mode type:
/vmx-

Let’s edit vmx-16 to vmx-12, for example, and save the OVF file.
Once you have saved changes in the OVF file, go back to VMware vSphere Client and click Next on the Select a compute resource step of the Deploy OVF Template wizard.
4. Review details. On this step you can verify the template details.
5. Select storage. Select the destination datastore in which to store the configuration and disk files of the VM and select the virtual disk format (Lazy Zeroed Thick, Eager Zeroed Thick or Thin Provision).

6. Select networks. Select a network for each virtual network adapter. You should configure each network adapter to connect to the appropriate network.

7. Ready to complete. Review the configuration and hit Finish to start VM creation.
Wait until a new VM is created from the template.
16. When VM import from the OVF template is finished, power on the VM on your ESXi host. Read more about VM templates in this blog post. If you get the message “Do you want to try to connect this virtual device every time you power on the virtual machine?”, respond that you don’t want to connect that device each time during VM boot by clicking No.

A physical Linux server has been converted to a virtual machine without using Windows and VMware vCenter Converter Standalone. The process of VMware P2V Linux conversion was explained on an example of Ubuntu Linux. If you need to convert physical servers running other Linux distributions such as SUSE or Red Hat to VMware virtual machines, use the same algorithm, but keep in mind that some commands and locations of configuration files can be different. Instead of using apt-get package manager in SUSE, you should use zypper and in Red Had use yum. You may need to reconfigure network settings of the virtual machine such as an IP address, default gateway, DNS server, etc.
Conclusion
Converting a physical Linux Server to a VMware virtual machine can be done by using a variety of methods. Today’s blog post has covered two methods of VMware P2V Linux conversion – with VMware vCenter Converter Standalone that requires a Windows machine, and by using Linux utilities in conjunction with VMware Workstation. When using any of these methods for converting a physical Linux Server to a VMware VM, you may need to edit VM configuration manually. When using the first method, only an ESXi host can be used as destination for P2V Linux conversion, while the second method can be used to convert a physical Linux machine to both VMware ESXi and VMware Workstation formats.