How to Back Up VMware VMs: The Definitive Guide
Backups are a critical part of any VMware virtual infrastructure. These days mission- and business-critical machines are expected to be up and running 24 hours a day, 7 days a week. This puts backups at the heart of any data protection strategy to ensure access to data and system availability.
When thinking about backing up VMware virtual environments, what are some backup methods and best practices to ensure you get effective and efficient backups that can be used for recovery in case of infrastructure failure, a natural disaster, or a malware infection? Read on about the main VMware backup methods and best practices.

How to Back Up VMware Infrastructure: 3 Methods
When planning backup for virtual machines, there are certain challenges to consider. These challenges are related to the working principle of virtual machines and maintaining the benefits of virtualization.
From the user perspective, VMs work similarly to physical machines. Users work in an operating system, edit files, and run applications. Administrators, on the other hand, know that a hypervisor emulates virtual hardware used by VMs that share an ESXi server’s physical hardware. VM data is stored as virtual disk VMDK files on ESXi datastores.
This VM working principle determines available methods to back up the VM data. There are multiple methods to back up virtual machines in a VMware infrastructure while preserving data consistency. Using an improper method to back up a running VM can cause data corruption and recovery failure, which defies the purpose of backups.
Another important aspect of VM backup is resource consumption. Virtualization allows you to use hardware resources rationally to run VMs. However, some backup methods can consume more VM and ESXi server resources than is necessary, slowing down processes and overloading the infrastructure.
Let’s cover some of these methods along with their advantages and disadvantages.
Method 1: Installing a Backup Agent in a Guest OS
You are probably familiar with the traditional approach to physical machine backup: special backup agent software is installed in the operating system. This agent performs scheduling, quiescing, and data transfers. A local area network (LAN) is used to copy data to a backup destination. Technically, you can use this method to back up virtual machines like you would physical machines.
VMware best practices usually recommend against backing up virtual machines as physical machines because of the high overhead involved and generally the poor performance in virtualized environments. Your VMware infrastructure can become overloaded when copying data by using a backup agent for physical machines installed on VMs.
VM backup is performed at the guest level when using a backup agent in a VM. Guest-level backup is not the recommended method for virtual environments because it’s not resource-efficient. Read more about host-level backup vs. guest-level backup.
You may have difficulties backing up a vCenter Server Appliance (VCSA), which is a virtual machine running Photon OS. If you run vCenter on Windows, it is technically possible to install the agent and back up data. However, only VCSA is supported in vSphere 7.0 and newer versions.
| Pros | Cons |
|
|
Method 2: File-Based VMware VM Backup
VMware virtual machines store data in VMDK files located on ESXi datastores. VMDK files are virtual disk image files. The idea of the file-based VM backup method is to copy VMDK files to a backup location. In addition to virtual disk files, VMware VMs also use configuration files, snapshot files, Changed Block Tracking files, etc. You should also back up these files to make it possible to restore the entire VM.
When it comes to recovery, you can only recover a full VM. This means that if you need to recover specific files, you first need to recover the entire VM and then access the particular files.
Note: Don’t confuse file-based VM backup when copying VM files and file-level backup when backing up individual files inside a VM.
| Pros | Cons |
|
|
Method 3: Dedicated Image-Based VM Backup Solution
To protect virtual machines, you can use a dedicated VMware backup solution operating at the ESXi host level, that is, at the hypervisor level. A host-level VM backup solution creates a VM image backup. This VM backup includes virtual disks, VM configuration, and other files. An image-based VMware backup solution interacts with the ESXi host via special VMware APIs to use virtualization features, such as snapshot technology and quiescing.
| Pros | Cons |
|
|
VMware Backup Best Practices with NAKIVO
We have already covered the theoretical part of how to backup VMware virtual machines using three methods. Now we can look at some of the VMware backup best practices.
1. Create backups
It may seem obvious that creating backups of VMs is our first VMware backup best practice. However, virtual machines are sometimes intentionally or unintentionally excluded from backups.
Some mistakenly believe that virtual machines are more resilient than physical ones because they usually reside on higher-end equipment. While this may be true and the risk of equipment failure may be slightly lower, there are still data-loss risks as a result of accidental errors by users, malware, and natural disasters. Just as with physical machines, VM backup is a cornerstone of any data protection strategy. Create backups regularly to make it possible to recover data for the needed point in time.
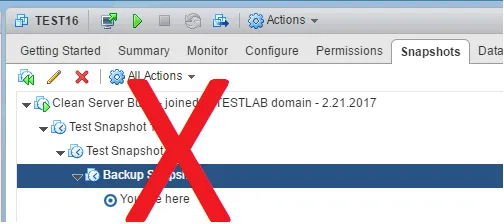
2. Don’t view snapshots as backups
This point builds on our first best practice, as some VMware administrators may think that they have a backup to use for recovery when they have a snapshot on a virtual machine. Then, when corruption or loss happens due to any number of factors, they discover that they cannot recover the VM or the data on those VMs. We have already covered the topic of snapshots vs backups, and snapshots are not backups.
Snapshots are a part of VM files and are dependent on VM disks. This is why they are referred to as snapshot “chains”. For valid VMware backups, they need to be able to recreate the virtual machine without any of the source virtual machine files or source infrastructure available to them.
Note that VMware snapshot best practices recommend using snapshots for a short time only. Creating many snapshots and preserving snapshots for a long time reduces VM performance and consumes too much storage space.
3. Choose image-based VM backup technology
Back up your VMware vSphere VMs at the host level rather than the guest level. In this case, you get a data backup of the entire VM as an image. The backup image capturing the virtual disks and other VM files can be saved at a backup destination in specific formats. The host-level image-based approach allows you to avoid overloading ESXi servers and the entire infrastructure. For this purpose, use a VMware backup solution designed to work in virtual environments, for example, NAKIVO Backup & Replication.
Don’t backup VMs at the guest OS level, which is a legacy backup approach used for physical machines. Legacy solutions require backup agents to be installed on each VM. This approach is inefficient in a virtualized environment with unnecessary resource consumption, which causes degradation of VM performance. These ESXi hardware resources are put to better use for VM workloads.
4. Use VMware APIs for VM backup
VMware provides different APIs for software integration and data protection. These APIs allow developers to create VM backup software that interacts directly with VMware vSphere environments and uses available virtualization features for effective data backup.
The VMware vSphere API for data protection is one of the most interesting APIs from the perspective of VM data backup. This API allows backup applications to offload backup processing off an ESXi host and provide unique features to backup VM. NAKIVO Backup & Replication uses vSphere APIs for efficient VM backup.
5. Use Changed Block Tracking
Changed Block Tracking (CBT) is part of the VMware Data Protection API, which makes up the VMkernel storage stack. It also allows third-party backup applications to have hooks into these APIs to take advantage of CBT when creating backups.
CBT-enabled VM backups allow for much more efficient incremental VM backups. The changed tracking functionality allows backup software to recognize data “blocks” that have changed since the last VM backup. VMware CBT benefits not only virtual machine backups but also other processes such as VM replication.
Virtual machines with CBT enabled have an additional file with the extension -ctk.vmdk in the virtual machine directory that stores the mapping of virtual disk blocks. This special file houses the block mapping information that is used to determine whether blocks have changed since the last backup. The created “ctk” file stays the same size as long as the size of the VMDK disk does not grow.
The benefits of using CBT can be exponential to the speed, performance, and efficiency of virtual machine backups. Unless you are using a RAW disk mapping or legacy virtual machine version for some reason, CBT is a definite recommendation to use with VMware VM backups.
6. Copy your backups to a secondary location
Having secondary backup copies is a must, as enterprise IT environments can’t afford to not have multiple copies of their backup data. Having at least one other backup copy offsite ensures that if the physical production location with your backup infrastructure is down, your backup copy is safe and can still be used for recovery.
Also, these days, many have been hit with a ransomware infection that has not only corrupted and encrypted production resources but also backup resources. If a user with administrator permissions is hit with ransomware, they may likely have access to production and backup systems, including backup repositories, etc.
You can create an additional copy of a backup stored in the primary production location and send it to a secondary backup repository. Ideally, this backup copy repository is in a different physical location either close by or in another geographic region. As long as you have network connectivity to your backup repository, you can copy that data across to the secondary backup repository.
7. Use immutable backup targets
The recent wave of ransomware has shown that no data is safe from attacks, not even backup data. To make sure that your backups are safe from modification and encryption by ransomware, send backup copies to immutable destinations.
An immutable backup repository can be located in the cloud, for example, Amazon S3, in a protected partition or local directory of a server managed by special software, or on special hardware that supports immutability like tape and disks. These options use the WORM, or write-once-read-many model, to allow access to the stored backup data without allowing any changes to it.
This means that if a ransomware attack hits your production and backup infrastructure after the immutable backup was created, you can still use it for a successful and swift recovery.
8. Provide enough resources for backup
Don’t skimp on VM backup resources, because this can cause backup failure, overload hardware, risk backup corruption, and negatively impact production workloads. VMware best practices recommend that you provide enough resources for backup, including network bandwidth, backup storage space, and CPU and memory on the server used to process backup jobs.
Make sure your hardware is not a bottleneck for a backup process. Backup servers consume resources not only for copying data but also for compression, encryption, and deduplication (when these features are enabled).
Use healthy disk drives to store backups. Some users can consider backups as something secondary and use old unnecessary drives that can fail at any time. Use IT infrastructure monitoring tools to check hardware health.
9. Use quiescing and VSS
Virtual machines can run transactional applications such as databases, email servers, Active Directory domain controllers, etc. You should ensure data consistency and freeze or quiesce the running VM to back up data. Quiescing ensures data consistency because the data is frozen and is in the proper state before being copied. There must be no writing transactions when starting to back up data.
Backups made with the quiescing technology for VMs with running applications are called application-consistent or app-aware backups. Applications must support this functionality to pause data writing and continue data writing after the data is backed up.
VMware VMs running Windows use Microsoft Volume Shadow Copy Service (VSS) to quiesce applications inside VMs to prepare them for backing up. VMware Tools must be installed on the guest operating system because they contain a driver working with VSS and VM backup software must support interacting with VSS in the guest OS.
10. Schedule backups and use automation
Running backups manually can lead to backup and retention gaps and job overlaps. Schedule backup jobs to run them automatically and follow backup schedule best practices. to avoid overlaps and overloading your infrastructure with a large number of VM backups at the same time.
Distribute backup jobs over time when scheduling them to avoid overloads and overlaps if possible. If you have a small backup window, for example, a few hours at night, ensure the network bandwidth and hardware performance are sufficient to back up large amounts of data at high speed.
11. Test backups
Knowing how to back up VMware virtual machines is important. But these backups should be tested regularly for validity to ensure successful recovery without any unpleasant surprises. Testing can help you detect possible recovery issues.
12. Back Up Fault Tolerant VMs
Fault Tolerance is a great VMware vSphere clustering feature that allows you to have zero RPO and RTO if a primary VM fails. There is a secondary ghost VM that mirrors the primary VM, with all data replicated in real time. This secondary VM is running but inactive.If the primary VM fails, the secondary VM becomes active immediately (VM failover).
Both VMs use the same virtual disk(s) on shared storage. If this storage fails, both VMs are unavailable. There are also no recovery points to recover the previous VM state by using Fault Tolerance. This is why it is recommended that you back up both primary and fault-tolerant VMs to be able to recover data and VMs to the previous state (for example, to the state before a ransomware attack or software failure inside a VM). Fault-tolerant VM backup is supported in the NAKIVO solution.
VMware backup solutions that back up VMs at the host level and create image-based backups use VM snapshots functionality when quiescing data to stop writes and make a consistent data copy. Fault Tolerance doesn’t support snapshots for fault-tolerant VMs yet (vSphere 7.0). One of the methods to back up a fault-tolerant VM is cloning that VM in vCenter and backing up the VM clone. Then you can delete the VM clone after finishing the backup job. However, this method is time-consuming and error-prone, especially if you have a large number of such VMs. The NAKIVO solution supports backup of fault-tolerant VMs. You can back up both primary and secondary VMs using a simple wizard, without any additional steps.
13. Encrypt your backups
Encryption helps secure backup data in two states: at rest and in flight. Encrypting backup data is a VMware backup best practice in today’s security-guided infrastructures.
A less than desirable byproduct of copying data to different backup targets to avoid a single point of failure is we now have sensitive and critical data in multiple places. This increases vulnerability to data breaches.
Suppose someone were to get their hands on unencrypted backup data. In that case, they could take that backup data and restore it to another unauthorized environment and have access to that data. This is where encryption at rest comes into play.
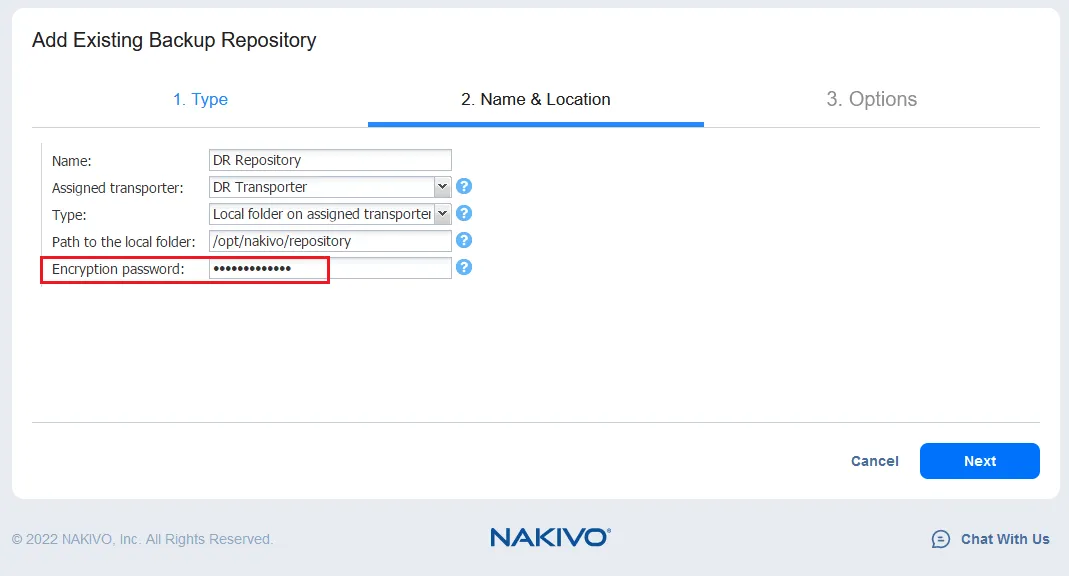
If we have encrypted the backup data repository, the backup data is useless without the encryption key. If someone does get their hands on unauthorized data, they won’t be able to use it. In NAKIVO Backup & Replication, we have the ability to encrypt a repository containing VM backups. It means that all data that is backed up to the encrypted repository will be unreadable without the encryption key.
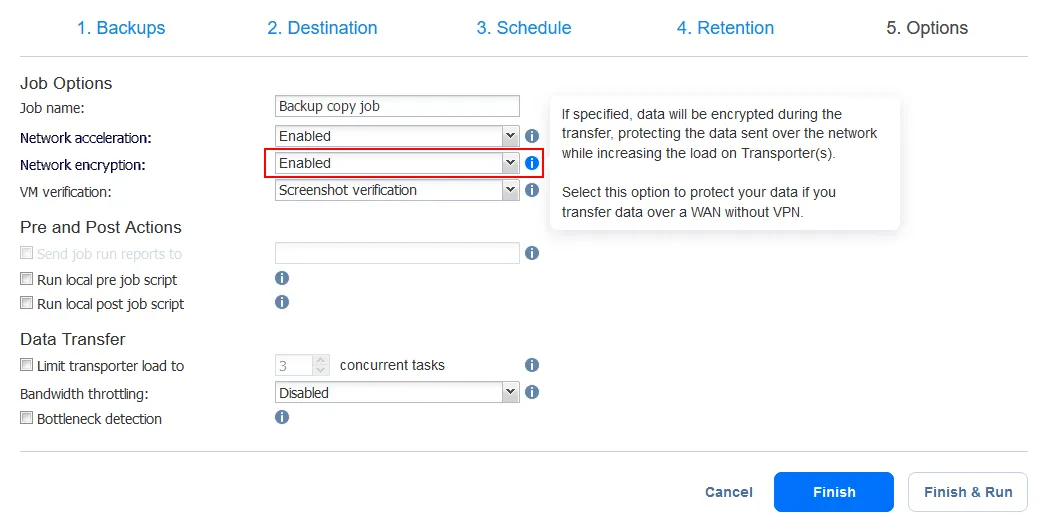
The second part of securing backups is encrypting data in flight. In a sample Backup Copy Job below in the NAKIVO backup solution, we can see that we have the option to select Enabled for Encryption in the job options. As the tooltip notes, job data will be encrypted during the transfer, which protects the data as it is sent over the network.
Conclusion
There are definite steps you should take when creating and running VMware backups. These best practices continue to evolve and change as new technologies and new threats emerge. Following these VMware best practices and other guidelines will help to ensure backup effectiveness, validity, security, and vSphere environment resilience.
NAKIVO Backup & Replication provides businesses with all the features and functionality needed to protect virtual, physical, cloud, and SaaS infrastructures. Download the Free Edition and try out its data protection capabilities first-hand.