Top Hyper-V Server 2012 R2 Features That Are Worth Your Attention
Microsoft Hyper-V was first introduced as a free server role within Windows Server 2008. Later, a standalone Windows Hyper-V Server was released, the main purpose of which was to provide a virtualization platform which had better capabilities than the Hyper-V role.
In this blog post, we will discuss how Hyper-V Server has changed since its first release and how the new and changed functionality of Hyper-V 2012 R2 has affected server virtualization.

What Is Hyper-V 2012 R2?
Hyper-V Server 2012 R2 is a free standalone product which provides hypervisor-based virtualization services. Hyper-V virtualizes hardware resources, which allows you to build an environment where multiple operating systems can be managed and configured at the same time. Each guest OS runs on an isolated VM, with an assigned amount of hardware resources which it can use. Even though Hyper-V 2012 R2 can be downloaded for free, you are still required to purchase a license for each guest OS.
Hyper-V 2012 R2 includes a command line interface (CLI) which is used to manage your virtual environment. However, if you feel more comfortable using a graphical user interface (GUI), you can install Hyper-V Manager or System Center Virtual Machine Manager (SCVMM) on another Windows computer with the Hyper-V role enabled. These management consoles allow you to manage your Hyper-V hosts and virtual machines (VMs) remotely, as well as monitor the operations running within them.
Hyper-V 2012 R2 can be considered lightweight, because it takes up less RAM and disk space than Windows Server 2012, and the hypervisor doesn’t update as often as Windows OS. Moreover, Hyper-V Server includes only the Windows hypervisor, a Windows Server driver model, and supporting components. However, despite its limited functionality, Hyper-V 2012 R2 is compatible with the same hardware as Windows Server 2012. Thus, Hyper-V 2012 R2 has a small footprint and minimal overhead in addition to ensuring efficient resource utilization.
Requirements for Hyper-V 2012 R2 Installation
As mentioned above, Hyper-V Server supports the same hardware compatibility as the corresponding version of Windows Server. Therefore, when it comes to Hyper-V installation, hardware requirements for Hyper-V 2012 R2 installation and for the Hyper-V role on Windows Server 2012 are practically the same. To install Hyper-V 2012 R2, check whether your host computer meets the following requirements:
- Minimum 512 MB of RAM
- A 1.4 GHz 64-bit CPU core
- Hardware-assisted virtualization enabled through the Intel Virtualization Technology (Intel VT) or the AMD Virtualization (AMD-V) technology
- Hardware-enforced Data Execution Prevention enabled through the NX bit for AMD systems or the XD bit for Intel systems
- 10/100 Mbps or faster network connection
- At least 32 GB free space on an HDD
Hyper-V 2012 R2 Improvements
Microsoft’s team has worked hard to improve the functionality of Hyper-V Server 2008 and introduced a new and updated set of features and configuration maximums with Hyper-V 2012 R2. The main purpose of those features is to ensure better performance and scalability of large virtual environments. Let’s discuss the most essential Hyper-V 2012 R2 features and how they have improved the virtualization capabilities of Hyper-V Server.
Resource metering
This feature is used to track data about the usage of the physical processor, RAM, storage, and network by selected VMs. Resource metering is not enabled by default and can only be configured by running PowerShell scripts.
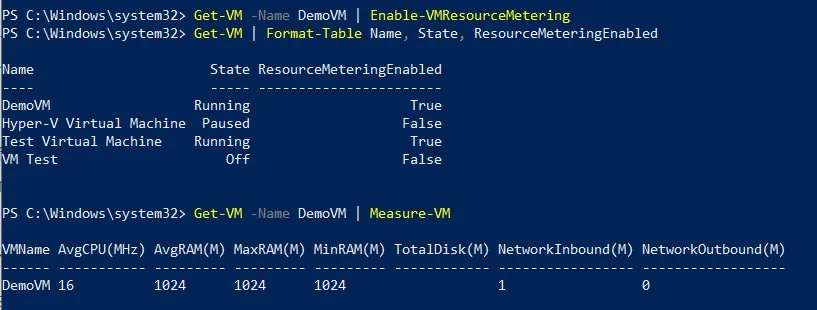
To enable this feature, open PowerShell as Administrator and run the following cmdlet:
Get-VM -Name DemoVM | Enable-VMResourceMetering
To verify that the cmdlet has been successfully enabled, use the following command:
Get-VM | Format-Table Name, State, ResourceMeteringEnabled
To view the data collected through resource metering, type the following script:
Get-VM -Name DemoVM | Measure-VM
As a result, your PowerShell window should look like this:
Live Storage Migration
This feature allows you to move virtual hard disks to another physical storage without turning off the VM, which results in zero downtime and no disruption of running operations. To move the storage of the selected VM, run the following cmdlet:
Move-VMStorage DemoVM -DestinationStoragePath D:\NewDemoVM
If everything is correct, you should see the following screen:

Virtual Fibre Channel
This feature allows you to access Fibre Channel-based storage area network (FC SAN) directly from within VMs and improves support for virtualized workloads by using a standard World Wide Name (WWN) associated with a selected VM. Data transfer and connectivity between VMs in the same FC SAN is made possible through Fibre Channel host bus adapters (HBAs). Below, we will demonstrate how you can create and configure Fibre Channel HBAs.
First of all, make sure that the VM is opted out of virtualization-based security so as to ensure that storage devices and servers can connect over the SAN without disruption. The VM must be turned off, when running this cmdlet.
Set-VMSecurity -VMName DemoVM -VirtualizationBasedSecurityOptOut $true
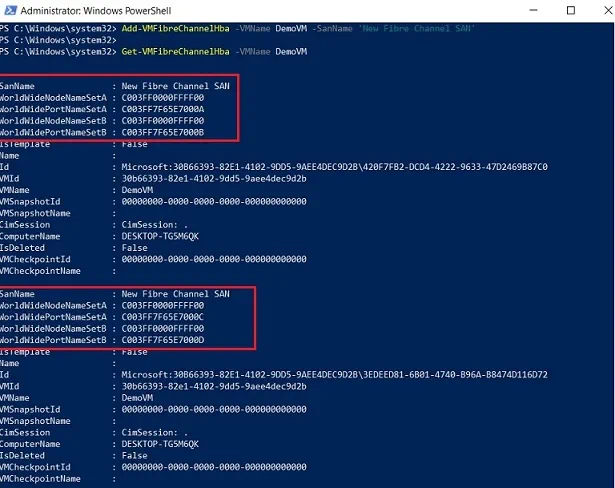
To add a Fibre Channel HBA, use the next script. Note that the VM must be in a powered-off state.
Add-VMFibreChannelHba -VMName DemoVM -SanName 'New Fibre Channel SAN'
If you don’t know the name of the SAN of your Hyper-V host, run the following script:
Get-VMSan
To verify that the Fibre Channel HBA has been successfully created, type the cmdlet below.
Get-VMFibreChannelHba -VMName DemoVM
On the screen, you should see a full list of the Fibre Channel HBAs associated with a particular VM. Note that WWNs assigned to each HBA are unique, which is crucial for ensuring connectivity between the VMs.
Single-root I/O virtualization (SR-IOV)
This feature permits a VM and a physical adapter to exchange data directly, without using the Hyper-V virtual switch. SR-IOV improves networking performance within a virtual environment and significantly reduces latency and CPU overhead. Note that in order to enable SR-IOV, specific hardware is required. In case required hardware resources are not provided, network connectivity is conducted through the virtual switch.
The following cmdlet can be used to enable SR-IOV for the selected network adapter:
Enable-NetAdapterSriov -Name vEthernet
If you don’t know what network adapters are available on your computer, type the following command to see all of the network adapters, including those that are hidden.
Get-NetAdapter -Name '* ' -IncludeHidden
Storage on SMB2 file shares
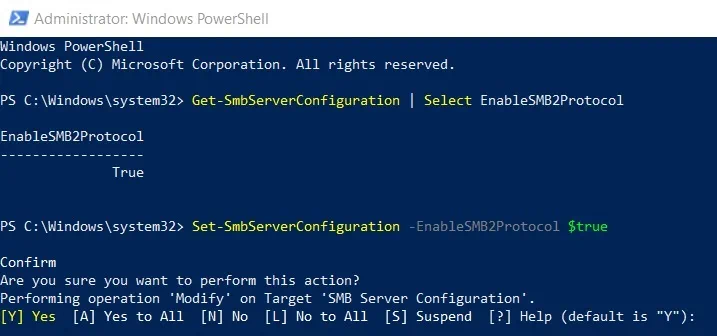
This feature is used to store Hyper-V files in file shares and execute various service requests over the Server Message Block (SMB) protocol. This technology allows you to bypass SAN, which improves resource provisioning and data migration. This feature is enabled by default in Hyper-V 2012 R2. However, to check if this is, indeed, the case, run the following command:
Set-SmbServerConfiguration –EnableSMB2Protocol $true
After that, you will be asked to choose one of the options to complete this operation.
NUMA Spanning
Non-uniform memory architecture (NUMA) helps in managing multiple CPUs and processes within the same NUMA node and can be used to optimize the use of memory by the VMs. If required, you can provide a specific VM with more computing resources by spanning NUMA nodes.
To check if this feature is available on your Hyper-V host, type the command below. The output will either be True (if enabled) or False (if not enabled).
(Get-VMHost).NumaSpanningEnabled
To enable NUMA spanning, run the following cmdlet. Note that NUMA spanning cannot be disabled while VMs are still running.
Set-VMHost -NumaSpanningEnabled $true

Restart-Service vmms
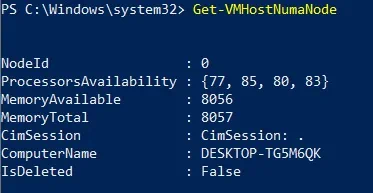
To get the VM host’s NUMA topology, which includes node’s ID and the total amount of memory available, run this cmdlet:
Get-VMHostNumaNode
On the screen, you will see the following information about NUMA nodes available on a Hyper-V host.
Hyper-V Replica
This feature allows you to create VM replicas and send them to a remote server. Those replicas are regularly updated with the changes occurring on the source VM and can be used for planned or emergency failover. Thus, the primary purpose of this feature is to ensure business continuity and minimum business downtime. Hyper-V replication is asynchronous, meaning that the new data is first written to a primary storage and then the changes are copied to the replica.
The configuration of this functionality is too complex to be explained in this blog post. Therefore, I will only describe how to enable replication of the selected VM to a specific replica server. For that purpose, use the PowerShell command which you can see below (where DemoVM is the name of the VM to be replicated, DESKTOP-HQ44314 is the name of the replica server, 250 is a port used for replication traffic, and Kerberos is the authentication type).
Enable-VMReplication DemoVM DESKTOP-HQ44314 250 Kerberos
Boot from USB Disk
Microsoft Hyper-V 2012 R2 allows you to use a USB disk for the OS installation. To boot the system from the USB, first create a bootable USB device and ensure that you have a USB 2.0 driver or newer. If you want to learn more about creating a bootable USB flash drive, read this article on the official Microsoft page.
RemoteFX
This feature is used to provide 3D graphics virtualization of the guest OSes and enable access to remote virtual desktops over a local area network (LAN). To add a RemoteFX video adapter to a selected VM, open PowerShell as Administrator and run the following command:
Add-VMRemoteFx3dVideoAdapter -VMName DemoVM
Moreover, you can configure the maximum resolution and the VRAM size of the RemoteFX adapter attached to a particular VM. To do so, type the cmdlet below:
Set-VMRemoteFx3dVideoAdapter -VMName DemoVM -MaximumResolution 1920x1200 -VRAMSizeBytes 67108864
Type the Get-VMRemoteFXPhysicalVideoAdapter cmdlet to get a full list of the RemoteFX physical graphics adapters available on your Hyper-V servers. This command can be used to verify that the Remote FX adapter has been successfully created.
Dynamic Virtual Machine Queue
This feature ensures successful packet delivery from an external VM network to a virtualized host OS. This technology allows you to reduce network overload by evenly distributing the incoming traffic among multiple physical CPUs. In Hyper-V 2012 R2, this feature has been updated to improve virtualization of intensive workloads.
The following example shows how the Virtual Machine Queue can be enabled on the network adapter Dynamic Adapter by running this cmdlet:
Enable-NetAdapterVmq -Name 'Dynamic Adapter'
New Virtual Hard Disk Format (VHDX)
In Hyper-V 2012 R2, a new file format – VHDX – was introduced to provide more advanced support for virtual workloads, increase the storage capacity, and improve protection against power failures. Moreover, you are now able to create a shared VHDX file, which can be used as a shared storage by multiple VMs and enables guest clustering. Read our blog post to learn more about Hyper-V VHDX files and how they can be configured in PowerShell.
Scale Enhancements
Apart from the new and updated features, Hyper-V 2012 R2 also provides support for the following maximum limits:
- 64 virtual CPUs per VM
- 1 TB per VM
- 64 TB per virtual hard disk
- 320 logical CPUs per Hyper-V host
- 4 TB per Hyper-V host
- 1024 active VMs per Hyper-V host
- 2048 virtual CPUs supported per Hyper-V host
- 64 nodes per cluster
- 8000 VMs per cluster
Conclusion
In this blog post, we have discussed the new and updated features that were introduced with Hyper-V 2012 R2. Each of these features and capabilities are unique and they were specifically designed to improve security, flexibility, and resiliency of your virtual infrastructure. New maximum limits ensure that you can create, manage, and monitor large-scale VMs, which allows you to achieve the highest levels of performance and scalability. Hyper-V 2012 R2 has a rather limited functionality when compared to Windows Server 2012.
However, the new and updated feature set of the Microsoft hypervisor makes it a cost-effective and reliable solution, suitable for consolidating multiple VMs on a single virtualization platform.