How to Manage Hyper-V Integration Services
If you work in a virtual environment, you know that managing multiple host servers and virtual machines (VMs) can be a quite challenging task. However, the Hyper-V virtualization platform includes a set of special utilities designed for improving management, performance, and connectivity between Hyper-V hosts and VMs. This set of services is known as Hyper-V Integration Services.

About Hyper-V Integration Services
Hyper-V Integration Services represent a software suite of services which, when enabled, improves the integration between a host server and a VM in a virtual environment. Each Hyper-V service has a specific function aimed at enhancing the performance of guest operating systems. The degree of their impact on the VM may vary as some of the Hyper-V services are designed for providing mere convenience for users, while others are critical for the VM’s functionality.
Hyper-V Integration Services include:
- OS shutdown
This Hyper-V integration service allows you to gracefully shut down a guest OS within a VM from the management console (such as Hyper-V Manager). In this case, you are not required to log into the VM and manually start the OS shutdown. After initiating the shutdown process, the VM will close open applications, stop running services, and save the data to the disk.
- Time synchronization
This Hyper-V integration service can be used to synchronize the system time of the VM and the host server, which is crucial when performing operations in a single virtual environment.
- Data exchange
This Hyper-V integration service is also known as Hyper-V Key/Value Pair Exchange. It enables you to exchange metadata between a VM and its Hyper-V host. The data exchange is performed using key-value pairs, which are automatically created and contain the general configuration information about the VM and the Hyper-V host.
- Heartbeat
This Hyper-V integration service can be used to monitor the state of the OS within the VM and verify that it has booted correctly. Also, Hyper-V Host periodically checks whether a VM is properly running. To check the VM’s heartbeat, open PowerShell as an Administrator and run the following cmdlet:
Get-VM -VMName TestVM | select Name, State, Status

As you can see from the screenshot above, the heartbeat service has checked the VM status and defined it as Operating normally.
- Volume Shadow Copy
This Hyper-V integration service allows for backing up data and applications of the running VM without disrupting the production environment. For this purpose, the Volume Shadow Copy Service is used to perform image-based Hyper-V backups. In this case, the OS and all data within it is captured and copied to a single file called an image. For this purpose, the Volume Shadow Copy Service is used to perform image-based Hyper-V backups. In this case, the OS and all data within it is captured and copied to a single file called an image. In this case, the OS and all data within it is captured and copied to a single file called an image.
- Guest Services
This Hyper-V integration service enables copying files from a Hyper-V host to a running VM and vice versa. With Hyper-V Guest Services, you no longer need a network connection for the guest and host machines to communicate. To copy files to and from the guest, run the Copy-VMFile cmdlet in PowerShell. Note that this feature is disabled by default.
Managing Hyper-V Integration Services
Previously, managing Hyper-V services was a challenging task because it had to be manually installed and updated on each guest OS. However, in newer Windows OSs, Hyper-V Integration Services are enabled by default, except for Guest Services, and the corresponding updates can be automatically downloaded and installed via Windows Update. Moreover, you can easily turn them on and off when needed by running PowerShell cmdlets or using Hyper-V Manager. Ensure that each Hyper-V integration service is enabled and updated in both a Hyper-V host and a guest OS for their successful interaction.
Below, we will describe how to manage Hyper-V Integration Services using both Hyper-V Manager as well as PowerShell.
How to check the status and version of a Hyper-V integration service
To identify which Hyper-V integration services are enabled on a selected VM, open PowerShell as an Administrator and run the following cmdlet:
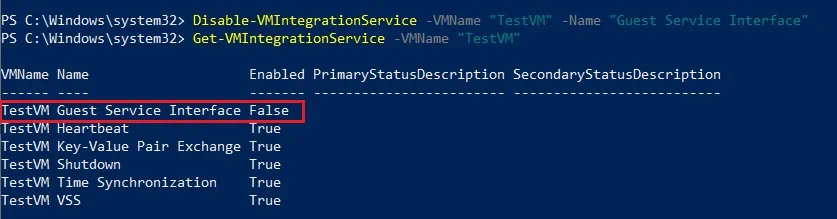
Get-VMIntegrationService -VMName "TestVM"
If everything is correct, you should see the following screen:
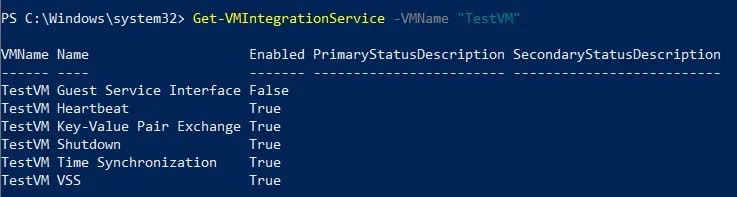
As you can see, all of the services are enabled by default, except for Hyper-V Guest Service Interface.
Also, make sure that each Hyper-V integration service on your guest VMs is up-to-date, as this might affect their performance in future. To check the guest’s integration services version, run this cmdlet:
REG QUERY "HKLM\Software\Microsoft\Virtual Machine\Auto" /v IntegrationServicesVersion
How to enable/disable a Hyper-V integration service
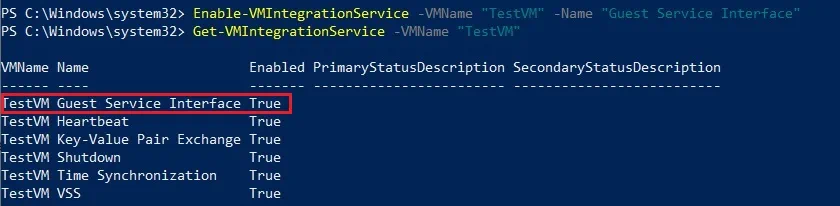
A selected Hyper-V integration service can be turned on by using the following PowerShell command:
Enable-VMIntegrationService -VMName "TestVM" -Name "Guest Service Interface"
After that, check whether the Hyper-V integration service has been successfully enabled. For that purpose, run the Get-VMIntegrationService cmdlet.
To turn off a Hyper-V integration service of your choice, the following cmdlet must be run in PowerShell:
Disable-VMIntegrationService -VMName "TestVM" -Name "Guest Service Interface"
Again, the Get-VMIntegrationService cmdlet can be used to verify that the changes have been adopted.
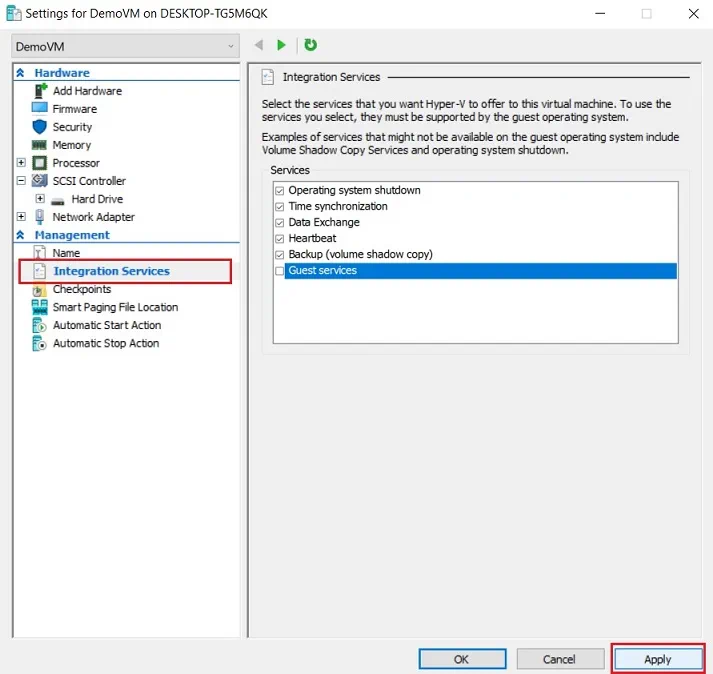
However, Hyper-V integration services can also be managed from Hyper-V Manager. To do so, open Hyper-V Manager, find the required VM, right-click it, and select Settings. In the Management section, click Integration Services and look at the list of services available for this VM. Select which services to enable or disable by checking or unchecking the corresponding boxes. Click Apply to save changes.
How to start/stop a Hyper-V integration service
As already mentioned above, a Hyper-V integration service must be enabled not only on a Hyper-V host but also the guest OS to ensure efficient performance. As a rule of thumb, when you start or stop the service from a Hyper-V host, the corresponding service within the guest OS starts or stops automatically. For example, when you start a Hyper-V integration service in the guest OS, which is disabled in a Hyper-V host, the selected service will not run. Or, when the service, which is enabled in a Hyper-V host, is stopped in the guest OS, Hyper-V will automatically start it. However, if the Hyper-V integration service is disabled in the guest OS, a Hyper-V host will not be able to start it.
To start or stop a Hyper-V integration service on Windows, take the following steps:
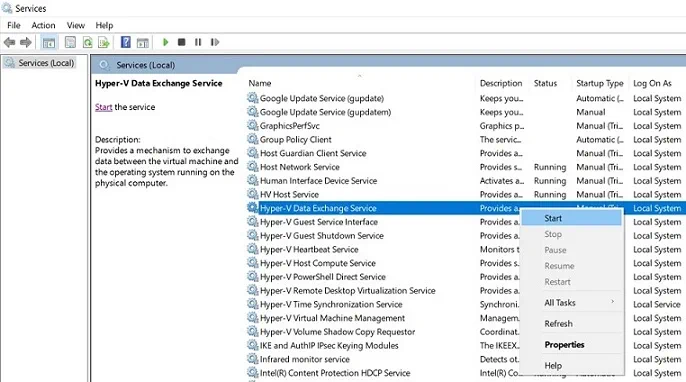
- Type Services in the search box below, which will open a corresponding Windows application.
- Find a list of all Hyper-V integration services and select the service which you want to start or stop. In the left pane, you will see the configuration options available, as well as a short description of the service.
- Right-click the required service and select the action to implement.
Another option is to start or stop a Hyper-V integration service using PowerShell. To do so, follow the steps below:
- Get a full list of Hyper-V integration services running in the guest OS by opening PowerShell as an Administrator and running this command:
Get-Service -Name vm* - To start or stop the service within a Windows guest, use the Start-Service or Stop-Service cmdlets. Look at the example below:
Stop-Service -Name "vmicshutdown"
How to update Hyper-V integration services
Hyper-V integration services have been repeatedly updated since the first release of Hyper-V. Thus, you need to keep Hyper-V Services up-to-date to ensure that the Hyper-V host and VMs can properly interact and their performance remains efficient and reliable. Since the release of Windows Server 2016, the update process is no longer manual as all of the Hyper-V updates are now conducted automatically via Windows Update.
However, if you have Hyper-V hosts with an OS version earlier than Windows Server 2016 and Windows 10, you will have to manually update Hyper-V integration services.
First, you need to check whether your VMs include outdated Hyper-V integration services. Open Hyper-V Manager and find the information about integration services in the VM summary in the center pane. Integration Services may read Up To Date, Update Required, May be Required, Not Detected.
In case you need an update, do the following:
- Open Hyper-V Manager.
- Select the VM and click Connect. VMConnect will open which allows interacting the OS in a selected VM.
- Click Action on the task bar above. In the drop-down menu, select Insert Integration Services Setup Disk. After that, the setup disk will be loaded in the virtual DVD drive.
- Find the DVD drive which contains the Integration Services Setup Disk. Right-click on it and select Install Hyper-V Integration Services.
- The installation will start.
- Restart your system to complete the installation.
- After the reboot, verify that Integration Services are updated by looking at the VM summary in Hyper-V Manager.
Why you should use NAKIVO Backup & Replication
Hyper-V environments cannot properly function without Hyper-V Integration Services. Turning off one of the services might cause issues with performance, connectivity, and data protection. If your business deals with large amounts of data and cannot afford a long period of downtime, it is critical to ensure that your virtual environment is constantly protected and can be instantly recovered if there is a need.
NAKIVO Backup & Replication is a fast and reliable data protection solution which has long proved its effectiveness and sustainability. NAKIVO Backup & Replication provides you with various data protection options, including backup, backup copy, backup to cloud, replication, and site recovery, for VMware, Hyper-V, and AWS EC2 environments. Moreover, the product includes multiple features which are used to achieve various results. For example, NAKIVO Backup & Replication can reduce storage space requirements with global backup deduplication, compression, and exclusion of swap files. Moreover, you can automate and orchestrate disaster recovery activities using our Site Recovery functionality, which allows for improving business continuity and minimizing the risk of prolonged downtime. With Policy-Based Data Protection, your virtual infrastructure is regularly scanned to detect the VMs which match the established policy rules (VM name, size, tag, location, etc.) and automatically protect them. As a result, you can simplify data protection management and save yourself considerable time and effort.
Remember that protecting your Hyper-V environment is extremely important because it allows you to ensure business continuity, minimize downtime, reduce management overhead, and achieve maximum efficiency.