How to Install ESXi on Hyper-V
One of the previous blog posts explained Hyper-V nested virtualization as well as the installation of a virtual Hyper-V server on a VM that runs on a physical Hyper-V server. Today’s blog post covers the installation of an ESXi server on a Hyper-V VM, and can be useful for testing and educational purposes; for instance, if you have Hyper-V hosts but you are thinking about deploying ESXi hosts in your environment. ESXi is VMware’s hypervisor, while Hyper-V is Microsoft’s hypervisor. Using an ESXi server installed on a Hyper-V VM in a production environment is not recommended.
Requirements
The following requirements must be met in order to install ESXi on a Hyper-V VM:
- Compatible hardware. Your processor must support hardware virtualization features. In case of using Hyper-V, you must have the Intel CPU (central processing unit) with Intel VT-x (Virtualization Technology) support. Intel VT-x must be enabled in BIOS or UEFI (Unified Extensible Firmware Interface) of your computer.
- Windows 10 (Build 10565 or later) or Windows Server 2016 with Hyper-V. Hyper-V VM configuration version must be 8.0 or later.
- PowerCLI 6.3 or later. PowerCLI is a tool with a command line interface (CLI) provided by VMware, which includes a set of cmdlets that can be executed in PowerShell as well as used for scripting and automation.
- ESXi installation image. The installation image must be ESXi-6.0.0-20170604001 Build 5572656 or older. Newer builds and versions of ESXi may not work due to blocking network drivers for a Hyper-V legacy virtual network adapter. Download the appropriate offline bundle in a ZIP archive. ESXi600-201706001.zip is used in this blog post.
Preparing Your Environment
Prepare your environment to make ESXi installation on a Hyper-V VM possible. The main steps include:
- Enabling a Hyper-V role. Go to Control Panel > Programs and Features > Turn Windows features on or off. Check the box near Hyper-V, click OK, and wait until the installation process finishes before restarting the physical machine. You can also enable a Hyper-V role by using PowerShell.
- Installing PowerCLI. You can download PowerCLI from VMware website. If you have previously installed any PowerCLI version that is older than 6.3, you should uninstall it. The PowerCLI installation process is rather straightforward – simply run the installer and follow the wizard steps. PowerCLI is used for integrating network drivers into the ESXi installation image in this case.
- Downloading tulip drivers. Tulip drivers, also known as net-tulip drivers, are drivers for the legacy virtual network adapter of a Hyper-V VM. They allow you to use network for ESXi under Hyper-V. By default, ESXi doesn’t recognize the network adapter of a Hyper-V virtual machine. You can download net-tulip drivers here.
Integration of Tulip Drivers to the ESXi Installation Image
Let’s take a closer look at the integration of net-tulip drivers to the ESXi installation image step by step. Without integration, the installation process will fail as ESXi cannot recognize a Hyper-V legacy network adapter without the appropriate drivers. For more convenience copy all necessary files to the same directory, e.g., C:\Virtual\ESXi-images.

Make sure you have installed Hyper-V and PowerCLI before continuing. Run PowerCLI and type the following command to change the current directory to the directory with the prepared files (in this case C:\Virtual\ESXi-images).
Add offline depot ZIP files to the current PowerCLI session. The metadata is imported from specified depots and can be used for creating new image profiles that can be used for generating new ISO installation images with Image Builder.

You need to know the name of the standard image profile that will be used in the next step. Retrieve the name by using the following command:

Clone the standard profile to a new image profile (in this example the new profile’s name is ESXi-NAKIVO).

Add custom packages with tulip network drivers to the new profile that was created in the previous step.

The acceptance level of a host image profile is used to determine which vSphere installation bundles (VIB files) are accepted for installation. By default, the AcceptanceLevel of a newly created profile is set to PartnerSupported. Custom packages with tulip network drivers have a CommunitySupported acceptance level that differs from the acceptance level of your new profile. This situation causes an error if you try to create an ISO image by using these settings. In order to prevent this, set the acceptance level of your new image profile to CommunitySupported. Type the following command to do this:

Now you are ready to create the ESXi installation ISO file that includes net-tulip drivers. Run the following command to create the ISO image:

The esxi60_custom.iso file is created in the specified directory.

The Alternative Method to Integrate the Drivers
Manual integration of network drivers was shown above; however, there is another way to integrate network drivers into the ESXi installation image. Let’s take a look at the alternative method to integrate the drivers into the ESXi image by using a free ESXi-Customizer script. You will need a free ESXi-Customizer script for PowerShell (ESXi-Customizer-PS.ps1) that can be downloaded here.
Copy the script to the directory that was used to store other installation files (in this example it’s C:\Virtual\ESXi-images). Open PowerShell, go to the directory by typing:
If you ran ESXi-Customizer-PS-v2.6.0.ps1 now, an error would be displayed. Type the following command to fix this issue:
Run ESXi-Customizer script with the following arguments:

Select base image profile. Your image profile version must be ESXi-6.0.0-20170604001 or older due to compatibility reasons.

In the current example, the image profile 71 is selected (ESXi-6.0.0-20170604001-standard). Wait until ESXi customizer downloads all of the needed components and builds a customized ESXi installation image.

The file ESXi-6.0.0-20170604001-standard-customized.iso is now ready in your directory with the installation files.
Creating and Configuring a Hyper-V VM for ESXi Installation
Now, when the ESXi installation image is ready, you can create a new Hyper-V VM and install ESXi in that VM. Open Hyper-V manager, click Action > New > Virtual Machine.

Enter a virtual machine name (for example, ESXi6-0) and set a location to store the virtual machine (disk C: is used in the current test lab as an example, please use a separate partition without operating system such as D:). Click Next to continue.

Select Generation 1 for your VM in order to make it possible to use a legacy network adapter with the compatible drivers that you have integrated into the ESXi installation image. Read more about Hyper-V Generation 1 and Generation 2 in our blog post. Click Next.

Assign at least 4 GB of memory. Using Dynamic Memory for this virtual machine is not recommended. Click Next.

Configure Networking. You can use the default settings because VM networking must be reconfigured after the virtual machine creation. Click Next.

Create a new virtual disk; 30 GB should be enough. If you are going to run multiple VMware VMs on a virtual ESXi host, set a larger size, or you can add another virtual disk later. You can also use the dynamically expanding virtual disk. Check the disk name and location, then click Next.

Select Install an operating system from a bootable CD/DVD-ROM in Installation Options. Use the ISO image file that you have prepared beforehand (esxi60_custom.iso in this example). Click Next.

Check the summary and click Finish to finalize the VM creation.

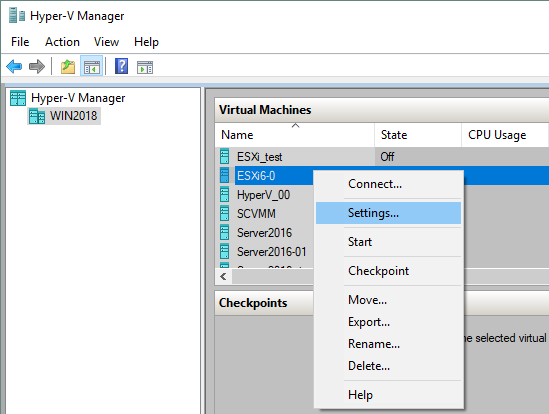
Once a new Hyper-V virtual machine is created, edit the VM settings. Right-click the name of your VM and select Settings… in the context menu.
In the left pane of the window in the Hardware section, select Processor and set the number of virtual processors to 2 or more (1 processor is used by default).

Select the network adapter. First, remove the existing network adapter created by default. In order to do this, click the Remove button.

Add a legacy network adapter to the VM. In the left pane of the window in the Hardware section click Add Hardware. In the right pane select Legacy Network Adapter and click Add.

A legacy network adapter has been added and you can see this adapter in the left pane of the window. Select the recently created legacy network adapter and then select the virtual switch for connecting the virtual adapter. In the current example the External virtual switch is used. Click OK to save the settings and finish configuring the VM.

Enabling Nested Virtualization for the Hyper-V VM with ESXi
Nested virtualization is a feature that allows you to run virtual machines inside a virtual machine. In this case a nested VM should run on a Hyper-V VM that has ESXi hypervisor installed. Enable nested virtualization for this VM in PowerShell (enter your VM name instead of ESXi6-0 if you have a different name to your VM).

ESXi Installation on the Hyper-V VM
Now you are ready to install ESXi on a Hyper-V VM. Start your VM (right-click the VM name, select Connect and click the Start button). Press TAB when you see the boot screen with a blue background to modify boot options, and prevent hanging the VM during boot. Type ignoreHeadless=TRUE and press Enter.

The VMware ESXi installer is loading. You can see the loaded modules including the tulip module that is integrated to your installation image.

When the installer has been loaded, you will see a welcome screen. Press Enter to continue.

Press F11 to accept the license agreement and continue.

Select a disk to install ESXi on. There is a 30GB disk attached to the VM in this example. Press Enter to continue.

Enter a root password, confirm the password, and press Enter.

The system warns you that a disk must be repartitioned. Press F11 to begin the ESXi installation.

Wait until the installation process is finished.

When installation is done, a reboot is required. Press Enter to reboot.
Press Shift+O before the boot begins.
![]()
Enter ignoreHeadless=TRUE at the end of the string and press Enter (similarly to how you did at the first step after starting the VM). Below you can learn how to set this option permanently.
![]()
When ESXi is loaded, you will see a menu on the grey and yellow background. Press F2 to customize the system settings. Enter your root password. Go to troubleshooting options and enable ESXi Shell and SSH. If ESXi Shell is disabled, your ESXi will freeze at the next step.

Press Alt+F1 to enter the ESXi console. Enter the following command and set the boot settings:

The console can be closed by pressing Alt+F2. Now you don’t need to enter ignoreHeadless=TRUE manually each time ESXi boots.
Configuring Network Settings
Check the network settings for making remote management possible. By default, the IP address is obtained via DHCP (Dynamic Host Configuration Protocol). You can select Configure Management Network in the system customization menu to configure a hostname as well as IP addresses.

In the current example the automatic IPv4 configuration is used. If you want to configure IP settings manually for using a static IP address, select IPv4 Configuration and press Enter.

Creating a VM on a Nested ESXi Host
When you have configured ESXi networking, open your browser and connect to your ESXi host via HTTP protocol. You can also access this web page from another computer that is connected to your network if the External Hyper-V virtual switch is used on your Hyper-V host. In this example, the address entered in the address bar of the browser is http://10.10.10.117. After the page is loaded click Open the VMware Host Client.

Enter the root credentials that you entered during ESXi installation to log in.

On the main screen click Create/Register VM to create a new VM.

1. Select creation type. Select Create a new virtual machine and click Next.

2. Select a name and guest OS. Enter your VM name, select the compatibility, guest OS family as well as version. Click Next.

3. Select storage. In the current example only one datastore is available. Click the datastore you want to use for storing the VM files and click Next.

4. Customize your settings. Set the parameters of virtual hardware. There are two options available for CD/DVD drive used by VM: Host device and ESXi datastore. Use the second option and upload the ISO installation image of the operating system to the local datastore on the ESXi host.

In the left pane click the datastore icon, then in the Datastores tab click Datastore browser.

In the datastore browser window click Upload. Select the appropriate ISO file that can be accessed from your machine (that is used for managing ESXi host with a browser) and wait until the file is uploaded.

Now you can go back to CD/DVD drive options, click Browse and select the recently uploaded ISO file on the datastore.

When the ISO installation image is specified and other VM settings are configured click Next to continue.

5. Ready to complete. Check the VM configuration summary and click Finish to create the VM.

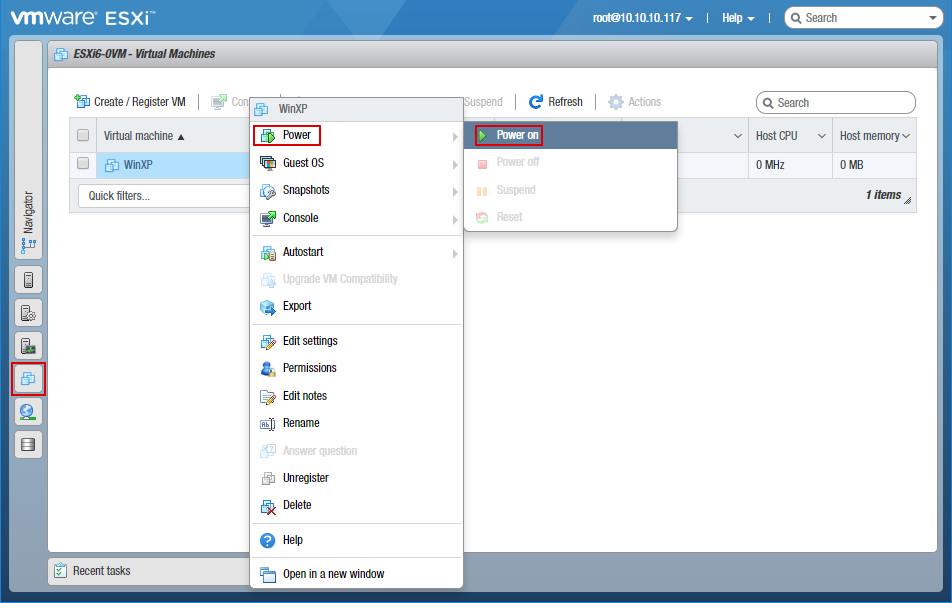
Once the VM has been created, you can try to run the VM for guest OS installation. In order to do this, click the VM icon in the left pane of the web interface, right click the VM and in the context menu select Power > Power on.
Note: Be aware that issues may occur because running ESXi on a Hyper-V VM is not officially supported.
Conclusion
Configuring an environment to run an ESXi hypervisor on a Hyper-V VM is a tricky process, and is not officially supported by vendors. However, you can deploy ESXi on a Hyper-V VM for educational and testing purposes. This blog post has explained how to prepare the ESXi 6.0 installation image with the integration of tulip network drivers as well as Hyper-V VM configuration, and configuring a virtual ESXi host on a Hyper-V VM. You can try to install ESXi hypervisor on a Hyper-V VM at your own responsibility. Do not use such solution in a production environment.