Hyper-V Storage Migration Guide
Modern organizations are interested in being mobile, flexible, and efficient so as to remain competitive in the ever-changing market. Thus, it comes as no surprise that the Hyper-V Storage Migration technology has become so popular among end users.
In a nutshell, Hyper-V Storage Migration is the Microsoft’s technology which can help you move the virtual machine’s (VM’s) storage from one location to another without experiencing any compatibility issues. Moreover, Hyper-V Storage Migration can be performed on live VMs, thus allowing you to avoid any downtime and continue business operations as usual.
Hyper-V Storage Migration is normally used in the following cases:
- A storage device starts running low on space.
- A storage requires maintenance or upgrade.
- A storage starts experiencing problems with I/O operations.
- Storage load is too high and needs to be redistributed among other storages.
Read further to learn more about the Hyper-V Storage Migration technology and how you can use Hyper-V Manager and PowerShell to launch and configure Hyper-V Storage Migration. Moreover, find out how NAKIVO Backup & Replication can ensure data protection before, during, and after the storage migration process.
What Is Hyper-V Storage Migration?
A new and enhanced functionality of Windows Server 2012 has transformed the way we approach server virtualization, resource utilization, workload management, as well as storage virtualization. Starting from Windows Server 2012, you can use Hyper-V Storage Migration which allows you to migrate the virtual machine (VM) storage to another location, while the VM is still running. Previously, you had to shut down the VM in order to prevent this operation from failing. It was a safe but time-consuming approach which could lead to undesirable business downtime.
To better understand the Hyper-V Storage Migration technology, let’s go through its main characteristics:
- Both VHD and VHDX files can be moved using Hyper-V Storage Migration. Note that VHD and VHDX files are moved first, followed by the remaining files.
- Virtual hard disks used by a VM can be migrated to another storage device even if the VM is still running.
- Data storage can be moved from one VM to another within a single Hyper-V host or across Hyper-V hosts.
- Hyper-V Storage Migration can be performed using: Hyper-V Manager, Windows Failover Cluster, PowerShell, and System Center Virtual Machine Manager.
- It is the storage and not the VM that is being moved to another location.
- A target storage can either be local or remote, but it is critical for a Hyper-V host to have access to the target storage.
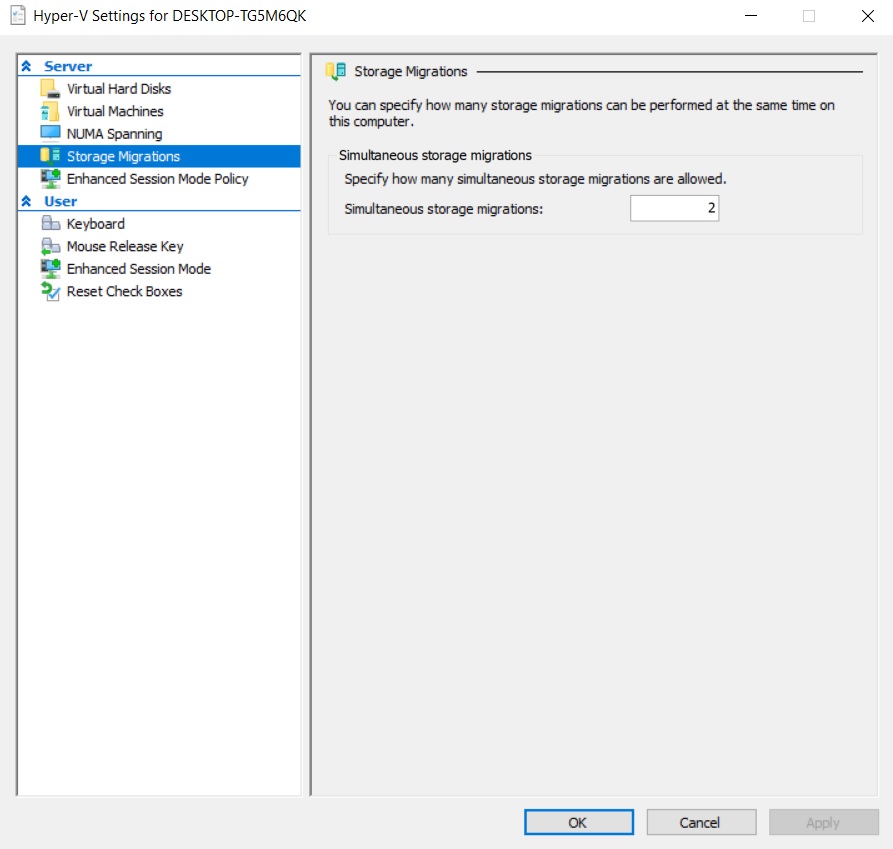
- You can specify how many storage migrations can be performed simultaneously on the selected host. By default, you can perform 2 simultaneous storage migrations. To change default settings, you should open Hyper-V Manager, click Hyper-V Settings in the Actions section, select Storage Migrations, and insert the required value.
How Hyper-V Storage Migration Works
Hyper-V Storage Migration might look like a challenging task but, in reality, it is a simple process which takes the following steps.
- Hyper-V Storage Migration is launched and configured using one of the Hyper-V management tools mentioned above.
- After the operation is initiated, the VHD files, VM configuration files, and another data are being transferred from the source storage to a new location.
- Read and write operations are performed at the source virtual hard disk, whereas write operations are mirrored to both the source and target virtual hard disks.
- The target storage is synchronized with the source disk, meaning that the VM will be switched to a new virtual hard disk once the copy process is complete. This way, you can avoid significant business downtime.
- Finally, the source storage and all of its files will be deleted from the Hyper-V host once the operation is complete.
How to Perform Hyper-V Storage Migration
Now, let’s see how Hyper-V Storage Migration actually works by going through the configuration process. For this purpose, you should have the Hyper-V role enabled on your computer and, with that, you are ready to go. Below, we are going to demonstrate two approaches to migrating Hyper-V storages: using Hyper-V Manager or running PowerShell cmdlets.
Using Hyper-V Manager
To perform Hyper-V Storage Migration in Hyper-V Manager, you should do the following:
1. Open Hyper-V Manager.
2. Right-click the VM from the list and select Move to open the Move Wizard. As you can see, we have selected the running VM.

3. Read the Before You Begin page and click Next.

4. In the Choose Move Type section, click Move the virtual machine’s storage.

5. In the Choose Move Options section, you can specify what exactly you want to move. You have three options: move all of the VM’s data to a single location; move the VM’s data to different locations; move only the VM’s virtual hard disks. Make a choice and configure the rest following the prompts. In this blog post, we want to demonstrate how VHD and VHDX files can be moved. Thus, click Move only the virtual machine’s virtual hard disks.

6. In the Select Items to Move section, you can select the virtual hard disks which you want to be migrated by checking the corresponding box.

7. In the next section, you can select a target location for the VM’s virtual hard disk.

8. In the Summary section, you can look through the list of all the selections which are about to be implemented. Click Finish to close the wizard and start the operation.

9. The Hyper-V Storage Migration process can take some time. Let’s wait for the operation to complete.

10. After that, you can check that the operation has been successful by right-clicking the VM’s name, selecting Settings, and clicking Hard Drive.
As you can see, the selected virtual hard disk has been successfully moved to the Virtual Hard Disks folder.

Using PowerShell
In this part, I am going to describe how you can use PowerShell commands to perform basic Hyper-V storage migration. First of all, let’s check where the VM’s virtual hard disk that we want to move is currently stored.

As the next step, you should open PowerShell and run the following command. This cmdlet allows you to move the storage of the running VM, including its VHD or VHDX files as well as paging files and snapshots. Note that PowerShell should be run as Administrator for cmdlets to work as required.

Finally, you should wait for the operation to complete. All files associated with the selected VM (Windows Server 2016) are currently being moved to a new location. After that, you can check whether the storage has been successfully migrated using Hyper-V Manager.

PowerShell is a great tool when it comes to managing and configuring multiple VMs at once. You can create PowerShell scripts for automating various core tasks, including Hyper-V Storage Migration. Thus, using a single PowerShell command can help you move the entire VM storage to a new location without experiencing any service disruption.
However, if you want to perform more complex tasks in storage migration (e.g. moving only selected files, or moving each of the VM’s items to different locations), PowerShell might confuse and intimidate an inexperienced user. It is recommended to first test PowerShell scripts in a non-production environments in order to see if they can actually work and how they might affect your infrastructure.
Wrapping Up
You may need to migrate your storage for various reasons. For example, you want to upgrade an existing hardware or you decided to switch business operations from the on-premises physical infrastructure to cloud-based platforms. Regardless of the reasoning behind it, storage migration can be a risky process resulting in unexpected failures and data losses. You can configure and perform storage migration manually using Hyper-V Manager or PowerShell but it is a time-consuming and error-prone approach. Thus, it is recommended to install a data protection solution, which can automatically protect your data before, during, and after the data migration process.
NAKIVO Backup & Replication is a reliable and powerful data protection solution, which can provide you with a rich set of features, affordable pricing, and the best support experience.