Hyper-V Storage Best Practices
Storage is one of the most important components involved with servers; this includes virtualization servers that have a hypervisor installed and virtual machines running. Storage can cause high or low performance, as well as ensure a high or low reliability of keeping the VM data and virtual disks. Different storage types can be used in Hyper-V virtual environment, and the administrator should make the right choice before configuring a server or deploying virtual machines.
This blog post aims to help you explore different types of storage options in order to make a storage selection that is best suited to your environment, and thus one which meets your requirements efficiently.

Hyper-V Storage Recommendations
Storage that can be mounted to Hyper-V server can be of two types: local storage or remote storage.
Local storage consists of several disks that are locally attached to the server. Such disks are usually connected with SAS (Serial Attached SCSI) interface to a RAID (Redundant Array of Independent Disks) controller inside the server’s chassis. Using SAS disks is preferred over SATA disks (despite the compatibility – SATA disks can be connected to SAS ports but not vice versa) because of the higher level of reliability of SAS disks. Local storage can be more affordable than remote storage. If you do not plan to deploy a Hyper-V cluster, you can use local storage.
Remote storage is located separately from Hyper-V server and is connected to the server via iSCSI, Fibre Channel, or SMB 3.0 protocols. Fibre Channel and iSCSI provide block-level storage while SMB 3.0 is file-level storage. Fibre Channel requires a special physical interface for connecting servers to storage such as SAN (Storage Area Network). FCoE (Fibre Channel over Ethernet) can be used to connect storage via Ethernet networks. iSCSI protocol can be used for connecting a server to SAN or NAS (Network Attached Storage). NAS device looks like a mini server that has a RAID controller with slots for disk drives inside and different ports for connecting to the network outside. A standalone server can also be configured to be used as NAS. SAN and NAS can ensure data redundancy for better reliability.
When deploying a Failover Cluster, remote storage shared with all nodes within the cluster must be used. In this case, such storage is called shared storage.
Use RAID 1 or RAID 10
RAID is the redundant array of independent disks. Data redundancy on your storage can protect your data in the case of disk failure. There are several RAID types.
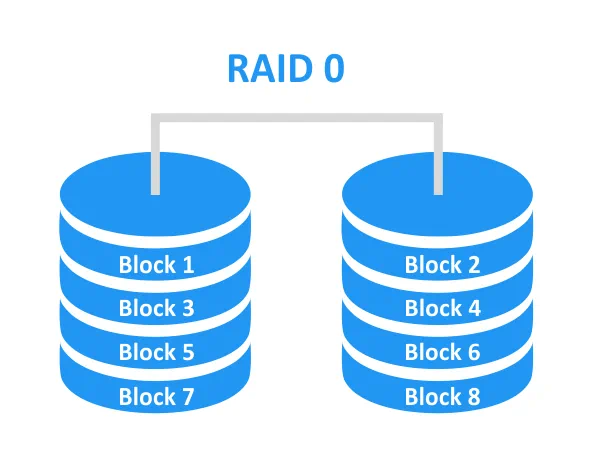
RAID 0 is not redundant and is called disk striping. There is no fault tolerance – the failure of one disk causes failure to the entire array. Increasing performance can be mentioned as a use case (for example, caching live streams for TV industry). A minimum of 2 disks is required to build this type of RAID.
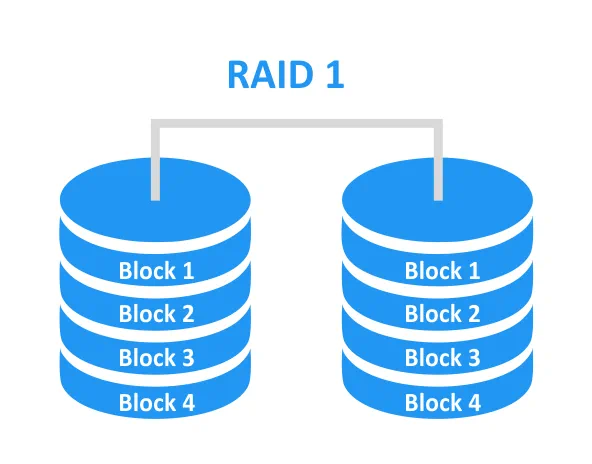
RAID 1 is redundant. All blocks on one disk are mirrored to another disk, hence, 100% redundancy is achieved. If one of the disks fails, the data on the second disk can be accessed and used to rebuild the array. The probability of a successful array rebuild is high. RAID 1 can be used for failover storage. A minimum of 2 disks is required to build this type of RAID.
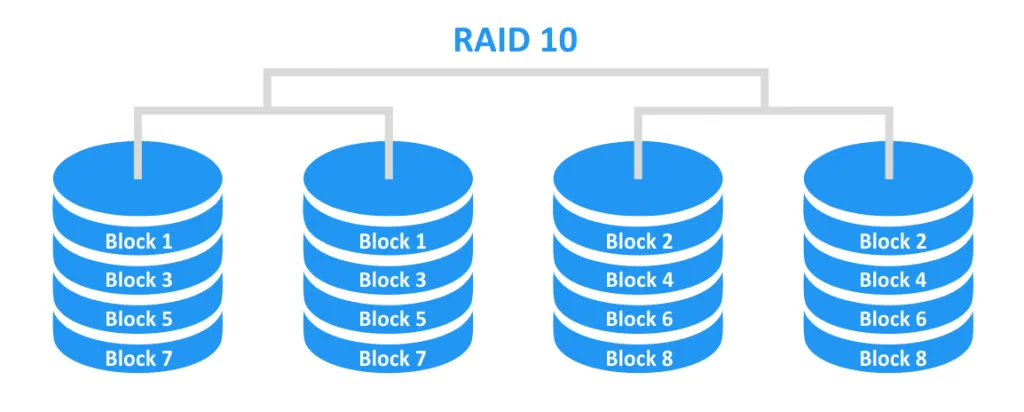
RAID 10 is a combination of RAID 0 and RAID 1. The advantages of these both array types are used, thus the result is a fault tolerant array with higher performance. The mirrored disks are combined into a stripe. A minimum of 4 disks is required to build this type of RAID. If RAID 10 consists of 4 disks, the data can be protected in a case of any single disk failure. Furthermore, the 4-disk array can survive if two disks from different mirrors fail.
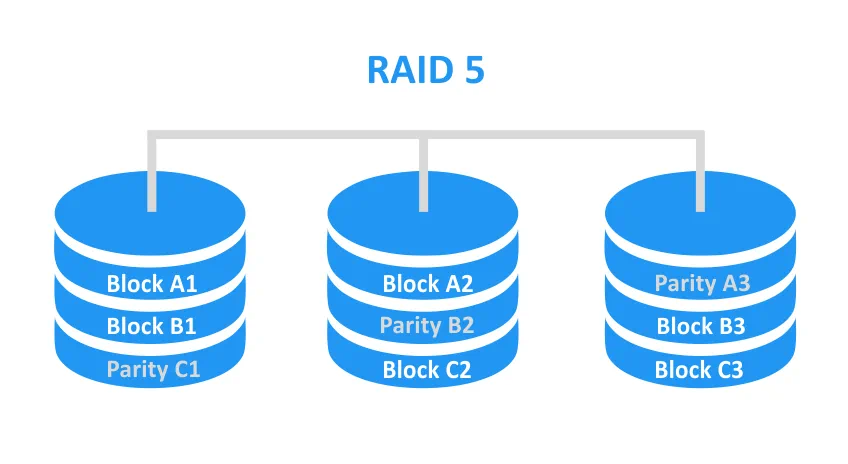
RAID 5 provides a striping with parity. The blocks are striped across disks, but parity information that can be used for recovery is also stored across the disks. Space occupied by parity information is equal to the capacity of one disk. For example, the parity information takes about 25% of space for a 4-disk array. It is not 100% redundant like RAID 1. In theory, RAID 5 can survive if one of the disks fails. A minimum of 3 disks is required to build this type of RAID.
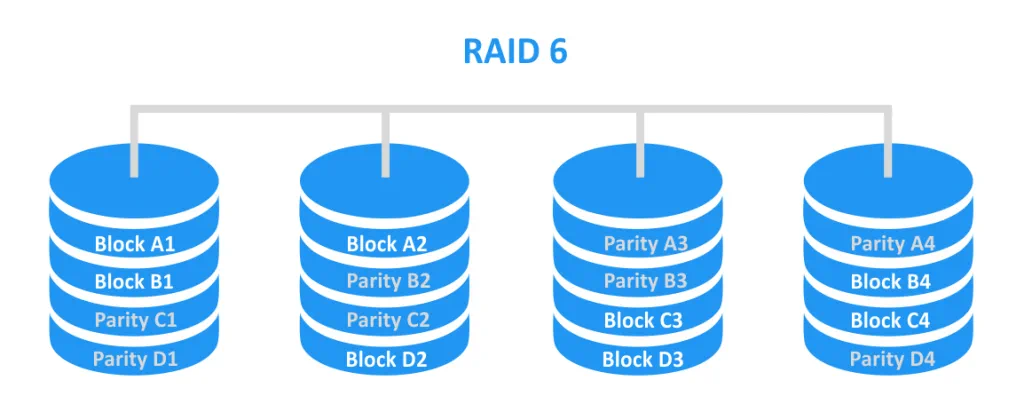
RAID 6 provides a striping with double parity. This is similar to the concept of RAID 5 but parity information is stored on two disks instead of just one. RAID 6 can survive in a case of failure of up to two disks. A minimum of 4 disks is required to build this type of RAID.
At first glance, RAID 5 and RAID 6 seem attractive, but let’s take a closer look. RAID 5 was developed dozens of years ago when the capacity of disks was quite small. In the modern world, hard disk capacity grows faster than the disk speed – consequently, if one disk fails then the rebuild of RAID 5 can take a long time. The workload of each disk in RAID 5 increases significantly during a rebuild, especially if the server uses storage intensively to perform regular tasks at the same time. There may be rarely used data on the disks that belong to RAID 5; and you cannot be sure that this data can be read successfully. This increases the probability of error. If an error occurs during the array rebuild then the entire array may fail. When RAID 5 has one failed disk, this array works like RAID 0 and the data is at risk.
RAID 6 has double the parity data that can be used for recovery as compared to RAID 5. As a result, the probability of surviving the failure of one disk as well as the probability of successful rebuild is higher. RAID 6 has another issue – its performance is the lowest as compared to RAID 10 and RAID 5. Performance issues are especially noticed during rebuild.
As can be seen, RAID 1 and RAID 10 provide the highest reliability, which is why they are recommended for use for Hyper-V storage. Hardware RAID can be configured on either a physical server or on a NAS device.
Make Use of High-Speed Storage
Storage input/output performance has a significant impact on providing enough VM performance. The fastest hard disk drives (HDD) should be used to store the VMs. There is a wide assortment of modern hard disks with high performance characteristics, which provide high speed for an affordable price per Gigabyte. If the speed of a hard disk drive is not enough for your VMs, you can use a Solid State Drive (SSD). There are no moving parts in a SSD in comparison to classic spinning HDD, thus an SSD provides higher speed – but is more expensive. The price per a Gigabyte for an SSD is higher, and its overall capacity is usually less than that of an HDD. By making use of the disks with the highest performance for your Hyper-V storage, VMs are able to work without lag.
Make Use of a Dedicated Volume to Store VMs
Refrain from storing VMs on system volumes. The system volume is usually occupied with reading or writing system files that are used by the operating system (C:\ is always a system volume by default). Thus, storing the VM files on the system volume may reduce VM performance. Another issue that may arise is that of insufficient free space on the volume. This situation may occur when system files occupy all of the free disk space, or when VM files such as virtual disk files occupy all of the disk space. As a result, the VMs on which files are stored within a system volume are at risk of failure. Additionally, Hyper-V host may also not work properly without sufficient free space for writing system files. Make use of separate volumes for storing operating systems and VMs. Furthermore, resist storing system files such as swap files on drives that are used for VM data.
Store VM Files In One Location
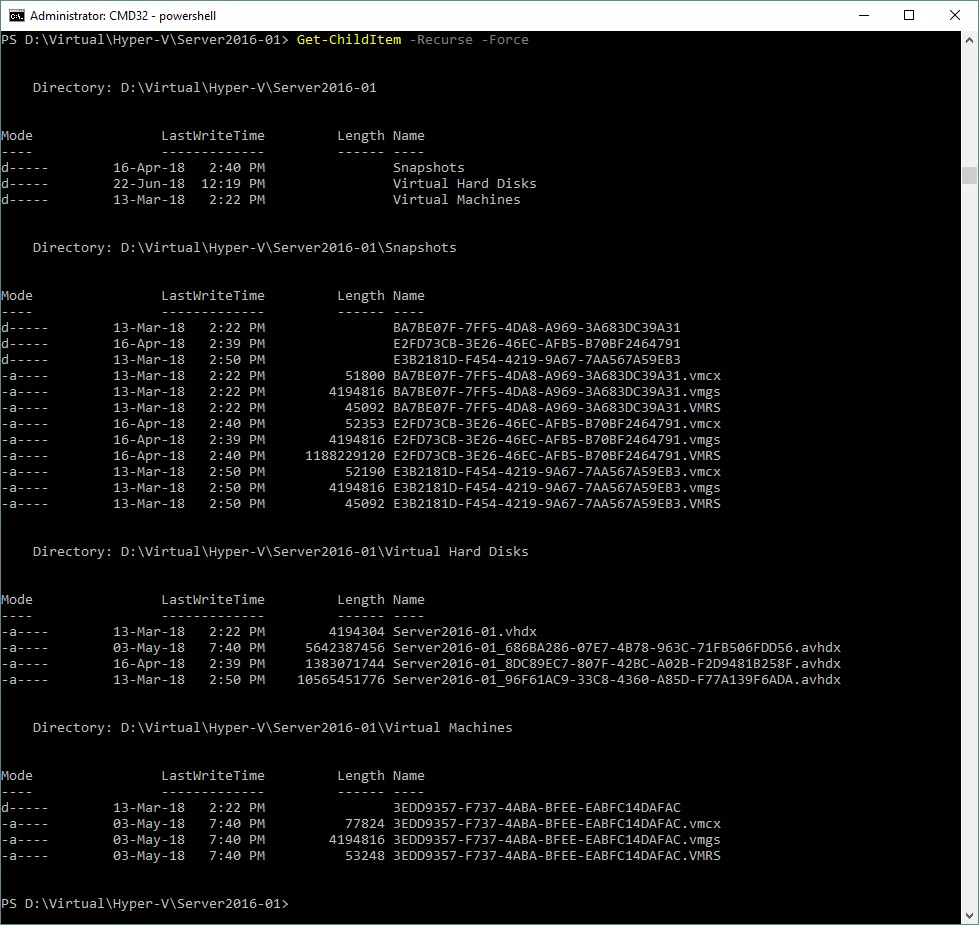
Some of the main files of Hyper-V virtual machine are: VHDX (VHD) – virtual disk files, AVHDX – differencing virtual disk files, VMCX – configuration files, and VMRS – runtime state files. The VM files might be stored in different default locations that are not convenient for administrators. To avoid this, specify a single directory for storing all files that belong to the current VM. On the screenshot below it can be seen that all files that belong to a VM named Server2016-01 are stored in subdirectories of one directory which is named Server2016-01.
Leave Space for BIN (VMRS) Files
BIN files consume disk space to store the memory state. For this purpose, a reserved space should be left on volumes where the VM files are stored. Since Hyper-V 2016, the extension of this file type has been changed from BIN to VMRS. This file type takes a second place in the consumption of disk space following virtual disk VHDX files. The size of a BIN (VMRS) file is equal to the size of the virtual memory of the VM. For example, if your VM has a 30GB virtual disk and 8 GB of virtual memory, you should reserve at least 38 GB on your storage. If the dynamic virtual memory is configured for a VM, then the BIN (VMRS) file size would be equal to the amount of provisioned memory at that current point in time.
Which File System to Use: NTFS or ReFS?
NTFS (New Technology File System) is a file system that was created by Microsoft in 1993, and is widely used in Windows environments in present day.
ReFS (Resilient File system) is the newest Microsoft’s file system released with Windows Server 2012 which has improvements such as:
- Protecting data against corruption by using checksums for metadata and files
- Integration with storage spaces
- Automatic data integrity checking and error correction (if an error occurs)
- Block cloning technology (which is useful when the VMs are cloned)
- Increased tolerance against power outages
- Support of an encryption with BitLocker
- Increased maximum file size and length of file name
- Increased maximum volume
- Faster creation of fixed virtual disks
As can be seen, the ReFS file system has a long list of the advantages and is designed to meet the requirements for the server’s storage more efficiently. However, some disadvantages are also present:
- Windows cannot be loaded from ReFS volume
- Data compression, Windows file-based deduplication, file encryption, hard links, extended attributes, disk quotas are not supported
- It cannot be used for Clustered Shared Volumes
- It does not provide support for legacy 8.3 file names
Finally, the choice of the file system lies with the administrator. Using ReFS for Hyper-V storage is recommended if the limitations of ReFS do not matter for your system.
Use a High-Speed Storage Network
When using remote storage, a network connection is a crucial factor. If you have high-speed disks in your NAS or SAN but a slow network connection, the overall performance of the storage system would be degraded. It is for this reason that using a dedicated high-speed network with low latency is recommended. A 10-Gbit network connection is recommended in order to ensure an acceptable speed. Using NIC teaming for bandwidth aggregation is also helpful.
Avoid Storing the VM With Domain Controller on SMB3 Share
Accessing a domain controller is required for SMB 3.0 share to work properly. If a host with SMB 3.0 share or a Hyper-V host is unable to access the domain controller, an authentication cannot be passed and a connection cannot be established. In this situation a Hyper-V server is unable to start a VM with Domain Controller that is placed on SMB 3.0 share. Keep a VM with Domain Controller on the local storage of your Hyper-V host in order to prevent this issue.
Make Use of Cluster Shared Volumes for Cluster Storage
When deploying a cluster, you should configure shared storage. When traditional storage without CSV is used, only one node (Hyper-V host) can access the same disk/LUN at a time. Clustered Shared Volumes (CSV) can resolve this issue by providing simultaneous access to storage for multiple nodes without remounting volumes and changing ownership with permissions. With CSV you can have a clustered file system layered above NTFS or ReFS for Hyper-V.
Avoid Using Pass-Through Disks
A pass-through disk is a physical disk (LUN) that is connected to a virtual machine. This type of disk is used as a storage device and is connected directly to the disk controller of a VM. For the first versions of Hyper-V, using pass-through disks helped increase performance. Nowadays, formats of virtual disks are progressive enough – thus, including performance and using pass-through disks does not make sense because of the issues that may occur when using them. You cannot easily move a pass-through disk with a virtual machine, and backup software cannot make a backup of a VM with this disk type on a host level.
Which Virtual Disk Type to Prefer – VHD or VHDX?
VHD is a legacy format of virtual disks for virtual machines that was introduced in 2003. VHDX is a more progressive format (released with Windows Server 2012) which has a higher capacity limit of a virtual disk (up to 64TB), supports 4KB blocks, has a live resize of virtual disk, and has a continuous metadata structure update which reduces the probability of data corruption caused by power loss. For this reason, favor using VHDX virtual disks in your Hyper-V environment.
The Use of Fixed and Dynamically Expanding Virtual Disks
A fixed virtual disk is a VHDX (VHD) file that consumes all pre-allocated space on storage, despite the amount of space used inside the virtual disk. The advantages of using a fixed virtual disk are that they work faster, no issues may be caused by over-provisioning, and the fragmentation of the VHDX file is the same after creation. The disadvantages of using a fixed virtual disk are that their creation may take a longer time on NTFS volumes, and more space on storage is needed for disk creation.
Dynamically expanding virtual disk starts with a small size of a few kilobytes after pre-allocation, this grows after writing files inside the virtual disk until it reaches the maximum size that was pre-allocated during disk creation. A dynamic disk cannot be reduced automatically when the data on the disk of this type is deleted. The benefits of using dynamic disks are that they save space, are quick to create, and include over-provisioning. The drawbacks are that dynamic disks are slower than fixed disks, involve higher fragmentation, and overprovisioning could cause insufficient free space on storage after the growing of dynamic disks.
You can use both fixed and dynamic virtual disks depending on your needs.
Differencing Virtual Hard Disks
A differencing virtual hard disk is a virtual disk file (AVHDX or AVHD) that is created in the VM directory with virtual disks after checkpoint creation. The purpose of differencing the virtual disk is storing changes that are written to a parent virtual disk of a VM after creating a checkpoint. A parent virtual disk can be a fixed, dynamic, or differencing disk. When a checkpoint is deleted, the differencing virtual disk that has been created with this checkpoint is merged with a parent virtual disk. Differencing virtual disk can also be created with Hyper-V’s new virtual hard disk wizard. It is important to note that creating a high number of checkpoints causes the creation of growing differencing virtual disks, which results in performance decreases.
Monitoring Disk Health and Performance
Monitoring disk health regularly can prevent any possible disk damage that may cause data corruption. Make use of utilities that can monitor S.M.A.R.T. (Self-Monitoring, Analysis, and Reporting Technology) data of disk drives, including disks that belong to RAID. The earlier you identify a disk with problems, the higher the probability that your data will be safe. Disk performance should also be monitored to identify which disks can be overloaded. This can help you make a decision to redistribute the VMs with disk-intensive operations between other storage in order to optimize overall performance.
Conclusion
Storage is a crucial component for servers because the data that storage contains is especially important for most IT companies. Today’s blog post has covered the best storage practices for Hyper-V, which can help optimize VM performance and ensure a high reliability of storage. From all the recommendations listed above, choose those that fit your environment.
Even if you have top class storage, it is important to back up your Hyper-V VM data properly. NAKIVO Backup & Replication can help you back up your Hyper-V VMs in the most efficient way.