Setting Up Hyper-V Replication Natively and with the NAKIVO Solution
Using virtual machine failover helps you avoid downtime if a disaster makes your primary environment unavailable. Failovers allow you to recover data and restore workloads quickly. To perform a failover, you need VM replicas created in advance. You can set up Hyper-V VM replication within the same host/cluster or to a different host/cluster.
This blog post covers setting up Hyper-V replication with native tools in Windows and with a third-party comprehensive data protection solution.

Requirements
To set up Hyper-V replication, you should have the following:
- 2 servers with Microsoft Hyper-V installed
- A reliable network connection between the Hyper-V servers
- Storage with high IOPS performance
Before Setting up Hyper-V Replication
You should plan how you will use Microsoft Hyper-V replication to protect data and recover workloads before proceeding with setting up Hyper V servers as this will impact your Hyper-V configuration. Here are some key factors that your plan should include:
- Define which virtual disks to replicate. If you are using a dedicated virtual disk for a swap file, you can exclude this virtual disk from replication. Data in a swap file is frequently changed (the changed data is considered the data to replicate), but this data is not required to restore a VM replica on the second server (that is, not required for failovers). So, you can reduce Hyper-V VM replication time when excluding unnecessary disks.
- Decide how often to synchronize data between VMs. Select the synchronization interval based on your RPOs, that is, recovery point objectives set for your workloads. Consider factors such as network bandwidth when selecting VM synchronization frequency. Lower network bandwidth would make it difficult to synchronize large amounts of data frequently.
- Define possible scenarios to recover data. How many recovery points should you save for a VM replica? Each recovery point is saved as a virtual disk snapshot (called a checkpoint in Hyper-V) for a VM replica. A snapshot is used to revert the needed VM state for the appropriate point in time.
- Decide whether you need to have application consistency for your Microsoft Hyper-V VM replicas. Some applications like Active Directory Domain Controller, Microsoft Exchange Server, Microsoft SQL Server, Oracle Database, and other database servers can write data during their regular operation. The process of writing data must be quiesced by using Volume Shadow Copy Service (on Windows VMs or using scripts for Linux VMs) before starting replication to preserve application consistency.
- Select the method of initial VM replication. If you have a high-speed network connection, you can start the initial Hyper-V replication over the network. If the network bandwidth is low (for example, when creating replicas over WAN or internet between offices or data centers), then you can copy a VM on a removable storage media (for example, a USB HDD) and then copy the VM to the replica server (known as replication seeding). This VM will be the initial replica and only data changes will be replicated over the network from then on.
Preparing Hyper-V Hosts
You need to prepare the Microsoft Hyper-V hosts and ensure that network traffic for VM replication is allowed and DNS names are resolved.
Network connection for Hyper-V replication
Network connection for Hyper-V replication can be established in two ways:
- HTTP (port 80, TCP). This connection type can be used if the two servers running Hyper-V are members of an Active Directory domain. Authentication is performed by using Kerberos in Active Directory to make it secure. Otherwise, it is not recommended that you use HTTP to transfer data over the internet via unencrypted network connections as HTTP is an unencrypted protocol. Configuring Hyper-V replication via HTTP is not difficult, you just need to join the servers in the domain.
- HTTPS (port 443, TCP). This connection type is encrypted and secure in itself. However, setting up Hyper-V replication via HTTPS is a complicated process. You need to create certificates and manually import them to all the servers with Hyper-V. A certificate is used for authentication between the Hyper-V hosts. If your Hyper-V servers are not in an Active Directory domain, you must use an HTTPS connection for Hyper-V VM replication.
If you use an HTTPS connection, you need to buy a certificate from a certificate provider (certificate authority or CA). This approach is the most secure one. The alternative is generating a self-signed certificate manually. You can create SSL certificates by using native tools in Windows Server 2019. However, using self-signed certificates is less secure than obtaining them from a CA. Certificates periodically expire, and then you need to reconfigure Hyper-V hosts to use new certificates.
Use a secure network connection if you use the internet for communication between the two Hyper-V hosts. You can use VPN or an IPSec tunnel. Note that if you use an encrypted VPN connection, traffic is encrypted, and you don’t need to encrypt with HTTPS for communication between the Hyper-V hosts for VM replication. If you use HTTPS in this case, you get overhead because encrypted data is bigger in size (there are larger traffic requirements – one reason is the fact that key-based encryption is asymmetrical). As a result, the performance of data transfers worsens. For this reason, avoid using double encryption.
In our example, we have two Windows Server 2019 machines with Hyper-V installed. Both machines are members of a domain (domain1.net). We don’t use an unsecured WAN connection. For this reason, in our walkthrough, we use Kerberos authentication and an HTTP connection for Hyper-V replication.
Resolving DNS names
Both servers running Hyper-V must resolve hostnames (DNS names) to IP addresses. If your servers are domain members, and a domain controller is set as the primary DNS server in the network configuration, this is not a problem. If your servers running Hyper-V are not in a domain (they are in a workgroup), you may need to add records to the hosts file manually. The hosts file is stored in:
C:\Windows\System32\drivers\etc\hosts
You can open PowerShell as administrator and open this file in Notepad with the ability to edit and save changes:
notepad.exe “$env:windir\system32\drivers\etc\hosts”
Add lines with the IP address and hostname to the hosts file like this:
192.168.101.2 server2
192.168.101.9 server9
Ping Hyper-V hosts to ensure that hostnames are resolved. ICMP traffic must be enabled in this case.
Configuring the Firewall
When you install Microsoft Hyper-V, some rules in the Windows firewall are created automatically. However, the rules needed for Hyper-V replication traffic are disabled by default, and Hyper-V replication traffic is blocked as a result. You need to enable the relevant Hyper-V replication rule for HTTP or HTTPS traffic, depending on your scenario. Enable the rules on both Hyper-V servers.
The rules are:
- Hyper-V Replica HTTP Listener (TCP-In) for HTTP traffic (port 80 for inbound connections)
- Hyper-V Replica HTTPS Listener (TCP-In) for HTTPS traffic (port 443 for inbound connections)
Note: We use default port numbers, and these rules are applicable. If you are using custom port numbers, you need to adjust the rules or create similar rules with the needed port numbers.
Using the command line interface
Do the following steps to configure Windows Firewall for Hyper-V replication in the command line:
- Open PowerShell as administrator.
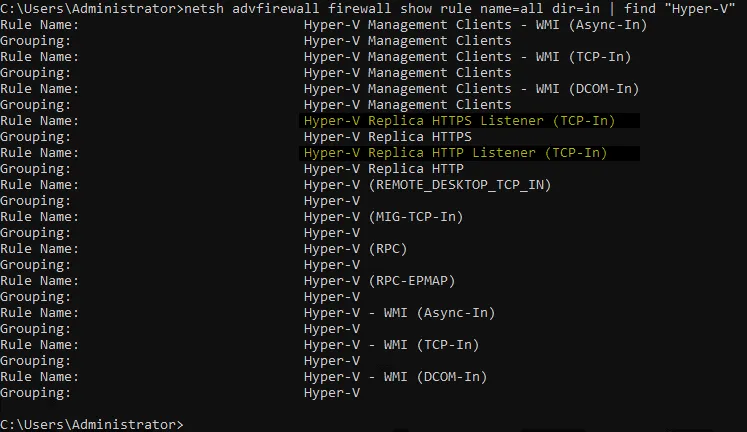
- Check firewall rules:
netsh advfirewall firewall show rule name=all dir=in | find “Hyper-V”
- Enable the rule:
- For HTTP:
Enable-Netfirewallrule -displayname “Hyper-V Replica HTTP Listener (TCP-In)”
- For HTTPS:
Enable-Netfirewallrule -displayname “Hyper-V Replica HTTPS Listener (TCP-In)”
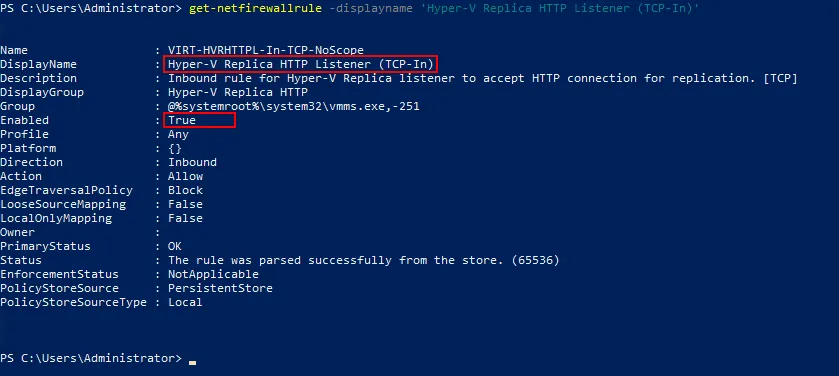
- Check whether the rule has been enabled:
- For HTTP:
Get-Netfirewallrule -DisplayName ‘Hyper-V Replica HTTP Listener (TCP-In)’
- For HTTPS:
Get-Netfirewallrule -DisplayName ‘Hyper-V Replica HTTPS Listener (TCP-In)’
Using the GUI
Using the graphical user interface (GUI) is a convenient way to configure Windows firewall for setting up Hyper V replication.
- In Server Manager, go to Tools > Windows Defender Firewall with Advanced Security.
As an alternative, you can run the following command to open the Windows Firewall window:
wf.msc
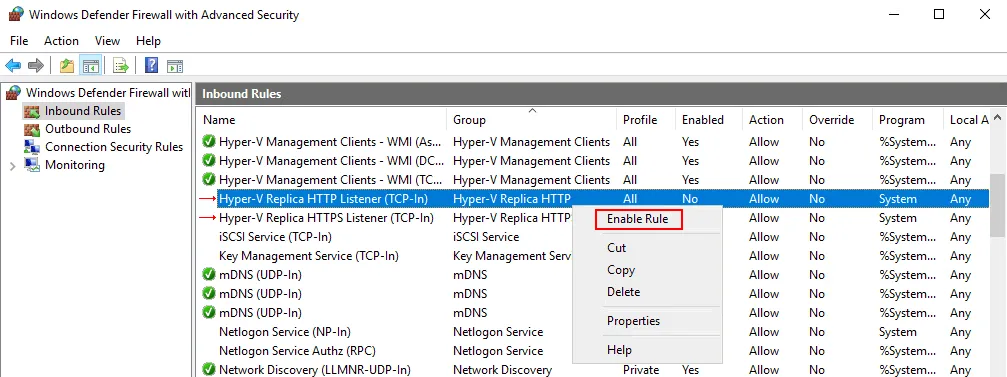
- Click Inbound rules in the left pane of the Windows Firewall window.
- Right-click the needed rule:
- Hyper-V Replica HTTP Listener (TCP-In)
- Hyper-V Replica HTTPS Listener (TCP-In)
- Click Enable Rule in the context menu that opens.
Setting up Hyper-V Replication with Native Tools
There are a few steps left to prepare both Hyper-V hosts before we can proceed to setting up Hyper-V replication.
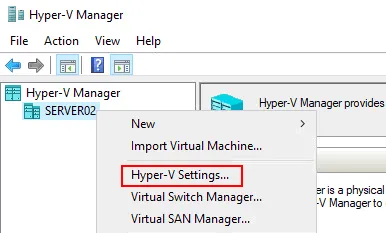
- To open Hyper-V Manager, open Server Manager and go to Tools > Hyper-V Manager. We are setting up Hyper-V replication from the main (source) server, which is Server02.
- Right-click the server name in Hyper-V Manager, and in the context menu, hit Hyper-V settings.
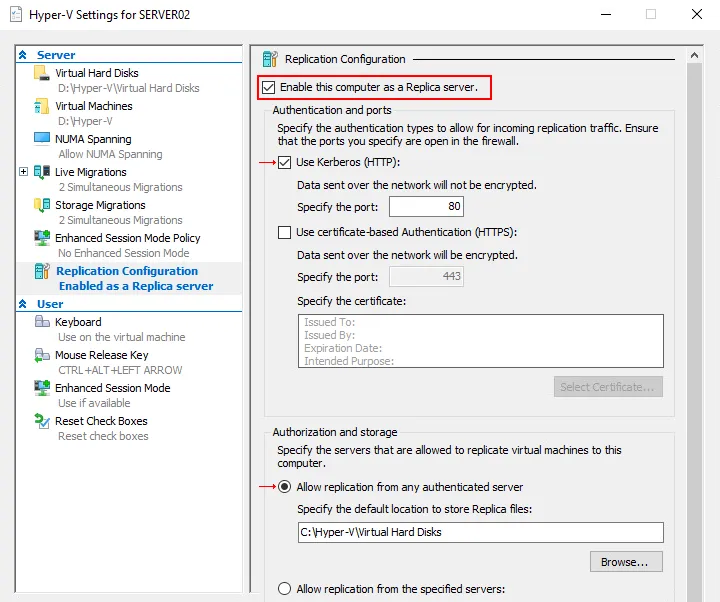
- In the left pane of the Hyper-V Settings window, click Replication Configuration. In the right panel of the window, select the following settings:
- Enable this computer as a Replica server
- Use Kerberos (HTTP). Specify the port (we use port 80, which is the default value). If you use HTTPS and certificates, select the appropriate options.
- Allow replication from any authenticated server
Click OK to save the settings.
Repeat all the steps on the second Hyper-V host (that is, the destination host for Hyper-V replication).
Enabling VM replication
We have configured both Hyper-V hosts, and now we can set up Hyper-V replication for a virtual machine on the source host.
Right-click the VM in Hyper-V Manager on the primary server (Server02 and VM2 in our case), and in the context menu, click Enable Replication.
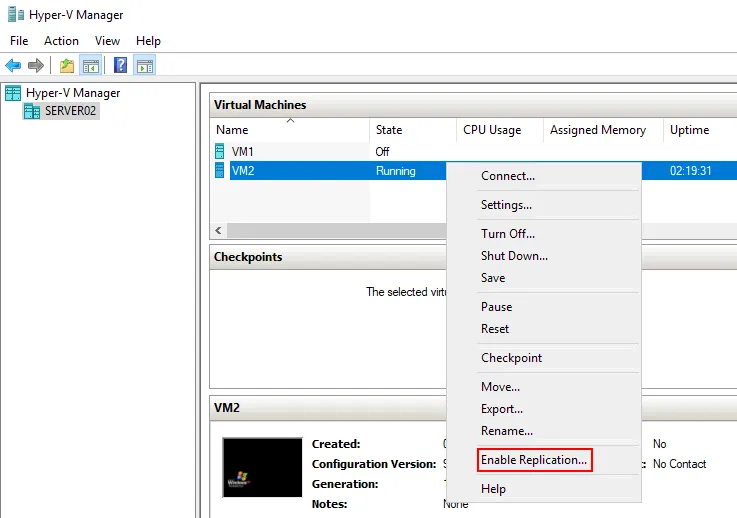
The replication wizard opens. Set up Hyper-V replication for the VM by following the steps in the wizard.
- Before you begin. You can skip this step because there is nothing to configure.
- Specify Replica Server
- Click Browse. In the window that opens, enter the server name (Server09 in our case).
- Click Check Names. When the server name is underlined, this means that the name is correct.
- Click OK to save settings and close the current window.
- Then you can click Next.

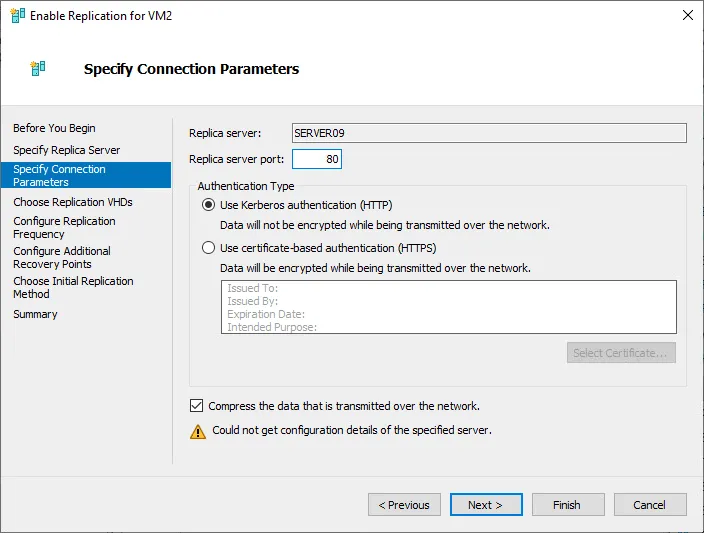
- Specify Connection parameters. The replica server has already been selected (Server09). Set the following parameters, which must match the ones you set previously in Hyper-V settings on both servers.
- Replica server port: 80
- Authentication type: Use Kerberos authentication (HTTP)
- Compress the data that is transmitted over the network
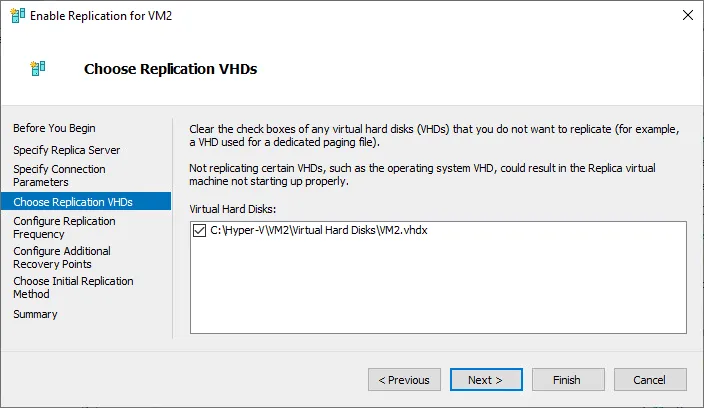
- Choose Replication VHDs. Select the virtual disks of the VM to replicate. The VM used in our example has one virtual disk.
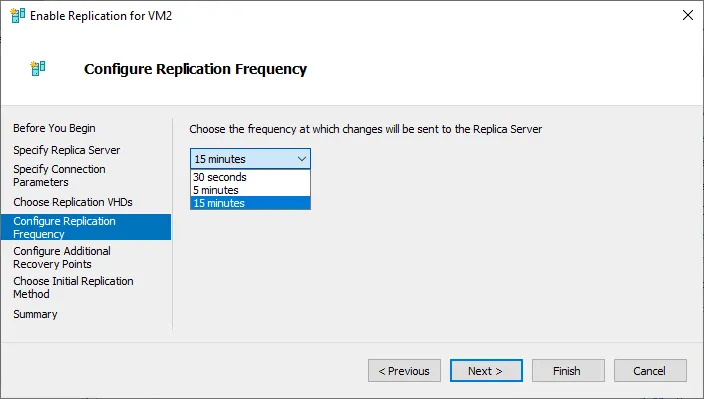
- Configure Replication Frequency. Select one of the three available options depending on your RPO and other factors such as network bandwidth and storage performance:
- 30 seconds
- 5 minutes
- 15 minutes
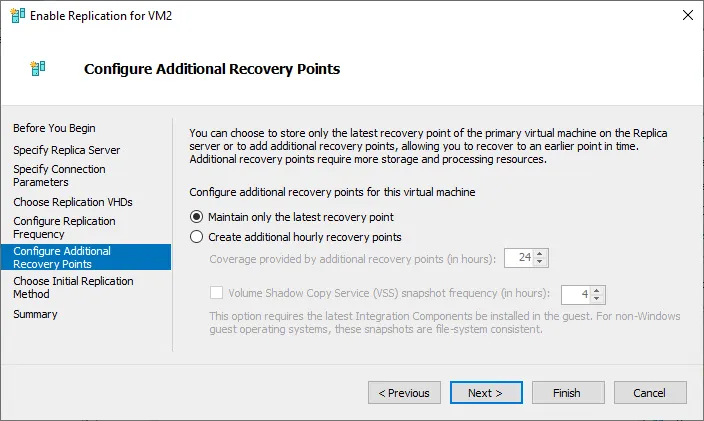
- Configure additional recovery points. Select the number of recovery points to retain for a VM replica. There are two options:
- Maintain only the latest recovery point – only one recovery point is available in this case.
- Create additional hourly recovery points – you can set the number of additional recovery points to create and the frequency.
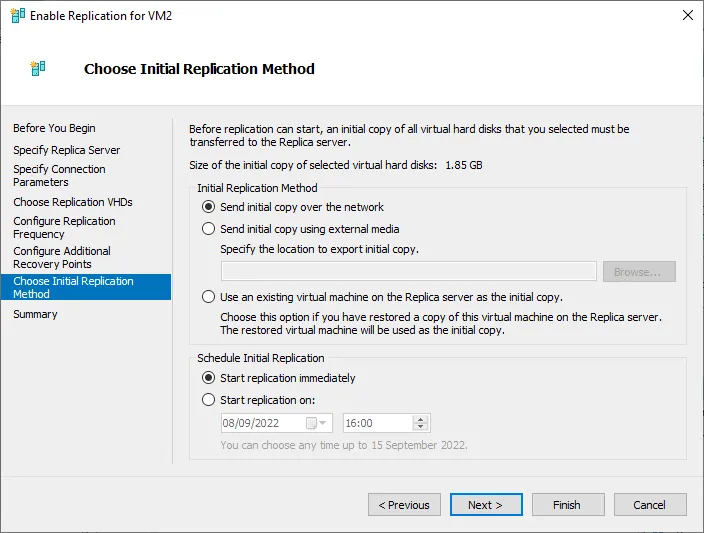
- Choose initial replication method
- Select one of the options:
- Send initial copy over the network (we use this option)
- Send initial copy using external media
- Use an existing virtual machine on the replica server as the initial copy
- Schedule initial replication. You can set when to start this Hyper-V VM replication.
Note: Avoid job overlaps (when scheduling replication for multiple VMs) to avoid overloading hardware and network, which will cause overall performance degradation of VM replication and running VMs.
- Summary. Check your Hyper-V configuration for VM replication and hit Finish.
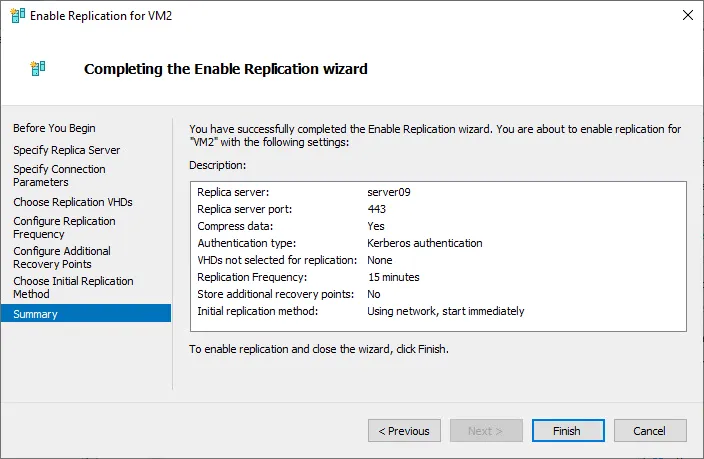
After enabling VM replication, you should see a notification message that you need to connect virtual network adapters of a VM replica to the network manually by editing VM settings.
Running VM replication
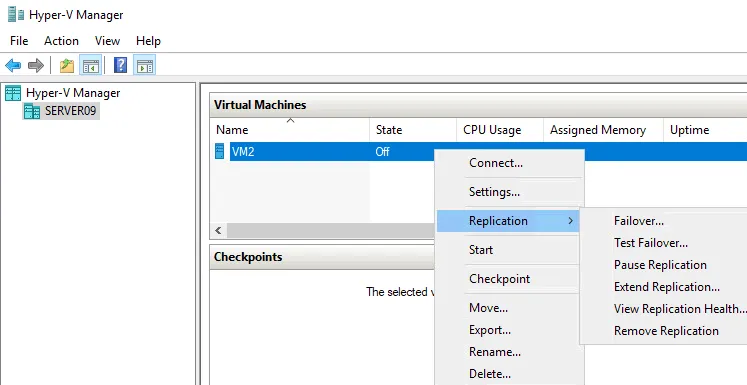
Let’s open Hyper-V Manager on the replica server (Server09). We can see that a VM replica has already been created. The name of this VM is VM2, as on the source Hyper-V host.
Right-click the VM replica to see available options. You can check replication health, run a test failover, or run a real failover.
Our VM replication has been completed successfully.
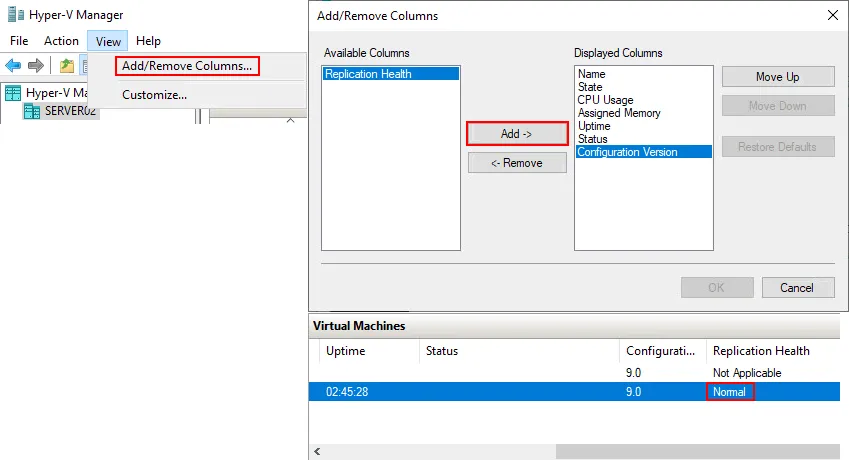
For more convenience, you can add a column to see replication health in the main Hyper-V Manager window in the list of VMs.
- Go to View > Add/Remove Columns in the main Hyper-V Manager window.
- In the Available Columns list, select Replication Health and click Add ->
- Click OK to save settings and close the window.
You can see that replication health for our VM replica is Normal.
You can check files of the VM replica, such as virtual disks, snapshots, etc., in the appropriate folder on the destination (replica) server.

Hyper-V Replication with NAKIVO Backup & Replication
Let’s look at how we can perform Hyper-V VM replication with a dedicated data protection solution called NAKIVO Backup & Replication. Configuration of Hyper-V replication is easy even if your Hyper-V hosts are in a workgroup and there is no Active Directory Domain. You don’t need to follow the difficult workflow to configure certificates like you would do with the native replication method. There are convenient options for using an encrypted connection.
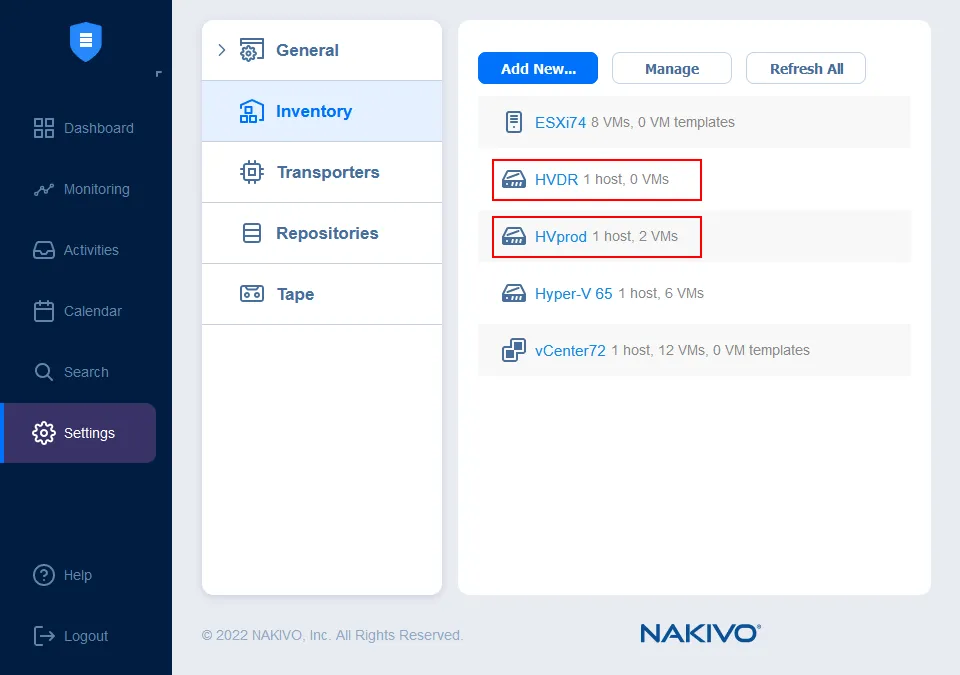
To perform Hyper-V replication, you first need to configure your Hyper-V hosts – both the production and disaster recovery (DR) environments. You have to add the hosts to the NAKIVO solution inventory and make sure firewall settings do not block connections, among other things. In the example below, we are replicating Hyper-V virtual machines from a production environment (HVProd) to a designated DR site (HVDR). It is worth noting that, as shown below, you can manage multiple hypervisors from the Inventory tab in the +NAKIVO Backup & Replication web interface.
Once you have the Hyper-V environments configured, you need to launch the Hyper-V replication wizard.
On the Jobs dashboard page, click Create > Replication > Microsoft Hyper-V replication job.
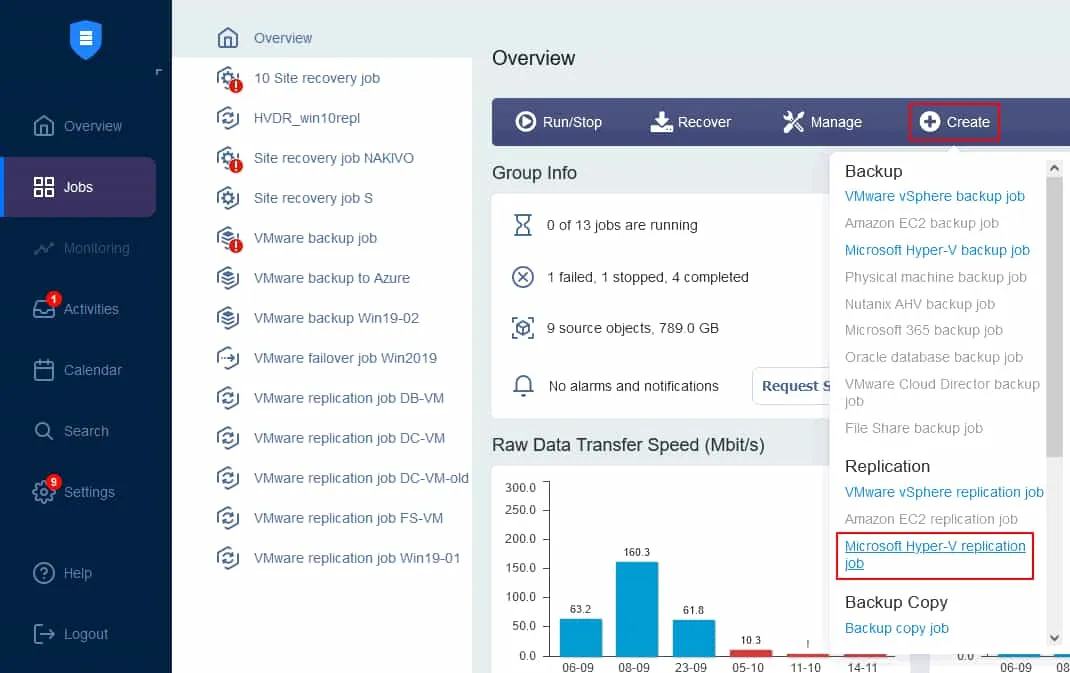
The New Replication Job Wizard for Microsoft Hyper-V opens.
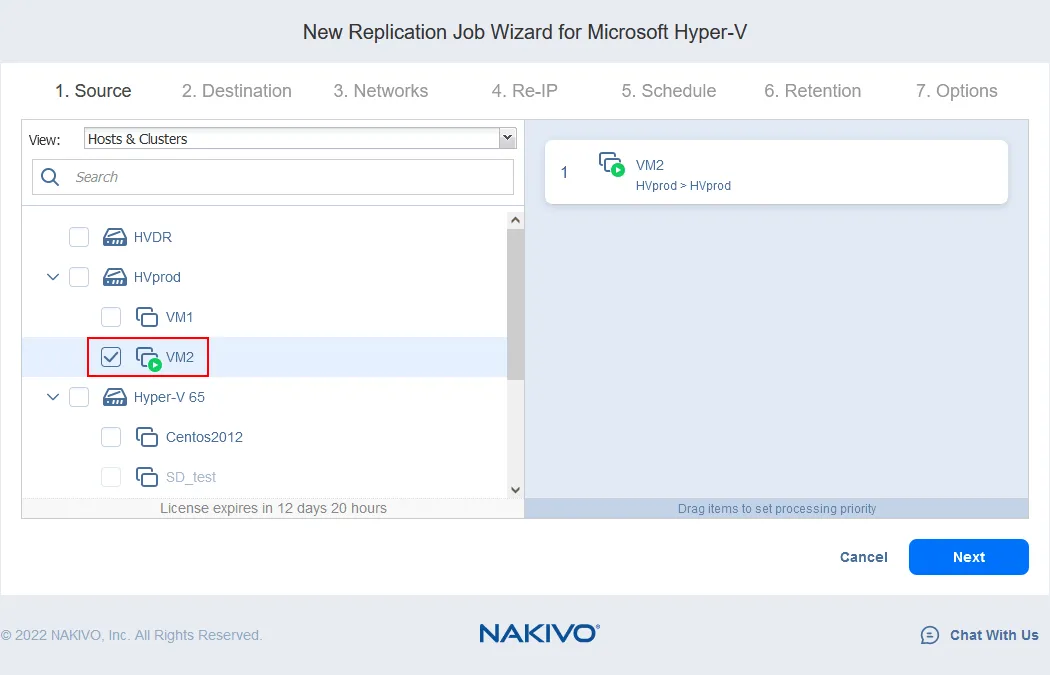
- Source. Select the virtual machines you want to replicate to the other environment. Note that in the example below, we select an individual virtual machine within our production environment.
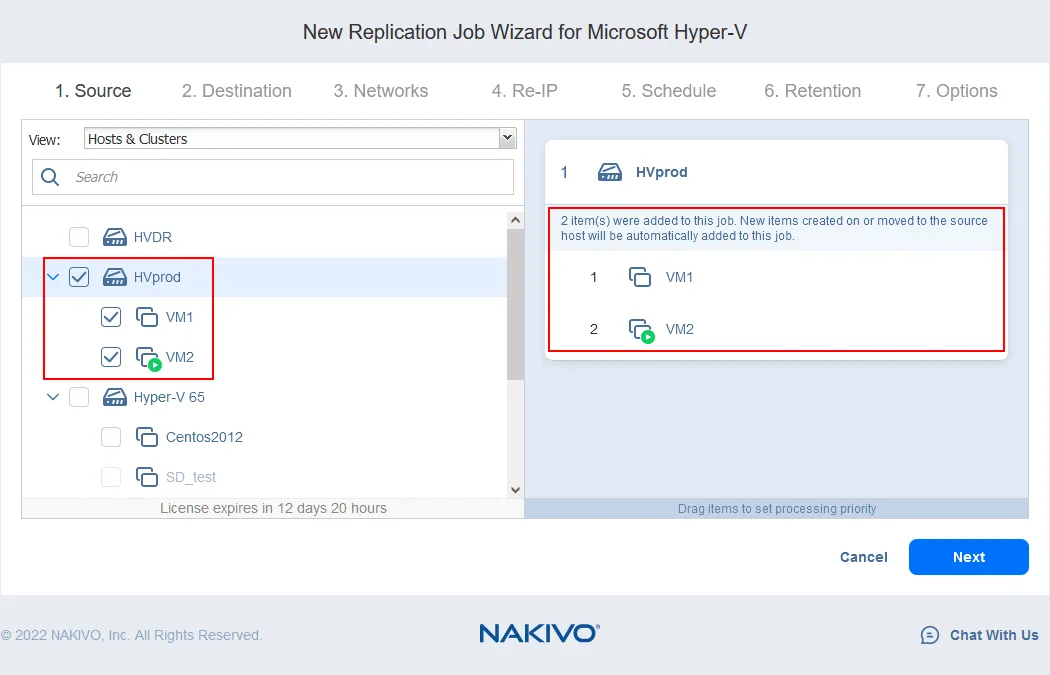
With the wizard, you can also choose to replicate virtual machines at the host level by ticking the checkbox next to the host/cluster. When you do so, you will see in the information pane: New items created on or moved to the source host will be automatically added to this job. This useful feature allows you to automatically have Hyper-V replication set up for any new virtual machines you add to your source environment.
Hit Next at each step to continue.
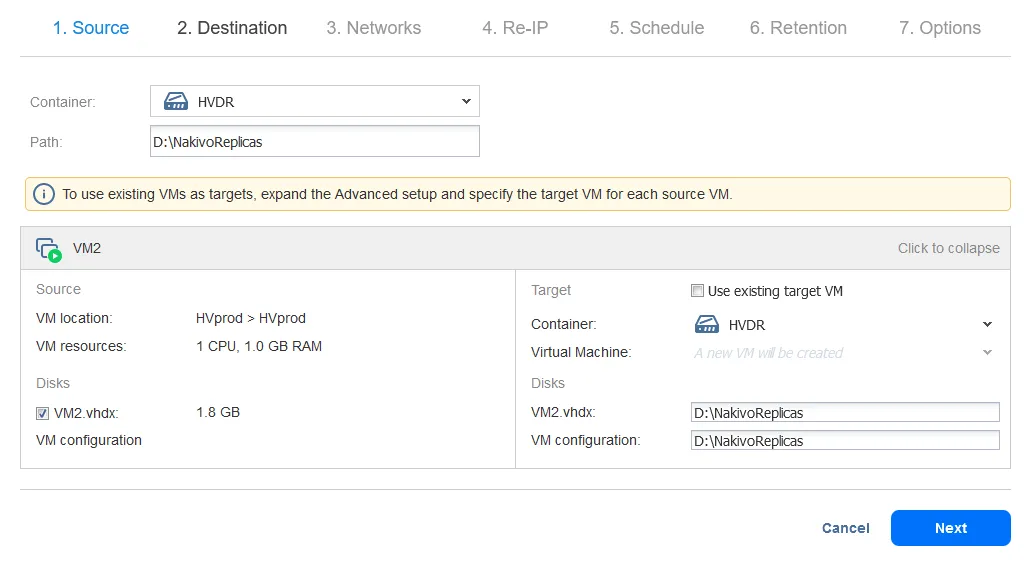
- Destination. Identify the target Hyper-V environment, including the destination path. The path selected in the example below (D:\NakivoReplicas) is the one we set in our Hyper-V settings to store our virtual machine replicas and configuration files.
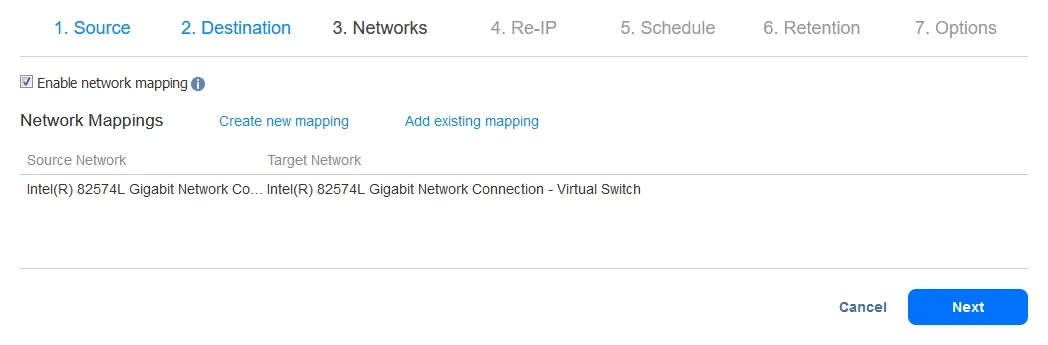
- Networks. Additionally, you need to select the target network for the replicated virtual machine in the destination Hyper-V host/cluster. A VM replica will be connected to this network.
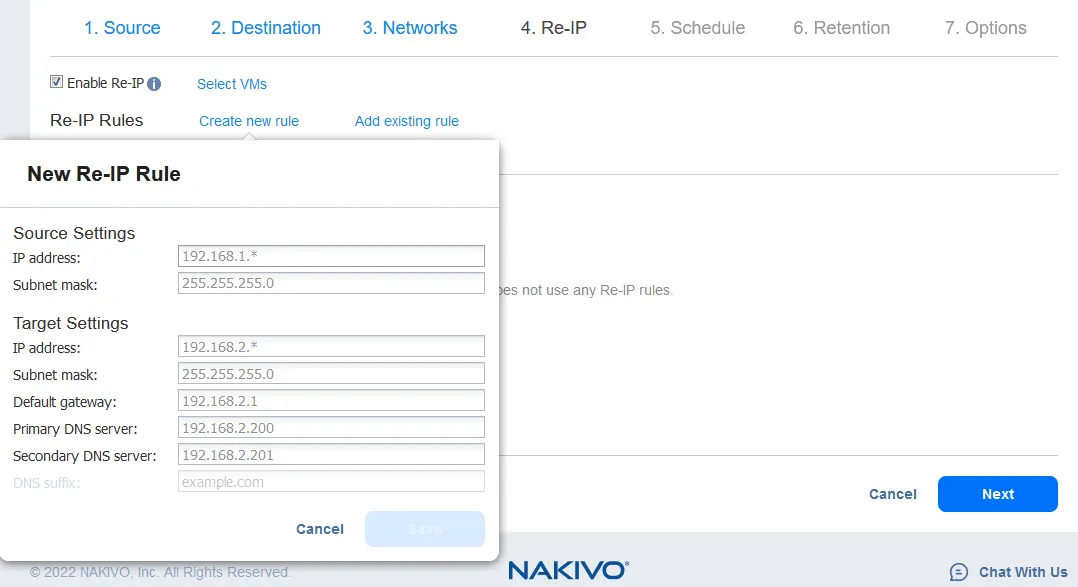
- Re-IP. You can set the custom IP address and other IP settings for the VM replica. Primary and secondary Hyper-V hosts can use different networks with different IP addresses, gateways, and DNS servers. You don’t have to edit VM settings for connecting a VM replica to the needed network manually in this case.
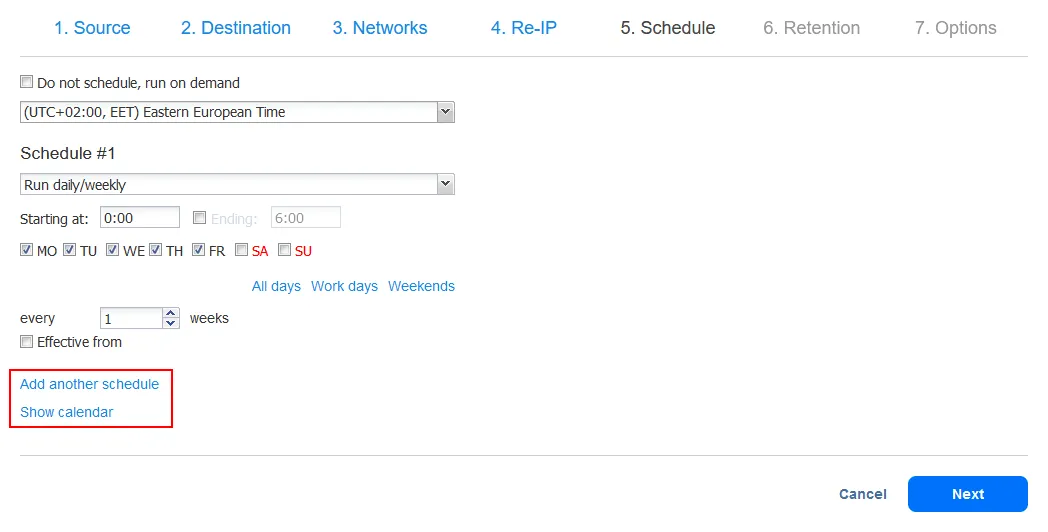
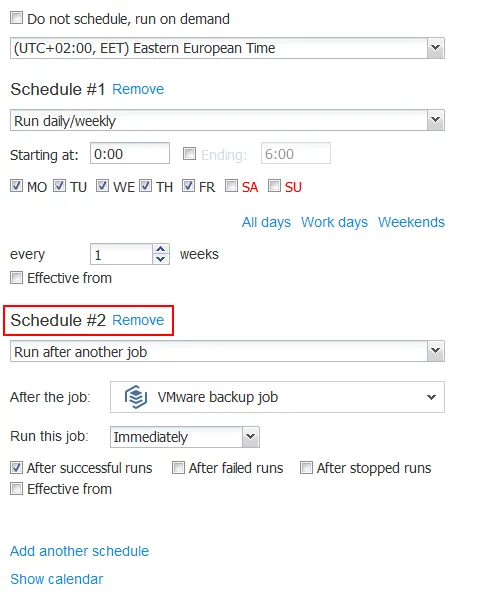
- Schedule. Set up the schedule based on which you want to perform replication of your Hyper-V virtual machine. Note the Add another schedule and Show calendar options.
A powerful feature of NAKIVO Backup & Replication is the ability to set up job chaining. Job chaining allows you to link one job to another one. For example, you may chain a replication job to a backup job. In the screenshot below, we have the Run after another job option selected and the corresponding backup job chosen. With these settings, after a successful backup job, the solution immediately kicks off the replication job for your Hyper-V virtual machine.
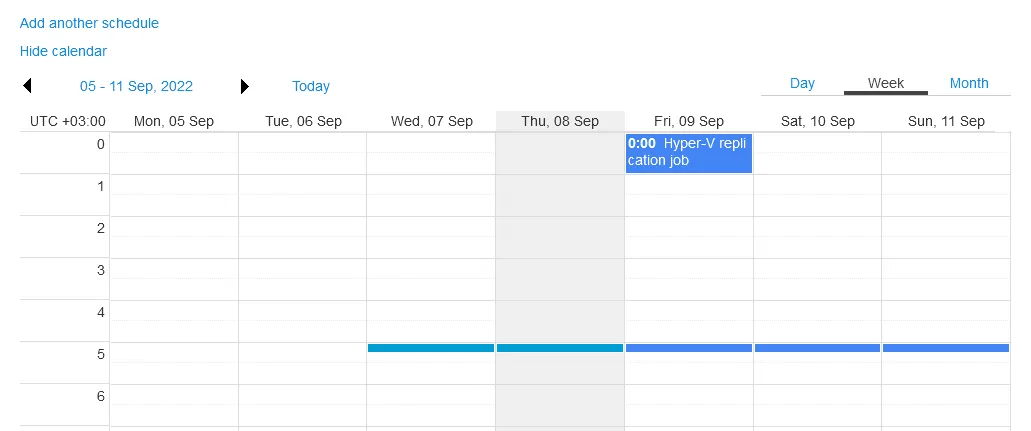
If you click the Show calendar link, you can see the Calendar dashboard, which is a great way to get a visual overview of all the jobs scheduled in NAKIVO Backup & Replication. You can also create and edit jobs, including Hyper-V replication jobs, right from this interface. The Calendar also helps you avoid any job overlaps.
With the NAKIVO solution, you can also set up multiple schedules for a Hyper-V replication job by clicking the Add another schedule link. This allows you to create different schedules for different days of the week, which is something that many businesses might appreciate if they experience variations in working hours and/or typical activity. For example, we can have a different schedule set up for weekdays versus the weekend.
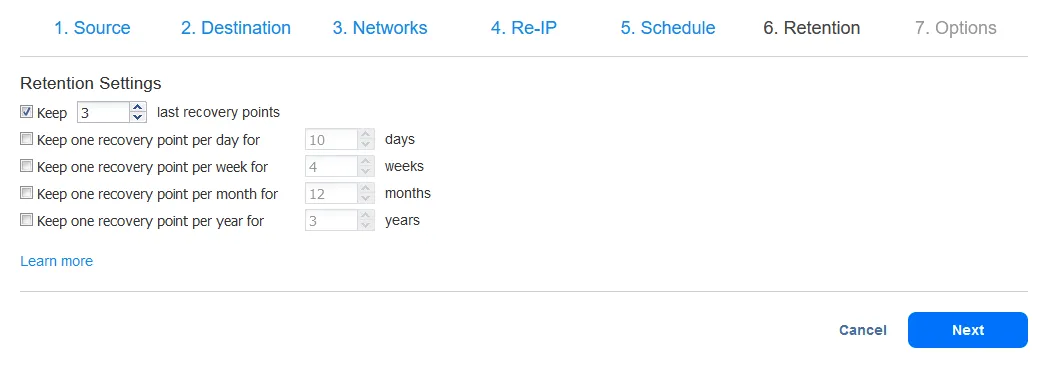
- Retention. You can set the number of recovery points that will be retained. These equate to checkpoints in Hyper-V on the replicated virtual machine.
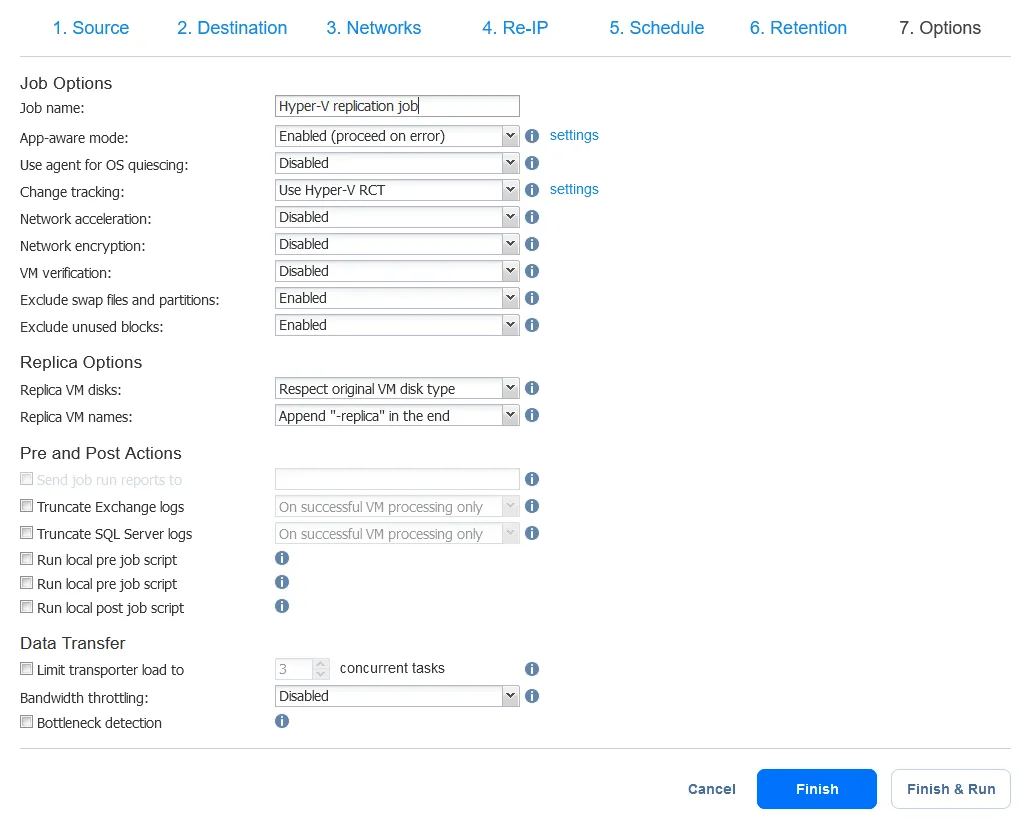
- Options. Finally, you are given many interesting options showcasing the power and versatility of NAKIVO Backup & Replication. On the Options screen, you can configure the following settings for your Hyper-V replication job:
- App-aware mode – This mode allows you to maintain data consistency on the Hyper-V replica. You might want to use this mode if you are replicating, for instance, a Microsoft SQL Server virtual machine.
- Change tracking – Hyper-V RCT was introduced with Windows Server 2016 and allows you to perform efficient changed block tracking, that is, recording only the changes that are made between each backup iteration without using a filter driver. You can also choose to use NAKIVO’s proprietary change tracking technology.
- Network acceleration – This option allows you to compress data and reduce traffic and, thus, increase data transfer speeds by up to 2 times.
- Encryption – You can control whether you want the transferred data to be encrypted in flight over the network.
- Replica disks – You can replicate the source VM settings here if you select Respect original VM disk type. You can also select to use dynamic disks, which is essentially thin provisioning the resulting Hyper-V replica virtual machine.
In addition to the options above, you can control the naming of your replica virtual machines, opt to receive job completion reports via email, truncate Microsoft SQL Server and Exchange Server transaction logs, and choose to execute local pre- and/or post-job scripts.
Click Finish & Run.
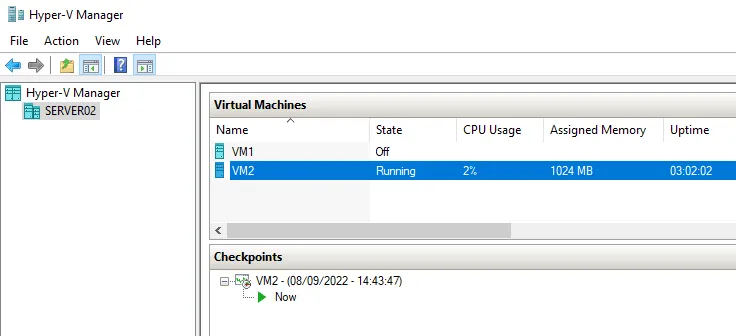
In your Hyper-V Manager of the source server (Server02 in our case), you can see a temporary Microsoft Hyper-V checkpoint of the source virtual machine that is being replicated.
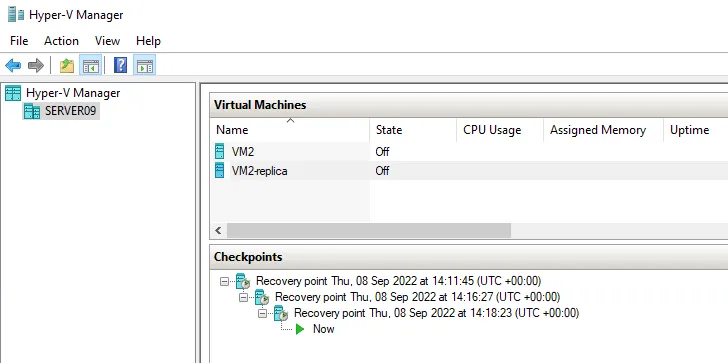
Below, we have an example of the checkpoint existing on the Hyper-V replica virtual machine once it is created (the VM name is VM2-replica). The chain of checkpoints will grow to the value of Keep <N> last recovery points. If we set to keep 3 last recovery points, we will have maximum 3 checkpoints for the VM-replica on the destination Hyper-V host.
Conclusion
Microsoft Hyper-V replication allows you to place a VM replica (an exact copy of a VM) in a different location to protect against data loss in the event of a site-wide failure or disaster with the ability of fast VM failover, that is, recovery.
You can use a dedicated Hyper-V replication solution like NAKIVO Backup & Replication to simplify the process and access more flexible options.