Hyper-V Networking Best Practices
In most cases when you deploy virtual machines (VMs) on Hyper-V, you need to configure network access for VMs according to your tasks. The correct Hyper-V network configuration ensures a high level of performance and security for your virtual machines, Hyper-V hosts, and the entire infrastructure while improving the stability of the whole datacenter. A physical network adapter (network interface controller – NIC) and a virtual switch are the two main components required for Hyper-V networking. You need at least one of them to establish network connections for VMs.

Using the Latest Drivers for NICs
Use the latest drivers for your physical network adapters on a Hyper-V host. Using the latest network drivers, you get the latest available features provided by a network adapter driver, the maximum network speed and stability. Known bugs are usually fixed in the latest drivers and firmware versions. Even if your Windows operating system recognizes your physical network adapters and automatically uses built-in drivers, according to Hyper-V networking best practices it is recommended to install native drivers from the network adapter manufacturer.
Using Static IP Addresses for Hyper-V Networking Setup
Set static IP addresses for network adapters of your Hyper-V servers during Hyper-V networking setup as well as use static IP addresses for the virtual network adapters of VMs running as virtual servers. This is recommended because other hosts in your network may be connected to physical or virtual servers by using their IP addresses. When addresses are obtained via DHCP (Dynamic Host Configuration Protocol), they may be changed after appropriate time intervals during which other hosts will not be able to connect to that servers.
Using the Appropriate Type of a Virtual Switch
The virtual network adapters of virtual machines are connected to ports of a virtual switch that is a software-based analog of the physical switch operating on the second layer of the OSI network model. A virtual switch is connected to an Ethernet-based network via the physical network adapter of a Hyper-V host and physical switch. There are three types of virtual switches in Hyper-V – Private switch, Internal switch and External switch. Hyper-V networking best practices recommend that you use the appropriate virtual switch type for different purposes.
- Private virtual switch. This type of virtual switch is used when virtual machines are required to run in a completely isolated virtual network which can be used for testing as well as for security reasons. VMs connected to this virtual switch type can communicate only with each other via the network but cannot access a Hyper-V host. Hyper-V hosts cannot connect to VMs which are connected to a Private virtual switch.
- Internal virtual switch. VMs that are connected to this virtual switch type can communicate with each other and with a Hyper-V host. A Hyper-V host can also communicate with VMs connected to the Internal virtual switch. Virtual machines cannot connect to external networks including the Internet. No gateways are used in the IP network configuration of VMs connected to this virtual switch type (as is the case for the Private virtual switch). Internal virtual switch is useful for file exchanges between a host and guests. A virtual network interface is added to the Hyper-V host in this case.
- External virtual switch. VMs connected to External virtual switches can communicate with each other, with a Hyper-V host as well as connecting to external networks including the Internet. A Hyper-V host can communicate with VMs connected to External virtual switch. A gateway is configured in the network settings of the Hyper-V VM for connecting to other networks in this case. A virtual network interface is also added to the Hyper-V host.
Using NIC Teaming Except for iSCSI Networks
Use NIC teaming for your Hyper-V networking configuration to enable link aggregation if you have more than one physical network interface controller. NIC teaming is a feature that allows you to distribute traffic among physical and virtual network adapters by grouping physical network adapters into a team. Such combinations provide higher performance (is always factually the case) and fault tolerance (is factually true for Hyper-V networking configuration used for a cluster).
Adding a NIC to a team increases available network bandwidth by not summing the network speed of all adapters (if you add four 1Gbit network interface controllers into a team, you will not have a 4Gbit network connection). NIC teaming can redistribute network traffic rationally between network adapters. If you want to deploy a Hyper-V cluster, create a 2-adapter NIC team (use a stand-by adapter option) and connect each NIC to a different physical switch to ensure fault tolerance for Hyper-V networking.
Don’t use NIC teaming for iSCSI networks to prevent possible wrecks. As an alternative, you can configure MPIO (Multipath Input/Output) on your Windows Server. Check whether both iSCSI initiators and iSCSI targets can support using MPIO in your infrastructure for load balancing.
Hyper-V networking best practices also do not recommend using NIC teaming for SMB 3.0 storage networks in Hyper-V environment due to the same issues as stated for iSCSI.
Using Separate Networks for Different Purposes in a Cluster
If you have more than one Hyper-V host and use shared storage to store VMs, use a separate storage network (iSCSI or SMB 3.0). Hyper-V networking best practices recommend you to use the following separate networks for each type of traffic, especially if you are deploying a failover cluster:
- Storage network. VM performance is highly dependent on the speed of the storage network. Storage traffic is critical for clusters and must not be routed (use the same subnet). The storage network must be as fast as you can provide. A 10 Gigabit network will be a good choice.
- CSV (Cluster Shared Volume) or Heartbeat network. CSV traffic is usually minimal but is used for standard cluster communications. Heartbeat traffic is light but latency-sensitive and requires that each component of a cluster is healthy and online. If there is no dedicated network for sending heartbeats, then heartbeats may be delayed or even lost when large amount of data is transferred (for example, copying files over network) and a cluster can fail after losing quorum.
- VM Live Migration network. The VM migration process requires enough bandwidth to complete migration tasks quickly and devoid of errors, especially if a VM is running. The iterative process of copying dirty memory pages between Hyper-V hosts is performed while copying the memory state of a running VM. Large chunks of memory must be copied as quickly as possible.
- VM network. This network carries the most important virtual machine traffic from the side of Hyper-V networking.
- Management network. This network type is used for managing Hyper-V hosts and virtual machines residing on those hosts.
This approach helps you segregate different types of traffic for improving performance and security. It can be done physically by using multiple network adapters and logically by using VLAN tagging. Be sure to create a dedicated virtual switch for each network.
Enabling Jumbo Frames for iSCSI, Live Migration, and CSV Networks
A Jumbo frame is an Ethernet frame that can carry a TCP packet whose size is more than 1500 bytes. In this case MTU (Maximum Transmission Unit) is 1500 bytes. The standard size of Ethernet frame is 1518 bytes, but if VLAN tagging is used, then the frame size increases by 4 bytes and becomes 1522 bytes. The MTU for the Jumbo frame can be up to 9000 bytes. You can see the structure of a standard Ethernet frame and tagged Ethernet frame on pictures below.
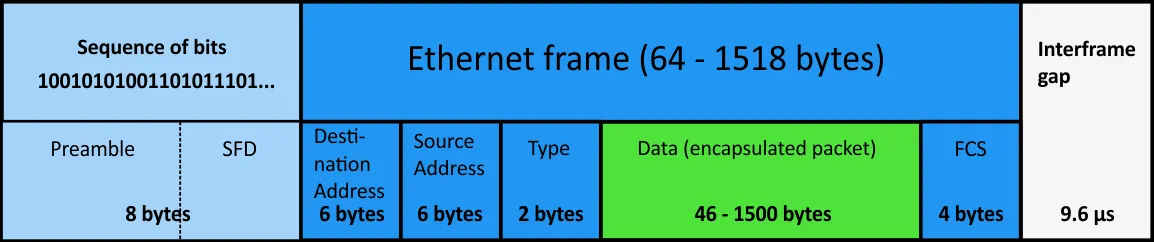
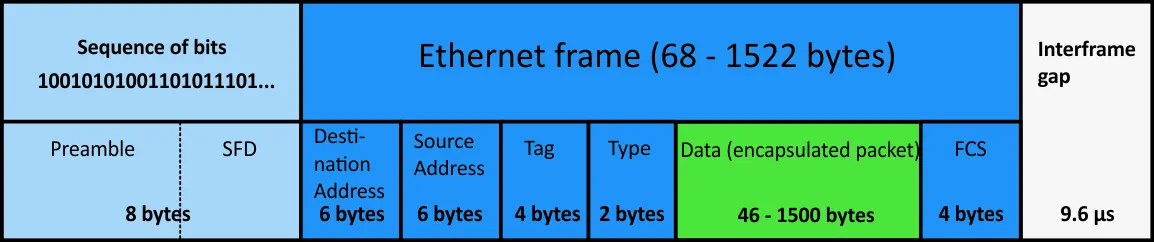
Note: A portion of sent data that includes a frame starts with a preamble and SFD (Start frame delimiter). An interframe gap is present between sending such portions of data. A payload data area of the frame can contain an encapsulated packet which in turn consists of a header and payload. FCS refers to a frame check sequence that is used to ensure there are no errors and that delivered data is consistent.
Jumbo frames are larger than standard frames and cause less overhead on the server since they can carry larger packets. Fewer packets cause fewer CPU interrupts and, as a result, you have less overall computer loading. Fewer interrupts reduces delay on the server bus. Fewer packets results in less network overhead in terms of frame formats and headers for more rational utilization. See the diagram below that resembles a diagram comparing storing data on hard disks with 512B classic sectors and disks with 4KB sectors (Advanced Format).
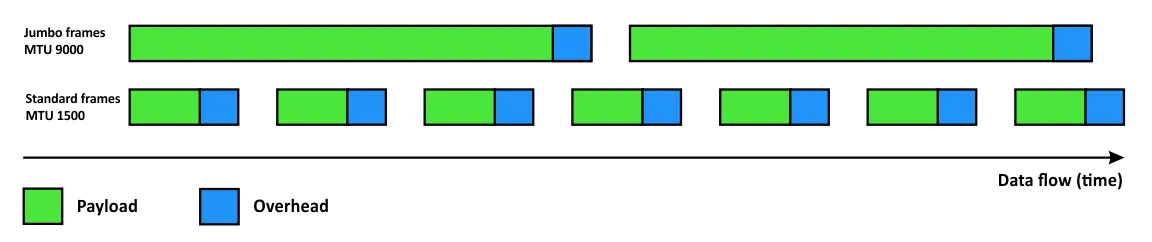
By enabling Jumbo frames for your iSCSI, Live Migration and CSV networks, you can get a data transferring speed boost of about 27%. Remember, that a frame is a PDU (Protocol Data Unit) of the second layer of the OSI model and a packet is a PDU of the third layer of the OSI model.
All network devices (switches, routers, NICs) of your infrastructure that are used for iSCSI, Live Migration and CSV networks need to support Jumbo frames and this option must be configured on all those devices. Remember to install the latest drivers and firmware for your network adapters on Hyper-V servers as mentioned in the section above so as to make possible the enabling of Jumbo frames during your Hyper-V network setup. Don’t use Jumbo frames for all other networks because you can get a negative effect.
Using Synthetic Virtual Network Adapters When Possible
A synthetic Hyper-V virtual network adapter which is available for Generation 2 VMs works faster than a legacy network adapter that is the only virtual network adapter type available for Generation 1 VMs. Note that a guest operating system must be Hyper-V-aware to use a synthetic network adapter because Integration Services that contain the appropriate drivers must be installed on the guest OS. Up to 8 synthetic virtual NICs can be attached to a Hyper-V VM, while the maximum number of legacy network adapters that can be attached to a VM is 4. A synthetic virtual network adapter is added by default into a Hyper-V Generation 2 VM after creation. Synthetic network adapters provide better functionality including VLAN tagging support.
Legacy network adapters should be used for PXE (Pre-boot Execution Environment) boots as well as for older operating systems that need emulated (legacy) hardware. Be sure to recall this fact when performing Hyper-V networking configuration.
Respecting the Balance of Network Bandwidth With Shared Storage Capacity
When shared storage capacity is large and a lot of VMs are stored on that storage, low network speed can become a bottleneck. As a result, you may get low data transferring speed even if disks used on a storage device (for example, NAS – Network Attached Storage) are fast (solid-state drives in RAID 10, for example). Inversely, if you have a storage network with a high speed and low latency, but disks used for storage arrays on a storage device are slow (for example, magnetic hard disk drives with 5400 RPM), then overall data transferring speed may be low. For this reason, Hyper-V networking best practices recommend that you keep the balance between the network bandwidth and the speed of disks used for shared storage.
Conclusion
The network is an important component of a virtual infrastructure if you use Hyper-V. This blog post has explored Hyper-V networking best practices that can help you make sure that your Hyper-V network configuration works for different situations – for using a standalone Hyper-V host, multiple Hyper-V hosts, or Hyper-V Failover Cluster. As you can see, some recommendations are general and some of them are Hyper-V specific. If you understand the main networking principles, you can configure networks for much more than just Hyper-V.