Hyper-V Cluster Setup on Windows Server Machines: A Step-by-Step Guide
One of the critical requirements for virtual infrastructures, especially in large data centers, is the elimination of a single point of failure and ensuring the high availability of services and apps. In a Hyper-V environment, the Microsoft Failover Clustering technology is available to configure multiple Hyper-V hosts (or nodes) that can take over the load if one host fails.
In this step-by-step guide, learn the practical aspects of Hyper-V failover clustering configuration, including initial host and network configuration, Hyper-V role installation, and cluster creation.

Hyper-V Host Configuration
To prepare hosts for failover clustering, we should select an operating system to install on all the hosts that will be used in a particular cluster. Then we need to perform a basic configuration of the environment, including all hosts, to prepare them for Hyper-V cluster setup.
Selecting an operating system to install
In this setup, we are using two Windows Server 2016 Server Core installations to minimize moving parts and to improve security. Using the Windows Server 2016 Server Core installation eliminates a lot of unnecessary components and reduces the footprint. The increased difficulty of administration with Server Core is offset by the benefits of efficiency and security. You can also use the newer Windows Server versions, such as Windows Server 2019 for Hyper-V cluster setup.
Note: For the administration and configuration of Windows Server 2016 Server Core, we use PowerShell. It is technically possible to use Windows Server with Desktop Experience to configure Hyper-V failover clustering.
Initial configuration of the environment
Before thinking about the Hyper-V hosts as a cluster, we must perform our initial configuration of the hosts. This involves much of the same steps of preparing any Windows server – naming, network configuration, patching, etc. Network planning, in particular, is crucial in a Windows cluster as it allows for proper cluster communication as well as communication with shared storage.
- Naming. Both servers have been named and joined to the lab domain. Note that starting with Windows Server 2016, joining a domain is no longer a prerequisite. Server configurations are displayed in the screenshots below for the first server H1. The configurations for the second server H2 are similar.

- Updates. We need to update any prospective Hyper-V cluster nodes to the latest patch level available according to the Hyper-V clustering best practices. Installing updates on Hyper-V hosts improves the security of our system. You may need to restart Windows to complete the installation of updates.

- Consistency. As a best practice, we want all our potential cluster nodes to be configured identically except for computer names and IP addresses. This ensures that everything is standardized between the hosts, including patch levels, networks, etc.
Network Planning
Proper environment planning mitigates many risks in the future. For the lab network in this scenario, four network adapters have been configured for each host. Both lab hosts are not doing any NIC teaming for simplicity sake. However, you would want to team your adapters in production to avoid having a single point of failure in any one network.
For our lab setup, we have:
- Management and VM traffic
- iSCSI
- Private Cluster Traffic
- Live Migration
With the above networks in mind, we assign IP Addresses to each server in our desired subnet ranges. VLANs are also a consideration here, as you will most likely want to align your subnets with VLANs provisioned. This would need to be thought through in advance.
iSCSI Storage Target Setup
Hyper-V cluster storage is a crucial point for building a cluster. For iSCSI storage in a lab environment, in this example, we are using FreeNAS to create iSCSI targets and present these to our Hyper-V cluster. Of course, setting up iSCSI on vendor hardware of your choice or software iSCSI can be different depending on the vendor, so always follow the methods defined for each.
Note: FreeNAS is a universal and flexible FreeBSD-based operating system that you can install on a computer to use it as NAS. You can create a Hyper-V cluster shared storage or build a backup appliance with FreeNAS and the NAKIVO solution.
Below is a quick overview of how the storage for Hyper-V failover clustering is set up using FreeNAS. We won’t delve into all the details of how to set up FreeNAS for iSCSI. However, here are the basic settings for presenting a couple of iSCSI targets to our Hyper-V hosts.
- Start the iSCSI service in FreeNAS and set up your network configuration for the storage network to match what you intend to use for the Hyper-V hosts.
- Check the base IQN setup for the targets that we will create.

- Set up a portal in FreeNAS to listen for iSCSI traffic.

- Set up iSCSI target names. In our FreeNAS appliance, we are setting up:
- a quorum volume to be used as a disk witness
- a volume to be used for the Hyper-V cluster shared volume to house our VMs
Note: Quorum is the mechanism in a Windows cluster that is used to make sure that in the event of something going down between parts of a cluster, you always have a majority of cluster resources available for the cluster to function.
- Starting with Windows Server 2012, every node in the cluster has a single quorum vote by default. By adding an extra vote with a file share, disk, or a new cloud storage account in Windows Server 2016, one part of the cluster should always get more than 50% of the quorum vote by claiming the share, disk, or cloud storage account vote.
- With Windows Server 2012 R2, the recommendation changed to always configure the disk or file share witness. The vote is extended to the additional witness (file share, disk, or cloud storage account) only if there is an even number of nodes. With an odd node number, the witness does not get a vote and isn’t used.
In the screenshot below, we have created the two target names: a quorum volume to be used as a disk witness and a volume to be used for our cluster shared volume.

- Add Extents, which in the below example are mapped to the individual disks that we have physically assigned in our FreeNAS appliance.

- Associate the Target with the Extent. The targets are mapped to the storage in FreeNAS.

Installing the Hyper-V Role
To install the Hyper-V role service, run the following command in a PowerShell command prompt:
Install-WindowsFeature -Name Hyper-V -IncludeAllSubFeature -IncludeManagementTools -Restart

Setting Up Storage: Adding the iSCSI Portal Address
Before adding our iSCSI portal address, we need to configure and start the Microsoft iSCSI service as below:
- Set the service to automatic.
Set-Service -Name msiscsi -StartupType Automatic
- Start the service.
Start-Service msiscsi
- Use PowerShell to add the iSCSI portal address provisioned:
New-iscsitargetportal -targetportaladdress <IP address>

- Connect the specific iSCSI targets that, in our case, were created on our FreeNAS appliance. Below are examples of what we used in adding the FreeNAS targets to the Hyper-V hosts provisioned for the cluster.
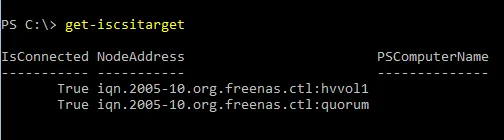
- Connect-IscsiTarget -nodeaddress iqn.2005-10.org.freenas.ctl:quorum -IsPersistent $true -IsMultipathEnabled $true -InitiatorPortalAddress 10.0.0.70 -TargetPortalAddress 10.0.0.1
- Connect-IscsiTarget -nodeaddress iqn.2005-10.org.freenas.ctl:hvvol1 -IsPersistent $true -IsMultipathEnabled $true -InitiatorPortalAddress 10.0.0.70 -TargetPortalAddress 10.0.0.1
You can verify and see the targets that are added by running the Get-iSCSItarget command.
Note: You can use the get-disk command to show disk information and make sure the Hyper-V cluster shared storage is online and healthy.

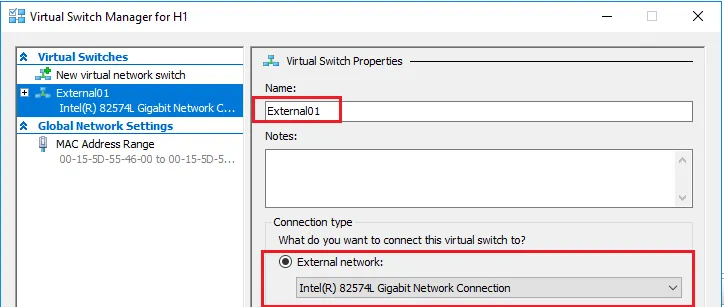
Setting Up Virtual Switches
Configuring virtual switches is needed for proper Hyper-V failover cluster network configuration. We can use either PowerShell or Hyper-V Manager to set up our virtual switches for Hyper-V.
An example of the command to create a virtual switch in PowerShell:
New-VMSwitch “ExternalSwitch01” -NetAdapterName “Public” -AllowManagementOS 1
Note: Set up your virtual switch names identically between both hosts as we need to ensure that the virtual switches match, especially when performing a live migration.
Creating a Hyper-V Cluster
Using PowerShell, creating the cluster is a simple one-line commandlet.
- Before creating the cluster, run this command to validate the cluster configuration meets Hyper V clustering best practices:
Test-Cluster H1,H2
- Use the new-cluster commandlet to create a cluster and assign the name, the nodes, and a static IP address to the cluster.
New-Cluster -Name HVCluster -node H1,H2 -staticAddress 192.168.85.75

- When the cluster creation process is finished, you see the output displaying the cluster name in the command line.

Hyper-V Clustered Shared Volumes
Even though we have shared storage from an iSCSI target perspective, we need to make sure the storage that houses our VMs is set up on a Hyper-V clustered shared volume. The clustered shared volume (CSV) was introduced in Windows Server 2008 R2 to be used with the Hyper-V role so that a VM can have VHD files accessed by any node in the cluster. There is also resiliency built into CSV, including I/O fault detection allowed for alternate communication paths to be used in the event of communication failures.
Let’s take a look at creating the clustered shared volume step by step for our VMs.
- Rename the cluster disk resource that will be used for VM storage (optional). In our lab setup, this is Cluster Disk 1:
(Get-ClusterResource | ?{$_.Name -eq “Cluster Disk 1”}).name = “VMs”
- Now we can add this volume to a cluster shared volume:
Get-ClusterResource -Name “VMs”| Add-ClusterSharedVolume
Note: We can also use Failover Cluster Manager to add a disk to the CSV:

- Check the state of the cluster shared volume with the get-clustersharedvolume commandlet.

Note: If you have a management workstation to connect using the Failover Cluster Manager, you can look at storage with the graphical user interface (GUI) by connecting to Windows Failover Cluster. Here we can easily see the Disks available and the roles assigned to them. Below we see both the Quorum and VMs disk that is designated as a cluster shared volume.

Changing Hyper-V Storage Settings
Now that we have our clustered shared volume setup, we can change our Hyper-V settings to use our Hyper-V cluster shared volume as the default location for storing our VMs.
In the Hyper-V Settings for each host, change the Virtual Hard Disks location and the Virtual Machines location to your cluster shared volume, which is C:\ClusterStorage\volume(x) on your Hyper-V hosts.

Creating a Highly Available VM
We can now launch Failover Cluster Manager and begin to create a highly available VM.
- Right-click the Roles and choose to create a New Virtual Machine.

- Choose the Hyper-V host (one of the cluster nodes) for the virtual machine.

- Work through the New Virtual Machine Wizard prompts to provision a new virtual machine.

- In the Connect Virtual Hard Disk step of the wizard, ensure that the virtual machine is created on our Hyper-V clustered shared volume.

- The Summary step displays the options we selected.

- When you click finish, the High Availability Wizard displays the summary of enabling high availability on the role and the virtual machine. As you can see, it has been successfully enabled.

- If you want to take a look at the high availability report, you can click the View Report button, which displays a more detailed rendering of the high availability tests.

Hyper-V Failover cluster configuration is finished and we now have a highly available VM running in the cluster. You can create more VMs in your cluster to use Hyper-V High Availability.

Final Thoughts
Hyper-V failover clustering allows you to reduce the downtime of VMs in case of failure. However, this won’t protect your VM data if you don’t have frequent Hyper-V cluster backups. As VMs can migrate between hosts in the Hyper-V failover cluster, VM backup can be a daunting task. Use NAKIVO’s solution and easily back up even those VMs that are running in the cluster.