Hyper-V Best Practices for Administration
Flexibility, scalability, redundancy, and cost-efficiency… This is only a short list of benefits that Hyper-V can provide you with. While Hyper-V can help you build a large-scale environment capable of performing various tasks, there are still some aspects of the process that you can improve in order to achieve maximum performance of Hyper-V hosts and virtual machines (VMs).
For this purpose, we have compiled a list of Hyper-V best practices that are worthy of your attention:
- Plan ahead
- Test everything in a pre-production environment
- Carefully choose the management OS
- Know the difference between VHD and VHDX
- Keep Hyper-V Integration Services up-to-date
- Install and configure antimalware for efficient protection
- Pay attention to resource allocation
- Do not create too many virtual switches
- Choose Generation 2 VMs over Generation 1 VMs
- Change the default location for VM configuration files
- Apply Hyper-V monitoring tools
- Think twice before enabling Dynamic Memory
- Focus on proper disk sizing
- Configure NIC teaming
- Always check default VM settings
- Avoid overloading the management OS
- Configure Hyper-V VMs with PowerShell cmdlets
This blog post describes how each of these Hyper-V best practices can help you achieve the best results in a Hyper-V environment. Moreover, read further to discover how NAKIVO backup can help protect your Hyper-V virtual environment in just a few clicks.
What Is Hyper-V?
Hyper-V is Microsoft’s virtualization server role which allows you to create, manage, and configure multiple VMs at once. All VMs run in isolation from each other on a single physical server and share the same resources through virtualization of the underlying hardware. With Hyper-V virtualization platform, you can manage multiple virtual and dedicated servers at the same time, effectively use available resources, ensure better performance of your system, and reduce the overall cost of operations.
Key Considerations for Hyper-V Deployments
When deciding to build a Hyper-V virtual environment, it is important to consider whether selected servers are fit for deploying a Hyper-V host and running multiple VMs at the same time. For this purpose, you first need to consider capabilities of the underlying physical hardware and how efficient it would be in running the current workload and adjusting to potential growth.
Here’s a list of hardware considerations which are crucial for Hyper-V deployment:
- When choosing a physical server for running a Hyper-V environment, you should take into account the number of its processors. Each VM is assigned a specific number of CPUs. The main factor in this case is the active operating system (OS). You should decide how many vCPUs a single VM should have to ensure that the CPU resources can be efficiently used without over-engineering the system.
- Memory. To achieve high performance, you need to provide sufficient RAM resources to both Hyper-V hosts and VMs. As per Hyper-V system requirements, you should provide at least 4 GB of memory, which then should be assigned to a Hyper-V host as well as VMs running on top of it. The main criterion is the amount of expected virtual workload.
- Storage. To efficiently carry the virtualization workload without experiencing any interruptions, you need to ensure sufficient I/O bandwidth. For this purpose, you need to carefully choose storage controllers and disks. Moreover, you should properly configure RAID, which can help you streamline I/O operations among multiple disks in a balanced way.
- CPU cache. When running virtual environments with a heavy workload, it is quite helpful to have large processor caches. Due to its fast processing capabilities, the CPU cache allows for accessing specific data and applications more rapidly and easily than through the main RAM.
Hyper-V Best Practices
In order to achieve efficient and reliable performance within a Hyper-V environment, you need to follow Hyper-V best practices. Hyper-V best practices are recommendations which, when properly implemented, allow for improving Hyper-V VM management, configuration, and deployment.
Plan ahead
This Hyper-V best practice claims that before you start building a virtual environment, you should first consider the scale and scope of the future workload. Based on that, decide how many system resources you will need to ensure sufficient performance, deployment, and maintenance.
Test everything in a pre-production environment
This Hyper-V best practice states that you should create a separate pre-production environment (PPE), which can be used for testing and deployment purposes. If you want to implement some changes to the main production center, it is recommended that you first validate such changes in the testing environment. This way, you can see how system modifications might affect the production environment and whether they should be adjusted in any way.
Carefully choose the management OS
When choosing the management OS for your production environment, you can go with one of the following options: GUI-based Windows Server, Windows Server Core, and Hyper-V Server. Read our blog post to discover the benefits and peculiarities of each of these options. In all likelihood, the best choice would be Hyper-V Server due to its reduced footprint, lack of licensing requirements, minimum OS resource overhead, and small attack surface.
Know the difference between VHD and VHDX
When it comes to virtual hard disk drives, it is critical to know that VHD and VHDX are not the same and, thus, they need to be used in different ways. To achieve maximum performance with VHD, create a fixed-size disk which allows you to assign storage space beforehand. As for VHDX, it is recommended that you create a dynamically expanding disk which can automatically expand its size if additional storage space is needed.
Keep Hyper-V Integration Services up-to-date
The following Hyper-V best practice helps you ensure that each Hyper-V Integration Service is enabled in both a Hyper-V host and guest VMs and is kept up-to-date. This way, you can ensure better compatibility between the host and guest machines and improve their performance.

Install and configure antimalware for efficient protection
If you have anti-malware software installed, it is recommended that you properly configure it so as to avoid any performance issues within your environment. For example, there is a high risk that anti-malware software might stop I/O operations in your infrastructure and identify such activity as suspicious. Moreover, some antimalware tools can be set up to scan your environment for viruses during working hours, which can increase the load within you production environment. Thus, according to this Hyper-V best practice, it is better to check the default settings of the active antimalware and configure it properly.
Pay attention to resource allocation
The Hyper-V best practice, in this case, is to make sure that you do not overload the Hyper-V environment. Thus, you should pay attention to how many VMs are in a running state, whether they are actively used in your infrastructure, and whether the available resources are efficiently distributed across the system so as to avoid overconsumption of resources.
Do not create too many virtual switches
The next Hyper-V best practice is to create a single virtual switch per host. If you want to ensure isolation among VMs, it is not recommended to create multiple virtual network switches as this can result in processing overhead. Instead, try VLAN tagging, which enables network isolation and separate communication between the VMs in the system.
Choose Generation 2 VMs over Generation 1 VMs
Note that once a VM has been created, you cannot change its generation. Due to this, one of the Hyper-V best practices is to use Generation 2 VMs instead of Generation 1 VMs. The basic advantage of the Generation 2 VM is the boot method. Generation 1 VMs allow booting from the IDE controller only, whereas, with Generation 2 VMs, you can boot from the SCSI controller, which is a faster and more secure booting method. Moreover, the maximum boot volume for Generation 2 VMs can be up to 64 TB, whereas for Generation 1 VMs, the maximum boot volume is 2TB (VHDX) or 2040GB (VHD), depending on the virtual hard disk format you choose.

Change the default location for VM configuration files
Choose a different default location for storing VM configuration files. When the Hyper-V role is enabled on the computer, the default folder used for storing VM configuration files is created (C:\ProgramData\Microsoft\Windows\Hyper-V). It is recommended that you change this default location to a non-system hard disk drive as there is a high risk of hard disk latency and disk space shortage if the same default folder is used.

Apply Hyper-V monitoring tools
Another Hyper-V best practice is to use Hyper-V monitoring tools to control the performance of your virtual infrastructure and its components (including CPU load, memory disk usage, I/O operations, system health, etc.). Hyper-V monitoring software can scan your entire infrastructure and notify you of any changes within the system. Some Hyper-V monitoring tools can not only identify problems within your virtual environment but also provide you with a list of Hyper-V best practices to deal with the issues that have been detected.
Think twice before enabling Dynamic Memory
The next Hyper-V best practice is to enable Dynamic Memory only when needed. Even though Dynamic Memory is an extremely helpful feature which allows you to automatically assign the selected VM with the amount of memory it actually requires at the moment, you should not use it blindly. With Dynamic Memory, you can assign the amount of minimum RAM and maximum RAM to a specific VM, which a single VM can use. However, there is a high risk of memory over-commitment and potential system crash if the computer runs out of the available memory. Thus, you need to closely monitor the way memory is being allocated within your system to avoid any issues in the future. Alternatively, you can simply disable Dynamic Memory and go with the static memory allocation.
Focus on proper disk sizing
Over- or under-sizing your disk requirements can both be detrimental to your infrastructure. This Hyper-V best practice states that you need to assess your storage capabilities and evaluate the I/O activity in your environment. Moreover, you need to take into account current workload demands and expected growth in the environment in order to be prepared for any potential changes beforehand.
Configure NIC teaming
When building a Hyper-V environment, you need to take care of network connections. For this purpose, Hyper-V NIC teaming has been introduced, allowing you to group multiple physical NICs into a single logical NIC. This feature can be used to eliminate a single point of failure, as well as ensure redundancy and load balancing.
As you can see, it is an extremely helpful feature, which, if not configured correctly, can result in the network failure. For example, you should avoid teaming ports which belong to the same network controller. Once the network controller fails, all of its ports will fail as well. Another common mistake is including the network controllers of different models into the same NIC team because they might be incompatible and cause lagging.

Always check default VM settings
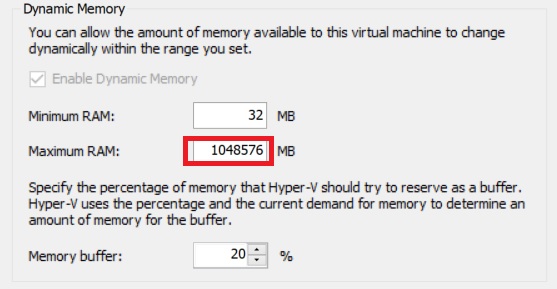
Some users may believe that the default settings are the most efficient ones and decide never to change them. However, when creating a virtual infrastructure, it is important to consider why you need it in the first place and build your environment around that notion. If your primarily focus is on business needs, you might find that the VM default settings do not ensure high performance.
For example, when you enable Hyper-V Dynamic Memory, the default amount of maximum RAM can be as high as 1 TB, which is quite a lot, and not many computers can provide such a great amount of physical memory. Thus, default VM settings can cause poor resource allocation and, over time, result in hardware failure.
Avoid overloading the management OS
The main goal of the management OS is to run and protect VMs. Therefore, it is recommended that you only add software, a server role, or application to the management OS if it can help you with this goal, most notably in the form of antimalware, backup solutions, etc. In other cases, new software should be installed in a guest VM in order to avoid overloading the management OS, and properly organize a virtual environment.
Configure Hyper-V VMs with PowerShell cmdlets
Even though Microsoft provides you with several Hyper-V management tools (such as Hyper-V Manager or Server Manager), there are still some functions that can only be set up using PowerShell. Running PowerShell cmdlets may seem like a challenging task for an inexperienced user. However, once you figure them out, you can get access to a free Hyper-V management tool which allows you to easily control and automate administrative tasks of any level of difficulty.
Wrapping Up
Hyper-V best practices can be used for a wide variety of purposes and the main intention behind applying a specific Hyper-V best practice is to improve your server performance. However, when it comes to protecting your virtual infrastructure, the best approach is to install a data protection solution which can ensure that critical data and applications are regularly backed up and the entire infrastructure can be easily recovered if the need arises. NAKIVO Backup & Replication is a fast, reliable, and cost-effective solution which aims at providing its users with flexibility, convenience, and simplicity.