How VMware EVC Mode Works: Complete Overview
If you are familiar with the vMotion feature, you probably remember that the recommended practice is to use the same processors on all ESXi servers for VM live migration. If you want to use servers with different processor models in the cluster, it is better to deploy processors of the same generation. Moreover, the strict requirement is that the processors must be manufactured by the same vendor, such as Intel or AMD. Otherwise, you are likely to get an error when using vMotion.
VMware designed their vSphere software with regard to the situations that can occur in the production environment, including expanding a cluster by adding new servers with different processors. This is a common situation – imagine that you have a cluster with 5 ESXi nodes you bought 3 years ago and you need to add two more nodes to run more VMs for meeting your business needs. The processors you bought 3 years ago are not being produced at present and are no longer sold in the market; you can buy only the processors of the newest family. There is no reason to worry – you can use High Availability clusters in vSphere, add nodes with different processors, and use vMotion for virtual machine live migration between hosts that have different processors. This is possible due to the Enhanced vMotion Capability (EVC) feature that can be enabled for clusters in VMware vSphere.
Today’s blog post covers the EVC mode functionality and contains the following sections:
- Working Principle of VMware EVC Mode
- VMware vSphere Version / CPU compatibility for EVC
- VMware Compatibility Guide
- Requirements
- How to Enable and Configure EVC
- CPUID Masking
- Checking Configuration of the EVC Mode in PowerCLI
- Per-VM EVC Mode
- How to Enable the EVC Mode in the Cluster Without Downtime
- Enabling the EVC Mode for the vCenter VM
Regardless of whether you use a cluster or not, don’t forget to back up VMware VMs. NAKIVO Backup & Replication is a fast, reliable, and affordable data protection solution that can protect your VMware VMs even if those VMs are migrating across ESXi hosts in clusters. Download a full-featured free trial today to try the solution that can satisfy your data protection needs, save time and resources, and give you peace of mind.
Working Principle of VMware EVC Mode
Each newer generation of processors includes new instruction sets in addition to the instruction sets available for the previous processor generation. New features typically improve performance or security of running applications. For example, processors of the SkyLake generation have one new instruction set (SGX) compared to the processors of the Haswell generation. Let’s look at the instruction sets of these two processor generations and explore their details.
Haswell (2013) instruction sets:
x86-64, MMX, AES-NI, CLMUL, FMA3, SSE, SSE2, SSE3, SSSE3, SSE4, SSE4.1, SSE4.2, AVX, AVX2, TXT, VT-x, VT-d. TSX instructions are disabled via microcode for Haswell processors due to a bug, except for Haswell-EX.
SkyLake (2017) instruction sets:
x86-64, MMX, AES-NI, CLMUL, FMA3, SSE, SSE2, SSE3, SSSE3, SSE4, SSE4.1, SSE4.2, AVX, AVX2, TXT, TSX, SGX, VT-x, VT-d.
This means that if you select the Haswell compatibility level in EVC settings, the SGX instruction set must be disabled (masked, more precisely speaking) on the servers with Skylake processors and, as a result, all processors will work with the same instruction sets. Thus, you will have a homogeneous environment adopted for VM migration by using vMotion. The uniform vMotion compatibility is provided by enforcing the same CPUID instruction baseline for all VMs running on ESXi hosts without uniform processors. CPUID can be considered an API for the CPU.
On one hand, the advantages of the SGX instruction set are lost when the Haswell EVC mode is enabled, but on the other, the performance of your existing cluster is not reduced if you add hosts with newer processors to the cluster. If you add ESXi hosts with older processors to the existing cluster, you may notice performance reduction in particular cases.
Note: SGX (Software Guard Extensions) allows you to organize protected fragments of code and data (also called as enclaves) for ensuring a high level of data protection for working applications against hacker attacks. Developers who use SGX instructions for their applications can protect the applications against unpermitted access or modification even if the attacker application has higher privileges.
Note: TSX (Transactional Synchronization Extensions) ensures moving the majority of running tasks for distributing resources among processor cores to the hardware level (the CPU itself). Without support of TSX instructions by a processor, this distribution is performed on a software level by an operating system and applications. If the TSX instruction set is disabled for your Haswell processor via microcode, you may need to set the older (Ivy Bridge) level for the EVC mode.
Generally, running VMs must be shut down and powered on to apply the changed EVC mode settings. If you use vCenter 4.1 or later, the VMs running on the ESXi host with the oldest processor may not be powered off (you can leave them in the running state). In this case, the EVC mode must be equal to the generation of that oldest processor. VMs running on ESXi hosts that have processors with newer CPU features must be powered off before enabling the EVC mode in the entire cluster. When the ESXi host is excluded from a cluster, it continues to operate with the EVC mode disabled.
VMware vSphere Version / CPU Compatibility for EVC
The required EVC mode depends on the processor models and version of vCenter Server. The EVC mode on the latest version of vCenter Server supports the latest processors. Consider using vCenter of the latest versions if you have servers with processors of the newest generations. In the table below, you can see which combinations of Intel processors generations and vCenter versions are supported for determining the EVC cluster baseline for your environment.

The most suitable EVC mode is determined by the model of the oldest processor of the ESXi server inside the cluster. It is technically possible to select the older (lower) level of the EVC mode than the generation of the oldest processor, but generally there is no reason to make such settings. Older releases of ESXi and vSphere support new processors, but the maximum EVC baseline is preserved on the level of the older processors that were functional when that vSphere version was released and were considered the newest available at that time.
When you change the level of the EVC mode, you should power off and power on running VMs to apply the settings to those VMs; rebooting the VM is not sufficient.
VMware compatibility guide
You can check the compatibility of your processors and the highest possible EVC mode available for your vCenter server on the VMware’s website. In order to check the compatibility, open the page of VMware Compatibility Guide, select CPU series in the drop-down menu (i.e. what are you looking for), in the Product Release Version list select your ESXi version, in the CPU series list hold the Ctrl button and select processors installed on your ESXi hosts (click the left mouse button). Once you have selected the necessary parameters, click the CPU/EVC Matrix button to see the table of available EVC modes for your ESXi servers. In the example shown on the screenshot below, ESXi 6.5 (managed by vCenter 6.5), Intel Xeon E3-1500-v5, Xeon E5-4600-v3 and Xeon Platinum 8100 processors have been selected. The highest level of the EVC mode supported by all selected processors is Intel Haswell Generation.

Requirements
For vMotion to work properly after enabling the EVC mode, the following requirements must be met:
- Processors of all ESXi hosts must be Intel only or AMD only.
- Processor virtualization features such as Intel VT-x or AMD-V must be enabled in UEFI/BIOS of ESXi hosts.
- ESXi hosts must be managed by the same vCenter Server.
- ESXi hosts must be configured to use vMotion.
How to Enable and Configure EVC
After getting familiarized with the theory, let’s review configuration of the EVC mode in practice. You may need to power off your VM on the ESXi host whose EVC level must be degraded. Make sure that there are no processor features disabled in UEFI/BIOS to avoid possible issues.
Open VMware vSphere Web Client in your web browser by entering the IP address of your vCenter Server in the address bar of the browser. Go to vCenter > Hosts and clusters and select each ESXi host to verify the CPU (central processor unit) configuration. In the current example, we consider two hosts running ESXi 5.5 that are added to the cluster and managed by vCenter Server 5.5. As you can see on the screenshot below, the processor model of the first ESXi host is Intel Xeon E3110 and the processor installed on the second ESXi host is Intel Xeon X3430.

If ESXi hosts have already been added to the cluster, choose your cluster (temp-cluster in our example), click the Manage tab, then open the Settings tab, select Configuration > VMware EVC and click the Edit button.

Now, before selecting the EVC mode in vCenter, open a new tab in your web browser and open VMware Compatibility Guide as shown above in this blog post. In the current example, we should select ESXi 5.5, Intel Xeon 31xx Series and Intel Xeon 34xx Series. After clicking the CPU/EVC Matrix button, you can see on the screenshot that Intel Penryn Generation should be selected in the EVC mode settings.

Go back to your web browser’s tab with vSphere Web Client and open EVC mode settings for the cluster. Click Enable EVC for Intel Hosts. In the drop down menu of VMware EVC Mode, we should select Intel Penryn Generation. At the bottom of the window, you should see Validation succeeded in the Compatibility section. Now you can hit OK to save EVC mode settings.

After that, in the VMware EVC section, the information that VMware EVC is enabled is displayed. Click Current CPUID Details to expand the section with details about registers and mask values.

The EVC mode can also be enabled during creation of a new cluster; VMware promotes this possibility as the recommended practices. Enabling the EVC mode while creating a new cluster prevents you from encountering issues related to shutting down and migrating VMs that are powered on in the cluster (as you recall, typically a VM must be shut down and powered on to apply the new EVC settings).
CPUID Masking
In addition to the global EVC mode that is applied to all VMs and ESXi hosts in the whole cluster, vCenter Server allows you to configure CPUID flags manually for a custom VM. vCenter compares the CPUID parameters set for the VM with CPUID parameters available on the destination ESXi host. If these parameters are the same, VM migration with vMotion is allowed. CPUID masking feature is older than the EVC mode feature.
In order to configure CPUID masks for a VM, perform the following actions:
Select the necessary VM, right click the VM and select Edit Settings. In the opened Edit Settings window, open Virtual Hardware > CPU, select CPUID mask, and click Advanced.

In the CPU Identification Mask window, select the necessary register string and click the value to edit the mask on a bit level. Hit the Legend button to view the meanings of each character used for setting the mask.

Caution! Please do not edit the masks before you have become familiarized with VMware Knowledge base or VMware support instructions. Editing the CPU compatibility masks manually can cause an unsupported VM configuration. For example, Windows VMs can fail with BSOD.
Checking Configuration of the EVC Mode in PowerCLI
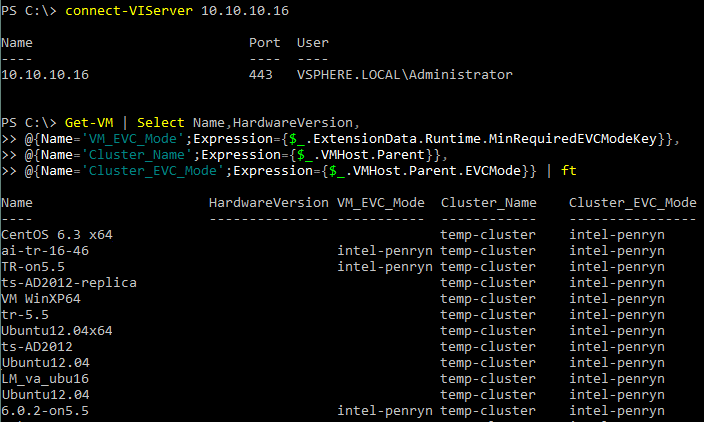
You can check the configuration of the EVC mode for the entire cluster and for custom VMs in VMware PowerCLI by using the command:
Get-VM | Select Name,HardwareVersion,
@{Name=’VM_EVC_Mode’;Expression={$_.ExtensionData.Runtime.MinRequiredEVCModeKey}},
@{Name=’Cluster_Name’;Expression={$_.VMHost.Parent}},
@{Name=’Cluster_EVC_Mode’;Expression={$_.VMHost.Parent.EVCMode}} | ft
You can also check the maximum supported EVC level for all hosts of your cluster after running the command:
Get-VMHost | Select-Object Name,ProcessorType,MaxEVCMode

Per-VM EVC Mode
The EVC mode considered above is a cluster-level option. VMware vSphere 6.7 provides the ability to set a per-VM EVC mode that can be useful for VMs migration across different clusters or vCenter Servers and offers you more granularity. A per-VM EVC mode is set as an attribute of the virtual machine settings and adds more flexibility for managing VMs that must migrate with vMotion. The VM hardware compatibility must be of the version 14 or higher. The configuration of the per-VM EVC mode is saved in the VMX configuration file of the VM as lines that contain featMask.vm.cpuid string. When a VM with configured per-VM EVC mode is migrated, its EVC configuration stored in the VMX file is migrated with the VM. The per-VM EVC mode settings can be changed when a VM is powered off (power off and power on the VM to apply the changed per-VM EVC mode settings).
If you enable a per-VM EVC mode for a VM residing in the cluster that already has the global EVC mode configured, a per-VM EVC mode can be equal or lower to the EVC mode set in the entire cluster. Thus, it is possible to configure both global and per-VM EVC mode at the same time. After cloning a VM, the per-VM EVC settings are cloned with the VM.
In order to configure the per-VM EVC mode, open VMware vSphere HTML5 client, go to Hosts and Clusters, then select the necessary VM. Open the Configure tab, select More > VMware EVC and hit Edit.

How To Enable the EVC Mode in the Cluster Without Downtime
In some cases, you can enable the EVC mode in the entire cluster without any VM downtime (generally, VMs must be shut down and powered on to apply the cluster EVC mode settings). This is possible if the following requirements are met:
- Running VMs reside on the ESXi host with the oldest processor
- The EVC mode in the cluster is configured to use the CPU instruction sets matching the generation of the oldest processor
Enabling the EVC Mode for the vCenter VM
You may experience the following situation that is common in VMware vSphere environments:
vCenter Server is running as a VM on an ESXi host that must be added to a cluster for which the EVC mode is enabled.
The problem is that an ESXi host with running VMs (including the VM running vCenter) cannot be added to the cluster after enabling EVC until all VMs are shut down. On the other hand, the VM running vCenter is needed to manage the cluster, and we cannot shut down the vCenter VM because it is in use right now. This problem is especially accute when the vCenter VM is running on the ESXi host with a newer processor.
Note: It is recommended to use a Standard vSwitch (not a Distributed vSwitch) for connecting the VM running vCenter to the network in this case.
A possible solution. Consider the algorithm that can help you to resolve the issue for VMware vSphere 5.5:
- Move another ESXi server (that is not running a vCenter VM) to the cluster if there are no ESXi servers in the cluster yet. VMs on the ESXi server that is being moved to the cluster must be powered off.
- Shut down the VM running vCenter Server. Connect to the ESXi host on which the vCenter VM resides by using VMware Host Client to unregister the VM or connect with an SSH client to copy files. In VMware Host Client, right click the vCenter VM and hit Unregister. Manually copy all files of the vCenter VM to the datastore connected to the ESXi server which you have already moved to the cluster in the step 1. If an NFS or iSCSI shared storage is used by both ESXi hosts, you don’t need to copy the VM files to another location.
Note: You may need to set the MAC address for the virtual network adapter of the VM running vCenter Server manually before moving the VM from one ESxi host to another.
- Register the vCenter VM on the ESXi host that has been moved to the cluster (connect to the ESXi host with VMware Host Client, open the datastore, locate the files of the vCenter VM, select the VMX file, right click the file and hit Register VM). Run the vCenter VM on this ESXi host in the cluster. Log in to vCenter with VMware vSphere Client to make sure that you can manage your vSphere environment with vCenter. You may need to disable Admission Control temporarily.
- Move the source ESXi host on which the vCenter VM originally worked to the cluster. Shut down other VMs on that ESXi host if needed before moving the host.
Conclusion
Enhanced vMotion Capability (EVC) is a useful VMware vSphere feature that keeps your cluster scalable and allows you to add nodes with the processors of different generations to the cluster for performing VM live migration between ESXi hosts with vMotion. The EVC mode masks the features of the new-generation processors for making a united baseline matching the features of the oldest processor’s generation used by ESXi hosts in the cluster. As a result, you have a homogeneous environment where all processors use the same instruction sets and running VMs can migrate with vMotion. A high number of VMware customers who use clusters use the EVC mode. It is recommended that you enable the EVC mode on the stage of the cluster creation to avoid possible issues related to adding ESXi hosts and migration of running VMs, including the VM running vCenter Server.