How to Use VMware vApp in a vSphere Environment: Short Walkthrough
Multi-tier and complex applications are used to distribute workloads across servers and to provide a higher level of security, performance, and scalability. When deploying applications that need components running on different servers, deploying virtualized servers on VMware vSphere provides a number of advantages. You can deploy virtual servers in a VMware cluster, provision as many hardware resources as you need, and add more storage, CPU, and memory capacity without experiencing significant downtime. Virtual machines (VMs) that are used to run complex applications can be grouped in VMware vApps for more rational management and convenience. Today’s blog post covers VMware vApps, relevant use cases, and the process of creating vApp in a VMware vSphere virtual environment. The blog post about VMware vApp includes the following sections:
- What is the VMware vApp?
- Requirements
- How to set up the VMware vApp
- Additional vApps options
- Cloning vApps
- Exporting vApps to OVF templates
- Creating nested vApps
What Is vApp in the VMware Environment?
VMware vApp is a group of virtual machines that are used for a common purpose. This group can be managed as a single virtual machine, a resource pool can be provisioned for a vApp, and a VM start sequence can be set to meet dependencies of components used by a complex application. A vApp functions as an administrative unit that can be powered on, suspended, powered off, and cloned. The VM start sequences can save you time – when you need to power on the vApp, all contained VMs start automatically in the appropriate boot order with the set delay needed for each previous VM to boot an operating system with key applications and services. When you send a shutdown signal to the vApp, VMs shut down in the reverse order if the appropriate settings are configured.
Imagine that you need to deploy an application that uses the Active Directory Domain Controller for authentication, a database or a file server to store content, a web server, an application server and a Microsoft Exchange Server to send email messages. Each component is installed on a separate VM. In this case, the boot order of VMs should be as follows:
- Active Directory Domain controller/DNS server
- Database server/file server
- Web server
- Exchange server
- Application server
You can create a vApp, add these five VMs to the vApp and configure the boot order for these VMs in the vApp settings. VMware Tools are required to be installed to shut down VMs correctly.
Requirements
There are some requirements that must be met to deploy a vApp in your vSphere environment:
- VMware vCenter Server should be installed and configured for centralized vSphere management.
- VMware cluster with the DRS (Distributed Resource Scheduler) feature should be set up.
It is also possible to deploy a vApp in the environment where one ESXi host is managed by vCenter, but this option is not usually used in the production environment.
How to Set Up VMware vApp
Using the example below, let’s explore how to set up VMware vApp.
1. Open VMware vSphere Client and connect to your vCenter Server. Make sure that a cluster is created. You can read how to create and configure VMware clusters in the eBook about VMware clustering.
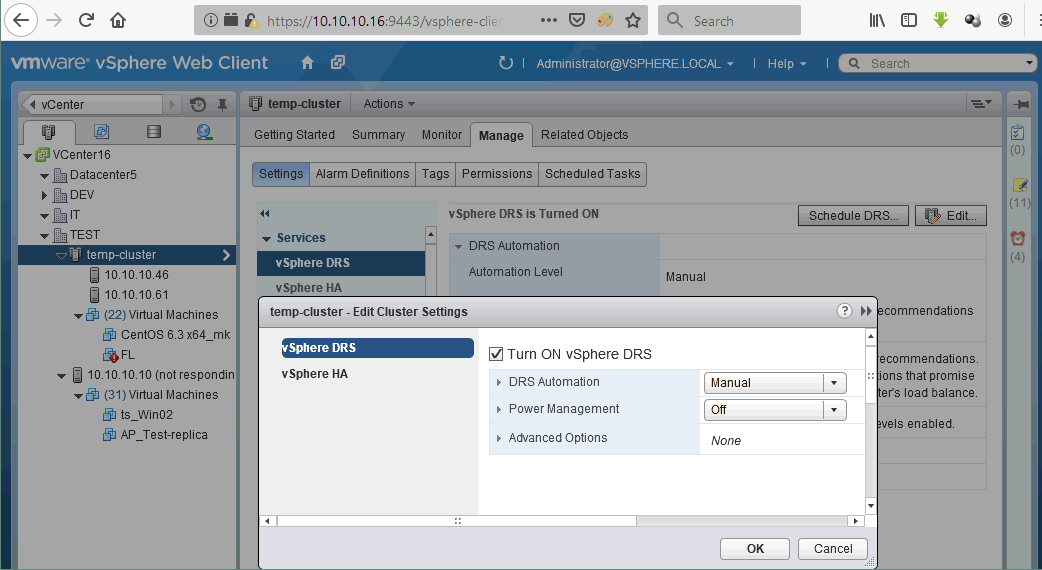
2. Go to Hosts and Clusters, select your cluster, open the Manage tab, then open the Settings tab, and select Services > vSphere DRS.
3. In the opened Edit Cluster Settings window, tick the Turn On vSphere DRS checkbox, and set DRS automation, power management, and advanced options if needed.
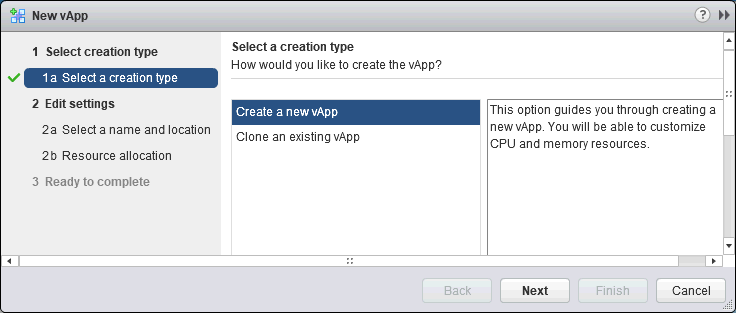
4. Once a DRS cluster is configured, right-click the cluster name and in the context menu, click New vApp.

The New vApp wizard should open in a new window. Here, you need to take the following steps:
1. Select a creation type. Click Create a new vApp and hit Next to continue.
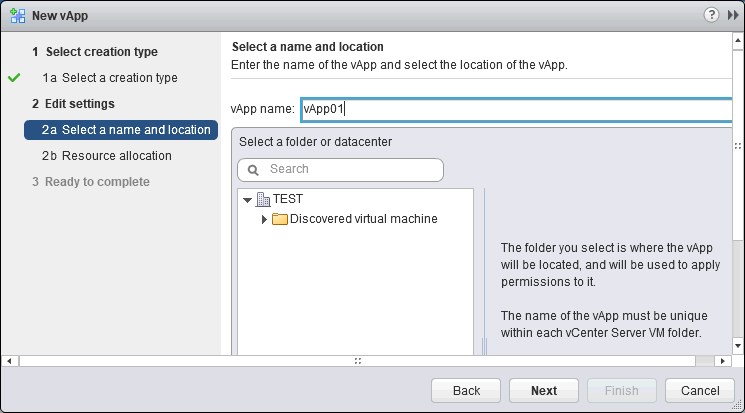
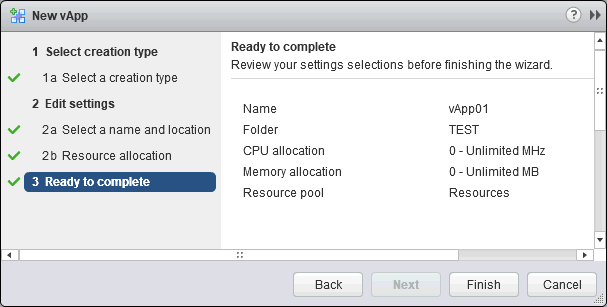
2. Edit settings – select a name and location. Enter the unique vApp name, then select a folder or a datacenter where the vApp is located. In our example, the vApp name is vApp01 and the vApp is located in the TEST datacenter.
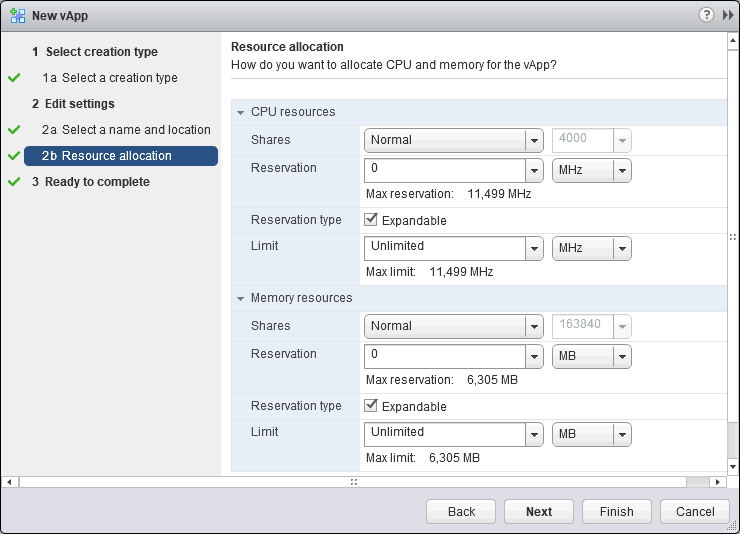
2b. Resource allocation. Select how much CPU and memory resources to allocate for the vApp. Select reservation, the reservation type, and its limit if needed. You can use Low, Normal and High presets if you want. Configuration is similar to configuring a resource pool, allowing you to use resources efficiently. These settings can be used to limit CPU and memory resources to avoid negative impact on existing production VMs running on ESXi hosts or to imitate hardware performance (conditions) that are used in the production environment where the vApp is later deployed. Another use case is to always provide enough hardware resources that are reserved for a vApp and prevent utilizing those resources by other VMs running on ESXi hosts. You can change these resource allocation parameters after creating a vApp.
3. Ready to complete. Review your setting for a new vApp. If something is wrong, click Back and edit the settings. If everything is correct, then hit Finish to create your vApp.
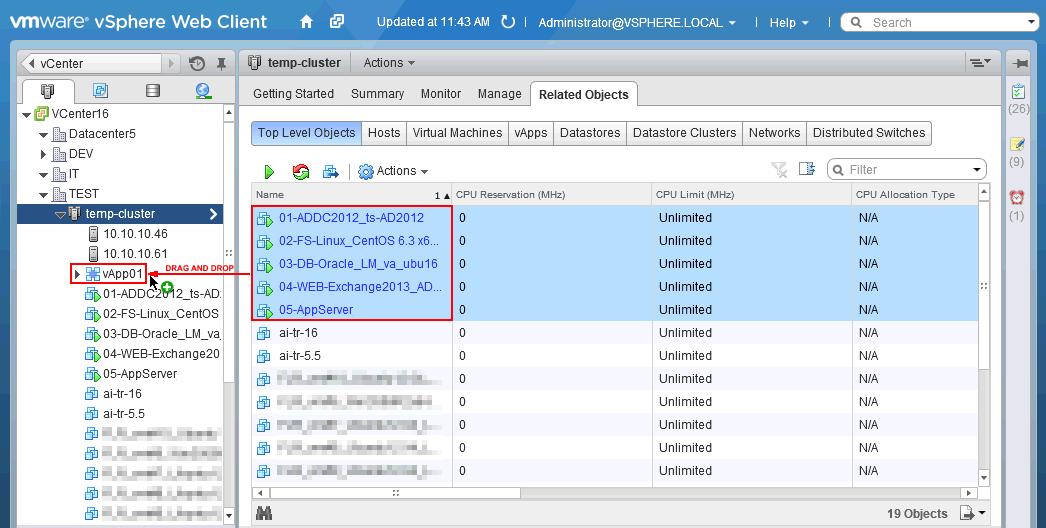
Now you can see your vApp entity in the list of cluster resources such as VMs, resource pools, etc. The vApp is empty now and doesn’t contain any VMs. You need to add the appropriate VMs to the vApp. In order to add VMs to the vApp, select all necessary VMs, click and hold down the left mouse button, then drag and drop selected VMs to your vApp (see the screenshot below). In our case, five VMs are added to the vApp:
01 – Active Directory Domain Controller running on Windows Server 2012
02 – A file server running on Linux that needs Active Directory to authenticate Samba users to access file shares via SMB (CIFS) protocol.
03 – A database server. Oracle is running on Ubuntu Linux.
04 – Microsoft Exchange Server that is used to send email messages via an application.
05 – An application server.
When you release the left mouse button, vCenter asks: “Perform this action on 5 objects?” Answer Yes to this question.
Once VMs have been added to the vApp, you can edit vApp settings and set the VM start order. In order to edit the vApp settings, right-click your vApp name and, in the context menu, hit Edit Settings.
Note: If you need to exclude a VM from the vApp container, drag and drop the VM from the vApp to the cluster.

The Edit vApp window is opened. Let’s configure the VM start order that is the most used feature of VMware vApps.
VM start order. In the Authoring section, click the Start Order option to expand settings. Select the necessary VM and click the up or down buttons in the graphical user interface of VMware vSphere Client to increase or reduce the VM start priority. Set the Power On operation for a startup action. The delay between start of VMs is 120 seconds by default. If you tick the “VMware Tools are ready” checkbox, a VM that is next in the start order list launches after 120 seconds have passed or when VMware Tools are initialized in the guest operating system of a VM. If VMware Tools are initialized in less than 120 seconds, the next VM is started once VMware Tools are ready (when the checkbox is ticked). Be aware that VMware Tools can initialize faster than Oracle database starts; hence, the VMware Tools are ready checkbox should not be used in all cases.
This is important because if VM2 with application 2 (that is dependent on application 1 installed on VM1) boots when the application 1 is not ready on VM1, errors can occur in application 2.
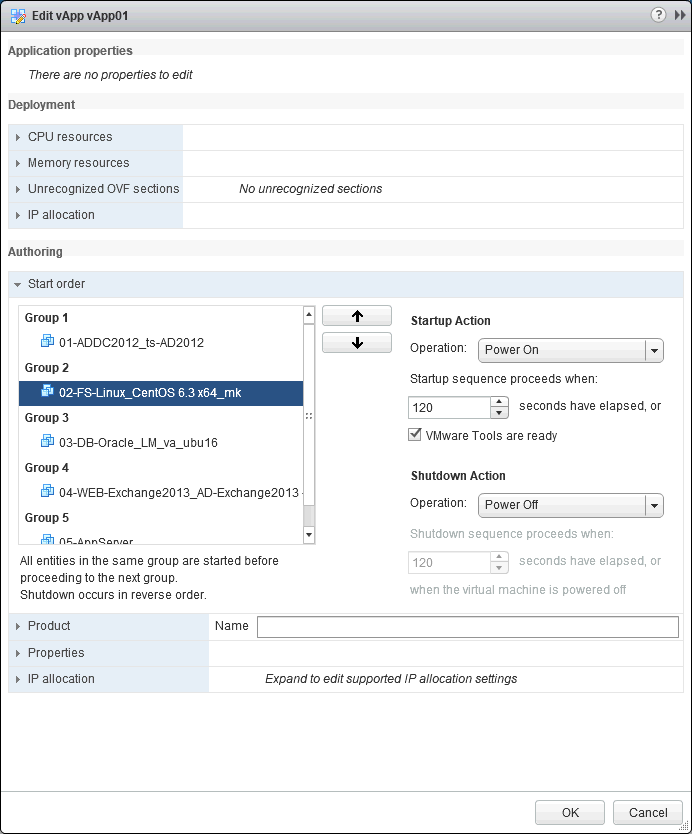
VMs are placed in groups. One group can contain multiple VMs. Make sure that the shutdown action is set to Guest Shutdown, not Power Off to verify that VMs have shut down correctly.
Note: The Power Off action for a VM is the same as unplugging a power cable from a physical computer.
The Guest Shutdown action uses VMware Tools installed on a guest operating system to initiate shutting down a machine by sending a shutdown signal, much as you would run the init 0 command in Linux or shutdown -s -t 0 in Windows.
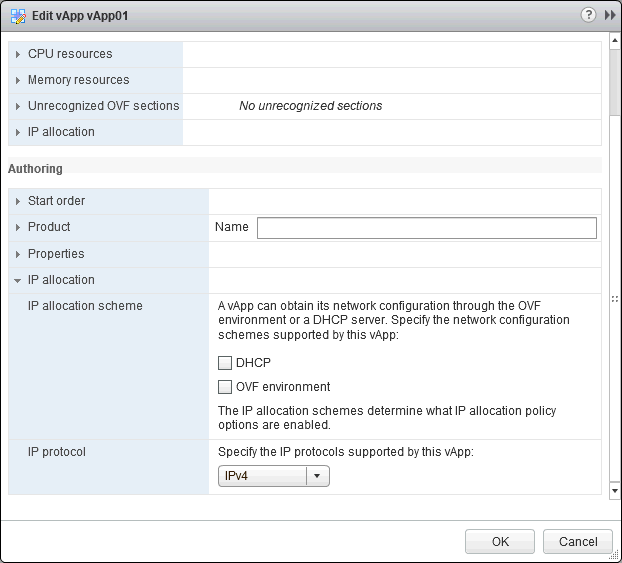
IP allocation options. You can set VMs of the vApp to obtain IP addresses from a DHCP server, or use network settings that are preconfigured in the OVF template for the OVF environment (if you are deploying a vApp from an OVF template). By default, the Static – Manual method of setting IP addresses for VMs is used.
Additional vApp Options
That’s not all. There are some additional options for VMware vApps. You can clone vApps, export vApps to OVF templates, and create nested vApps.
Cloning vApps
You can clone vApps much as you would clone VMs. Shut down the vApp and make sure that all VMs of the vApp are powered off. Right-click the vApp and in the context menu select All vCenter Actions > Clone. In the New vApp wizard, select cloning options much like you would have selected for creating a new vApp and cloning standalone VMs.
Exporting vApps to OVF Templates
OVF is a widely used format for distributing VMs as templates. You can export your vApp to an OVF template and distribute the pre-configured vApp to your partners and customers, for instance. You can also deliver a pre-configured vApp to testers and developers to find bugs and fix them.
In order to export a vApp to an OVF template, shut down the vApp and when all VMs of the vApp are powered off, right click the vApp and select Export OVF Template in the context menu. You may need to install the Client Integration Plug-in. OVA and OVF templates are available as an export format. You can convert OVF to OVA with the OVF Tool and then open vApps in VMware Workstation and VMware Fusion.
Moreover, exporting a vApp to an OVF template can be considered as a method of backup that allows you to recover all related VMs from a single file, but it’s better to consider using special backup solutions for this purpose.
Creating Nested vApps
Support for nested vApps allows you to create vApps inside a parent vApp that provides you with a more granular approach to vApp management. A complex application can use multiple multi-tier applications that, in turn, consist of multiple VMs grouped using vApps.
Conclusion
Today’s blog post has covered vApps and answered the question: “What is vApp in VMware vSphere?” A vApp is a group of VMs that combines features of VMs and resource pools. VMware vApps are used to deploy multi-tier applications which components are running on different VMs, as well as grouping VMs used for a similar purpose. The most commonly used vApp feature is the VM Start Order that allows you to start the VMs running dependent applications in the right order through launching the vApp first. This way, you can provide proper operation of the components and of the entire multi-tier application.
Additionally, a vApp can be used in disaster recovery scenarios to recover all necessary VMs from an exported OVF template file. However, it is much better to use the Site Recovery feature of NAKIVO Backup & Replication. This fast, reliable, and affordable solution can back up, replicate, and recover VMs and other VMware vSphere objects (VM folders, clusters, vApps, resource pools). If a VM or other objects included into the job is migrated from one ESXi host to another within the cluster, NAKIVO Backup and Replication can automatically detect the location of the migrated object and perform required jobs. When the time for recovery comes, you can perform disaster recovery and recover the necessary VMs and other vSphere objects to the remote site. You can also perform granular recovery and restore Active Directory objects and files.
The vApp topic is a part of VMware certification program. Download the VCP6.5-DCV Study Guide to prepare yourself for VMware VCP certification.
If you are interested in developing or deploying multi-tier applications, consider also using Docker containers and a Kubernetes cluster for running applications.