
How to Use Scale-Out File Server in Windows Server 2019
Accessing data via a network is common today. File shares for regular users and administrative purposes are widely used in business environments. Network file shares are also used to store application data that should be accessible from the servers running the applications. Hyper-V servers can be configured to store virtual machine (VM) files on file shares and to access these files via the network. For important VM files located on file shares, there are advanced requirements for these file shares. For example, file shares must provide high availability, high performance, etc.
This blog post explains how to set up a Scale-Out File Server (SOFS) for Microsoft Hyper-V.

Preparing a Cluster
Deploying a failover cluster is a main requirement for configuring an Scale-Out File Server (SOFS). The SOFS can run on the same Hyper-V cluster or on a separate cluster based on Windows machines. When you use the same cluster to provide multiple services, this cluster is called a hyper-converged cluster. Hyper-converged environments are used in virtualized datacenters or software-defined datacenters.
You can read our blog posts about deploying a Hyper-V failover cluster and check the complete guide about Hyper-V clustering to learn about deploying clusters with Windows machines.
Here we will focus on the Scale-Out File Server configuration. You must use Cluster Shared Volumes based on iSCSI targets or Storage Space Direct as the storage connected to cluster nodes. Cluster Shared Volumes and Storage Spaces allow multiple servers to connect to the same disk simultaneously, which is important for a cluster.
When you create a cluster, you should add two identical cluster nodes to an Active Directory domain, and you must install the Failover Clustering role with the File Server role. You can use the graphical user interface in Windows Server or the command line interface in PowerShell.
You can install the Windows File Server role and Failover Clustering role on all nodes of the cluster with these PowerShell commands:
Install-WindowsFeature -Name FS-FileServer
Install-WindowsFeature -Name Failover-Clustering -IncludeManagementTools
Note: Functionality of the browser-based Windows Admin Center is limited and creating a cluster role and managing SOFS are not supported. Use the traditional Admin Center in the Windows graphical user interface.
Scale-Out File Server Configuration
Once you have prepared the environment according to the requirements and have the failover cluster configured, you can configure a Scale-Out File Server.
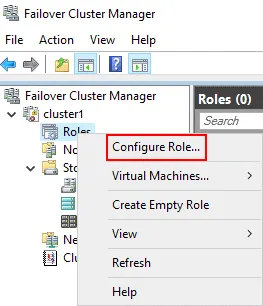
Open Failover Cluster Manager: Start > Administrative Tool > Failover Cluster Manager. Right click your cluster name (cluster1 in our case) and, in the context menu, click Configure Role.
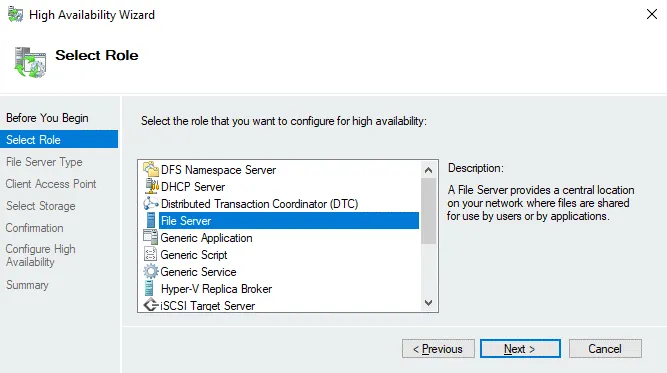
The High Availability wizard is launched.
Before You Begin. Skip this step and click Next.
Select Role. Select File Server as the needed role to deploy the Scale-Out File Server. Hit Next at each step of the wizard to continue. Note that this File Server role is not the same as the File Server role in the Add Windows Roles and Features Wizard of Windows Server.
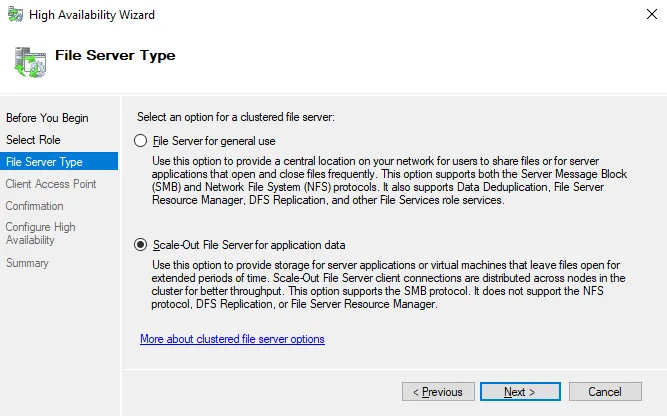
File Server Type. Select Scale-Out File Server for application data. This option is suitable for Hyper-V storage and database storage. Client connections are distributed across cluster nodes for better performance. The SMB 3.0 network protocol is supported for this option. SMB 3.0 is suitable for a Scale-Out File Server as it supports SMB Transparent Failover, VSS for SMB shares, SMB Encryption, SMB Multichannel, and SMB Direct. SMB Multichannel is used to provide multiple connections simultaneously over the network to increase performance and add fault tolerance functionality at the network layer.
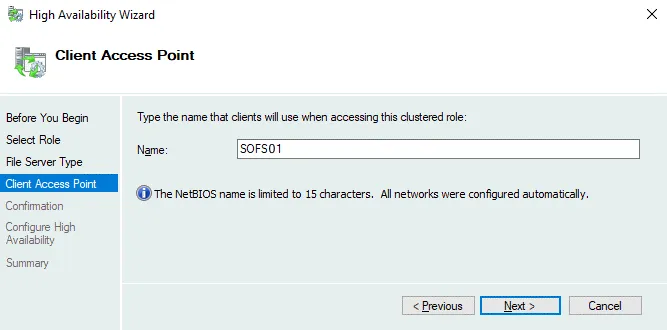
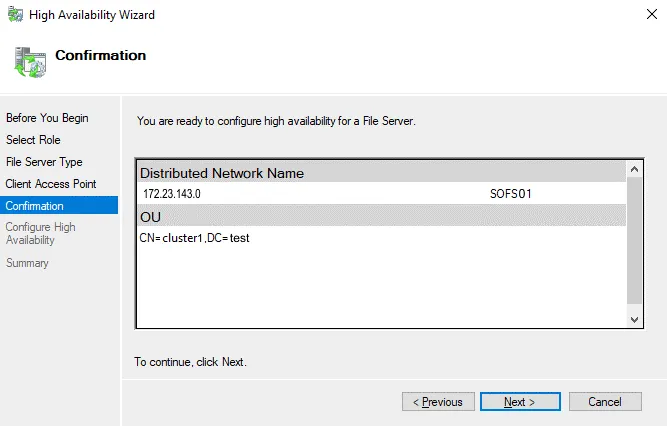
Client Access Point. Enter the name that clients must use to access this clustered SOFS role, for example, SOFS01. Follow the rules of entering a NetBIOS name.
Confirmation. Check your configuration and continue if you confirm this configuration. The needed objects are created in Active Directory.
Summary. Check configuration summary and click Finish to save settings and close the wizard.
The SOFS clustering role is now configured. We have not entered an IP address to access the SOFS share because DNS Round Robin is used to resolve the name defined for the Scale-Out File Server. The distributed network name is used without using a single clustered IP address.
Adding a File Share for SOFS
Now you can add a file share to the Scale-Out File Server.
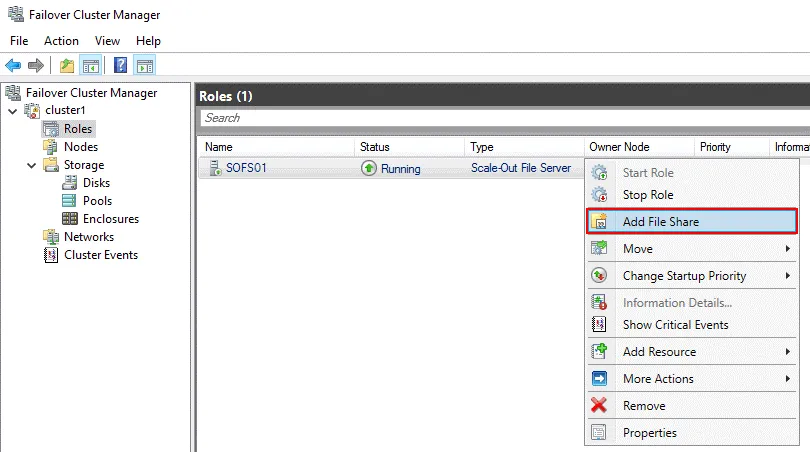
Go back to Failover Cluster Manager, select your cluster, select roles, and right-click the SOFS role (SOFS01 in our case). In the context menu, click Add File Share.
The New Share wizard opens.
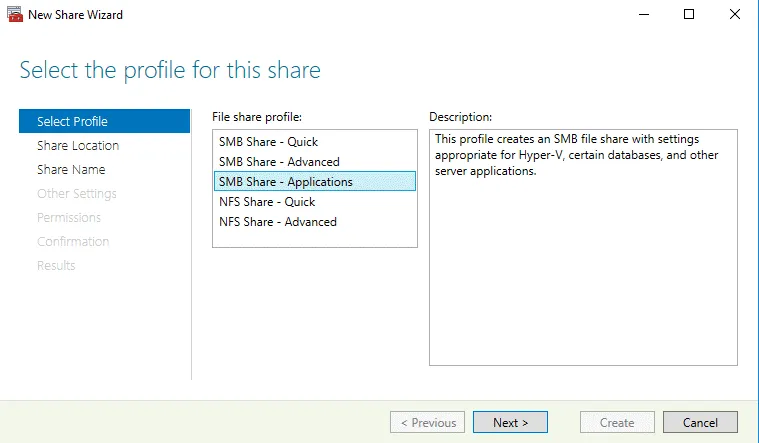
Select Profile. The profile is needed to define optimized settings for the needed share type. There are five file share profiles:
- SMB Share – Quick
- SMB Share – Advanced
- SMB Share – Applications
- NFS Share – Quick
- NFS Share – Advanced
Select SMB Share – Applications because this share type is intended to access storage for Hyper-V, databases and other server applications with the optimal settings. Click Next at each step to continue.
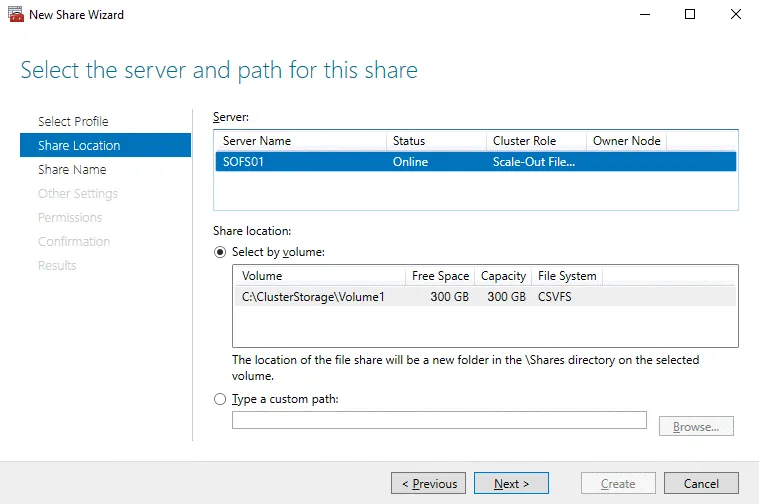
Share Location. Select the file server and path for the share. In my case, Iselect the file server named SOFS01. In the Share location section, click Select by volume with the appropriate path to the shared folder. A Cluster Shared Volume must be configured to enable the Select by volume option.
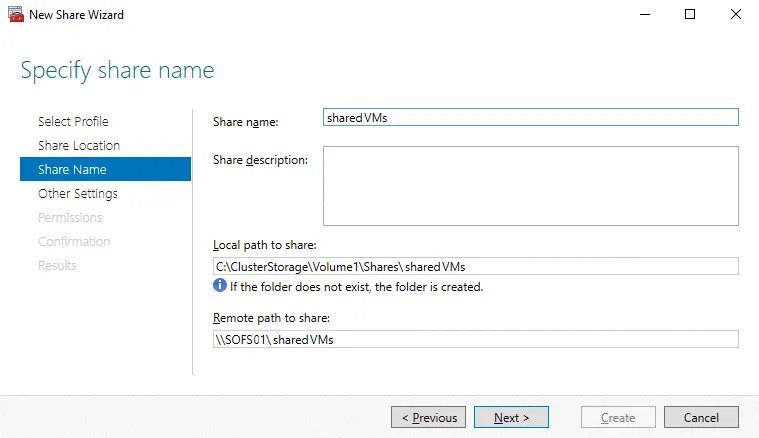
Share Name. Type an SOFS share name, for example, sharedVMs. The name is reflected in the path to the share. The format of the local path to the share is like C:\ClusterStorage\Volume1\Shares\sharename. The format of the remote path looks like \\SOFSname\sharename.
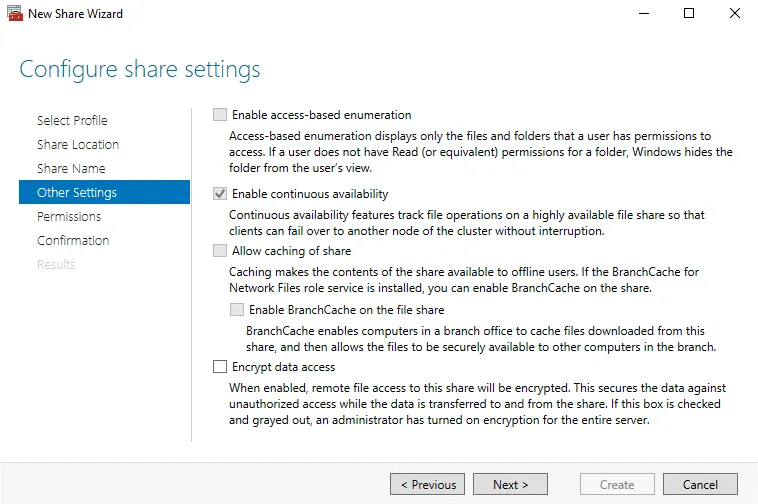
Other Settings. Configure share settings. Leave the Enable continuous availability checkbox selected. This option is selected by default at the Other Settings step if you select the “SMB Share – Applications” profile at the Select Profile step before.
You can leave other options as is (see the screenshot below).
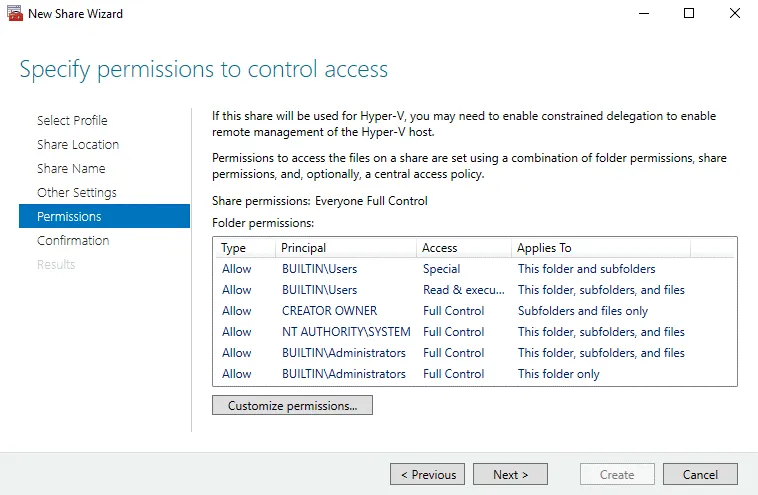
Permissions. Set permissions to control access to the SOFS share. On the screenshot, you can see permissions selected by default. If you are configuring scale-out storage for Hyper-V, then you must grant full control to all Hyper-V computer accounts, Hyper-V administrators accounts, and the SYSTEM account. Access must be granted on the file share and file system level. If you need to use a Scale-Out File Server to store MS SQL Server database files, then you must grant full access to the SQL Server service account on the file system and share level.
Confirmation. Check your configuration and click Create.
Results. Wait until the wizard configures the SOFS share.
Now you can open Failover Cluster Manager, select Your cluster name > Roles > Your SOFS name and click the Shares tab in the bottom of the Failover Cluster Manager window to view the shared folder and the path to this folder.
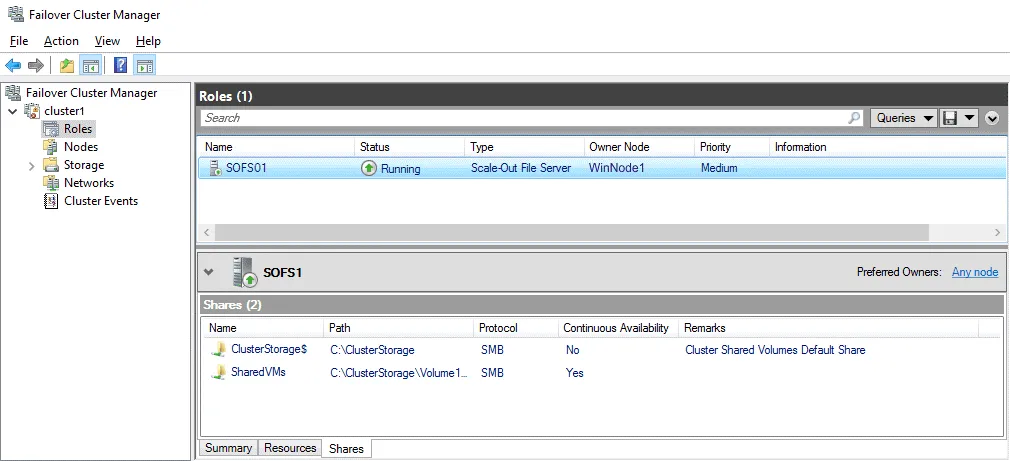
Now you can enter a network path to the shared folder and access the SOFS share. All servers of a file server cluster serve the file share. In my case, I use this path:
\\SOFS01\sharedVMs
I can create a Hyper-V virtual machine on Hyper-V hosts and define the \\SOFS01\sharedVMs path to the SOFS share to store the virtual machine files, including virtual disk files.
Conclusion
This blog post has explained how to deploy a highly available file share by using Windows clustering functionality and covered installation of a Scale-Out File Server in Windows Server 2019. An SOFS can be configured after preparing the failover cluster with the File Server role on all cluster nodes. The main steps of setting up an SOFS are configuring a high availability file server role and configuring an SMB network share.
Using a Scale-Out File Server to store Hyper-V VM files with high availability reduces the risk of VM failure from a storage perspective. However, it is highly recommended that you perform Hyper-V backup for all important virtual machines regularly. Having a Hyper-V VM backup allows you to protect data, avoid data loss, and restore workloads in a short time when needed.
NAKIVO Backup & Replication is the data protection solution that can protect your Microsoft Hyper-V VMs on standalone Hyper-V hosts and in failover clusters. Download the Free Edition of NAKIVO Backup & Replication and start backing up Microsoft Hyper-V VMs.


