How to Recover Deleted Emails in Office 365
Microsoft Outlook is one of the most popular email service providers with more than 400 million active users worldwide. With such a large number of users and exchanged messages, human errors and cyberattacks that lead to data loss are bound to happen. Luckily, you can recover deleted emails in Office 365 and guarantee workflows continue uninterrupted.
Read on to learn how to restore deleted emails in Outlook using Microsoft’s built-in tools. This post also explains how a third-party backup solution helps overcome the limitations of native recovery features.

Email Security Best Practices
While it is possible to recover deleted emails in Outlook, you should try your best to prevent data loss in the first place. There are several security measures that you can implement to reduce the chance of breaches and user errors that lead to lost or corrupted data. These include:
- Use a strong password: Simple passwords are easily discoverable by cybercriminals trying to access an account. Create a long password that contains uppercase and lowercase letters in addition to numbers and special characters. It is also recommended to use different passwords for varying accounts.
- Enable two-factor authentication: This method adds a second protection level when trying to log in to your account. After you enter your password, you need to provide a verification code found on your smartphone.
- Follow common security guidelines: Don’t share your password or write it down and leave it in a public location. Never open an attachment from an unknown source to avoid phishing and ransomware. Comply with your organization’s security policy.
How to Recover Deleted Emails in Office 365 Using Native Microsoft Tools
The built-in Microsoft tools allow you to recover deleted emails in Outlook when an item is lost. However, they do not provide comprehensive backup capabilities. In other words, the native features are limited and have different disadvantages, which could lead to data loss.
The Recycle Bin
When you delete an email in Outlook, it is sent to the Deleted Items folder where it is kept for 30 days. After this period expires, the email is removed from this folder.
Log in to Outlook.com then follow the steps below to recover a deleted email from the Deleted Items folder:
- In the left navigation pane, click Deleted Items.
- Select the message you want to restore or select Deleted Items to restore all messages available here.
- Click Restore in the menu bar.
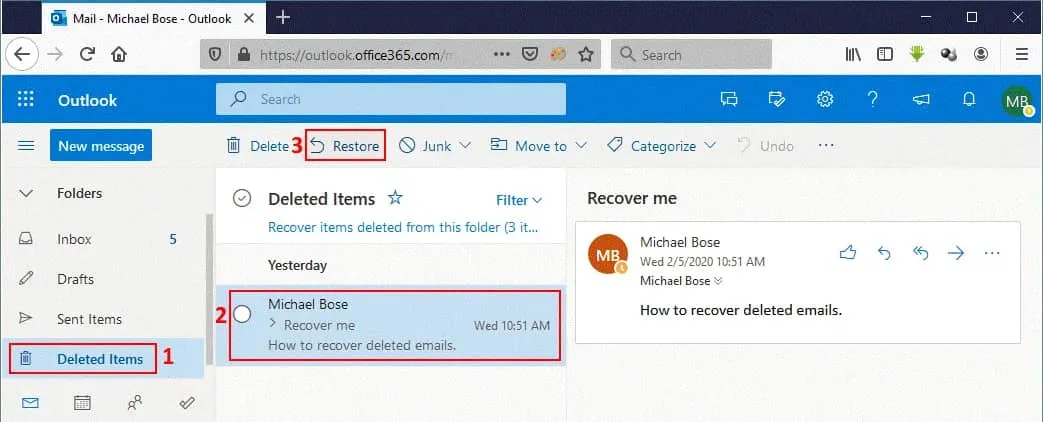
Note: You can also recover deleted emails in Outlook by right-clicking a specific message, selecting Move, then choosing your preferred destination (inbox or another folder).
If you can’t find the email you are looking for in the Deleted Items folder, then it has probably been moved to the Recoverable Items folder where it is kept for another 30 days. This happens when:
- The email was manually deleted from the Deleted Items folder.
- The 30-day period has expired.
- The Deleted Items folder was emptied.
- You removed the email from your inbox by pressing Shift+Delete.
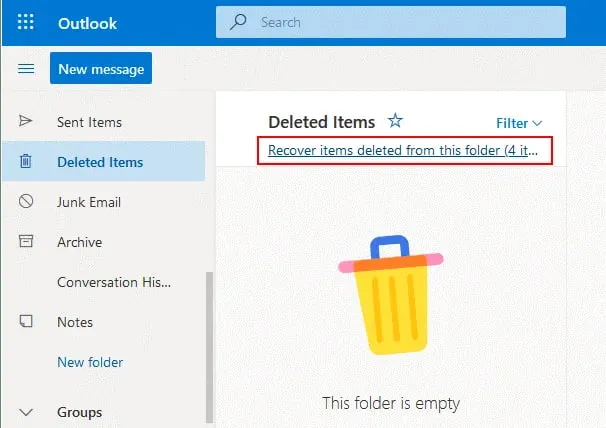
To restore an email from the Recoverable Items folder, go to Outlook.com then do the following:
- In the left navigation pane, click Deleted Items.
- Select Recover items deleted from this folder.
- In the Recoverable Items folder, choose the email you want to send to its original location and click Restore.
The Archive folder
The AutoArchive feature found in the Outlook desktop client can be configured to automatically retain and export email messages based on specific retention settings. In other words, deleted emails can be found in the Archive folder after they are removed from the inbox.
eDiscovery
In Microsoft 365, eDiscovery allows you to search for specific content found in mailboxes and sites. You can place a hold on the identified information and export your search results to use them as evidence in legal proceedings.
System administrators use the In-Place Hold capability of eDiscovery to search for, collect and export previously retained Outlook data even if it was deleted or modified. Keep in mind that you cannot recover deleted emails in Office 365 using eDiscovery since it is not a backup solution and can only be used for archiving purposes.
Email forwarding
You can enable email forwarding in the web interface of Microsoft Office 365 or by configuring the rules in the Outlook desktop client. After you create a secondary email address, set all incoming messages in the primary email to be automatically forwarded to the second account. This way, if a message is accidentally deleted from the first address, you can still find a copy in the other account.
Email export
The Outlook desktop client allows you to export/import email messages to/from a PST file. This feature can be used to transfer emails from one computer to another. When you export your emails, they are not deleted from the email client. However, a copy of your messages is exported to the PST file.
How to Recover Deleted Emails in Office 365 Using NAKIVO’s Backup Solution
Modern backup solutions like NAKIVO Backup & Replication provide robust data protection for Office 365 environments and allow you to recover permanently deleted emails in Outlook. More importantly, using a dedicated backup solution helps you overcome the limitations of the native Microsoft recovery tools and ensures that your data is protected and easily recoverable in case of accidental deletion or a cyberattack.
In order to back up Office 365 emails, first, you need to configure your environment by adding a Microsoft 365 account to the inventory of NAKIVO Backup & Replication and creating a SaaS backup repository. Once done, you can perform as many backup jobs as you need.
Adding a Microsoft 365 account to Inventory
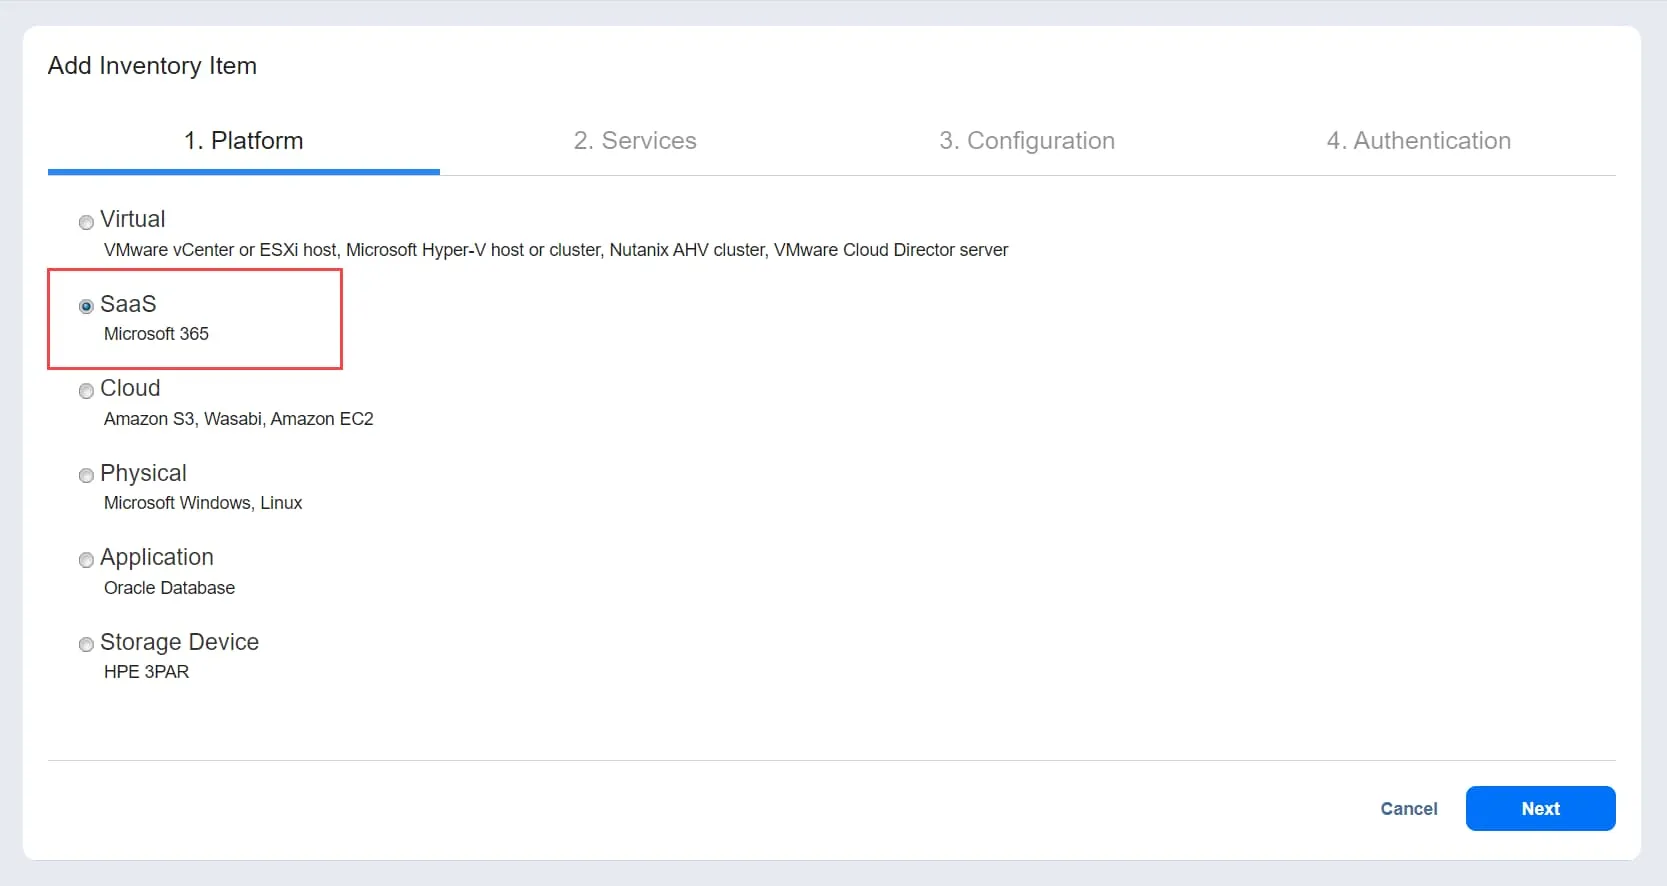
Before you start this process, check if your infrastructure meets the Microsoft 365 requirements. If it does, you can add your Microsoft 365 account to the inventory:
- Click Settings in the left pane.
- In the Inventory tab, select Add New.
- Choose SaaS on the Platform page, then click Next.
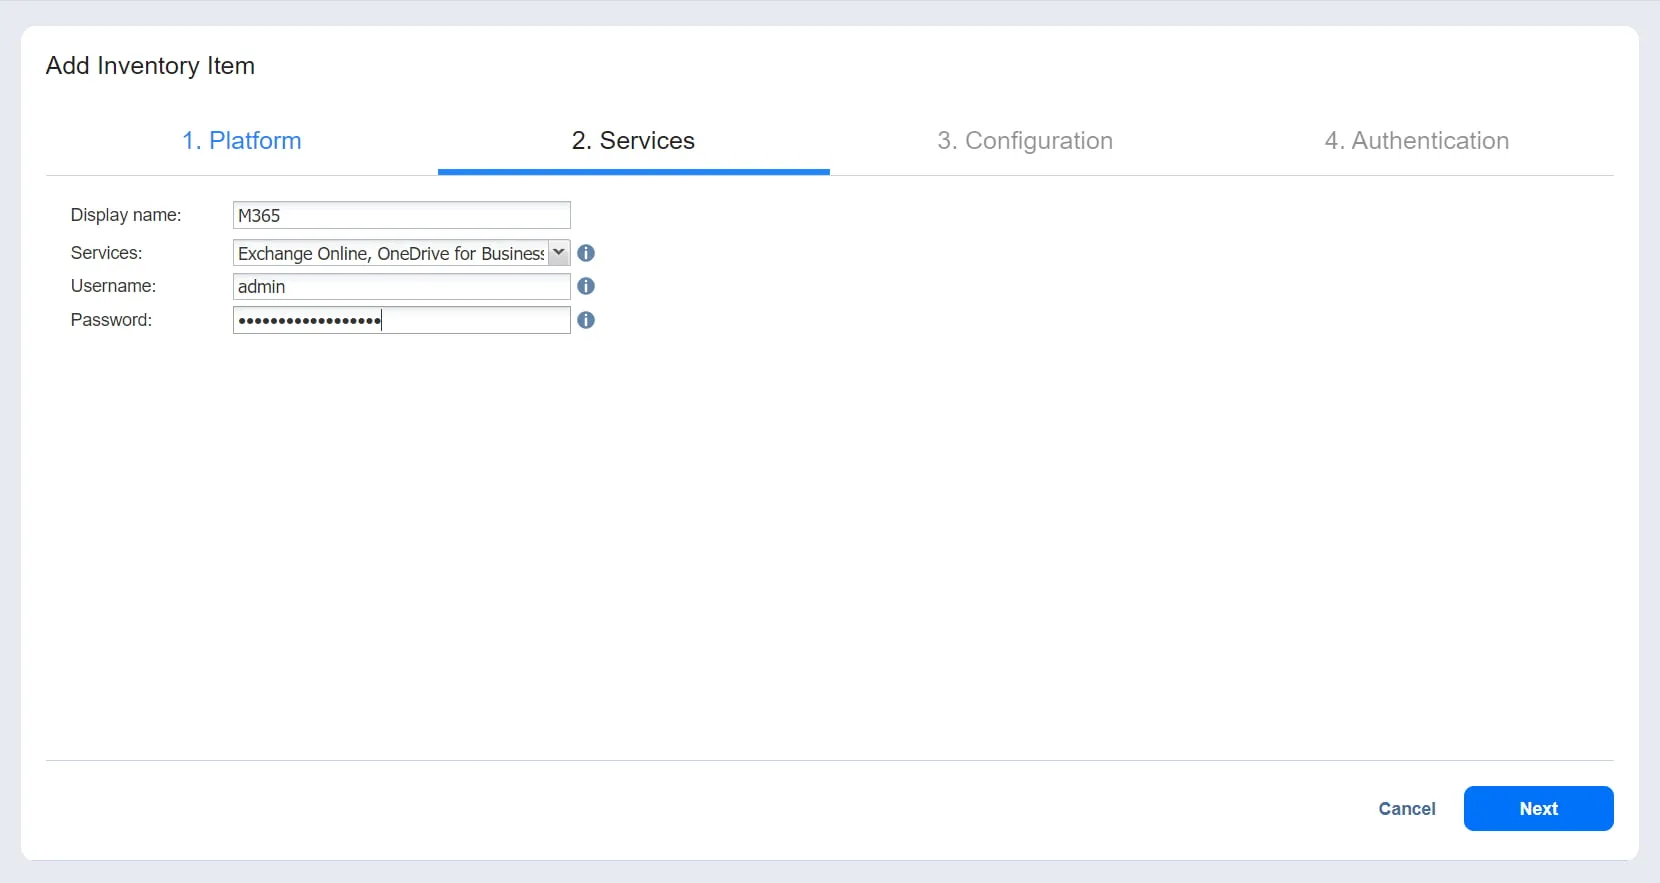
- Enter the following information on the Services page:
- Display name: Choose a name for this account.
- Service: Add the Microsoft 365 service(s) you want to back up.
- Username: If you want to protect SharePoint Online or Group mailboxes, provide the required administrator username.
- Password: If you want to protect SharePoint Online or Group mailboxes, provide the required administrator password.
Click Next to proceed.
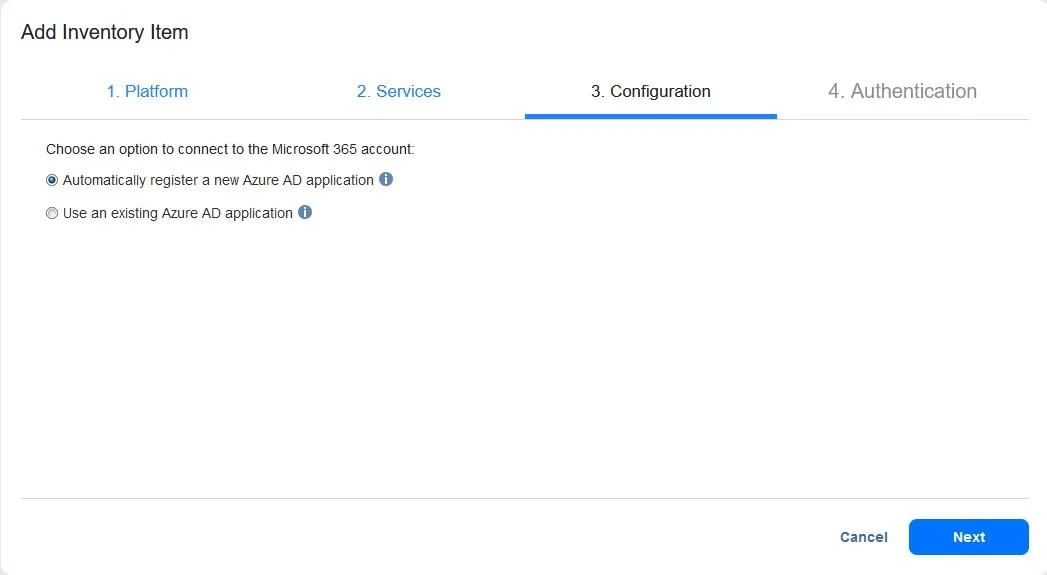
- On the Configuration page, you can choose one of the options below:
- Automatically register a new Azure AD application: The solution automatically registers the Microsoft 365 account as a new application in Azure Active Directory and grants the required permissions after authentication.
- Use an existing Azure AD application: Manually add an existing Microsoft 365 application that is already registered in Azure Active Directory.
Once done, click Next.
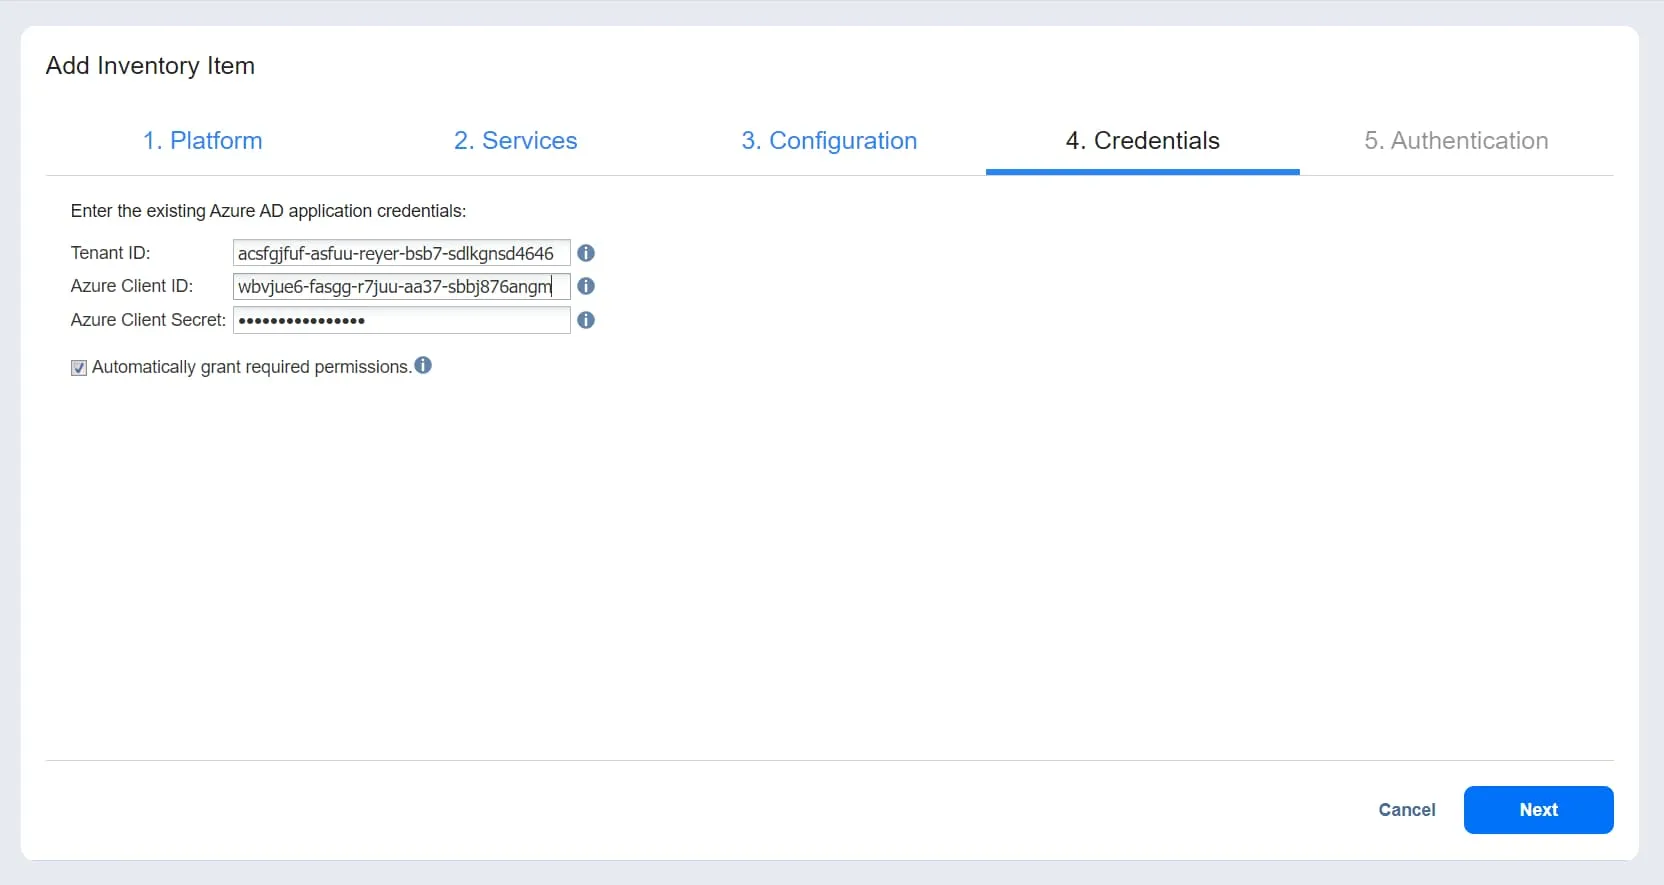
- The Credentials page becomes available if you choose Use an existing Azure AD application. Here you can:
- Enter your Azure AD credentials:
- Tenant ID: Enter the Azure Tenant ID created when registering your Microsoft 365 account in Azure Portal.
- Azure Client ID: Enter the Azure Client ID created when registering your Microsoft 365 account in Azure Portal.
- Azure Client Secret: Enter the Azure Client Secret obtained from the Azure Portal.
- Select Automatically grant required permissions (optional): When this option is selected, NAKIVO Backup & Replication automatically checks your organization’s Microsoft 365 account for the required API permissions and adds them if they are missing. Click Next to move to the following page.
- Enter your Azure AD credentials:
Click Finish to complete adding the item to the inventory in case you want to manually grant the required permissions.
Note: Refer to Obtaining Microsoft 365 Credentials to learn where you can find credentials and how you can grant permissions in the Azure Portal.
- If you have selected Automatically register a new Azure AD application on the Configuration page or Automatically grant required permissions on the Credentials page, the Authentication page becomes available. Once here, add the following information:
- Application name: Enter a name for the application.
- Code: This field displays the code that you need to add on https://microsoft.com/devicelogin.
- New code (optional): Use this to generate a new code if needed.
- Copy code: Copy the displayed code.
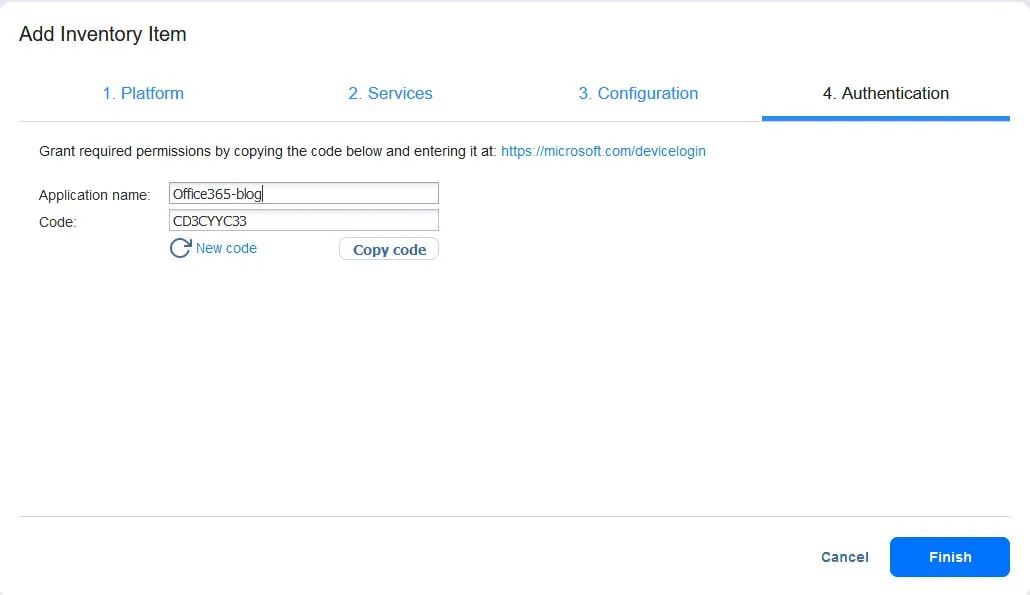
- Click Finish to complete adding the item to the inventory.
Note: Make sure that the Global Administrator role is assigned to the account in the Microsoft 365 admin center to complete the authentication process.
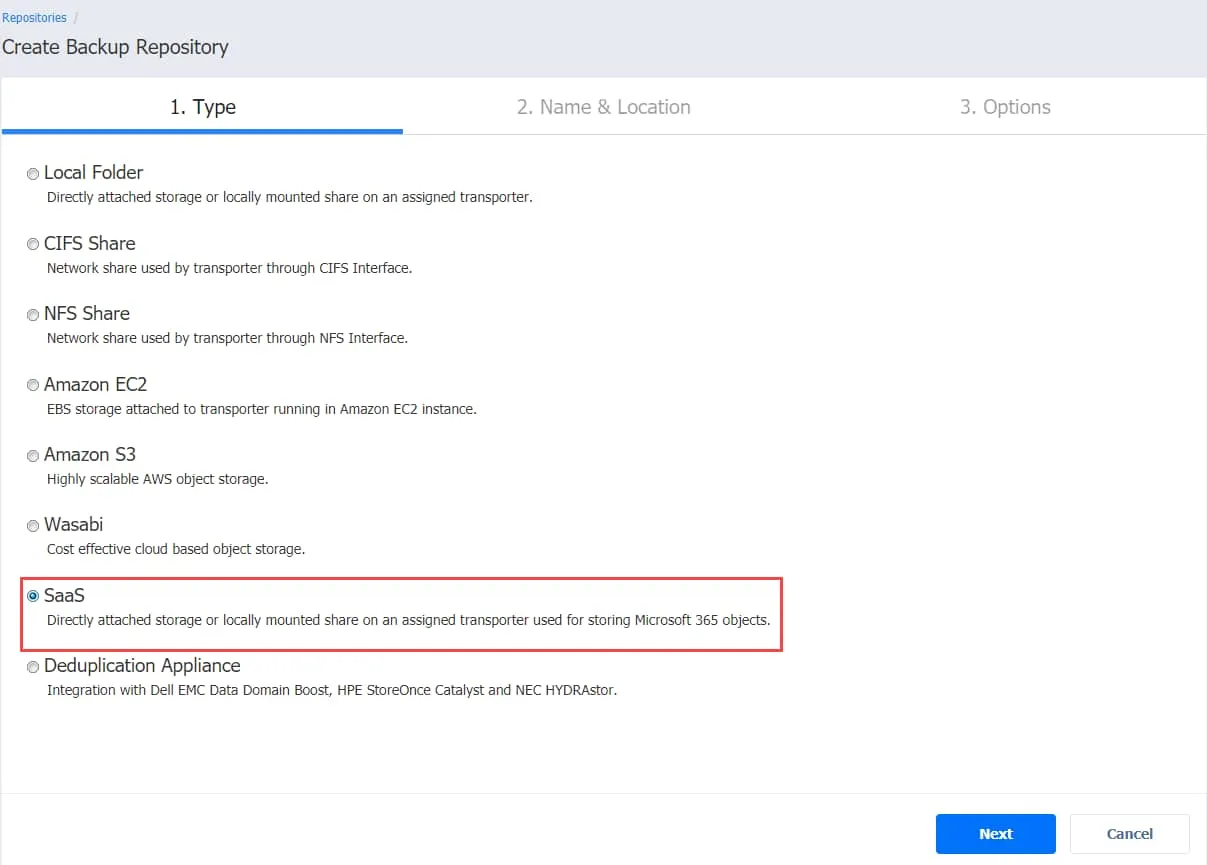
Creating a backup repository
All backed up Microsoft 365 data including Outlook emails are stored in a dedicated SaaS repository. The wizard to create a SaaS repository is divided into three steps:
- Type: Choose SaaS as the backup repository type for Microsoft 365 items, then click Next.
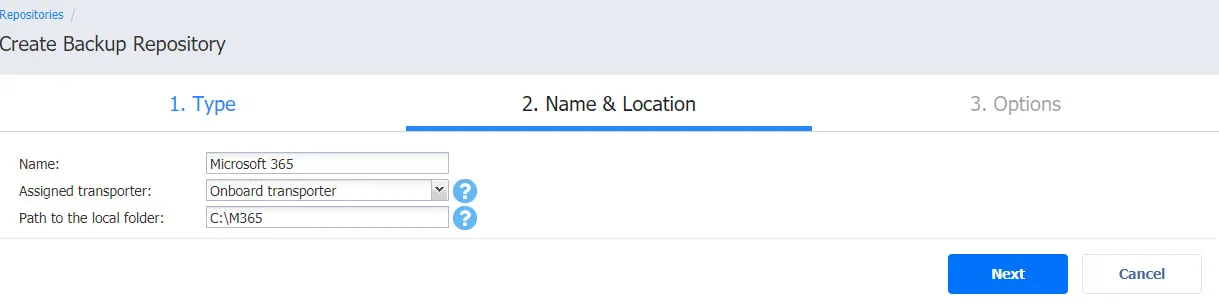
- Name and Location: Add the following information:
- Name: Enter the name of the backup repository.
- Assigned transporter: Select the Transporter from the drop-down list.
- Path to the local folder: Add the path to the local folder where the repository will be located.
Once done, click Next.
Note: You can deploy a Transporter on a remote machine, create a directory on that machine and use it to create a backup repository. This approach provides you with more flexibility and allows you to store Microsoft 365 data backups on remote machines.
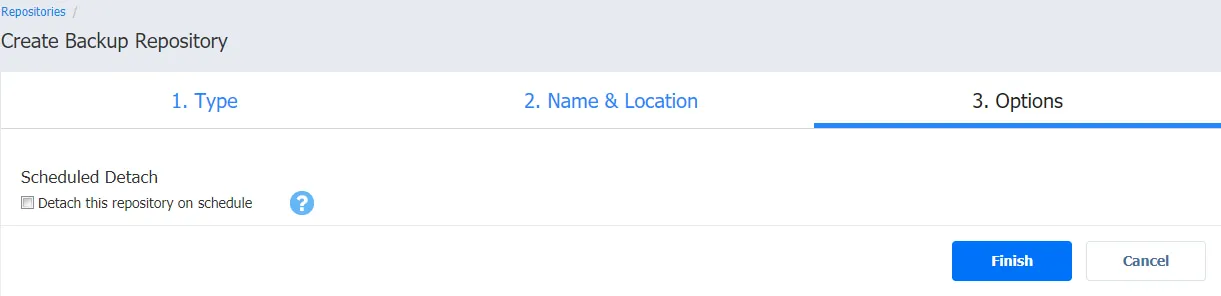
- Options (optional): Here, you can select Detach this repository on schedule to detach and attach the backup repository based on a set schedule when backup jobs are not running. You can then copy or move the backup repository to another storage media. This process preserves data consistency by stopping all interactions with the repository.
Click Finish to create the backup repository.
Creating a Microsoft 365 backup job
Now that your Microsoft 365 account has been added to the inventory of NAKIVO Backup & Replication, and you created a backup repository, you can run backup jobs that will allow you to recover deleted emails in Outlook in the future in case of data loss.
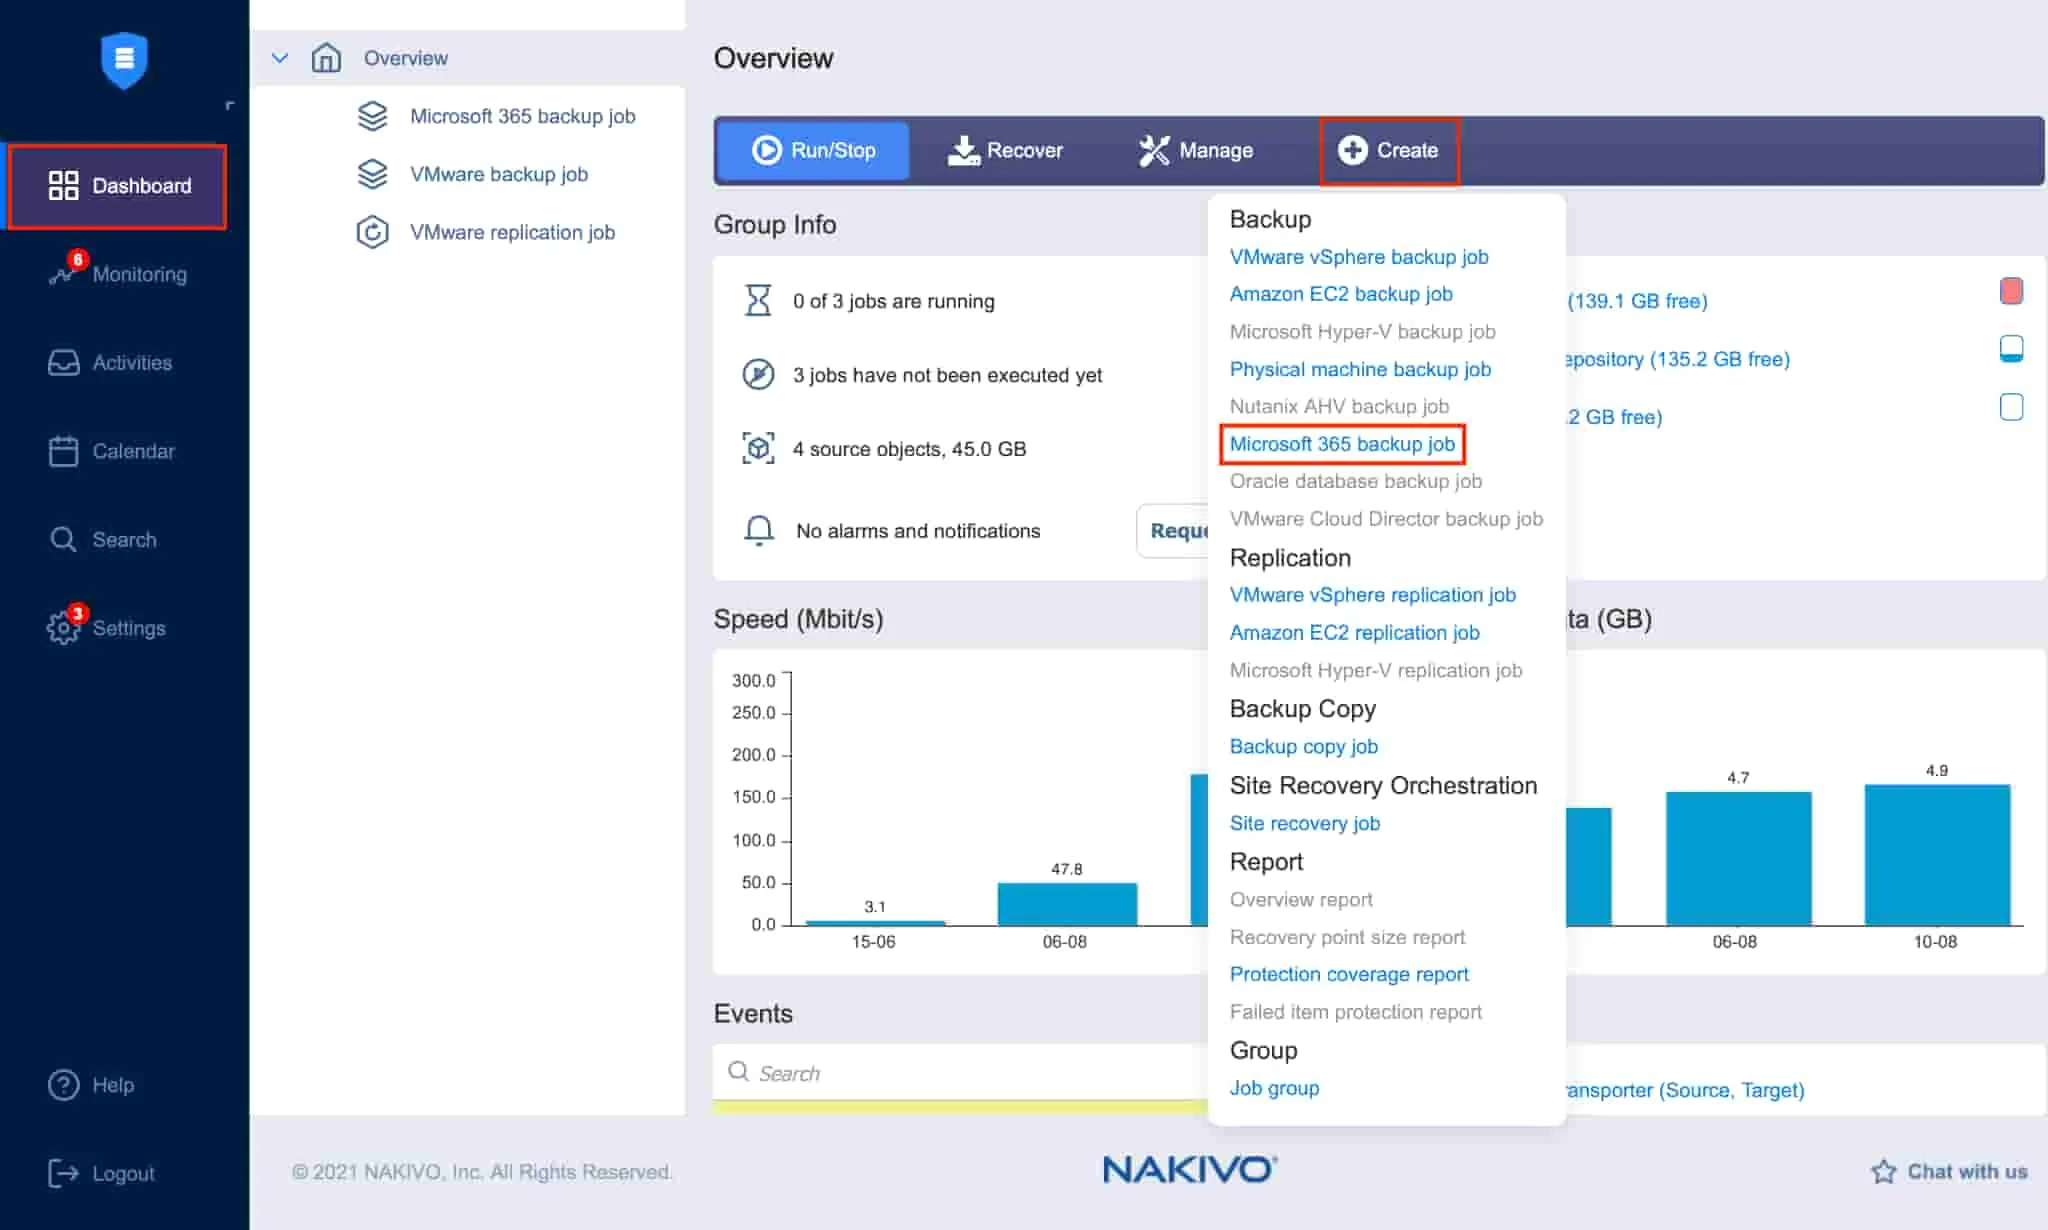
Start the backup job by opening the Dashboard in the solution’s web interface and clicking Create, then Microsoft 365 backup job.
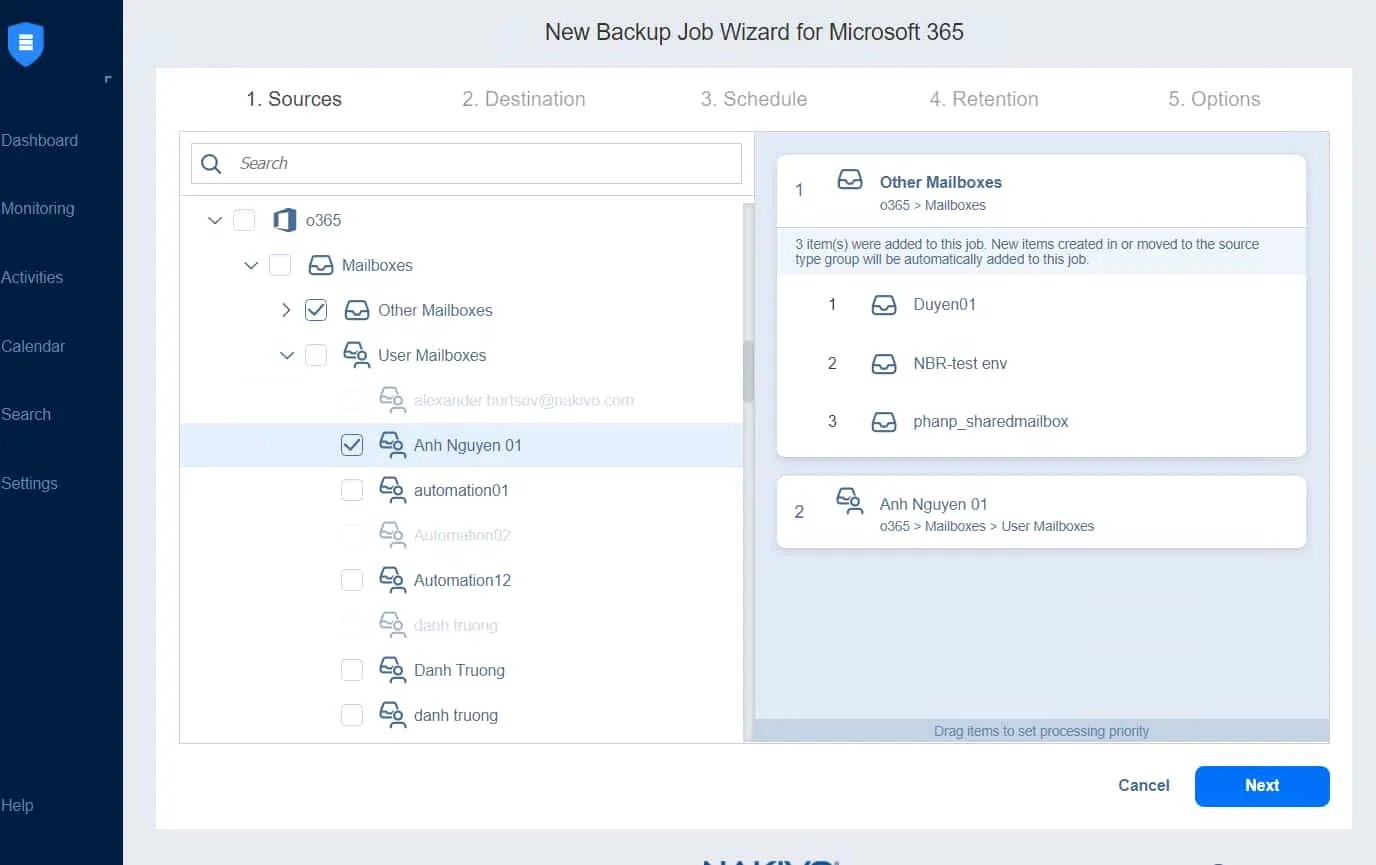
The backup job wizard for Microsoft 365 consists of the five steps detailed below:
- Sources: The left pane here displays the items that you can add to your backup job. Select or search for the mailboxes that you want to back up.
Click Next to confirm the selection and move to the next page.
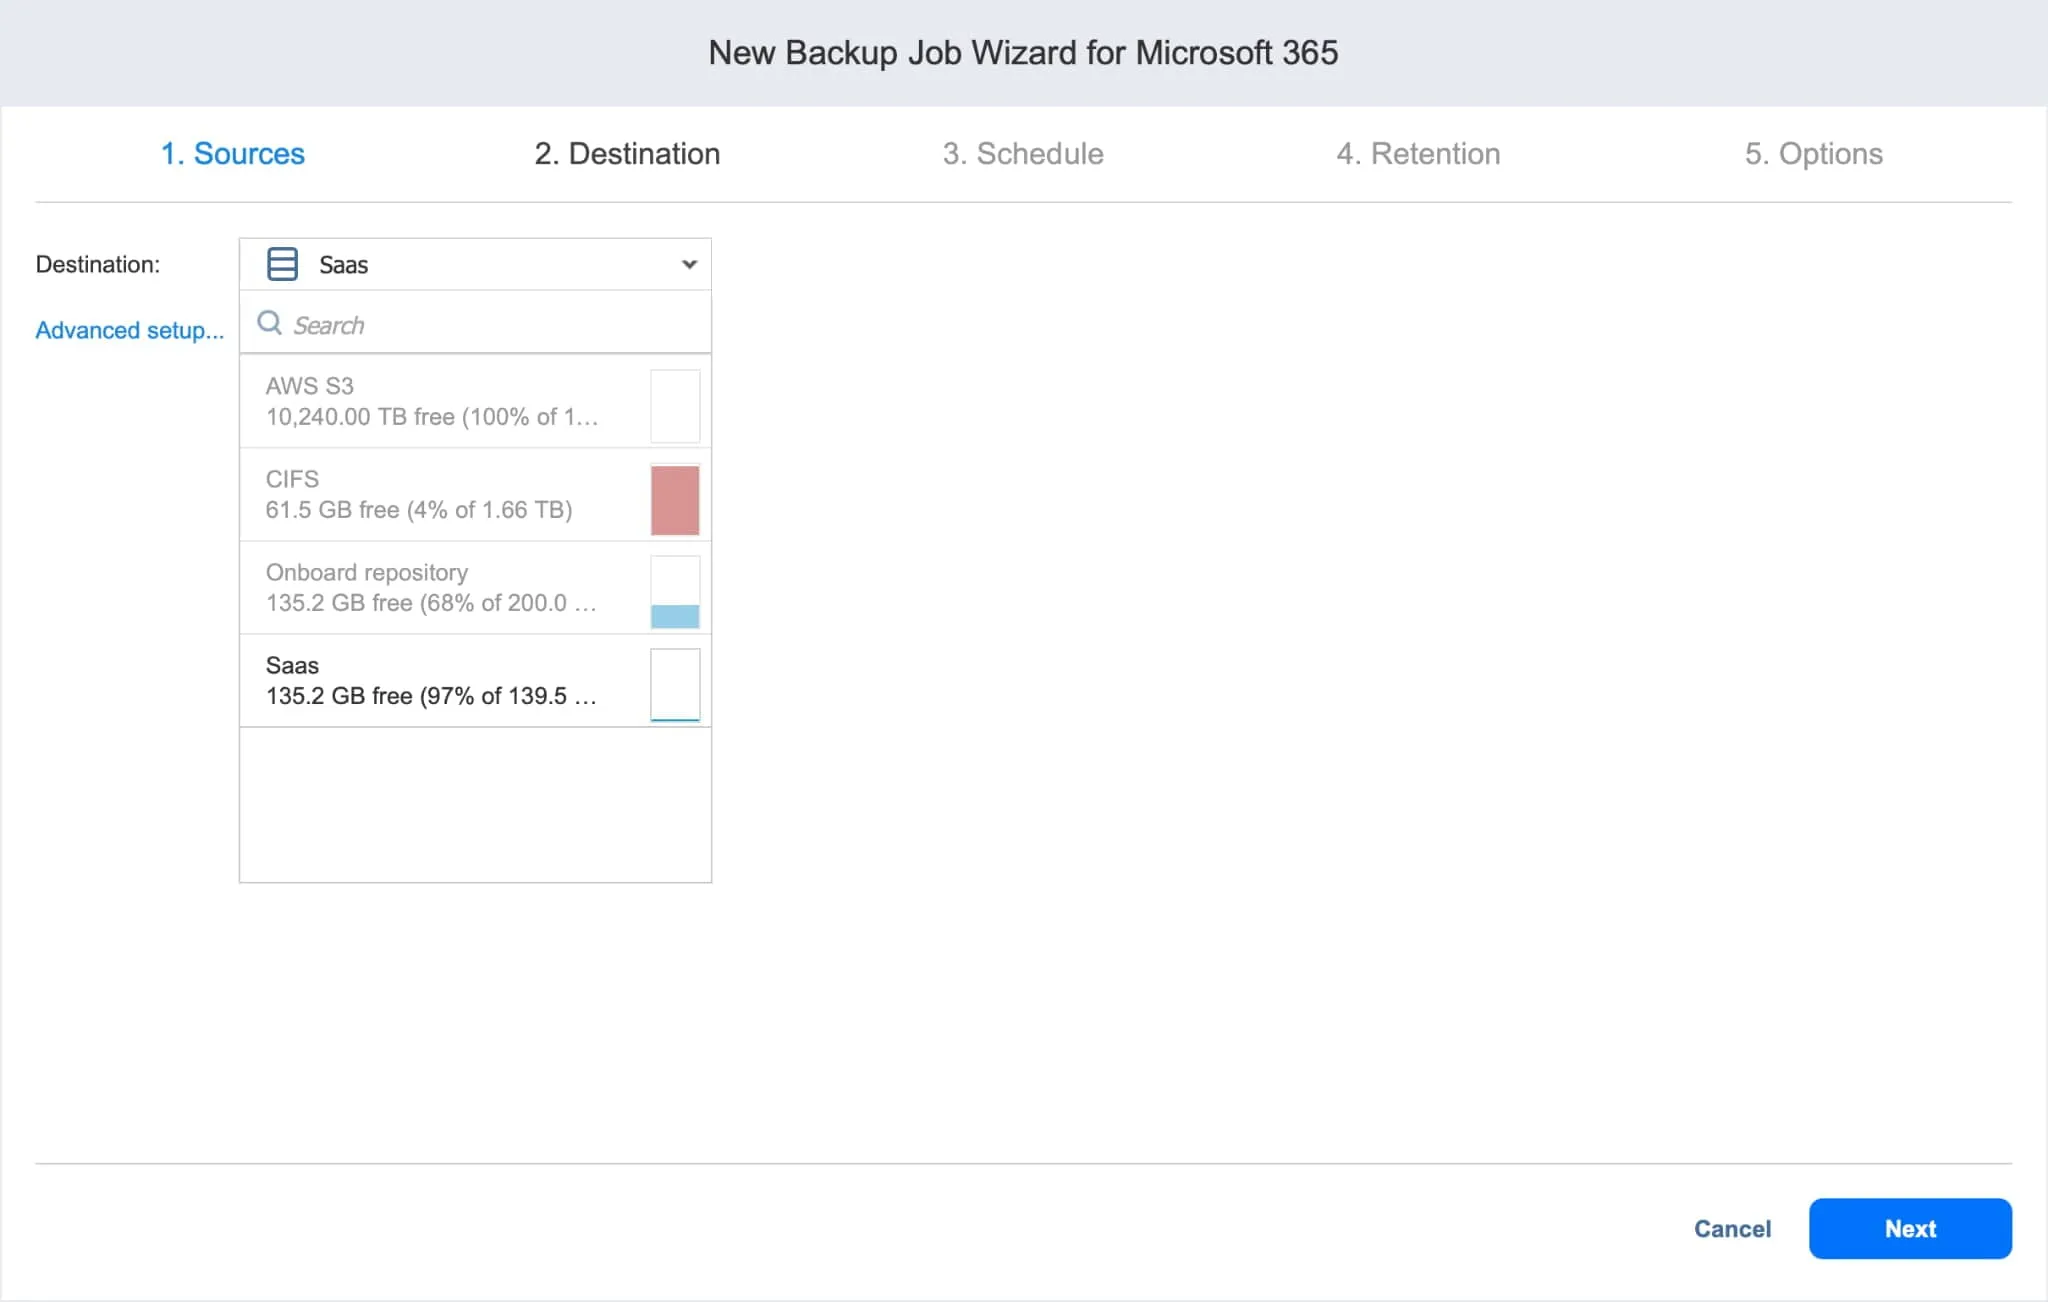
- Destination: Specify the SaaS backup repository in which you want to store your backed up mailboxes and emails. You can set the same or different backup repositories for each item.
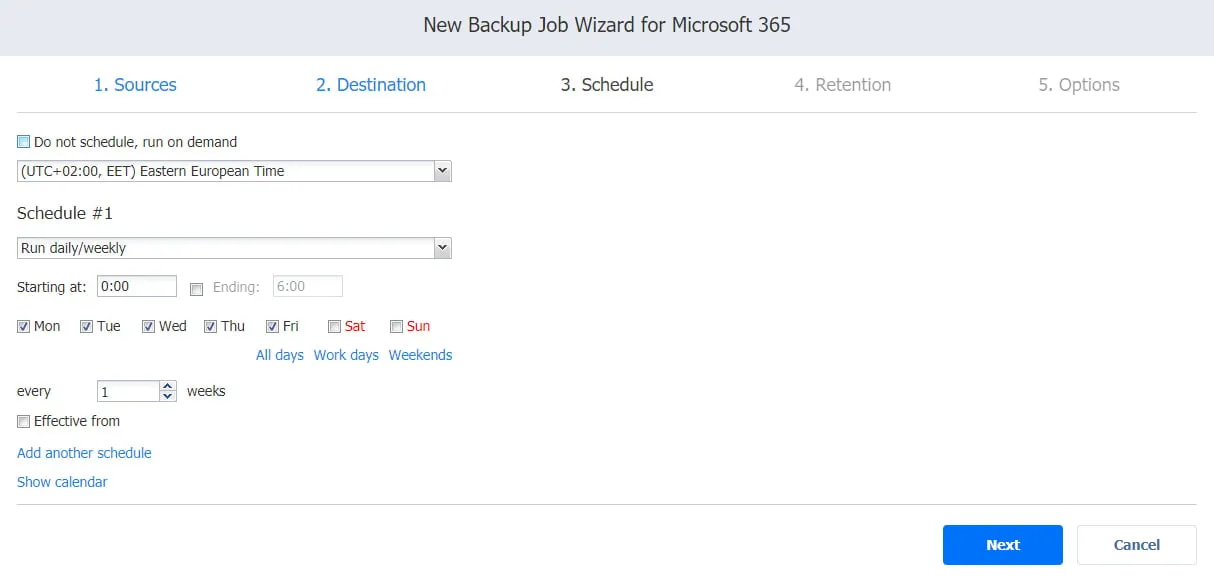
- Schedule: On this page, you can select whether to run the backup job manually or schedule it on a daily, weekly, monthly or yearly basis. You can also chain backup jobs to run automatically after each other.
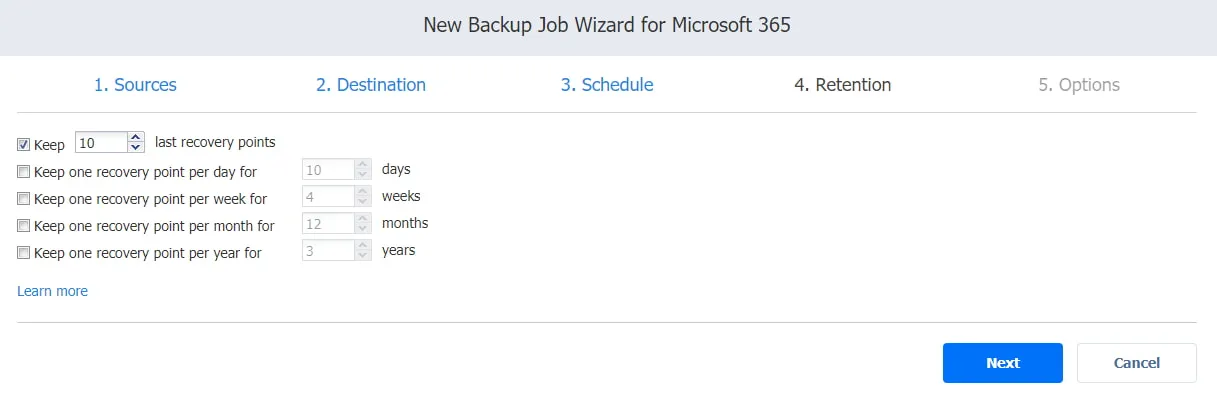
- Retention: NAKIVO’s solution creates a recovery point for each item in the backup repository after each job and allows you to use the grandfather-father-son (GFS) backup rotation scheme. This allows you to recover individual objects or the entire account. You can choose how many recovery points to preserve.
- Options: Here, you can enter the job name and enable certain actions before a backup job begins and after it is complete. You can receive backup reports or run custom pre- and post-job scripts.

Click Finish or Finish & Run to complete the job creation wizard.
Recovering Deleted Emails in Office 365 from NAKIVO Backups
To recover permanently deleted emails in Outlook, click Recover then Microsoft 365 in the web interface of NAKIVO’s solution.
The Object recovery wizard that opens consists of four main steps:
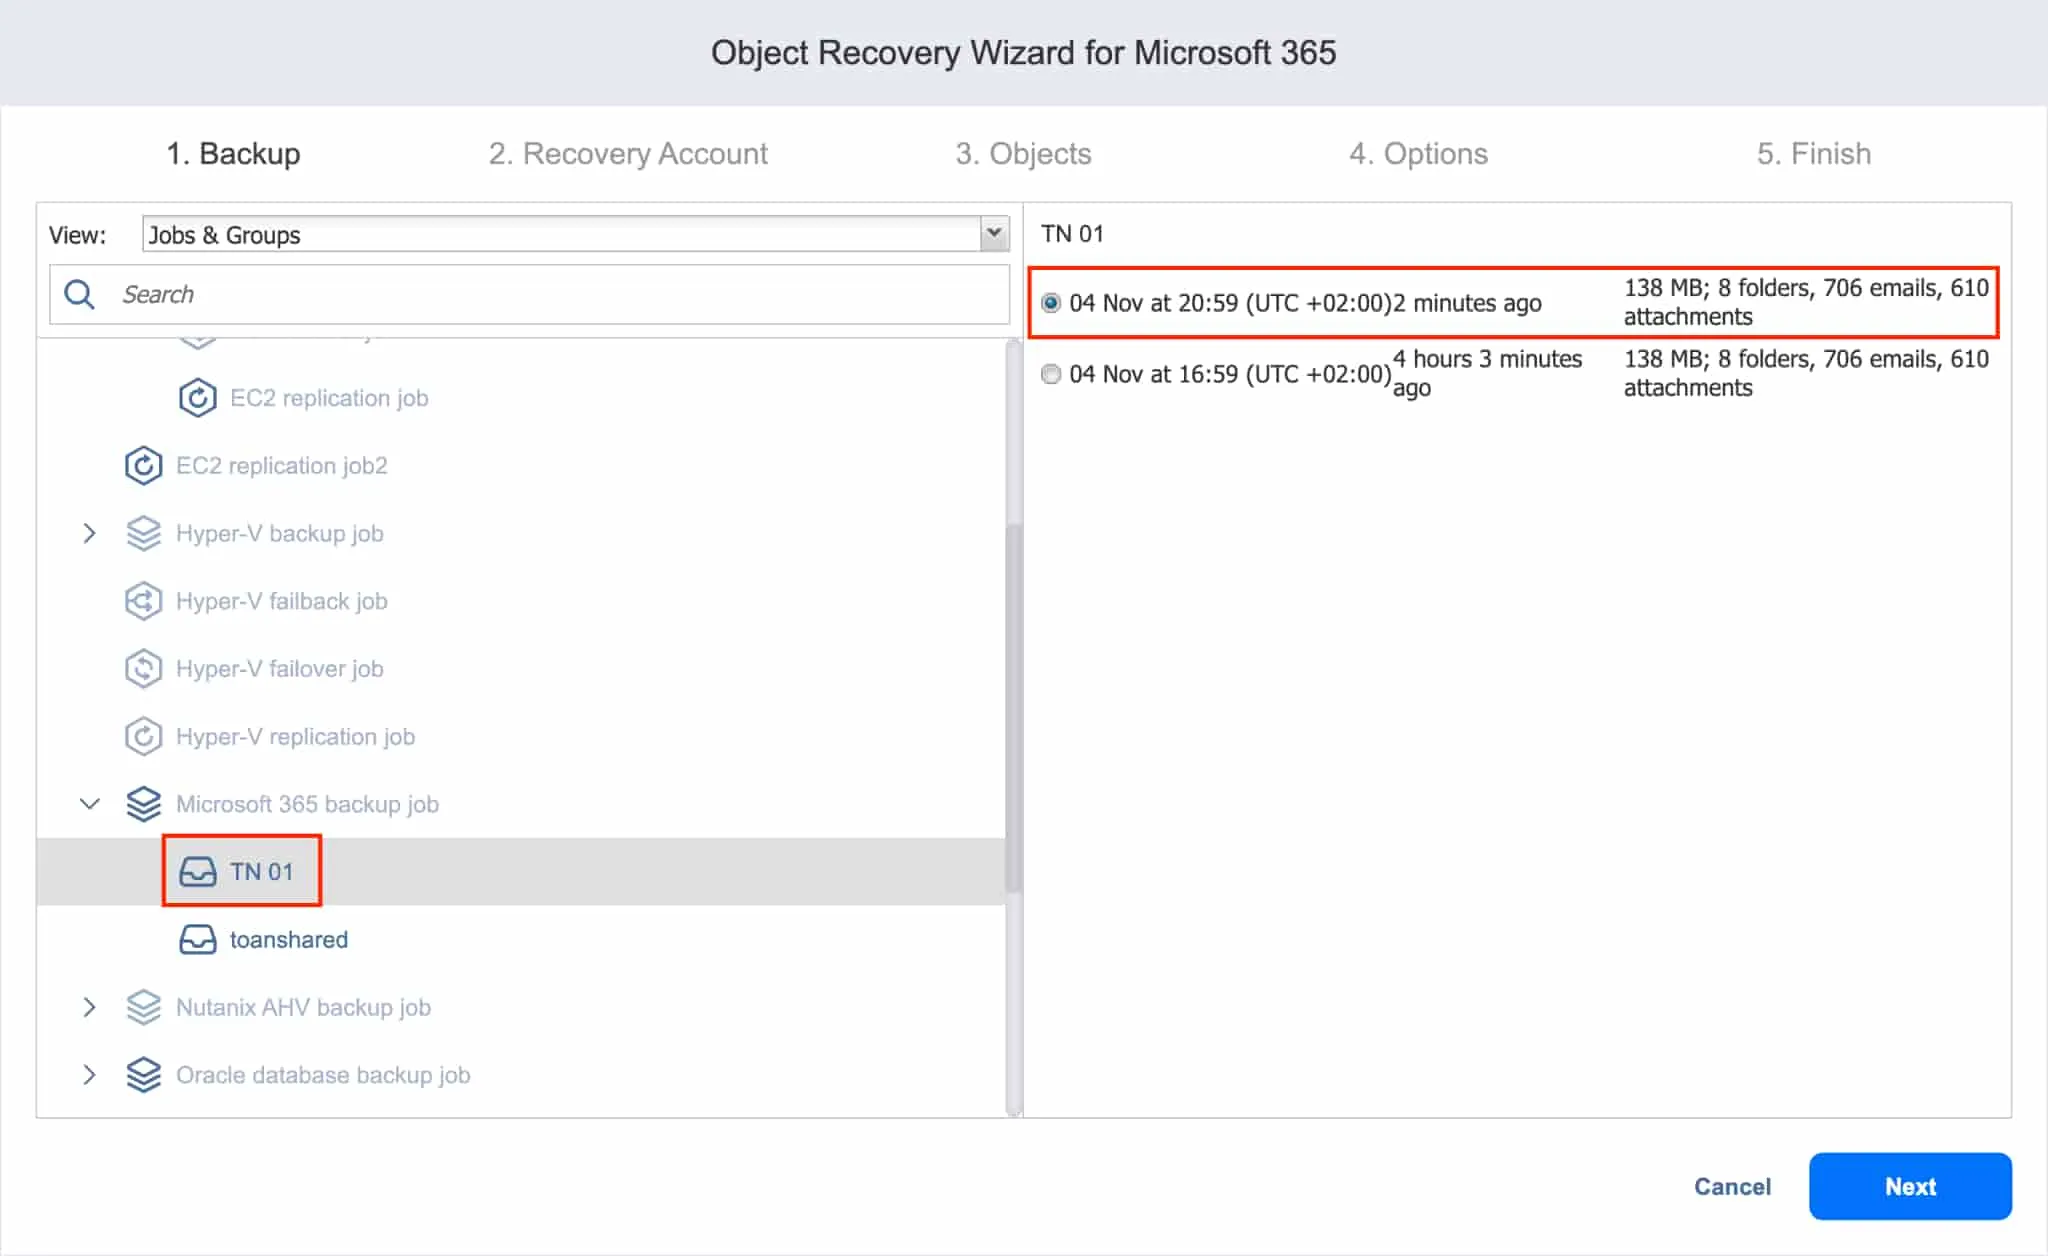
- Backup: All the backups are displayed in the left pane. Select the required mailbox backup you want to recover from then choose the recovery point in the right pane.
Click Next to continue.
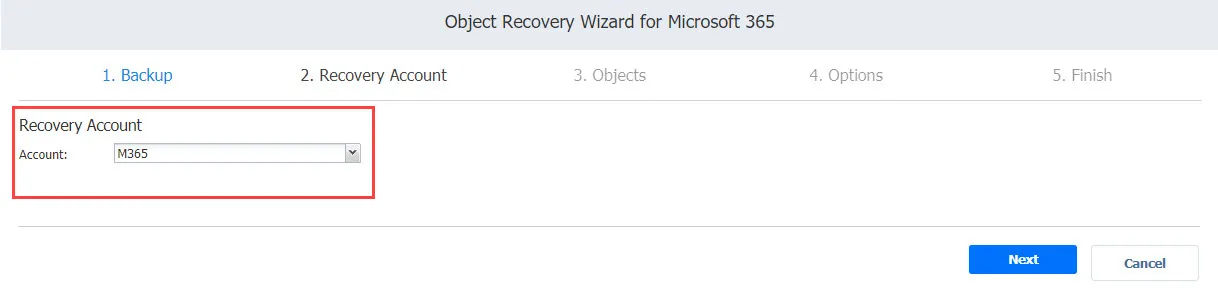
- Recovery account: Choose the Microsoft 365 account to which you want to recover your items from the drop-down list.
Click Next to proceed.
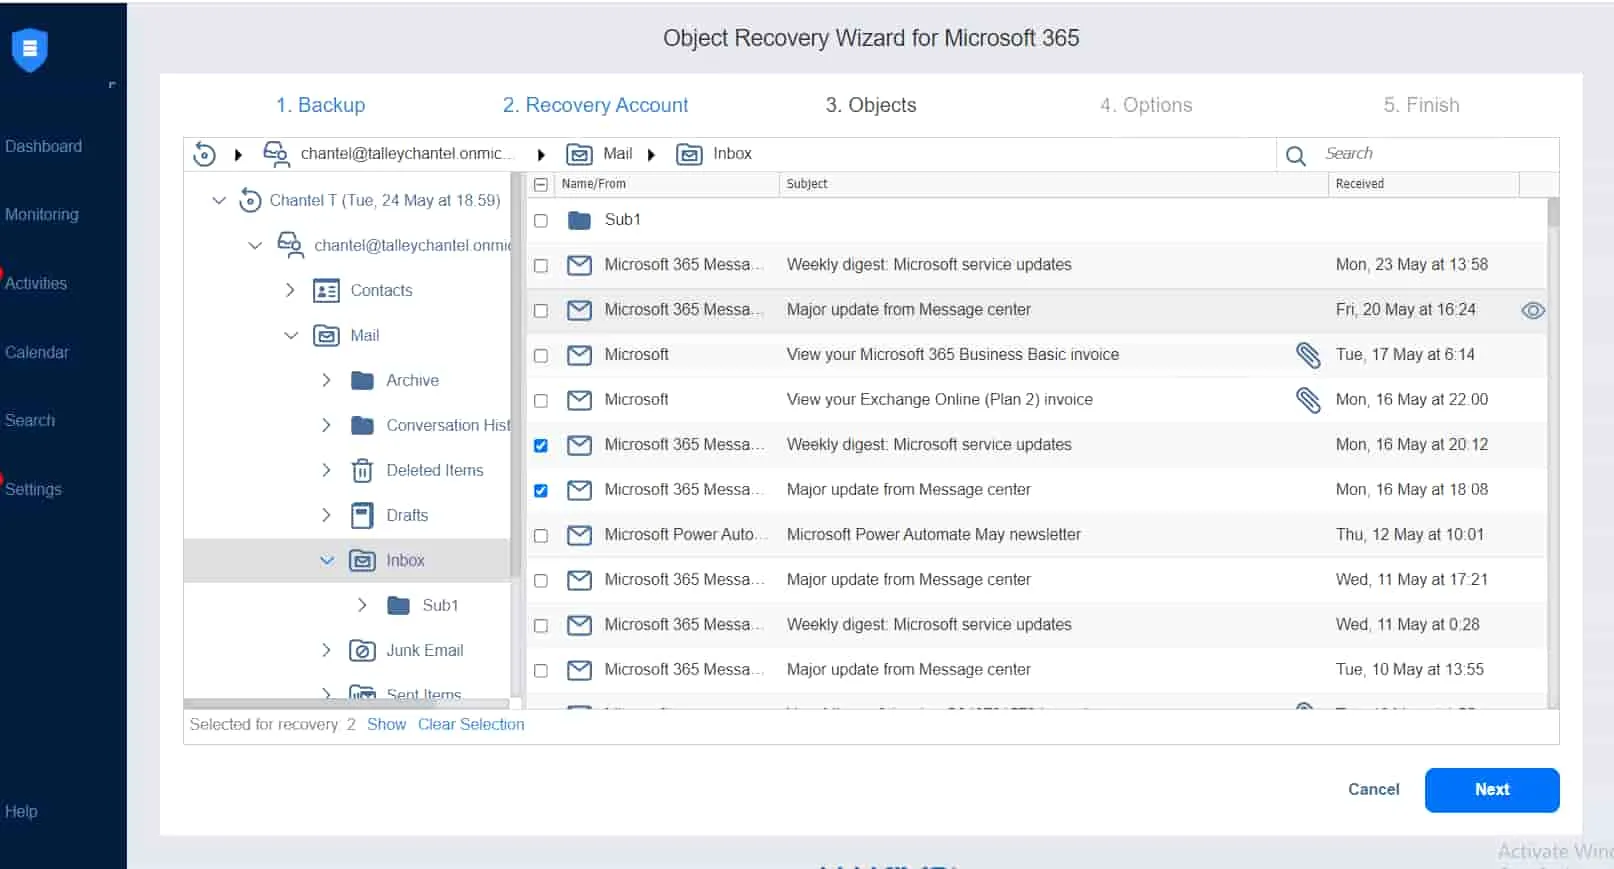
- Objects: Here you can view the contents of the mailbox at the time of the selected recovery point. You can drill down into mailbox folders, such as Inbox or Deleted Items, to view the list of email messages as well as open emails to view individual email message content. Search, view, and select the messages you wish to restore.
Once done, click Next.
- Options: On this page, you can configure whether to recover emails to their original location or to a different mailbox. In addition, you can select the desired overwrite behavior.
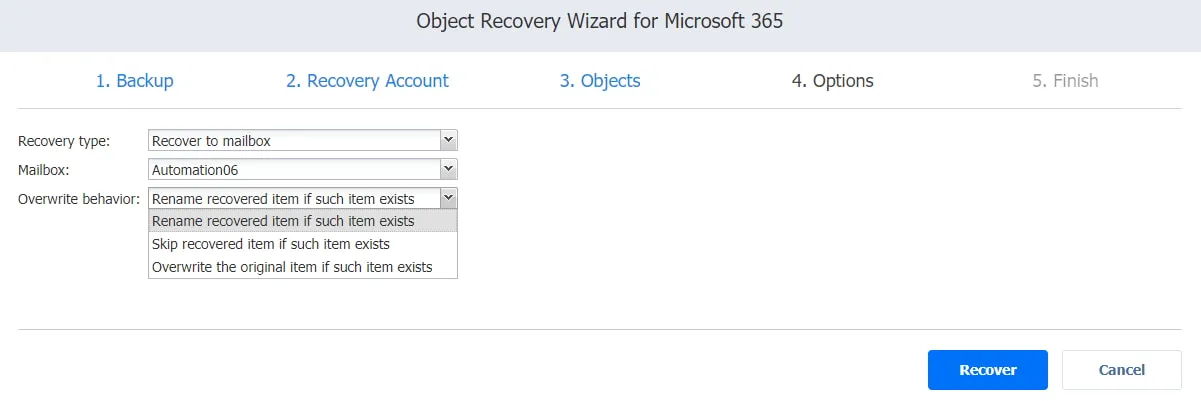
Click Recover to start the recovery process and track the progress in the Activities tab. Once recovery is complete, log in to the Outlook account to view the messages you just recovered.
Conclusion
Microsoft offers several native features that help you recover deleted emails in Office 365. However, these features are limited and can result in data loss in case of a user error or a breach. Third-party backup solutions like NAKIVO Backup & Replication are necessary to ensure data recoverability and eliminate a single point of failure.
You can use NAKIVO’s solution to protect your Microsoft 365 data and successfully back up and restore Outlook mailboxes. The solution also supports backup and recovery for OneDrive for Business and SharePoint Online. Download the Free Edition to check out all the advanced functionalities that guarantee optimal data protection.