How to Migrate from VMware to Hyper-V
You may need to convert a VMware VM into a Hyper-V VM for different reasons. For example, you may have a multi-hypervisor environment, you may need to perform VMware to Hyper-V migration for testing, you want a more rational licensing model for certain software, etc. However, these two virtualization platforms have some key differences despite some similarities.
Understanding the VMware to Hyper-V VM conversion process is important for a smooth and successful migration. This blog post explains some of the most affordable methods and tools to convert VMware VM to Hyper-V VM.

Overview of Conversion Tools and Methods
The following are the most widely used methods to convert VMware VM to Hyper-V available from Microsoft:
- Using Microsoft Virtual Machine Converter (MVMC). MVMC is a free standalone tool with a GUI (graphical user interface) that can convert virtual machines (as well as convert a physical machine to a virtual machine.) You can use it to move VMs to Microsoft Hyper-V or Azure and allows you to convert VMware ESXi VMs to Hyper-V format VMs.
- Converting VMDK to VHD and attaching a converted virtual disk to a new Hyper-V VM with PowerShell. You can use this method when you have the virtual disk files available but not all the VM files (such as VMX configuration files). This method allows you to convert both VMware Workstation VMs and VMware ESXi VMs.
- Converting VMs using System Center Virtual Machine Manager (VMM). VMM is a commercial software solution that enables centralized management for Hyper-V and VMware environments, including management of VMs, hosts, and clusters, and offers VM conversion features.
Preparing a VM for VMware to Hyper-V Migration
Before you convert VMware VMs to Hyper-V, you should do the following to prevent errors and streamline the migration process:
- Remove unnecessary virtual devices and eject the virtual CD. Devices such as virtual floppy drives and COM or LPT controllers can be removed to improve compatibility and prevent possible disruptions. You can add these devices later if you are creating a Generation-1 Hyper-V VM.
NOTE: MVMC 3 does not support Hyper-V Generation 2 VMs.
- Clean up the virtual hard disks. Delete temporary files and other unnecessary files that consume space on the virtual disks of VMs. Remove unused programs and components. This approach allows you to save disk space and time if your destination virtual disk is dynamically expanded (thin provisioned).
- Remove/consolidate all VM snapshots. The probability of errors during VM conversion can be reduced if your VM doesn’t contain snapshots.
- Uninstall VMware Tools before online conversion (online only). This provides a clean way to migrate VMware-based VMs to Hyper-V. The VMware Tools suite is not needed in a Hyper-V VM. Hyper-V provides the Integration Services utilities suite, which is designed to enhance the performance of a virtual machine’s guest operating system.
Additional considerations for VMware to Hyper-V migration
Microsoft Virtual Machine Converter (MVMC) takes a snapshot of the VM that is being converted before you uninstall VMware Tools, and then shuts down the source machine to preserve the state during conversion. The virtual machine is restored to its previous state after the source disks that are attached to the virtual machine are successfully copied to the machine where the conversion process is run. At that point, the source machine in VMware can be turned on, if required.
MVMC does not uninstall VMware Tools during offline conversion. Instead, it disables VMware services, drivers, and programs only for Windows Server guest operating systems. For file conversions with Linux guest operating systems, VMware Tools is not disabled or uninstalled. It is highly recommended that you manually uninstall VMware Tools when you convert an offline virtual machine.
Converting with Microsoft Virtual Machine Converter
Let’s consider converting a VMware-based VM to a Hyper-V VM using Microsoft Virtual Machine Converter.
The input parameters are as follows:
- A VM (virtual hardware version 7) is running on ESXi 6.5 (though the explained workflow is true for other/later virtual hardware versions).
- The VM has one virtual disk with no snapshots.
- The VMware Tools suite is not installed.
To start the conversion process:
- Download MVMC using the executable installer .msi file. The latest version of standalone MVMC is version 3.1. You can also download the .doc file with a description of the Windows PowerShell cmdlets.
NOTE: For a newer version of Microsoft Virtual Machine Converter, you can use this tool as part of Microsoft System Center Virtual Machine Manager (VMM) because Microsoft terminated releasing new versions of the standalone MVMC.
- The installation process is straightforward: run the installer, accept the license agreement, select the installation directory, and click Install in the setup wizard. Make sure that there is enough disk space, including the space for temporary files created during VM conversion.
- Once the installation process is complete, run the converter. Click Start > Microsoft Virtual Machine Converter to run the converter.
- On the Before You Begin screen, you can read a short description. Select the Do not show this page again checkbox if you don’t want to see this screen each time you run the converter. Click Next to proceed.
- Machine Type. Select the type of the source machine to be converted. In this case, select Virtual machine conversion. Click Next.

- Select a migration destination. There are two options available at this stage: migration to Microsoft Azure cloud and migration to Hyper-V. This blog post covers the conversion of a VMware VM to a Hyper-V VM, thus the Migrate to Hyper-V option should be selected in this case. Click Next.

- Select a destination Hyper-V host. In this example, the Hyper-V server is running on a local host (the converter and the Hyper-V server are installed on the same machine). Microsoft Virtual Machine Converter can also save a converted VM to an offsite destination host over the network.
Make sure that your firewalls are configured accordingly if your converter and Hyper-V host are running on different machines. Remote access through Windows Management Instrumentation must be enabled and the appropriate service must be started on the destination machine.
Select the name or IP address of your destination host and add the credentials of a user who has sufficient access privilege to connect to a Hyper-V host (the local administrator of the destination Hyper-V host and the domain administrator have this kind of access privilege). Then click Next to proceed.

- Set the disk options. Specify a network path to store the converted virtual hard disks. For the purpose of this walkthrough, the VM is being converted and transferred to a Hyper-V server installed on the same machine that is running the converter. Thus, the following network path is applied:
\\localhost\c$\Virtual\Hyper-V\converted
It is recommended that you avoid using the system disk (usually C:) for storing VMs in production environments. For example, if your Hyper-V host is a remote machine, your chosen path might look like this:
\\10.10.10.12\d$\Virtual\Hyper-V
Choose the type of virtual disk to be used after conversion. The virtual disk can be of two types: a fixed size disk (the analog of a thick-provisioned disk) or a dynamically expanding disk (the analog of a thin-provisioned disk). In this walkthrough, a dynamically expanding disk is chosen to save storage space.
Choose the format of the virtual hard disk: .vhdx is a newer and more progressive file format used by both Hyper-V Gen1 and Gen2 VMs. For the purposes of this walkthrough, we’ve chosen .vhdx.
Click Next to continue.

- Specify the source details for connection to a vCenter server or ESXi server. In this example, a VM running on an ESXi server is being converted. Hence, the IP address, user name, and password for the ESXi server should be entered at this step. You can use the administrative credentials of vCenter if vCenter is used for the centralized management of ESXi hosts. Click Next to proceed.

- Now, select the virtual machine for conversion from the ESXi server you have chosen. In this example, a lightweight Windows VM running on an ESXi host is being converted. After selecting the VM, click Next.

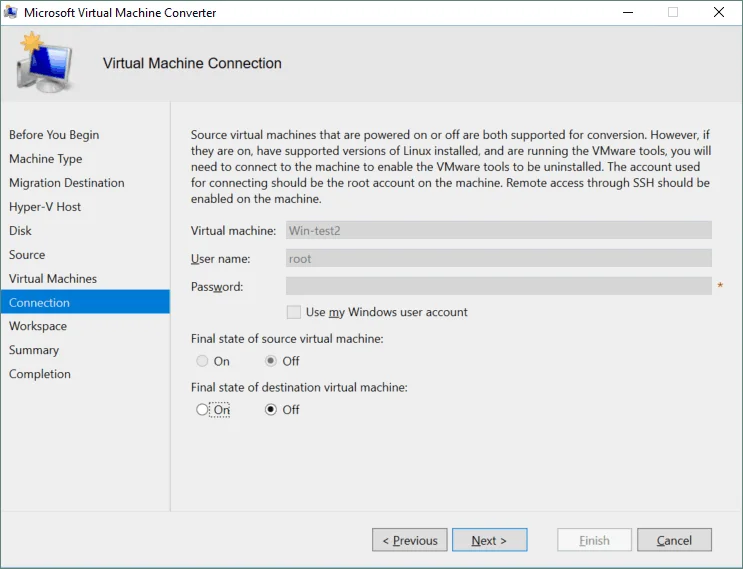
- Virtual machine connection. If VMware Tools is installed on a Linux virtual machine, you must provide the username and password of the root account on the source VM to allow the converter to uninstall VMware Tools. In this example, a Windows machine without VMware Tools is used, and these fields are inactive. Define the final state of the source machine and the final state of the destination machine (On or Off). Click Next.
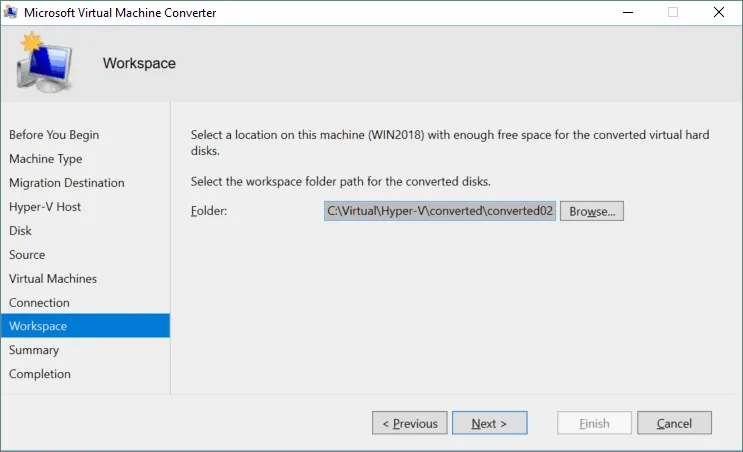
- Define the workspace. The workspace is a temporary folder that is used to store temporary files during the conversion process. For better performance, this folder should be located on the machine where Microsoft Virtual Machine Converter is installed. Enter the path or click the Browse button and select the appropriate folder. Then click Next.
- Check the summary. Review the configuration details you have specified. If the warnings are not critical, you can proceed – these do not prevent conversion. In our case, we ignore the operating system warning because the converter works for us with Windows 10, Windows Server 2016, 2019, and newer Windows versions. We can adjust memory settings later. Click Finish to start the virtual machine conversion process.

- Wait for the VM conversion to complete. The process can be time-consuming depending on the size of the virtual disks of the source VM as well as network speed. If the conversion is successful, click Close to exit the virtual machine converter.

- You can now edit the VM settings of your converted VM, which is displayed in the VM list of Hyper-V Manager. Right-click the VM and select Settings from the context menu. The VM is stored in the directory you specified earlier. Remove the network adapter and add a legacy network adapter for older guest operating systems to enable networking. Then select the appropriate virtual switch or create a new one for VM connection to the network.

- After configuring the VM settings, start the VM and configure the guest OS. Wait until the OS recognizes the new virtual devices. Don’t forget to install Hyper-V Integration Services for better performance and user experience. For manual installation of Integration Services, insert the vmguest.iso image in the virtual DVD drive of the VM and run the installer. Once the installation is complete, reboot the VM and eject the virtual ISO disc.

Converting VMDK to VHD Using PowerShell
Let’s now consider a different use case for VM conversion. If you have only VMware VM virtual disks, or if you have a VM for VMware Workstation (not for ESXi), the Microsoft Virtual Machine Converter GUI cannot be used.
When you install MVMC, some useful PowerShell cmdlets are also provided. In the following examples, you can learn how to convert a VMDK virtual disk to a Hyper-V format disk using the command line interface (CLI) and how to run a VM using that virtual disk on Hyper-V.
Converting VMware Workstation-based virtual disks
- Add the converter module to the current PowerShell session. The module is located in the directory where Microsoft Virtual Machine Converter is installed. In the current example, the default location is used for the converter. Type the following command in PowerShell:
Import-Module "C:\Program Files\Microsoft Virtual Machine Converter\MvmcCmdlet.psd1"If your converter is installed in another directory, type the path of your directory instead of C:\Program Files\Microsoft Virtual Machine Converter\

- Go to the directory of your VM and list the files of that directory. (The VM we want to migrate from VMware to Hyper-V is called StorageLinux.) In this example, the VM is located in C:\virtual\StorageLinux
cd C:\virtual\StorageLinuxdirYou can see the VM files here. Make a note of the name of the VMDK file, as it is needed for later operations. In this example, a Linux virtual machine with one virtual disk is used. Importantly, the VM has no snapshots and VMware Tools is not installed (see the screenshot below).

- It’s time to convert VMware to Hyper-V virtual disk format. Run the converter in PowerShell by using the following command and arguments:
ConvertTo-MvmcVirtualHardDisk -SourceLiteralPath "C:\Virtual\StorageLinux\StorageLinux 3.x kernel 64-bit.vmdk" -DestinationLiteralPath "C:\Virtual\Hyper-V\converted\01" -VhdType DynamicHardDisk -VhdFormat VhdWhere:
–SourceLiteralPath <path> is the path to the VMware virtual disk that should be converted.
–DestinationLiteralPath <path> is the path to a directory where the virtual disk of the Hyper-V format should be saved.
–VhdType <type> defines the type of the virtual disk – either dynamically expanding or fixed.
–VhdFormat defines the format of the Hyper-V virtual disk (VHD or VHDX).
Wait until the conversion process is completed. A progress bar indicates the current state.

- When the virtual disk is successfully converted from VMDK to VHD, you should see the following on the screen:

- Create a new VM and use the VHD disk created from the conversion. For this part, refer to the blog post that explains how to create a new virtual machine in Hyper-V. The key point is to connect the virtual disk. At the appropriate stage of the New Virtual Machine Wizard, select Use an existing virtual hard disk and specify the location of your newly created VHD file.

- After completing the configuration of the VM, run the virtual machine on your Hyper-V host.

You can also use this method for converting VMs with multiple virtual disks. Each virtual disk must be attached to the VM after conversion in this case.
Converting Virtual Disks of VMware ESXi Format
First, you need to copy virtual disk files from the ESXi host’s datastore to the machine with Microsoft Virtual Machine Converter installed. In this case, one VMware virtual disk consists of two files: diskname.vmdk and diskname-flat.vmdk. A .vmdk file is a descriptor that contains information about the virtual disk configuration and points to a -flat.vmdk file. The virtual disk data itself is stored in the -flat.vmdk file (in the raw format, similarly as for a physical hard disk drive). The size of a .vmdk file is a few kilobytes, while the size of -flat.vmdk file is much larger. You can copy VMware virtual disk files from an ESXi host using the VMware vSphere client or any SCP (Secure Copy Protocol) client.
Copying files using VMware vSphere client
This method can be used if you manage your ESXi hosts with vCenter Server.
- Log in to your vCenter with VMware vSphere Client – enter the IP address of your vCenter Server in the address bar of your web browser.
- Go to the Storage tab, select the datastore with the files of your VM, select the VM directory, and select the virtual disk that should be converted.
- Once you have selected the disk, click Download and save a zip archive with the .vmdk and -flat.vmdk files to the machine with MVMC installed. Pay attention to the size of the virtual disk file. The VM used in this example (Win-test2, which was converted earlier with MVMC through the GUI) has an 8 GB thin-provisioned virtual disk that consumes about 1.64 GB on the VMFS datastore. You can read more about thick and thin provisioning in a separate blog post.
NOTE: You can see only one VMDK file in the web interface of the VMware vSphere client and the VMware Host client. Don’t be alarmed – there are two files (.vmdk and –flat.vmdk) on the datastore. You can see both files on the datastore by logging in to your ESXi host using the SSH client and listing the files in the directory of your VM on the datastore.

- Once the zip archive is downloaded, extract the virtual disk files.

- After extracting the files, you can see that the –flat.vmdk virtual disk file consumes 8 GB of disk space (the maximum provisioned size of the current virtual disk) and not 1.64 GB. Later, you can convert this virtual disk to the dynamically expanding virtual disk for Hyper-V.

Copying files using WinSCP client
WinSCP is a free application that uses SCP, SFTP (SSH Secure Shell File Transfer Protocol), FTP, and WebDAV protocols for data transfer. SFTP is preferred, if possible. You can download WinSCP from the official website.
Run WinSCP and log in to your ESXi server by entering the IP address, port number, and root credentials.

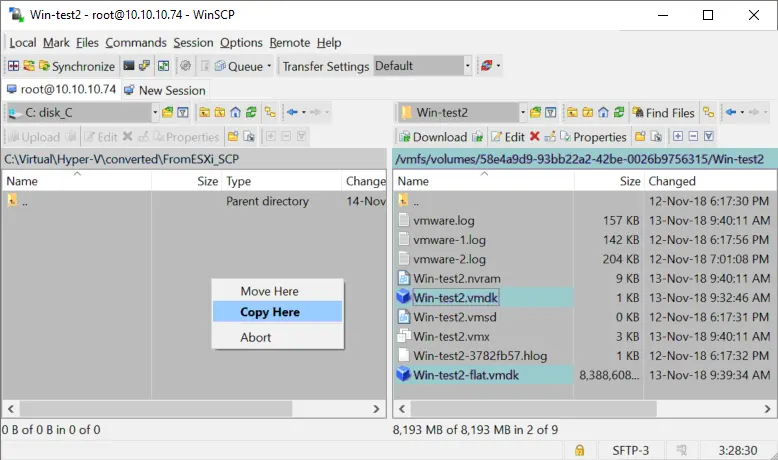
WinSCP has an intuitive GUI with two main panels where you can access files and directories. In the left panel, navigate to the directory where your VMDK files are stored before conversion. In the right panel, go to the VM directory on your ESXi datastore.
In this example, the path to that directory is /vmfs/volumes/SSD2/Win-test2. Select the two virtual disk files needed (.vmdk and –flat.vmdk) and copy them to your local directory. Simply drag and drop the files.
Converting a VMDK virtual disk copied from ESXi
The VMware virtual disk files copied from ESXi are now located on the Windows machine with Microsoft Virtual Machine Converter. We need to convert VMware to Hyper-V virtual disk format. Converting the virtual disks of an ESXi VM is similar to converting the virtual disks of a VMware Workstation VM. The main difference is that you now have two files (.vmdk and –flat.vmdk) rather than a single file.
- Open PowerShell and make sure that the appropriate converter module is imported. If it isn’t, type the following command:
Import-Module "C:\Program Files\Microsoft Virtual Machine Converter\MvmcCmdlet.psd1" - Now enter the following command to convert a virtual disk.
ConvertTo-MvmcVirtualHardDisk -SourceLiteralPath "C:\Virtual\Hyper-V\converted\FromESXi\Win-test2.vmdk" -DestinationLiteralPath "C:\Virtual\Hyper-V\converted\Win-test2PS" -VhdType DynamicHardDisk -VhdFormat VhdDefine the path to the .vmdk file (not to a –flat.vmdk file) for the –SourceLiteralPath argument.

- When the conversion process is successfully completed, create a new Hyper-V VM and use the existing virtual disk option to attach the VHD virtual disk that is ready after conversion (as explained above in this article). You can then edit VM configuration and run the virtual machine.
Common Conversion Errors and Resolutions
There are various errors that could prevent the conversion process from working. Let’s consider what issues can occur and how to resolve them.
The entry 1 is not a supported disk database entry for the descriptor
This error when converting a virtual disk from VMDK format to VHD format means that Microsoft Virtual Machine Converter cannot recognize some of the disk database entries. The number of the entry can vary – for example, you might see 2, 3, 4, etc., instead of 1. In order to fix this issue, edit the virtual disk descriptor.

Fixing the issue for a virtual disk of VMware Workstation format
A VMDK virtual disk of a VMware Workstation format has an embedded descriptor (the descriptor is integrated into the VMDK file with the disk data). You need to download a free utility kit to extract the virtual disk descriptor to a TXT file. You can then edit the descriptor and import the edited descriptor from the TXT file back into the VMDK file. The name of the utility kit is dsfok tools (DS File Ops Kit). You can download the dsfok kit here.
- Extract the files from the archive, for example, to C:\Virtual\_tools\dsfok
- Run CMD (Press Win+R, type cmd and press Enter). Go to the directory with dsfok tools:
cd C:\Virtual\_tools\dsfok - Run dsfo.exe with the following parameters:
dsfo.exe “C:\virtual\win7x64\win7x64.vmdk” 512 1024 descriptor-win7x64.txtwhere:
512 bytes is the offset
1024 bytes is the size of the exported data
Descriptor-win7x64.txt is the name of the file to which the descriptor is exported

- The descriptor is now extracted to the descriptor-win7x64.TXT file in the directory with dsfok tools.

- Edit the .txt file of the descriptor with a text editor (choose one that correctly recognizes the layout, such as Notepad++). Find the part of the descriptor with
ddb.toolsInstallType = "1"and comment that bit out by replacing the first “d” character with a “#” character. The format of the descriptor is not violated in this case and you have #db.toolsInstallType = “1” string as a result. The commented-out string is not processed when reading the descriptor’s configuration. Save the file when editing is finished.
- You now need to import the edited descriptor back into the VMDK file of VMware Workstation format. In order to do this, run
dsfi.exewith the following parameters:dsfi.exe "C:\virtual\win7x64\win7x64.vmdk" 512 1024 descriptor-win7x64.txt
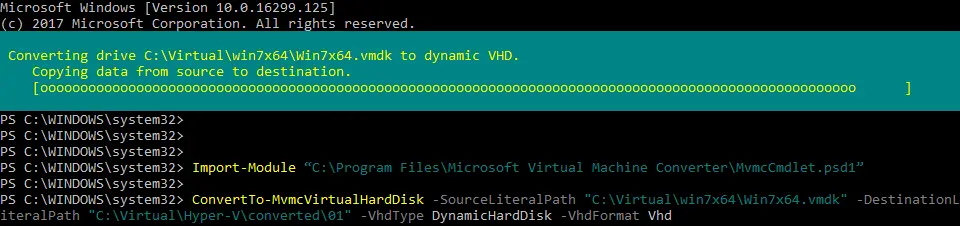
- Now you can convert the VMDK virtual disk to VHD format by running the following command in PowerShell:
ConvertTo-MvmcVirtualHardDisk -SourceLiteralPath "C:\Virtual\win7x64\Win7x64.vmdk" -DestinationLiteralPath "C:\Virtual\Hyper-V\converted\01" -VhdType DynamicHardDisk -VhdFormat VhdThe error is no longer shown and the conversion process starts.
- Once the virtual disk is converted to VHD format, you can create a new Hyper-V VM and attach the virtual disk (this process was explained earlier in this blog post). You can then run the VM on Hyper-V. However, another issue may occur. If your virtual machine doesn’t load and you see a blinking cursor on a black background, you need to fix the boot sector of the virtual disk.
Note: Windows 7 is installed on the virtual disk shown in this walkthrough example. You can use the same logic for VMs with Windows 10, Windows Server 2016, etc.
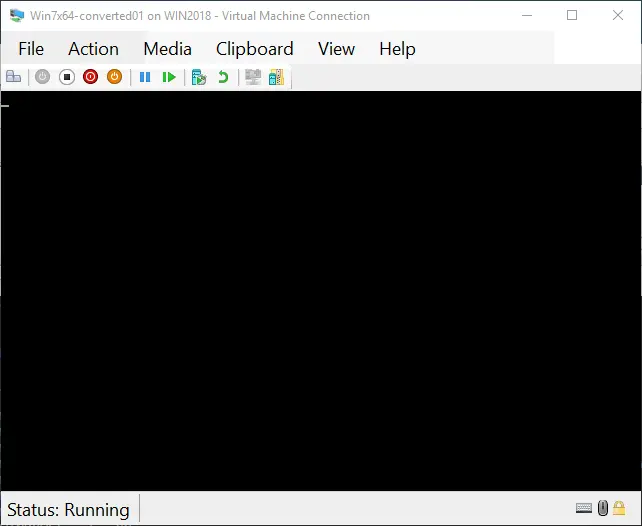
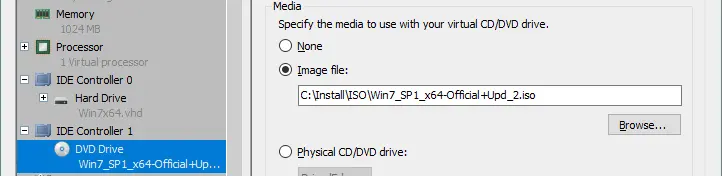
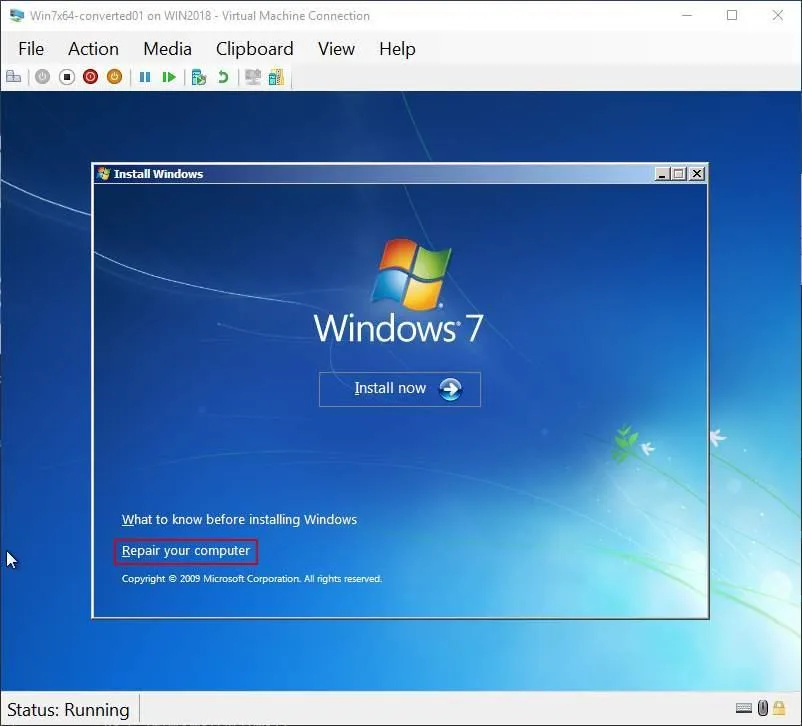
- Insert the ISO installation image of your Windows distribution and boot from the virtual CD/DVD drive. The built-in repair tools of the installation disc can be used to fix the boot sector, including the master boot record (MBR).
- Once the Windows installer is loaded, click Repair your computer.
- Select your operating system on the appropriate virtual disk and click Next.
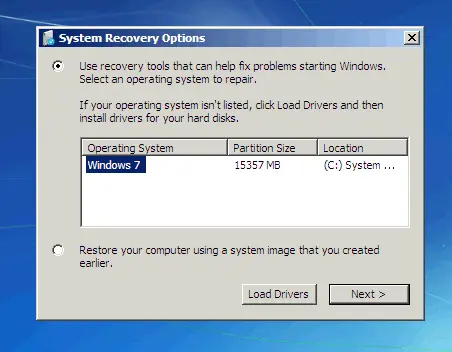
- Run the command prompt and execute the following commands:
bootrec /fixmbrbootrec /fixbootRestart the virtual machine and boot from the virtual hard disk.

- Your VM should now boot successfully.

Fixing the issue for a virtual disk of VMware ESXi format
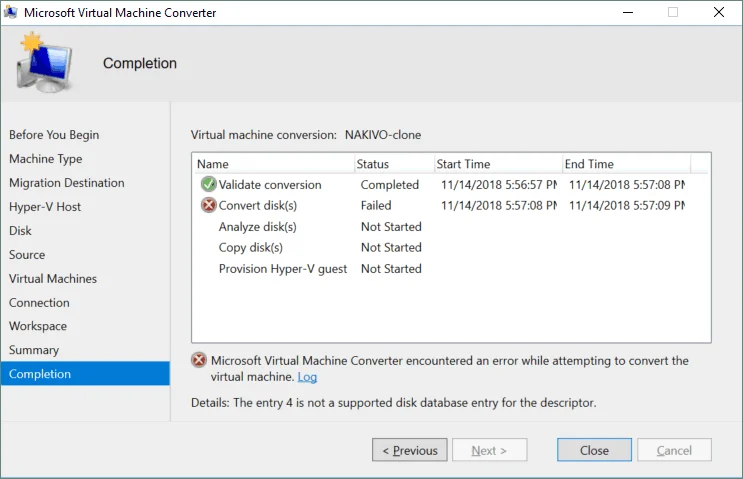
Let’s explore how to fix a similar issue when you export a virtual machine from VMware ESXi to Hyper-V. with a Linux VM (the VM name is NAKIVO-clone) and Microsoft Virtual Machine Converter returns the following error: The entry 4 is not a supported disk database entry for the descriptor. The method for fixing this issue is similar to the one explained in the previous example – you need to edit the descriptor of each virtual disk of the VM.
Keep in mind that a virtual disk of a VM running on VMware Workstation has an embedded descriptor (the descriptor is integrated into the VMDK file). By contrast, if a VM runs on an ESXi host, then the virtual disk data and descriptor are stored in two different files. Enable SSH access on the ESXi host where the VM you want to convert is registered. Log in to the ESXi console with an SSH client such as PuTTY.
- Go to the directory where the VM files are stored. In this example, the VM files are located in /vmfs/volumes/SSD1/NAKIVO-clone on an ESXi host. The name of the datastore is SSD1 in this case.
cd /vmfs/volumes/SSD1/NAKIVO-clone - Type
ls -alto list the files in the VM directory. As you can see from the screenshot below, the VM has two virtual disks.
- Edit the descriptor of the virtual disk using vi (the console text editor):
vi NAKIVO-clone.vmdk - Find the following string:
ddb.toolsInstallType = "4" - Edit the string by replacing the first “d” character with a “#” character. After editing the section, it should say: #db.toolsInstallType = “4”
Use the arrows to move your cursor. Press a to switch from navigation mode to editing mode for appending symbols. Once you have made the alteration, press Esc to exit the editing mode. Then type :wq and press Enter to write the changes to the file and exit.

- Check the virtual disk consistency after saving changes to the descriptor file:
vmkfstools -e Win7PMM.vmdk
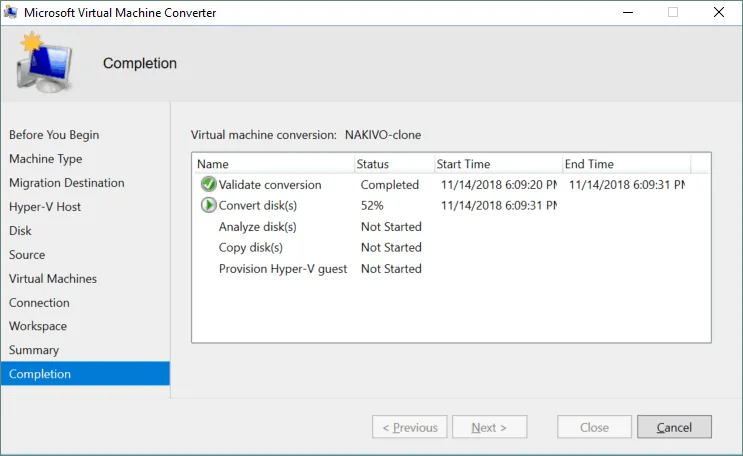
- Edit the descriptor of the second virtual disk in the same way. When the descriptors of all the VM’s virtual disks are edited, initiate VM conversion with Microsoft Virtual Machine Converter once again. The virtual disks of your VM can now be converted without errors.
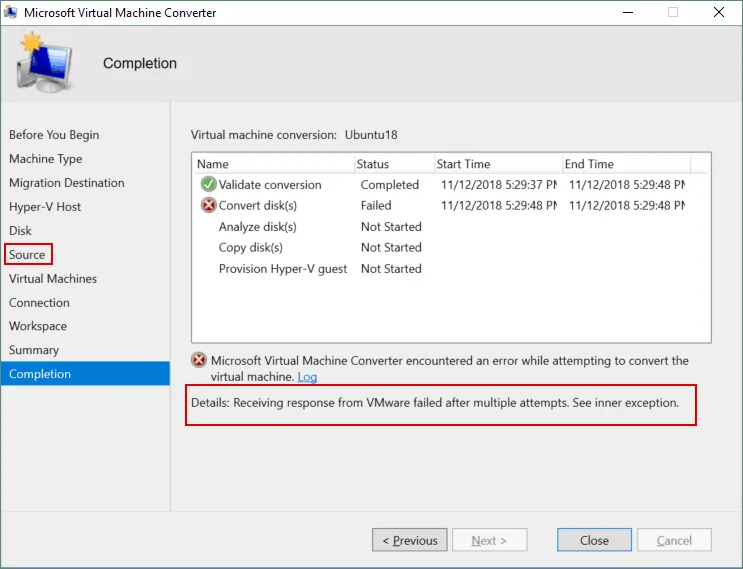
Receiving response from VMware failed after multiple attempts. See inner exception
This error can occur if an ESXi host is defined as a source in the GUI of Microsoft Virtual Machine Converter. If you use vCenter Server to manage ESXi hosts, including the current host, define the name or IP address and the credentials for the vCenter Server rather than the ESXi host in the Source section.
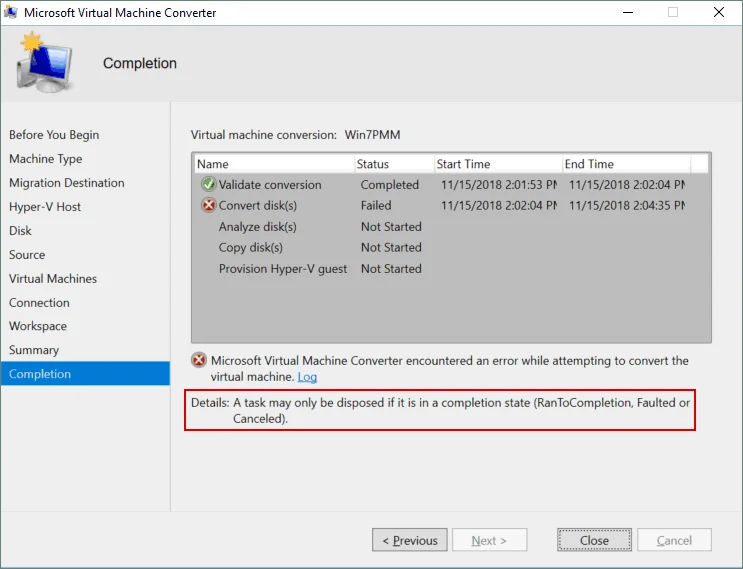
A task may only be disposed if it is in a completion state (RanToCompletion, Faulted or Canceled)
You can get this error when using Microsoft Virtual Machine Converter to convert a VM from ESXi to Hyper-V format. In this case, copy the virtual disk files (.vmdk and –flat.vmdk) to the machine with the converter installed, convert the virtual disks in PowerShell, then create a new Hyper-V VM, and attach the disks to that VM.
Convert a VMware VM to Hyper-V in VMM
System Center Virtual Machine Manager (VMM) is a massive solution with a wide set of options that allows you to convert VMware VMs to Hyper-V VMs. VMM is usually used in large environments with Hyper-V hosts and Windows servers.
Requirements
- System Center Virtual Machine Manager 2022 supports converting VMware VMs from vSphere 6.5 and newer.
- ESXi hosts must be added to System Center Virtual Machine Manager
- Converting EFI-based VMware VMs to Generation-2 Hyper-V VMs is supported
- VMware Workstation VMs cannot be converted with VMM
- Virtual hard disk connected to a virtual IDE controller cannot be converted
- Source VMs must be powered off to start the VMware to HyperV conversion process
- Uninstall VMware Tools before converting VMware VMs to the Hyper-V format
Using the wizard in VMM
Perform the following steps to convert a VMware VM to a Hyper-V VM:
- Navigate to VMs and Services > Home > Create > Create Virtual Machines > Convert Virtual Machine.
- In the Convert Virtual Machine wizard, you start at the Select Source step. Click Browse and within the Select Virtual Machine Source section, choose the VMware VMs you intend to convert from an ESXi host. Click Next at each step of the wizard to continue.
- In Specify Virtual Machine Identity, adjust the machine name and description according to your needs.
- In Virtual Machine Configuration, specify the desired number of processors and memory settings for a Hyper-V VM that will be created after conversion. You can select Generation1 or Generation2 for the destination VM.
- In the Select Host section, designate a destination Hyper-V host or Azure Stack HCI host (applicable from VMM 2019 UR3 and later) for VM placement. If you see the message “No available connection to selected VM Network can be found”, then you should navigate to the Fabric Resources, locate the Logical networks section and configure the network. You may need to restart VM conversion after editing these settings.
- Configure the storage location on the host for the VM files in the Select Path. Default VM paths are provided in the list.
- In the Select Networks segment, select the logical network, virtual network and VLAN as needed.
- Under Add Properties, configure the necessary settings. You can select Power On / Power Off options for the VM to be applied after conversion/deployment.
- In the Summary, review the settings and choose to start the virtual machine after deployment if required. You can click View script and save a text file with PowerShell commands to use this set of commands to convert more VMware VMs to Hyper-V VMs.
- Click Create to initiate the conversion process. Verify the progress and completion of the VM’s conversion by visiting VMs and Services > Home > Show > VMs.
You can open a list of System Center jobs to view the progress of VMware to Hyper-V migration with this VMM conversion tool. The conversion speed depends on the VM size, network speed, CPU, memory and storage resources of servers in the infrastructure.
To convert a VMware VM to Hyper-V with VMM in PowerShell, you can use the cmdlet:
New-SCV2V -VMHost <Host> -VMXPath <string> [options]
Conclusion
Microsoft Virtual Machine Converter (MVMC) is one of the most affordable tools that you can use to convert VMware VMs to Hyper-V format. It includes GUI tools and command line tools for PowerShell. With the MVMC GUI, you can convert entire VMs running on ESXi hosts. PowerShell cmdlets allow you to convert individual VMware virtual disks of ESXi format and Workstation format.
No matter which virtualization platform you use, your virtual machines must be backed up to prevent data loss and downtime. NAKIVO Backup & Replication can back up and replicate VMware VMs and Hyper-V VMs, and also helps you run VMs recovered from VMware backups on Hyper-V and vice versa with the advanced Cross-Platform Recovery feature.