Full Overview of Hyper-V Dynamic Memory Best Practices
Hyper-V Dynamic Memory was first introduced in Windows Server 2008 R2 with SP1. Prior to its release, a Hyper-V virtual machine (VM) would start and run with the full amount of RAM assigned to it, which resulted in memory overuse and affected overall VM performance. Moreover, the amount of available VM memory could be changed only when the VM was turned off. Thus, it is reasonable that static memory allocation had to be replaced with dynamic memory allocation and the Hyper-V Dynamic Memory feature was introduced.

What Is Hyper-V Dynamic Memory?
Hyper-V Dynamic Memory is a feature that allows you to dynamically allocate memory resources to the VMs running in Hyper-V environments. This functionality reclaims a part of unused memory from VMs that don’t need it at that particular moment and then reassigns the reclaimed memory to other VMs that actually require it.
With Hyper-V Dynamic Memory, you can specify the amount of startup memory that the VM can use, set the range of available physical memory for a specific VM, and determine the VM’s priority for memory allocation. Physical memory can be efficiently and dynamically assigned to the VM on an as-needed basis and with minimal performance impact. As a result, you have more granular control over memory usage and enhanced resource optimization.
Advantages and Disadvantages of Hyper-V Dynamic Memory
Hyper-V Dynamic Memory is a useful feature which offers a lot of advantages, such as:
- Reduced memory consumption, as the VM uses only the amount of memory that it actually needs within the limits set by an administrator
- Efficient memory distribution, as you can dynamically assign more or less memory to the running VM
- Higher consolidation numbers due to the more efficient use of memory resources
- Enhanced reliability for restart operations with the help of Hyper-V Smart Paging
- Cost-efficiency as VM resources are not wasted
However, Hyper-V Dynamic Memory also has a number of disadvantages, which can negatively affect VM memory performance. They include the following:
- Risk of overprovisioning computer physical memory in case you don’t keep track of memory allocation within your virtual environment
- Some memory settings cannot be changed when the VM is running. Thus, you cannot decrease or increase the maximum and the minimum memory amount, as well as modify the VM startup memory amount, when the VM is still running or paused.
- When Hyper-V Dynamic Memory is enabled, issues with database applications may occur. It is recommended that you use applications that are compatible with Hyper-V Dynamic Memory to avoid any performance issues.
Hyper-V Dynamic Memory Settings
Hyper-V Dynamic Memory includes five VM settings which can be configured in Hyper-V Manager. For that purpose, open Hyper-V Manager, select the required VM, click Settings, and choose Memory. You will see the following:
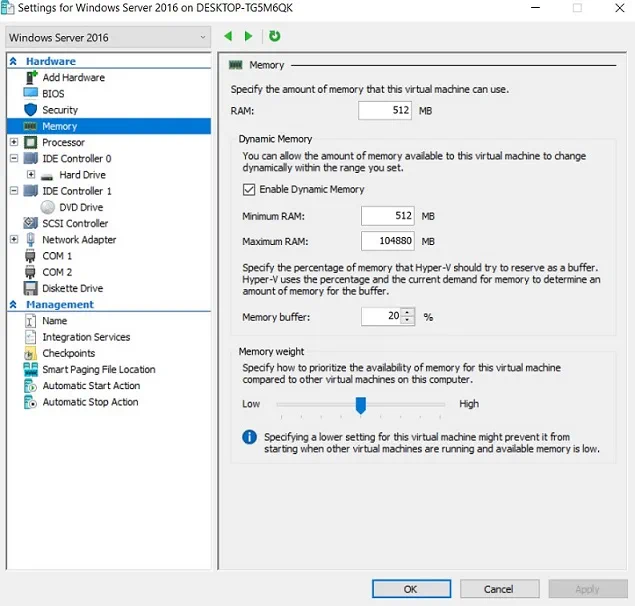
However, before you can start configuring Hyper-V Dynamic Memory settings, it is first recommended that you get to know how these components work and what benefits they can provide. Let’s take a look at each of them.
Startup RAM
This Hyper-V Dynamic Memory value defines the minimum amount of physical memory a selected VM can use during its startup. Startup RAM should be high enough to enable the VM to start rapidly and without interruption. Note that startup RAM cannot be changed when the VM is running.

Minimum RAM
This Hyper-V Dynamic Memory value determines the minimum amount of physical memory that should be assigned to the VM after it has started. If other VMs require additional RAM, the Hyper-V host can start reclaiming unused memory from this VM until the minimum RAM value is reached. Note that the value can be set as low as 32 MB but it can’t be higher than Startup RAM. Moreover, you cannot increase the minimum memory while the VM is running or paused, but you can decrease it (e.g. you can change the minimum RAM value from 512 MB to 64 MB).
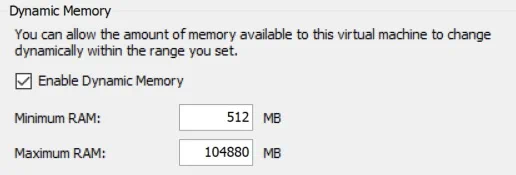
Maximum RAM
This Hyper-V Dynamic Memory value specifies the maximum amount of physical memory that the VM can use. Note that this value cannot be lower than the assigned Startup RAM but can go as high as 1 TB (1,048,576 MB). Moreover, you cannot decrease the maximum memory amount while the VM is running or paused, but you can increase it (e.g. you can change the maximum RAM value from 512 MB to 2048 MB).
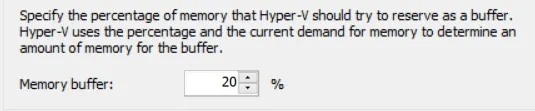
Memory Buffer
This Hyper-V Dynamic Memory value determines the percentage of physical memory that should be allocated to the VM as a buffer. Memory buffer is a portion of physical memory which is set aside for the VM based on its memory needs. To calculate the memory buffer, you need to use the following formula:
Amount of memory buffer = how much memory the virtual machine actually needs / (memory buffer value / 100).
By default, the memory buffer value amounts to 20% but it can be set up to be as low as 5% and as high as 2000%. You can change the memory buffer value at any point, even while the VM is running.
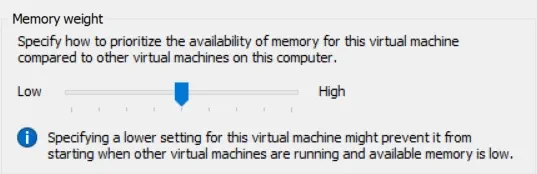
Memory Weight
This Hyper-V Dynamic Memory value specifies the priority of the selected VM compared to other VMs on this host. Based on this order of priorities, you can determine how to distribute the available memory among multiple VMs running on the same Hyper-V host.
Note that if the VM priority is set too low and the amount of available physical memory decreases, there is a risk that this VM will not be able to boot. You can change the memory weight value at any point, even while the VM is running.
Hyper-V Dynamic Memory Best Practices
To achieve high performance and improve memory utilization in Hyper-V environments, it is recommended that you adhere to Hyper-V Dynamic Memory best practices.
The Hyper-V Dynamic Memory best practices listed below can considerably improve VM memory performance and your overall experience in Hyper-V environments.
Enable Hyper-V Integration Services
Hyper-V Integration Services is a set of utilities which allow for improving VM performance in Hyper-V environments. Each Hyper-V Integration Service must be enabled in both the host and guest so that they can properly function and deliver services as required. By default, all Hyper-V Integration Services, except for Hyper-V Guest Service Interface, are enabled on the guest OSs.
For Hyper-V Dynamic Memory to function effectively, make sure that Hyper-V Integration Services are upgraded to the latest version and that the guest operating system supports the Dynamic Memory feature. Otherwise, Hyper-V may experience issues because memory cannot be provided dynamically and memory demands cannot be addressed properly.
Since the release of Windows Server 2016, Hyper-V Integration Services and corresponding updates can be installed through Windows Update. Therefore, you should configure your VMs to receive updates in order to make sure your Hyper-V infrastructure uses the latest version of Hyper-V Integration Services.
Monitor memory usage and resource allocation
Currently, there are many Hyper-V management tools on the market which allow you to monitor memory usage and resource allocation in Hyper-V environments. With Hyper-V Dynamic Memory enabled, it is possible to overprovision RAM and completely run out of memory. Thus, it is recommended that you keep track of the RAM that you allocate to various VMs on your Hyper-V host.
For this purpose, you can use native monitoring tools or purchase third-party software. For example, you can check the VM memory state through the host in Hyper-V Manager or the guest VM in Task Manager.
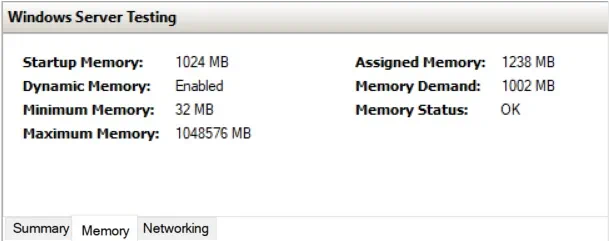
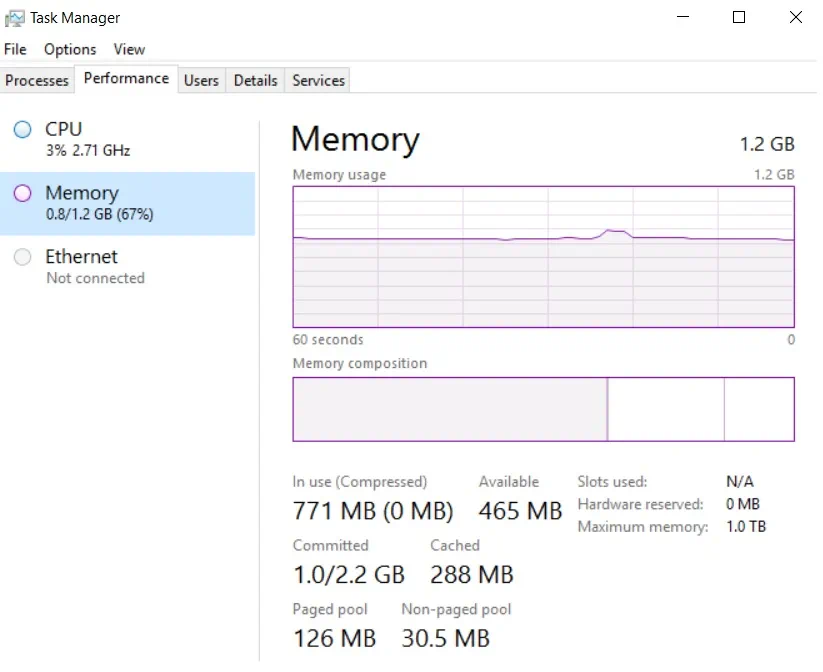
This way we can monitor how memory resources are used within the system. However, note that Hyper-V Manager and Task Manager demonstrate different outputs for memory usage. The guest monitoring tool doesn’t show the actual results because the guest VM believes that the total amount of memory assigned to the VM is actually in use by its driver. In reality, the host is generally more aware of the way memory is being distributed to VMs within the infrastructure. Unused memory is actually reassigned to other VMs and this is reflected in Hyper-V Manager.
Take into account Startup RAM
Setting up Startup RAM higher or lower can considerably affect Hyper-V performance. You should increase the Startup RAM to ensure that the OS and the applications running on it start as required. This is due to the fact that Windows requires more RAM during startup than when the OS is idle.
Moreover, during install or upgrade operations, the amount of RAM available to the guest OS is equal to the Startup RAM value. Therefore, before performing installation or upgrades, it is critical to ensure that the Startup RAM value meets the minimum memory requirements of the selected OS.
Note that if the Startup RAM value is set too high, this might also negatively affect Hyper-V Dynamic Memory performance and overall memory usage. Thus, it is recommended to assign 512 MB as the Startup RAM value for the guest OS so that it would boot without interruption.
Don’t forget about memory leaks
When setting Hyper-V Dynamic Memory limits for a particular VM, it is critical to keep in mind that your infrastructure may be subjected to memory leaks. Memory leaks imply the gradual loss of available memory as a result of incorrect memory allocation. It usually occurs when an application fails to release memory which was provided only for temporary use. If the issue is not detected before any serious damage is done, the OS memory can become exhausted and the application will eventually fail.
In order to mitigate negative effects of this issue, it is recommended that you install a monitoring tool (e.g. RAMMap) and scan the entire infrastructure for any inconsistencies and detect unusual cases of memory usage by running applications. Also, such tools can help you determine the minimum and maximum RAM values which would be most appropriate for this particular VM.
Configure the Maximum and Minimum RAM values
To ensure that Hyper-V Dynamic Memory functions as required, it is recommended that you determine limits which the system cannot exceed. This way, memory utilization within your infrastructure is effectively controlled, meaning that the VM won’t consume too much or too little memory.
Carefully set the Memory Buffer value
One Hyper-V Dynamic Memory best practice is to assign the appropriate Memory Buffer value, which specifies how much extra memory should be made available for a selected VM. If the Memory Buffer value is set high, this extra amount of memory is generally used for file caching in large-scale VMs and streamlining I/O operations within the system.
At the same time, the Memory Buffer value should be set low if there is a running application that requires a large amount of physical memory. With the reduced Memory Buffer value, you can be sure that the available memory is not completely consumed by a single VM.
Moreover, if a large amount of memory has already been assigned to the VM, it is unlikely that it will ever require extra memory. Thus, it makes more sense to share unused memory resources with other VMs which need it more.
Update Hyper-V hosts when needed
In order to keep your Hyper-V environment stable and secure, make sure that your Hyper-V hosts install all updates and security patches when required. The main purpose of Microsoft updates and security patches is to deal with the issues that have been identified in the system. For example, an issue with Hyper-V Dynamic Memory that prevented Hyper-V VMs from getting additional memory was detected in Windows Server 2012 R2. Even though the feature was enabled on the VMs, it still continued to fail. Due to this fact, Microsoft released the hotfix in order to remove the issue and ensure that the functionality works as required.
Detect performance changes in the course of the day
Production workload increases considerably during working hours, which eventually affects Hyper-V performance as well as resource allocation and memory utilization. As one of Hyper-V Dynamic Memory Best Practices, it is recommended that you monitor the changes in memory usage throughout the course of the working day. By detecting when the cycles of high and low memory usage typically occur, you can learn how to use Hyper-V Dynamic Memory to your advantage.
Enable Hyper-V Dynamic Memory when it is actually required
Even though Hyper-V Dynamic Memory is an extremely helpful feature which improves the use of physical memory, there are some cases when static memory allocation is the preferable option. Thus, you should consider whether Hyper-V Dynamic Memory needs to be enabled on a particular VM or not. For example, some applications perform better if they have a pre-determined amount of RAM which they can use without interruption. The amount of pre-assigned RAM stays the same despite the fluctuations in memory demands.
Thus, it is recommended that you plan ahead how physical memory will be distributed in your Hyper-V environment so as to prevent running low on RAM and avoid application failures in future.
Use Hyper-V Dynamic Memory with compatible applications only
Before installing any application on your Hyper-V host or guest, make sure that this application can be used along with Hyper-V Dynamic Memory. To check such information, it is recommended that you first read product support documentation to know about its functions and system requirements. Such precautionary measures can help you avoid any issues with memory usage and allocation which might occur.
Wrapping Up
After learning about Hyper-V Dynamic Memory best practices, you can start using physical memory more efficiently and securely. However, your virtual infrastructure is still exposed to various dangers and threats which can undermine its performance. To ensure safety of your virtual environment, using a data protection solution is the most feasible option. NAKIVO Backup & Replication is a reliable, effective, and affordable solution which provides VM backup, replication, backup to cloud, backup copy, site recovery and a rich set of features.