Essential Hyper-V PowerShell Commands: What They Are and How to Use Them
Managing Hyper-V environments can be a challenging task. Thus, you need a powerful management tool to configure and control your virtual infrastructure from a central console. In addition to the graphical user interface, Hyper-V provides a command line interface using PowerShell for Hyper-V management.
In this blog post, we describe how PowerShell works, which Hyper-V PowerShell commands can improve virtual machine (VM) performance, and how this CLI tool can considerably simplify the process of Hyper-V management.

What Is PowerShell?
PowerShell is a task automation and configuration management framework developed by Microsoft, which includes a command-line shell and associated scripting language built on the .NET Framework and .NET Core.
PowerShell commands, also known as cmdlets, can be used to automate various tasks by arranging several cmdlets in a single PowerShell script. Microsoft has developed more than one hundred core PowerShell commands that can be used for performing complex as well as basic tasks.
What Can PowerShell Do?
PowerShell can help Hyper-V administrators rapidly automate tasks that manage operating systems (Linux, macOS, and Windows) and associated processes. Unlike GUI tools, PowerShell allows you to manage the entire system using only the command line.
Moreover, you can save required Hyper-V PowerShell commands in a text file (with the .ps1 extension) and then run this script to perform certain tasks. What’s more, you can schedule PowerShell scripts to run at a set time using Task Scheduler.
How to Open PowerShell
There are a couple of ways we can run PowerShell in Hyper-V. An easy way to gain access to PowerShell is to connect directly to a Hyper-V server and launch it from there. To connect remotely to a Hyper-V host, we need to make sure Remote Desktop is enabled. Once Remote Desktop is enabled, we can use the Remote Desktop utility and connect remotely to the server as we would with any Windows Server GUI (graphical user interface).
Opening PowerShell from the GUI
To open PowerShell in a GUI-based OS, follow these steps:
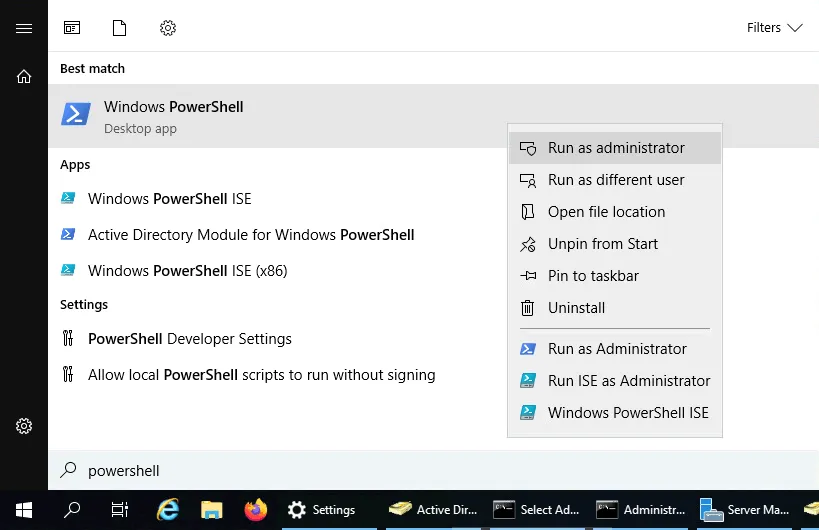
- You need to click Start and type PowerShell in the search bar.
- Right-click the PowerShell icon and select Run as Administrator to open PowerShell in elevated mode.
Opening PowerShell from the command line
To run PowerShell if you’re running Windows Server Core or Hyper-V Server, follow these steps:
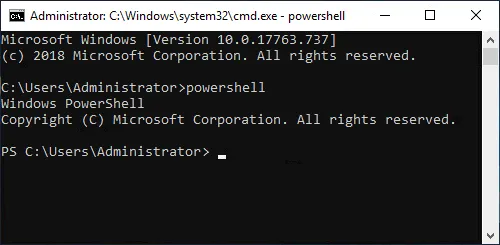
- Type PowerShell in the Command Prompt and press Enter.
- A Windows PowerShell session should start automatically in the Command Prompt window. A PS prefix is then added to the command prompt to indicate that you have started a Windows PowerShell session.
- Once you are in PowerShell, you can use Hyper-V specific PowerShell commands, which we cover below in this post.
Remote Settings
To check remote desktop settings in Windows Server Core or Hyper-V Server, you can launch the sconfig utility if not already launched and configure it using option 7. Also, once connected remotely to the Hyper-V host, you can use option 15 to Exit to Command Line.
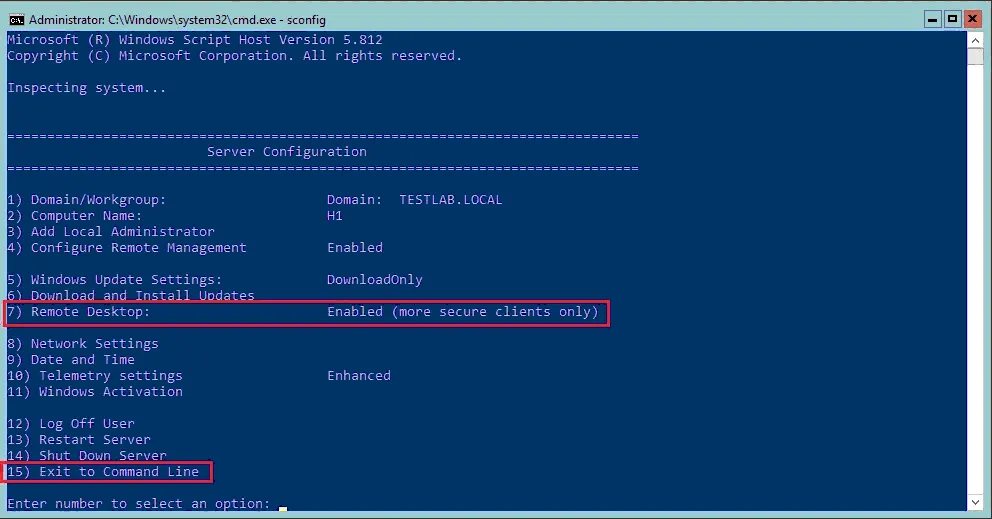
Once there, you are in a regular cmd.exe environment – not PowerShell. To launch a PowerShell environment, simply type powershell in the command line.
Remote PowerShell
Using PowerShell, you can also remotely interact with Hyper-V. In other words, you can remotely execute PowerShell commands on the Hyper-V host without establishing a Remote Desktop connection.
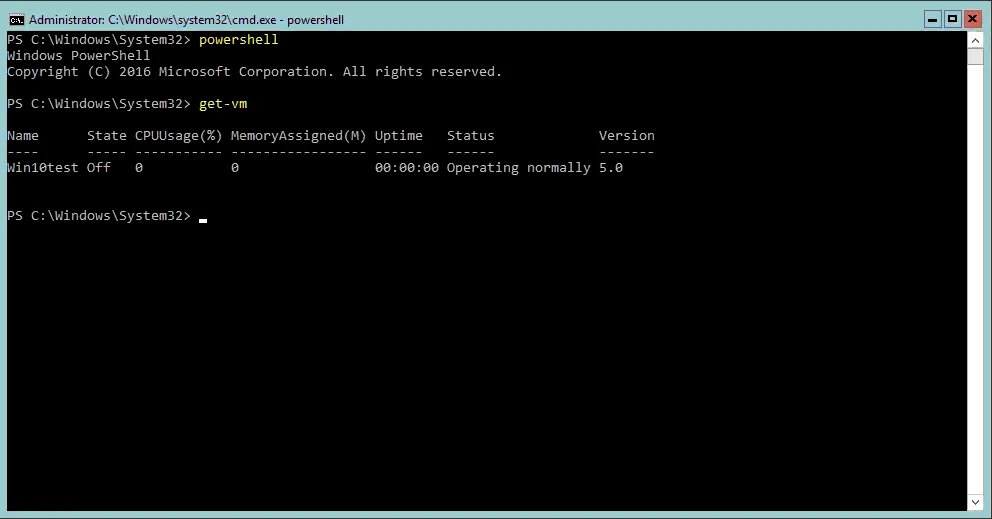
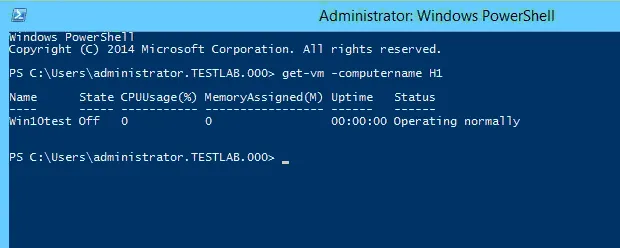
From the administration workstation on which we have Hyper-V management tools loaded, we can execute our Hyper-V commandlets. First, we need to install the Hyper-V tools, including these commandlets (cmdlets).
Install-WindowsFeature RSAT-Hyper-V-Tools
Once we have the tools loaded, we can run the same types of commands using the -computername parameter pointing to our Hyper-V host like in the screenshot below. We pass the name of our host to the get-vm PowerShell commandlet.
12 Essential Hyper-V PowerShell Commands
There are a number of effective Hyper-V PowerShell commands that can make the process of managing Hyper-V easy and simple. Let’s look at how you can use different Hyper-V PowerShell commands.
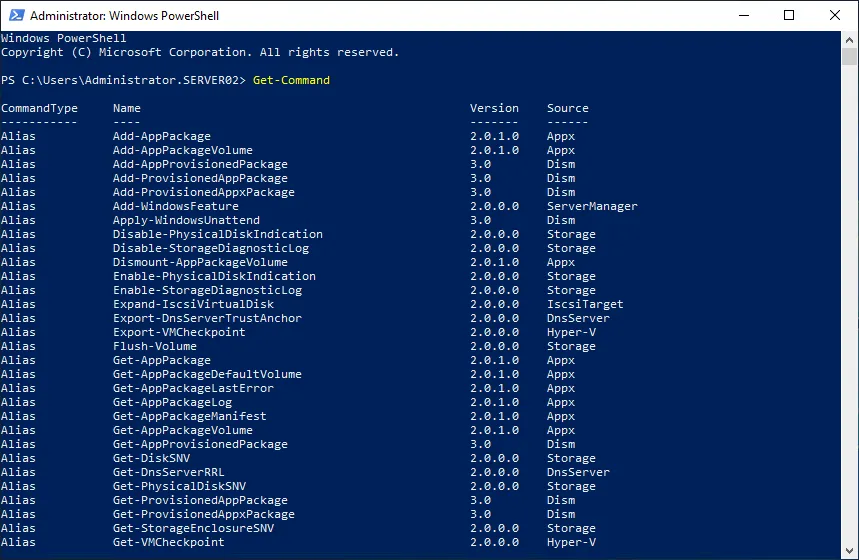
Get-Command
Let’s start with a Hyper-V PowerShell command that is helpful for users who are new to PowerShell and don’t know which cmdlets should be used and how. By running the Get-Command cmdlet, you can see the full list of all available cmdlets (Windows PowerShell commands), functions, and aliases installed on the computer.
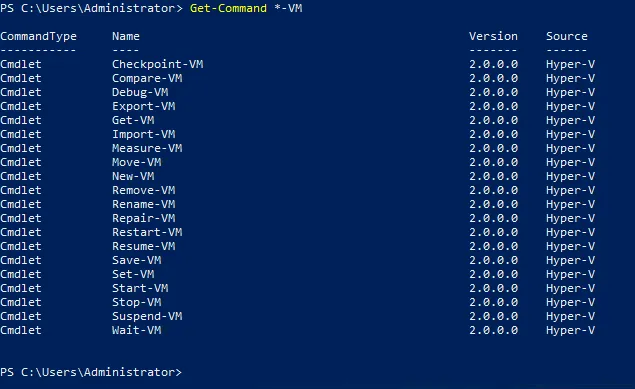
However, if you wish to narrow down your search and get the list of Hyper-V PowerShell commands that match specific criteria, you can use the Get-Command *-VM cmdlet to find the list of commands that allow you to control and configure VMs.
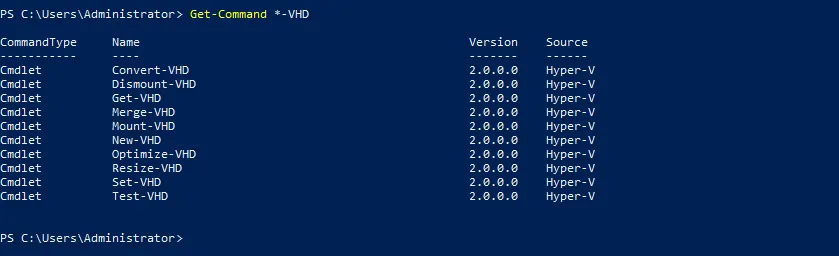
By changing the VM parameter to VHD, you can get the full list of cmdlets used for managing virtual hard disks. Thus, you can try out various search parameters to get the results you need.
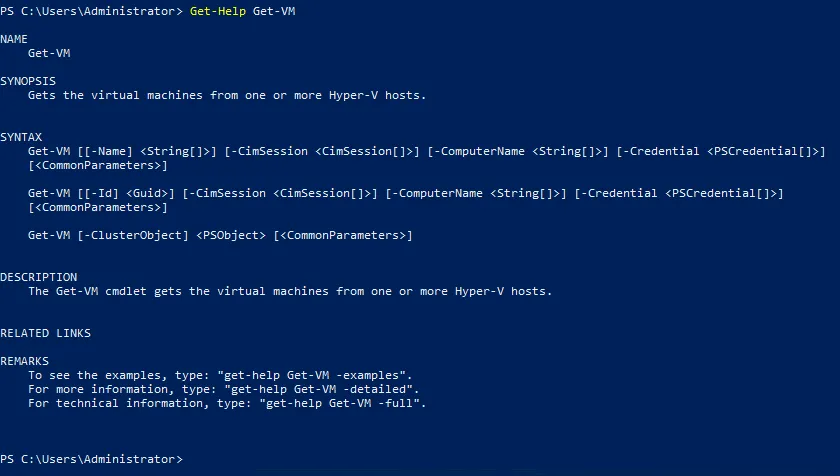
Get-Help
Once you have decided which Hyper-V PowerShell command you want to use, you can learn more about that cmdlet. For this purpose, you can use the Get-Help cmdlet. For example, to find out more about the Get-VM cmdlet, type the following:
Get-Help Get-VM
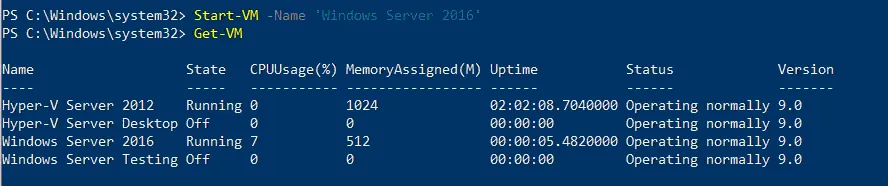
Get-VM
The Get-VM PowerShell command allows you to see all of the VMs available on one or more Hyper-V hosts. To see all VMs on the local Hyper-V host, you should run the Get-VM PowerShell cmdlet.

On the PowerShell screen, you can see the list of available VMs, including their name, state, CPU usage, memory assigned, uptime, status, and version.
Start-VM
This particular start VM PowerShell cmdlet helps you start a VM. For this purpose, run the following Hyper-V PowerShell command:
Start-VM -Name 'Windows Server 2016'
As a result, the VM named Windows Server 2016 is started on your local Hyper-V host. Let’s check to see if the VM has actually started by running the Get-VM cmdlet.
Moreover, you can use a modified version of the Start-VM PowerShell cmdlet to launch VMs only if their names start with Hyper-V:
Start-VM -Name Hyper-V*
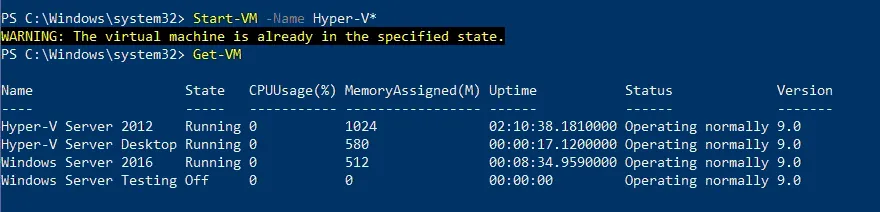
As you can see, the VM named Hyper-V Server Desktop has successfully started. However, another VM (Hyper-V Server 2012) has already been in a running state and PowerShell notifies you of this.
Stop-VM
The Stop-VM cmdlet allows you to shut down or turn off a VM. For this purpose, you can run the following cmdlet:
Stop-VM -Name 'Windows Server 2016'

As you can see, the selected VM has been successfully shut down through the guest OS.
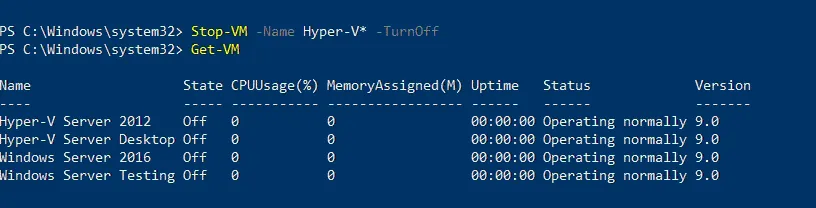
Another example is that you can turn off the VMs whose names start with Hyper-V:
Stop-VM -Name Hyper-V* -TurnOff
If you find that your VM is not responding, you can force its shutdown. To do this, run the following PowerShell cmdlet:
Stop-VM -Name 'Windows Server 2016' -Force
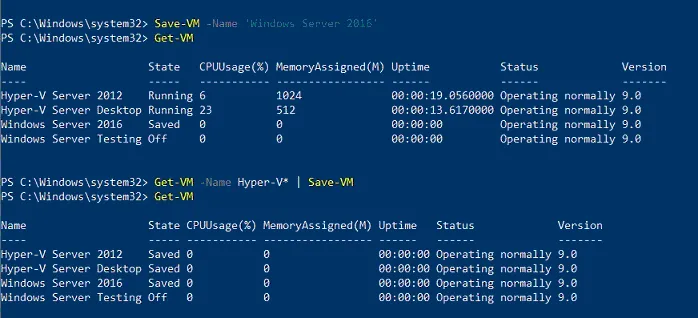
Note that forced shutdown is similar to pulling the power on a physical machine, meaning that it can result in a loss of unsaved application data. In this case, it is recommended that you save the VM in order to avoid potential data loss. For this purpose, you need to run the Save-VM cmdlet, which is equivalent to hibernating a physical computer:
Save-VM -Name 'Windows Server 2016'
If you want to save the VMs whose names start with Hyper-V, run the following Hyper-V PowerShell command:
Get-VM -Name Hyper-V* | Save-VM
Checkpoint-VM
The Checkpoint-VM cmdlet helps you create a Hyper-V VM checkpoint (also known as a Hyper-V snapshot). Run the following cmdlet to create a checkpoint named Update1 of the specific VM (Windows Server 2016):
Checkpoint-VM -Name 'Windows Server 2016' -SnapshotName Update1
To verify that the VM has been successfully created, use the following Hyper-V PowerShell command:
Get-VMSnapshot -VMName 'Windows Server 2016'

On the other hand, if you want to delete certain Hyper-V snapshots, you can use the Remove-VMSnapshot cmdlet. For example, if we want to delete all VM snapshots whose names start with Testing, we should run the following cmdlet:
Get-VM 'Hyper-V Server 2012' | Remove-VMSnapshot -Name Testing*
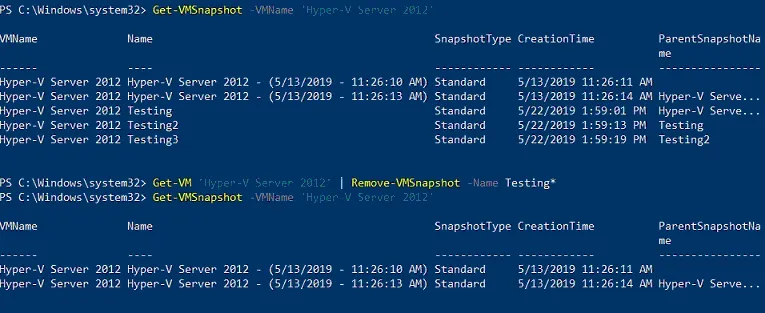
The screenshot above demonstrates the entire process of deleting the selected Hyper-V snapshots.
Test-VHD
This Hyper-V PowerShell command is intended for verifying that the virtual hard disk file actually exists and can be used for Hyper-V deployment. This cmdlet is as follows:
Test-VHD -Path C:\Testing.vhd
In the case that the VHD path is valid, you would see the following output on your screen:
![]()
To learn more about managing virtual hard disks using PowerShell cmdlets, we recommend that you read our blog post about the basics of working with Hyper-V VHD and VHDX files.
Measure-VM
This Hyper-V PowerShell command allows you to gather resource utilization data for a specific VM. For example, run the following cmdlet to learn about CPU usage, RAM usage, disk capacity, and network traffic for the VM named Windows Server 2016:
Measure-VM -VMName 'Windows Server 2016'

Note that the Measure-VM cmdlet can report required data only after resource metering has been enabled on a VM. To enable resource metering, use the following Hyper-V PowerShell command:
Enable-VMResourceMetering -VMName 'Windows Server 2016'
Get-VMNetworkAdapter
Another helpful PowerShell cmdlet is Get-VMNetworkAdapter, which allows you to identify the virtual network adapters of the selected VM. For example, if you want to find virtual network adapters from all VMs as well as the management OS, you should run the following Hyper-V PowerShell command:
Get-VMNetworkAdapter –All
If everything is correct, you should see the following information in your PowerShell console:
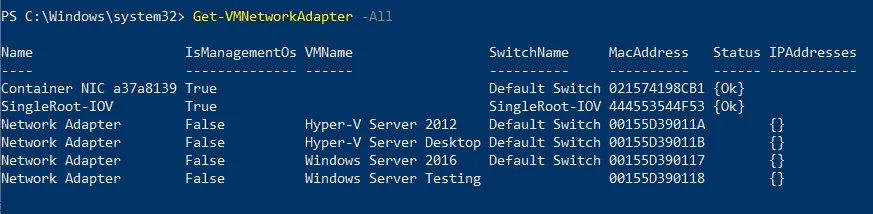
Using Hyper-V PowerShell commands, you can perform various simple as well as complex tasks with your Hyper-V network adapters. Check out our guide on the cmdlets that can help manage and configure virtual network adapters in your Hyper-V environment.
Update-VMVersion
PowerShell has a cmdlet that allows you to update the version of the selected VM:
Update-VMVersion -Name 'TestVM'
After running the Hyper-V PowerShell command, the VM named TestVM can be updated to the current VM version.

Get-Process
This Hyper-V PowerShell command can help you see all the current processes on your local computer. After running the Get-Process cmdlet, you can get the following information on your screen:
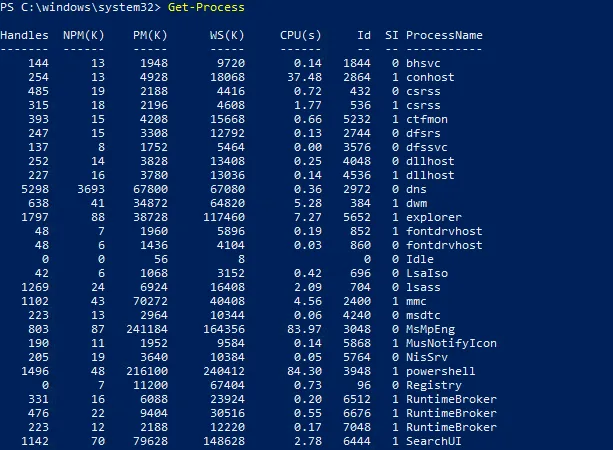
This table includes information about:
- the number of handles the process has opened
- the amount of non-paged memory the process is using
- the amount of pageable memory the process is using
- the size of the working set of the process
- the amount of virtual memory the process is using
- the amount of the processor time that has been allocated to all processors
- the process ID
- the process name
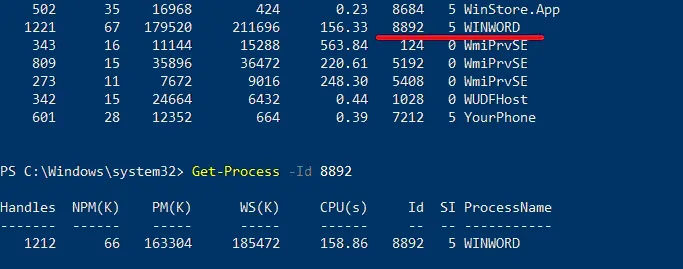
To narrow down the search and find a specific process, you should type the process name or ID. For example, if you want to learn how Microsoft Word is currently working, you should look through the list of all the running processes and find the line with the information about Microsoft Word (that is, WinWord), including its process ID. Using the process ID, you can run the following cmdlet to get the necessary data:
Get-Process -ID 8892
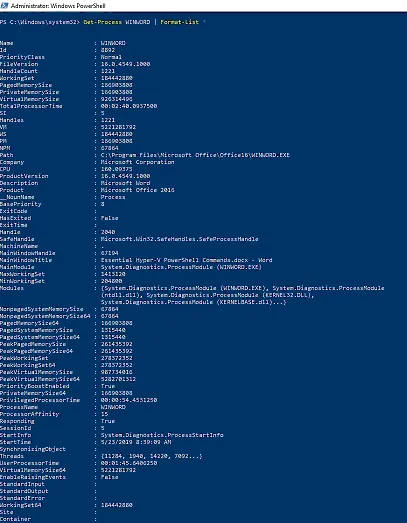
Furthermore, the data about the current WinWord processes can be presented in another format, that is, as a list of properties. Run this cmdlet to get a more detailed output:
Get-Process WINWORD | Format-List *
After getting hold of the process data, you can run the following cmdlets:
Stop-Processallows you to stop one or more running processes.Wait-Processallows you to wait for one or more running processes to be stopped before enabling any other input.Start-Processallows you to start one or more processes on the local computer.Debug-Processallows you to attach a debugger to one or more running processes on the local computer.
For example, if you want to launch the Notepad application from PowerShell, you should run the following cmdlet:
Start-Process -FilePath "notepad.exe"
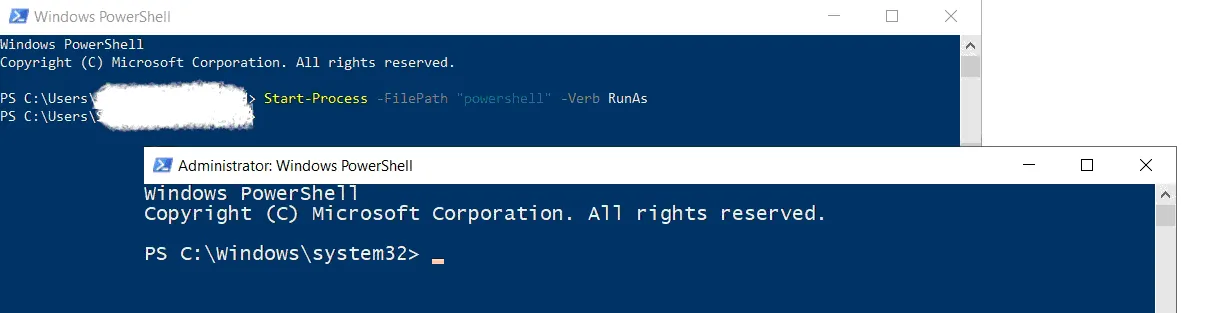
Another example is when you have opened PowerShell in “normal” mode, but you need to run PowerShell in elevated mode to get access to administrative rights. In such case, run the following Hyper-V PowerShell command:
Start-Process -FilePath "powershell" -Verb RunAs
On the other hand, if one of the running processes stops responding, you can run the Stop-Process cmdlet to halt the failed application:
Stop-Process -Name "notepad"
In this case, all instances of the Notepad application on the local computer are stopped.
Each Notepad instance has its own process ID. If you want to stop a particular Notepad instance, you should use the ID parameter in the Stop-Process cmdlet. For this purpose, you first need to run the Get-Process cmdlet, find the required active processes, and identify the process ID that you want to stop.
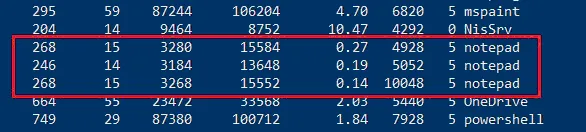
For example, you can stop the specific Notepad process by identifying its process ID and running the following Hyper-V PowerShell command:
Stop-Process -ID 5052
As a result, only the selected Notepad process is stopped.
These PowerShell commands allow you to detect a process that is consuming unwanted resources and reducing Hyper-V performance in order to end this process.
Where-Object
This Hyper-V PowerShell command allows you to filter pipeline objects and find the exact data that you need. In this case, you need to create a PowerShell script in which you specify which objects can be passed along the pipeline. Using various search criteria, you can find any object on the local computer.
For example, if you would like to locate the processes which have stopped running, use this cmdlet:
Get-Service | Where-Object {$_.Status -eq 'Stopped'}
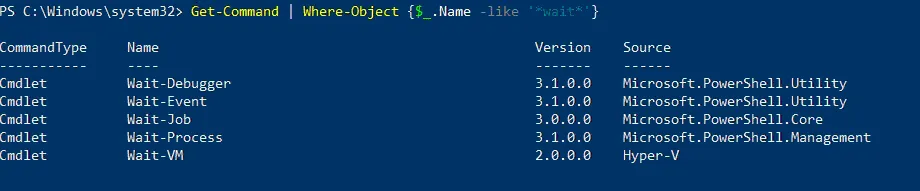
Another example of using the Where-Object cmdlet is when you want to find a specific cmdlet. The following Hyper-V PowerShell command can help you find all cmdlets which start with Wait:
Get-Command | Where-Object {$_.Name -like '*wait*'}
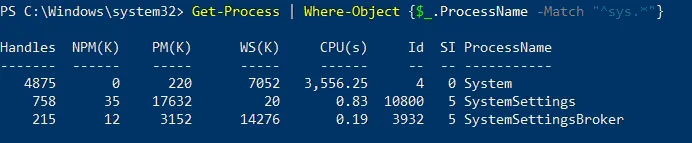
The next Where-Object cmdlet can help you find a particular process based only on its name. By running the following command, you can get a list of all the processes whose names start with sys:
Get-Process | Where-Object {$_.ProcessName -Match "^sys.*"}
How to Create a Hyper-V VM Using PowerShell
One of the powerful built-in features of Hyper-V is allowing the use of PowerShell for management operations. Among the many things that we can do with PowerShell in Hyper-V is create virtual machines. Let’s look at a set of Hyper-V PowerShell commands for creating new VMs.
PowerShell commands to create a new VM
To create a new Generation 2 VM with a brand new 60 GB VHDX hard disk and connect it to a specific virtual switch (in this case, “ExternalSwitch”), run the following PowerShell commands on your Hyper-V host.
-
Creating a VM:
new-vm -Name "WSTEST" -MemoryStartupBytes 2GB -Generation 2 -NewVHDPath "D:\hyper-v\virtualhard disks\WSTEST.vhdx" -NewVHDSizeBytes 60000000000 -Switchname "ExternalSwitch" -
To add a DVD drive along with an ISO image to boot from, we can run addition commands:
Add-vmscsicontroller -vmname WSTESTAdd-vmdvddrive -vmnname WSTEST -controllernumber 1 -controllerlocation 0 -path D:\ISO\my.iso -
If we want to create a fixed size disk and attach it to our VM, we can run the following to create a fixed size VHDX and attach it to our VM:
new-vhd -path "d:\hyper-v\virtual hard disks.wstest.vhdx" -sizebytes 60GB -fixedadd-vmharddiskdrive -vmname WSTEST -path "d:\hyper-v\virtual hard disks\wstest.vhdx"
Conclusion
PowerShell might seem intimidating at first, but once you learn how to work with it, you can quickly discover how to use Hyper-V PowerShell commands and streamline administration in your Hyper-V environment. Just keep in mind that whatever you use to manage your VMs, you need to be creating backups to avoid data loss and downtime.
NAKIVO Backup & Replication is a reliable and powerful data protection solution, which can help you protect VMware, Hyper-V, Nutanix, AWS EC2, Linux, Windows and Microsoft 365 environments.