How to Configure Hyper-V VMs in Windows Server 2016 and Newer
The point of setting up the Windows Server 2016 Hyper-V hypervisor is to host virtual machines. Once you have installed the Hyper-V role, the virtual machine configuration and creation process in Windows Server 2016, 2019 and 2022 is identical. As a result, you can use the same workflow to create and configure a virtual machine (VM) in modern Windows Server operating systems.
Let’s explore how to create and configure VMs in Windows Server 2016 Hyper-V.
Creating a Hyper-V Virtual Machine
Start by using Hyper-V Manager to connect to the Hyper-V host. Hyper-V Manager is included in Remote Server Administration Tools (RSAT) for client operating systems such as Windows 10 or included in the Server Manager “install features” section of Windows Server 2016 and 2019. Note that RSAT is a separate download.
To begin, right-click your Hyper-V host and select New > Virtual Machine.

This launches the New Virtual Machine Wizard.
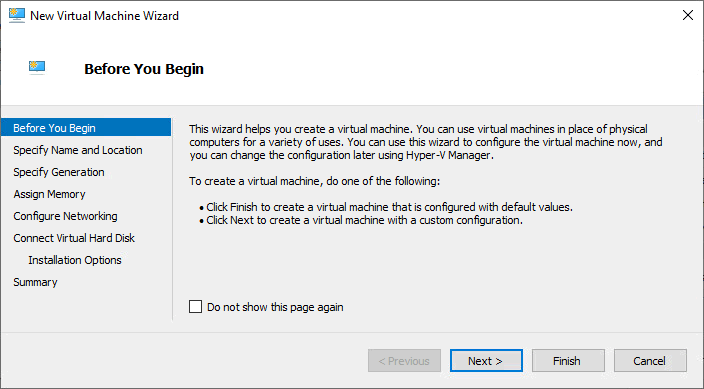
- Before you begin. Read the wizard introduction if you want and click Next. You can select the checkbox not to show this page again when you create a new virtual machine in Hyper-V.
- Specify Name and Location for your new Hyper-V VM. Begin the configuration by selecting a name (WStest in our example). The path saved in the Hyper-V configuration is used by default to store VM files. You can select the Store the virtual machine in a different location checkbox to define a custom path for this virtual machine configuration.

- Specify Generation. Once a VM is created, you cannot change its generation. So make sure you choose the right generation before proceeding.
- For greater compatibility, including moving to Azure, Generation 1 VMs should be selected. If none of the limitations mentioned are true, and you want to use features like UEFI secure boot, then Generation 2 would be the better choice.
- Note that Generation-2 VMs are only compatible with Hyper-V versions 2012 R2 and later. Windows Server 2012/Windows 8 64-bit and above are supported with Generation-2, but 32-bit versions of those operating systems do not work.

- Assign Memory. Memory management in Hyper-V has an option called Dynamic Memory. You can see the checkbox that can be selected to enable the feature at this stage. If you choose to enable this option, Hyper-V cooperates with the VM guest operating system in managing guest operating system memory.


- Configure Networking. In order for a particular VM to have connectivity to the network, you must attach a virtual switch that is connected. You can also leave a VM in a disconnected state, as a connection to a network is not a requirement for completing VM configuration. In this example, we connect the VM to ExternalSwitch, which is a virtual switch connected to our production LAN.

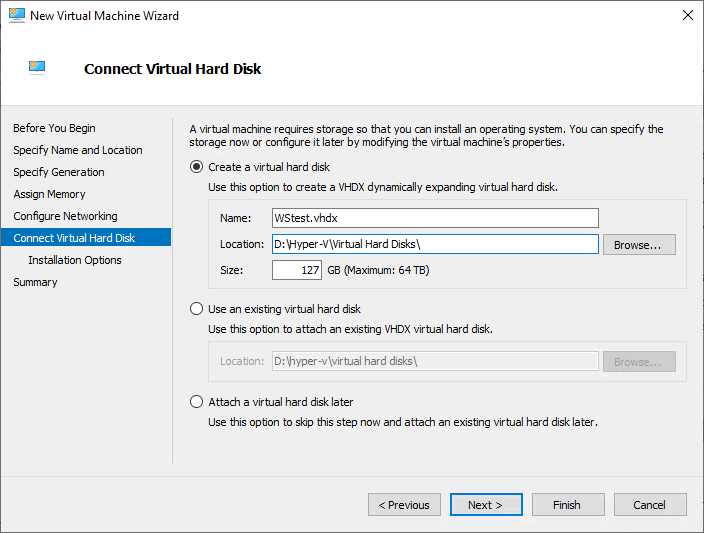
- Connect Virtual Hard Disk. There are three options to choose from:
- If you choose the Create a virtual hard disk option, you are creating a brand new vhdx disk on your Hyper-V host. You can set the size of the disk as well. The wizard defaults to 127 GB, which can easily be changed. 127 GB will be enough for the Windows Server virtual machine used in our example.
- The Use an existing virtual hard disk option lets you attach your new VM configuration to an existing virtual disk. Perhaps you copied over a vhdx file that you want to reuse with the new VM configuration. You can simply point the wizard to the vhdx file with this option.
- With the Attach a virtual hard disk later option, you can choose to skip the creation of a hard disk in the wizard and assign a disk later.
There is one significant caveat to the create a virtual hard disk step – you cannot choose the type of disk that is created. By default, Hyper-V creates dynamically expanding disks, which are thin-provisioned disks. This means that space is used only as needed.
Note: There are some downsides to this approach. While the Hyper-V storage driver generally makes efficient use of resources for optimal performance, you may still prefer to provision thick disks or fixed size in Hyper-V. To do that, you should choose the third option and attach a thick virtual hard disk after your VM is created. Read about the differences between VHD and VHDX.
You can create only one virtual hard disk at this step of new VM creation; however, you can add more virtual hard disks after VM creation is completed.
- Configure Installation Options. This means configuring how you want to install the guest operating system (OS) in your new VM.
- Install an operating system later doesn’t make changes to the virtual machine configuration at this step, but you can edit this setting later.
- Install an operating system from a bootable image file is the most common way is to install an operating system. You need to have an ISO file of the OS saved somewhere on your server. Simply guide the wizard to the location using the Browse button. In our example, we create a Windows Server VM and select the appropriate installation ISO image file. Read how to copy an ISO file to a Hyper-V server.
- Install an operating system from a network-based installation server. You can use this option if you have a network-based installation server (a server with remote installation services deployed).

- Check the configuration Summary. The displayed information allows you to ensure that your configuration is correct. If something is incorrect, you can go back and modify the settings. Once you click Finish, your Windows Server VM is created according to your specified virtual machine configuration.

Starting the VM
Now that virtual machine configuration and creation are complete, you can power on your Windows virtual machine.
- Right-click the VM and select Start.
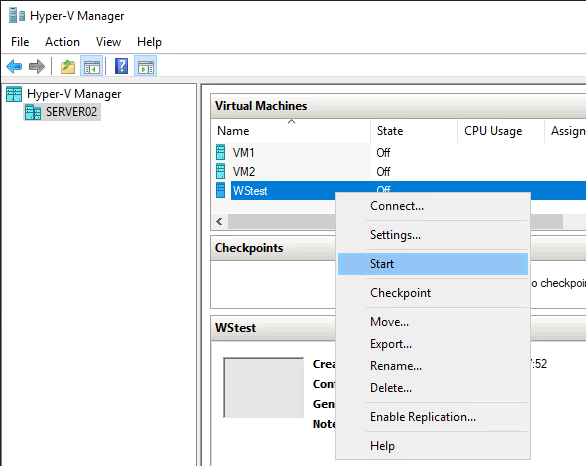
- You can connect to the VM console by right-clicking the VM and selecting Connect. The Virtual Machine Connection (VMConnect) console is a management interface where you see a “monitor” connected to a VM, similarly as when using Windows Remote Desktop.

After connecting to the VMConnect, we should now be able to boot our VM and install the operating system as usual through the operating system installation prompts. After finishing the installation, we have a Windows Server virtual machine. We can edit the windows virtual machine configuration, install applications inside the VM, etc.
See a complete walkthrough in our video tutorial:
Conclusion
The steps for how to create a Windows Server virtual machine in Hyper-V running on Windows Server 2016, 2019 and 2022 can be used to install a VM running any other supported operating system such as Windows 7, Ubuntu Linux, etc.
Using Hyper-V Manager is a convenient method to create a VM and edit the virtual machine configuration. Alternatively, you can create a Hyper-V VM in PowerShell that can be useful for automation and mass deployment. Whatever method to create and set up a VM you use, remember to backup Microsoft Hyper-V VM backup to avoid data loss and downtime.