How to Perform AWS EC2 Backup: Step-By-Step Guide
AWS Backup is a relatively new addition to the wide range of AWS services and tools. AWS Backup can help you automatically back up and protect your data and applications in the AWS cloud as well as in on-premises IT environments. For Amazon EC2 instances, there are several ways to protect the data to prevent data loss resulting from accidental deletion or malicious attacks. Read on to learn some of the available methods to ensure that data in AWS EC2 is easily recoverable when needed.

How to Backup AWS EC2 Instances
AWS is a high-performance, constantly evolving cloud computing platform that allows you to store data and applications in the cloud environment. AWS can provide you with the tools you need to create EC2 instances which act as virtual servers with varying CPU, memory, storage, and networking capacity.
Currently, there are three ways to back up AWS EC2 instances: taking EBS snapshots, creating AMIs, or designing an AWS Backup plan. Let’s take a closer look at each of these approaches and see how they differ.
Taking EBS Snapshots
If you want to back up an AWS EC2 instance, you should create snapshots of EBS volumes, which are stored with the help of Amazon Simple Storage Service (S3). Snapshots can capture all data within EBS volumes and create their exact copies. Moreover, these EBS snapshots can then be copied and transferred to another AWS region to ensure safe and reliable storage of critical data. Thus, in case of a disaster or accidental data loss, you can be sure that you have a backup copy securely stored in a remote location which you can use for restoring critical data.
Prior to running AWS EC2 backup, it is recommended that you stop the instance or at least detach an EBS volume which is about to be backed up. This way, you can prevent failure or errors from occurring and affecting the newly created snapshots.
Please note that, for security purposes, some sensitive information has been removed.
To back up AWS EC2 instance, you need to take the following steps:
- Sign in to your AWS account to open the AWS console.
- Select Services in the top bar and click EC2 to launch the EC2 Management Console.

- Select Running Instances and choose the instance you would like to back up.

- In the bottom pane, you can view the central technical information about the instance. In the Description tab, find the Root device section and select the /dev/sda1 link.

- In the pop-up window, find the volume’s EBS ID name and click it.
- The Volumes section should open. Click Actions and select Create Snapshot.

- The Create Snapshot box should open, where you can add a description for the snapshot to make it distinct from other snapshots, as well as assign tags to easily monitor this snapshot. Click Create Snapshot.

- The snapshot creation should start and be completed in a minimal amount of time. The main factor here is the size of data in your Amazon EBS volume.
After the snapshot creation is complete, you can find your new snapshot by selecting the Snapshots section in the left pane. As you can see, we have successfully created a point-in-time copy of the EBS volume, which can later be used to restore your EC2 instance.

For this purpose, you need to select the snapshot of the backed up volume, press the Actions button above, and click Create Volume. Following the prompts, configure the volume details (volume type, size, IOPS, availability zone, tags). Then, click Create Volume for the new volume to be created, which can later be added to the AWS EC2 instance of your choice.

Creating a new AMI
The next approach to performing AWS EC2 backups is creating an Amazon Machine Image (AMI) of your AWS EC2 instances. An AMI contains all the information required for creating an EC2 instance in the AWS environment, including configuration settings, the root volume template, launch permissions, and block device mapping. Basically, the AMI can act as a template for launching a new AWS EC2 instance and replacing the corrupted one. Note that, prior to creating the new AMI, it is recommended that you stop the AWS EC2 instance which you want to back up.
To create a new AMI and ensure AWS EC2 backup, you should do the following:
- Sign in to your AWS account to open the AWS console.
- Select Services in the top bar and click EC2 to launch the EC2 Management Console.

- Select Running Instances and choose the instance you want to back up.

- Click Actions > Image > Create Image.

- The Create Image menu should open. Here, you can specify the image name, add the image description, enable/disable reboot after the AMI creation, and configure instance volumes.
Do note that when you create an EBS image, an EBS snapshot should also be created for each of the above volumes. You can access these snapshots by going to the Snapshots section.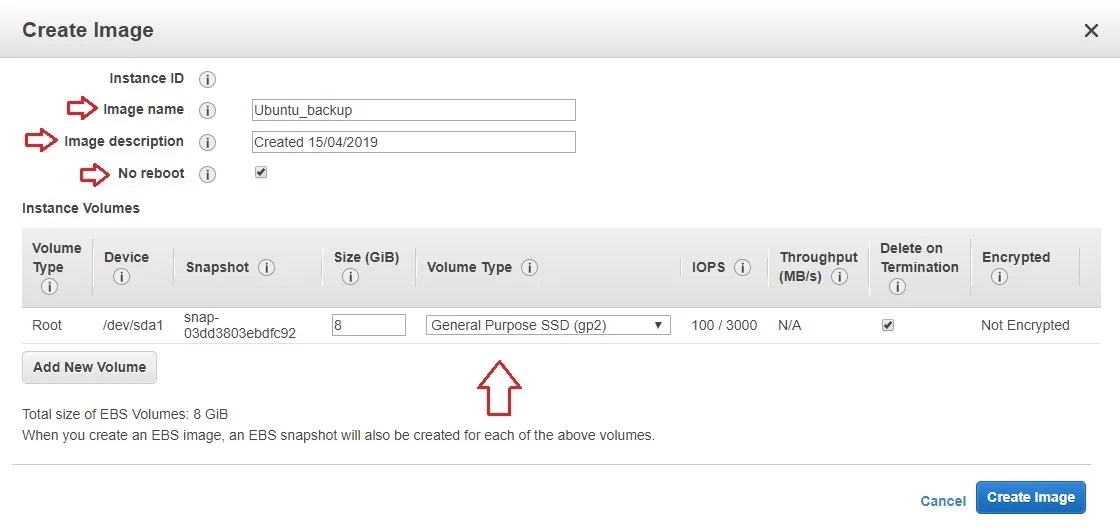
- Click Create Image.
- The image creation process should now start. Click the link to view the pending AMI.
- It should take some time for the new AMI to be created. You can starting using the AMI when its status switches from pending to available.
After the AMI has been successfully created, it can then be used to create a new AWS EC2 instance, which will be an exact copy of the original instance. For this purpose, simply go to the Instances section, click Launch Instance, select the AMI you have created in the My AMIs section, and follow the prompts to finish the instance creation.

Creating AMIs is arguably a more effective backup strategy than taking EBS snapshots. This is due to the fact that AMIs often contain EBS snapshots as well as a software configuration which allows you to simply and easily launch the new AWS EC2 instance in just a few clicks, created free of charge (you only pay for snapshot storage).
However, both methods require significant manual input on your part and cannot be set to run automatically. AWS EC2 backup in large-scale environments using these two approaches has proven itself to be a complicated and error-prone process.
Automating AWS EC2 backup
Previously, the only way to automate AWS EC2 backup was by running scripts or using API calls, which was a very challenging and resource-intensive process. The person responsible for backup automation had to be highly proficient in scripting in order to avoid any issues and inconsistencies. However, there was still a high risk that you would waste your time, effort, and money on a backup job configuration and still be left with failed or corrupted AWS EC2 backups.
Due to this ongoing concern, AWS decided to introduce the AWS Lambda service which allowed you to run your codes for managing the AWS services you need and performing various tasks in AWS environments. However, the downside of this approach is that you had to create your own codes or look for those available in open-source platforms. Ultimately, it could end up taking an excessive amount of time and effort to set up a workable code to perform the AWS Lambda function the way you want.
To deal with the existing issues further, the new AWS EC2 backup service referred to as AWS Backup was designed, allowing you to rapidly create automated data backups across AWS services and easily manage them using the central console. With AWS Backup, you can finally create a policy-based backup plan which can automatically back up the AWS resources of your choosing. At the core of each plan lies a backup rule which defines the backup schedule, backup frequency, and backup window, thus allowing you to automate the AWS EC2 backup process and requiring minimum input on your part.
To create an AWS backup plan, take the following steps:
- Sign in to your AWS account to open the AWS Management Console.
- Select Services in the top bar and then type AWS Backup in the search bar. Click Backup plans in the left pane.
- Press the Create Backup plan button.
 Here, you have three start options: Start from an existing plan, Build a new plan, and Define a plan using JSON.
 - Click Info if you want to learn more about available options to help you make the right decision. As we don’t have any existing backup plans, let’s build a new plan from scratch. Enter the new backup plan name and proceed further.

- The next step is Backup rule configuration. Here, you should specify the backup rule name.
- After that, you can set up a backup schedule. You should determine the backup frequency (Every 12 hours, Daily, Weekly, Monthly, Custom cron expression); backup window (Use backup window defaults or Customize backup window); backup lifecycle (Transition to cold storage and Expiration of the backup).

- At this step, you should select the backup vault for storing your recovery points (the ones created by this Backup rule). You can click Create new Backup vault if you want to have a new customizable vault. You can also use the existing Backup vault if you have one. Alternatively, you can choose the default AWS Backup vault.

- Next, you must add tags to recovery points and your backup plan in order to organize them and easily monitor their current status.
 After that, you can click Create plan to proceed to the next stage, the backup rule creation.
 - Your backup plan has been successfully created. However, before you can run this plan and deploy it in your environment, you should also assign resources which need to be backed up. Click the Assign resources button, which can be found in the top bar.

- In the next menu, you can specify the resource assignment name and define the IAM (Identity and Access Management) role. By selecting the IAM role, you specify what a user can or cannot do in AWS and determine which users are granted permission to manage selected AWS resources and services. Additionally, you can assign resources to this Backup plan using tags or resource IDs, meaning that any AWS resources matching these key-pair values should be automatically backed up by this Backup plan.

- Click Assign resources to complete the configuration process. After that, the backup job should run automatically. You can go to the AWS Backup dashboard to see the current status of your backup jobs and verify that they are working as planned.

As you can see, our backup job is already in progress. In this menu, you can also Manage Backup plans, Create an on-demand backup, or Restore backup. Choose the required option and set up another data protection job in AWS environment following the prompts.